Apache Tomcat Tutorial
Welcome to Apache Tomcat Tutorial. Learn to use Apache Tomcat as a JSP container, HTTP Web Server, etc., and understand configuration for security and scalability with examples.
Latest version available is Apache Tomcat 8.5.X.

Apache Tomcat Tutorial – Index
- Introduction to Apache Tomcat
- Installation of Apache Tomcat in Ubuntu
- Managing Tomcat
- Deploying Web Applications with Apache Tomcat
Introduction to Apache Tomcat
The Apache Tomcat software is an open source implementation of the Java Servlet, JavaServer Pages, Java Expression Language and Java WebSocket technologies.
Apache Tomcat is usually used as a Servlet Container even though Tomcat has a fully functional HTTP Server to serve static content. In most of production, Tomcat is used in conjunction with Apache HTTP Server where Apache HTTP Server attends static content like html, images etc., and forwards the requests for dynamic content to Tomcat. This is because Apache HTTP Server supports more advanced options than that of Tomcat.
Latest Apache Tomcat version 8.5 adds support for HTTP/2, OpenSSL for JSSE, TLS virtual hosting and JASPIC 1.1
Components and Features of Apache Tomcat
Apache Tomcat has following components and features to manage web applications.
- Catalina
- Coyote
- Jasper
- Cluster
- High Availability
- Web Application
Jasper 2
Jasper is the JSP Engine for Tomcat. Jasper is responsible for parsing JSP files and compilation of JSP’s Java code as servlets.
Jasper is capable of background compilation, which means if any changes are made to JSP files, then the older versions of those JSP files are still retained by the server, until the updated JSP files are recompiled.
Catalina
Catalina is Tomcat’s servlet container. Catalina makes Tomcat a Web Server for dynamic content.
Coyote
Coyote is the component that makes Tomcat capable as a HTTP Web Server. Coyote makes Catalina also act as a server that serves static content.
Installing Apache Tomcat on Ubuntu
To install Tomcat on Ubuntu, you could use command line interface and run the following command :
$ sudo apt-get install tomcat8~$ sudo apt-get install tomcat8
[sudo] password for arjun:
Reading package lists... Done
Building dependency tree
Reading state information... Done
.
.
Setting up tomcat8 (8.0.32-1ubuntu1.4) ...If you would like to install tomcat7 for some project related reasons, use tomcat7 instead of tomcat8 in the command.
Following are the useful locations that we may need in furthur steps :
- /etc/tomcat{X} for configuration
- /usr/share/tomcat{X} for runtime, called CATALINA_HOME
- /usr/share/tomcat{X}-root for webapps
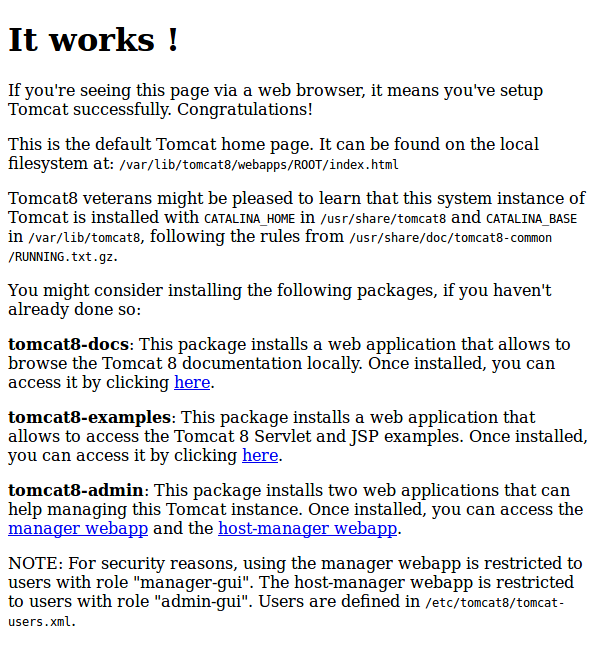
You could check if the Tomcat server is running, by opening a browser and hitting the url http://localhost:8080/.. Something similar to the following would be responded back with.

Start Apache Tomcat
Once you install Tomcat, it is started automatically.
In case if you have stopped it manually, and would like to start Apache Tomcat again, open a terminal and run the following command.
$ sudo /etc/init.d/tomcat8 start~$ sudo /etc/init.d/tomcat8 start
[ ok ] Starting tomcat8 (via systemctl): tomcat8.service.Restart Apache Tomcat
There could be scenarios, like you have updated your web-application, where you may need to restart Apache Tomcat for the server to pickup the changes.
To restart Apache Tomcat, Open a Terminal and run the following command.
$ sudo /etc/init.d/tomcat8 restart~$ sudo /etc/init.d/tomcat8 restart
[ ok ] Restarting tomcat8 (via systemctl): tomcat8.service.Stop Apache Tomcat
To stop Apache Tomcat, Open a Terminal run the following command.
$ sudo /etc/init.d/tomcat8 stopIf you have installed tomat7, use tomcat7 instead of tomcat8 in the above command.
~$ sudo /etc/init.d/tomcat8 stop
[ ok ] Stopping tomcat8 (via systemctl): tomcat8.service.Deploying Static Web-Applications with Apache Tomcat
In the following sections, we shall learn to deploy static and web applications in tomcat.
Deploying Static Web-Applications with Apache Tomcat
To deploy static web application with Tomcat, all you need to do is copy your project folder to tomcat web-apps directory.
For Linux :
~$ sudo cp -a StaticWebProject/ /usr/share/tomcat8-root/
~$ cd /usr/share/tomcat8-root/
/usr/share/tomcat8-root$ ls
default_root StaticWebProject
/usr/share/tomcat8-root$ cd StaticWebProject/
/usr/share/tomcat8-root/StaticWebProject$ ls
another_page.html index.htmlNow restart Tomcat for the changes to take effect.
~$ sudo /etc/init.d/tomcat8 restart
[ ok ] Restarting tomcat8 (via systemctl): tomcat8.service.Open a broswer, and hit the url, http://localhost:8080/StaticWebProject.
Deploying Dynamic Web-Applications with Apache Tomcat
.war is the format of the web application that Apache Tomcat Server could deploy. If you are building a web application using an IDE like Eclipse, you could export the application as a WAR file.
Conclusion
With these series of tutorials, we have learnt how to configure and work with Apache Tomcat.
