Databases and Dependency Injection in Kotlin
Learn about databases and dependency injection in Kotlin through four hands-on recipes in this guest tutorial by Aanand Shekhar Roy.
When you develop an app, you should bear in mind the situations when the app won’t be connected to the internet. To provide a great user experience, you need to ensure that some parts of your app work even when there isn’t any network connection.
For this, you’d need a persistent storage mechanism in your app. It can be achieved either by using shared preferences or the database. Shared preferences can come in handy when you have small amounts of data to deal with, such as the app’s setting values. Databases are much more powerful for situations when you may need to store structured data. In this tutorial, you will learn how to use Android’s built-in database SQLite. You will also learn about dependency injection with Dagger2, which is considered a best practice for developing quality apps.
Using SQLite database in Kotlin
SQLite is a relational database. Android comes with a built-in SQLite database. It is an open source SQL database and is widely used in Android apps. However, doing it in a raw manner is highly time-intensive. You’ll have to work with cursors, iterate over them row by row, wrap the code in try-finally, and such. Of course, you can use libraries that provide ORM mapping, which makes it easier to deal with a SQLite database, but for s small database, it is really expensive and, generally, overkill. Kotlin, with Anko, provides a really easy way to deal with a SQLite database.
The setup
You’ll need Android Studio 3.0 for coding. First, you need to add anko-sqlite to your build.gradle file:
dependencies {
    compile "org.jetbrains.anko:anko-sqlite:$anko_version"
}
You can replace $anko_version with the latest version of the library.
Implement the SQLite database
Anko provides a wrapper around the built-in SQLite API, which helps eliminate a lot of boilerplate code and also adds safety mechanisms.
While implementing a SQLite database, the first step is to create the database helper class. In this case, you need the class to extend the ManagedSQLiteOpenHelper class. ManagedSQLiteOpenHelper is concurrency aware and closes the database at the end of query executions. Check out the following code for a simple database helper:
class DatabaseHelper(ctx: Context) : ManagedSQLiteOpenHelper(ctx, "SupportDatabase", null, 1) {
    companion object {
        private var instance: DatabaseHelper? = null

        @Synchronized
        fun getInstance(context: Context): DatabaseHelper {
            if (instance == null) {
                instance = DatabaseHelper(context.applicationContext)
            }
            return instance!!
        }
    }

    override fun onCreate(db: SQLiteDatabase) {
        db.createTable("Requests", true,
                "id" to INTEGER + PRIMARY_KEY + UNIQUE,
                "name" to TEXT,
                "message" to TEXT)
    }

    override fun onUpgrade(db: SQLiteDatabase, oldVersion: Int, newVersion: Int) {
        db.dropTable("Requests", true)
    }
}
In onCreate, you create tables and in onUpgrade, you upgrade the tables. Here, a single table (Requests) is created in the database. The Requests has the name, message, and id fields as the primary keys.
You can provide access to the database by adding it as an extension property to the context. This allows access to the database for any class that requires context:
// Access property for Context
val Context.database: DatabaseHelper
    get() = DatabaseHelper.getInstance(getApplicationContext())
Now, here’s the code for the activity where you have fields for name and message, and on pressing the Enter button, the details are stored in the database:
class MainActivity : AppCompatActivity() {
override fun onCreate(savedInstanceState: Bundle?) {
super.onCreate(savedInstanceState)
MainActivityUI().setContentView(this)
btn_send.onClick {
database.use {
insert("Requests",
"id" to 1,
"name" to name.text.toString(),
"message" to message.text.toString())
}
}
}
class MainActivityUI : AnkoComponent<MainActivity> {
override fun createView(ui: AnkoContext<MainActivity>) = with(ui) {
verticalLayout {
gravity = Gravity.CENTER
padding = dip(20)
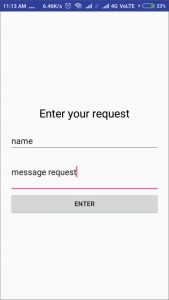
textView {
gravity = Gravity.CENTER
text = "Enter your request"
textColor = Color.BLACK
textSize = 24f
}.lparams(width = matchParent) {
margin = dip(20)
}
val name = editText {
id = R.id.name
hint = "What is your name?"
}
editText {
id = R.id.message
hint = "What is your message?"
lines = 3
}
button("Enter") {
id = R.id.btn_send
}
}
}
}
}Please note the code in bold. Basically, you can perform operations on the database inside the use block. The database will be opened at the beginning of the use block and closed after its execution.
The following screenshot shows the layout:
When you enter something in the database, this is how it looks:
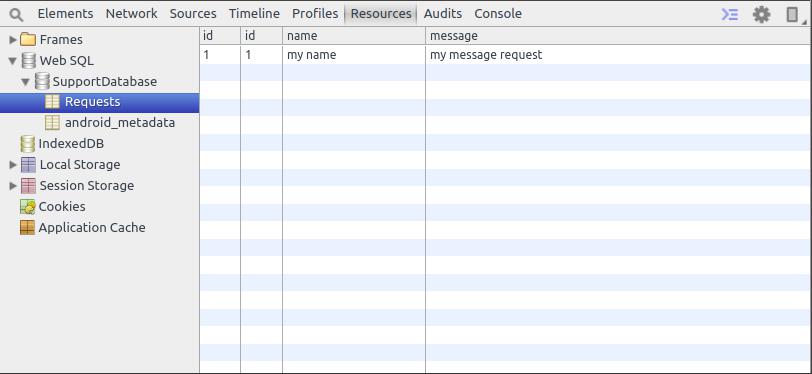
Stetho (https://github.com/facebook/stetho) has been used here to view the database in Chrome dev tools.
Creating database tables
Now that you have learned how to add anko-sqlite dependencies to your project and how to use SQLite database in the first recipe, the next step is learning how to create database tables.
Create two tables called Requests and customers:
- The Requests table can have the name and message fields, and you can directly create them in the onCreate method of your database helper, as shown below:
db.createTable("Requests", true, "id" to INTEGER + PRIMARY_KEY + UNIQUE, "name" to TEXT, "message" to TEXT) - For the customers table, you’ll need to use a better coding practice by making a data class and using it to define the columns of the customers table. Here’s the code for the Customer data class:
data class Customer(val id: Int, val name: String, val phone_num: String) { companion object { val COLUMN_ID = "id" val TABLE_NAME = "customers" val COLUMN_NAME = "name" val COLUMN_PHONE_NUM = "phone_num" } } - Use this data class to create the table as follows:
db.createTable(Customer.TABLE_NAME, true, Customer.COLUMN_ID to INTEGER + PRIMARY_KEY, Customer.COLUMN_NAME to TEXT, Customer.COLUMN_PHONE_NUM to TEXT) - The following is how your database helper finally looks after filling in the code for drop tables:
class DatabaseHelper(ctx: Context) : ManagedSQLiteOpenHelper(ctx, "SupportDatabase", null, 1) { companion object { private var instance: DatabaseHelper? = null @Synchronized fun getInstance(context: Context): DatabaseHelper { if (instance == null) { instance = DatabaseHelper(context.applicationContext) } return instance!! } } override fun onCreate(db: SQLiteDatabase) { db.createTable("Requests", true, "id" to INTEGER + PRIMARY_KEY + UNIQUE, "name" to TEXT, "message" to TEXT) db.createTable(Customer.TABLE_NAME, true, Customer.COLUMN_ID to INTEGER + PRIMARY_KEY, Customer.COLUMN_NAME to TEXT, Customer.COLUMN_PHONE_NUM to TEXT) } override fun onUpgrade(db: SQLiteDatabase, oldVersion: Int, newVersion: Int) { db.dropTable("Requests", true) db.dropTable(Customer.TABLE_NAME, true) } } // Access property for Context val Context.database: DatabaseHelper get() = DatabaseHelper.getInstance(getApplicationContext()) -
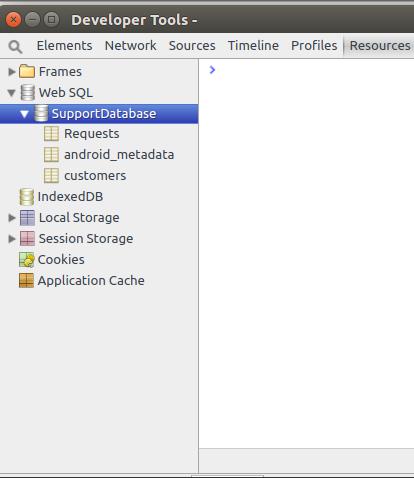
Time to install your app and see whether the two tables have been formed in the database. The following screenshot shows how the database will look (using Stetho):
Injecting dependencies in Kotlin
In Android development, Dagger 2 is the most popular dependency injection framework. You define the dependency objects, and with the help of a Dagger component, you inject it where you want. In this recipe, you will see how to inject the dependencies.
When you’ve defined all the dependency objects you need in the module class, you can get the component:
- To inject the object, you just need to add the @Inject annotation before the variable and the object will be injected there. Take a look at the following example:
@Inject
lateinit var mPresenter:AddActivityMvpPresenter
The lateinit modifier is also used to void null checks before using the variable.
- Another way to do it is by constructor injection. To understand it, take a look at the given code:
@Module class AddActivityModule { @Provides @ControllerScope fun providesAddActivityPresenter(addActivityPresenter: AddActivityPresenter):AddActivityMvpPresenter =addActivityPresenter } - As you can see, AddActivityPresenter is sent to the providesAddActivityPresenter, but the module doesn’t provide it. This usually won’t work unless you provide AddActivityPresnter as follows:
class AddActivityPresenter @Inject constructor(var mDataManager:DataManager):AddActivityMvpPresenter
When you use the @Inject annotation in the constructor, it means that the class needs the DataManager object before it can be created. Dagger2 will look into the dependency tree and provide you the dependency if it can.
Reading data from database
Take a look at the given steps to understand how to read data from the database:
- Add a button to the existing layout; on clicking, it should retrieve all the data from the Requests table. Check out the updated code, which is as follows:
class MainActivity : AppCompatActivity() { override fun onCreate(savedInstanceState: Bundle?) { super.onCreate(savedInstanceState) MainActivityUI().setContentView(this) val btn_send = find<Button>(R.id.btn_send) btn_send.onClick { database.use { insert("Requests", "name" to name.text.toString(), "message" to message.text.toString()) } toast("success") name.text.clear() message.text.clear() } val btn_read = find<Button>(R.id.btn_read) btn_read.onClick { var reqs = database.use { select("Requests").parseList(classParser<Request>()) } for(x in reqs) { logd(x.name + ": " + x.message) } } } private fun logd(s: String) { Log.d("request", s) } class MainActivityUI : AnkoComponent<MainActivity> { override fun createView(ui: AnkoContext<MainActivity>) = with(ui) { verticalLayout { padding = dip(20) textView { gravity = Gravity.CENTER text = "Enter your request" textColor = Color.BLACK textSize = 24f }.lparams(width = matchParent) { margin = dip(20) } val name = editText { id = R.id.name hint = "What is your name?" } editText { id = R.id.message hint = "What is your message?" lines = 3 } button("Enter") { id = R.id.btn_send } button("Show me requests") { id = R.id.btn_read } } } } class Request(val id: Int, val name: String, val message: String) } - Use Anko DSL to create the layout for the activity. To read data from the database, we use the select function. The syntax is as follows:
db.select(tableName, vararg columns) // where db is an instance of the SQLiteDatabase
- Inside database.use {…} you can directly use methods such as select and insert.
This is the data:
Here’s the output:
11-18 18:21:34.709 12523-12523/android.my_company.com.helloworldapp D/request: name 1: request 1
11-18 18:21:34.709 12523-12523/android.my_company.com.helloworldapp D/request: name 2: request 2
11-18 18:21:34.709 12523-12523/android.my_company.com.helloworldapp D/request: name 3 : request 3
- There’s a lot more you can do with the query builder; listed here are the methods provided by Anko:
- column(String): This is used to add a column to the select query
- distinct(Boolean): This is used to add distinct to the query
- whereArgs(String): This is used to specify the raw where string
- whereArgs(String, args): This is used to specify the where query and the corresponding arguments
- whereSimple(String, args): This is used to specify a where query with the ? marks and corresponding arguments for ?
- orderBy(String, [ASC/DESC]): This is used to specify a column for order by
- groupBy(String): This is used to specify a column for group by
- limit(count: Int): This is used to limit the number of rows returned by the query
- limit(offset: Int, count: Int): This is used to limit the number of rows returned by the query after an offset
- having(String): This is used to specify the raw having expression
- having(String, args): This is used to specify the raw having expression with arguments
- Here’s another example. In this example, you will select data from a database using the where clause:
select("Requests")
    .whereArgs("(id > {userId})",
        "userId" to 1)
Here’s the output of the about query:
11-18 21:11:04.328 18149-18149/android.my_company.com.helloworldapp D/request: name 2: request 2
11-18 21:11:04.329 18149-18149/android.my_company.com.helloworldapp D/request: name 3 : request 3
- After getting the query results, you also need to parse the result. You’ll get a cursor as a result from the query and using methods provided by Anko, you can easily parse them into regular classes. In the preceding example, you made a class named Request:
class Request(val id: Int, val name: String, val message: String) - The class has all the fields that you may get as columns from your query result cursor. The following are the methods that you can use for parsing results:
- parseSingle(rowParser): T: This parses only one row; if there’s more than one row in the cursor, then it throws an exception
- parseOpt(rowParser): T?: This parses zero or one row, but if there’s more than one row in the cursor, then it throws an exception
- parseList(rowParser): List<T>: This parses zero or more rows
Here, you used parseList. You can pass row parsers or map parsers, and you can also use classParser of the custom class type, which passes a row parser as follows:
valrowParser= classParser<Person>()