 TutorialKart.com
Learn how to deploy JEE applications in Google Compute Engine and Google App Engine. The tutorial covers project setup, Google Cloud CLI configuration, deployment to a Compute Engine virtual machine with Docker, and deployment to the App Engine standard environment.
Version note: This tutorial demonstrates a Java EE 8 application and includes Eclipse, Docker Compose, and App Engine workflows originally prepared for Java 8-era tooling. Google Cloud interfaces, supported Java runtimes, Docker Compose commands, and Eclipse plugins may differ in current installations. Review the current Google Cloud and Docker documentation before using these steps for a production deployment.
Choosing Google Compute Engine or App Engine for a JEE application
Google Compute Engine and Google App Engine provide different levels of infrastructure control. The correct option depends on how the JEE application is packaged and how much control it requires over the operating system, application server, network, and scaling configuration.
| Deployment option | Suitable when | Primary responsibility |
|---|---|---|
| Google Compute Engine | The application needs a custom application server, Docker containers, operating-system packages, or detailed network control. | You manage the VM, operating system, firewall rules, runtime, updates, scaling, and application processes. |
| Google App Engine | The application can run within a supported managed Java runtime and does not depend on unsupported operating-system customization. | Google manages most of the underlying infrastructure while you manage the application configuration, versions, traffic, and data services. |
Google Cloud prerequisites for JEE deployment
- A Google account with access to Google Cloud Console.
- A Google Cloud project with a unique Project ID.
- Billing configured when required by the selected service and resource.
- The Google Cloud CLI installed and authenticated.
- A deployable JAR, WAR, Docker image, or project source tree.
- Appropriate IAM permissions to create and manage Compute Engine or App Engine resources.
Before deploying, also identify the application’s listening port, database dependencies, environment variables, persistent-storage requirements, and external services. These details determine the firewall, runtime, and configuration changes needed after the application is uploaded.
Setting up a Google Cloud project for JEE deployment
In this section, you will see how to deploy JEE applications in Google Compute Engine (IaaS offering) and Google App Engine (PaaS offering). Compute Engine (https://cloud.google.com/compute/) can be considered an AWS EC2 counterpart, and App Engine (https://cloud.google.com/appengine ) an Elastic Beanstalk counterpart. You need to have a Google account to log into Cloud Console at https://console.cloud.google.com. You need to have at least one project created in Google Cloud to deploy applications. When you log into the Cloud Console, it will prompt you to create a project if there are no projects already available:
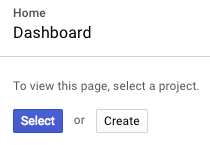
All you need to enter in the Create Project page is the name of the project. The Project ID will be automatically selected for you. You should keep this Project ID handy, because many SDK commands need a Project ID as one of their parameters.
If you already have projects, but want to create a new project for this book, open the Google Cloud Console web page and go to the IAM & admin | Manage resources page. Click the Create Project link on the page.
Setting up Google Cloud tools for a Java application
Setting up Google Cloud Tools requires multiple steps. Start with installing the SDK.
Installing and initializing the Google Cloud CLI
Download the SDK from https://cloud.google.com/sdk/. Unzip it and run the following command from the bin folder:
gcloud initSee https://cloud.google.com/sdk/docs/initializing for more options regarding initializing the SDK.
After initialization, verify the active account and project before creating resources. This helps prevent deploying the application to the wrong project.
gcloud auth list
gcloud config get-value project
gcloud config list
Installing Java extensions for the App Engine SDK
Run the following command (make sure that the Cloud SDK is installed and configured):
gcloud components install app-engine-javaSee https://cloud.google.com/sdk/docs/managing-components for details on managing Google Cloud components.
Next, set the default project name for gcloud commands:
gcloud config set project <your-project-name-here>The placeholder should be replaced with the Google Cloud Project ID, which can differ from the human-readable project name.
Installing Google Cloud Tools for Eclipse
To install the plugin for Google Cloud in Eclipse, open Eclipse Marketplace (select the menu Help | Eclipse Marketplace…). Search for Google Cloud Tools:
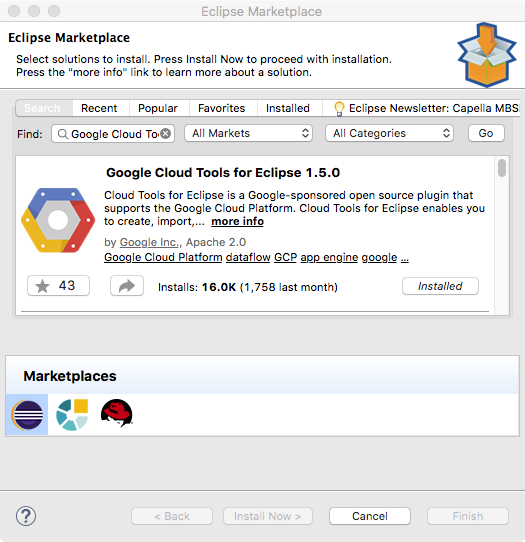
The availability and capabilities of IDE plugins can change. If the Eclipse integration shown here is unavailable, the application can still be built with Maven or Gradle and deployed from a terminal using the Google Cloud CLI.
Setting Eclipse preferences for Google Cloud Tools
Open Eclipse Preferences and go to the Google Cloud Tools preferences:
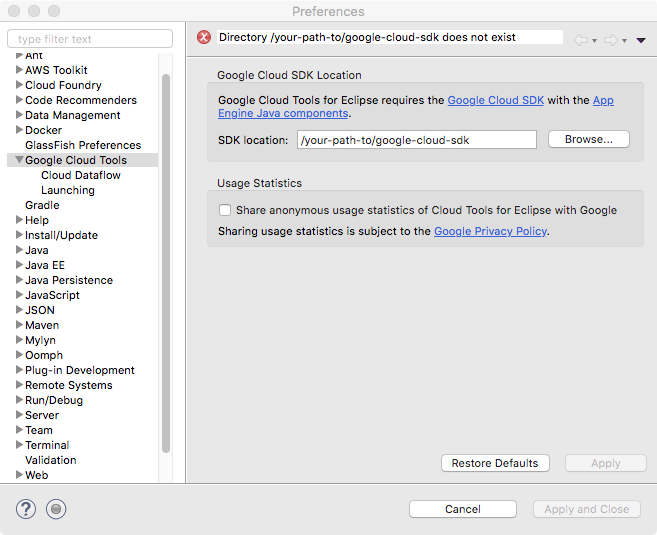
Enter the path to the folder where you unzipped the SDK in the SDK location field.
Deploying a JEE application on Google Compute Engine
In this section, you will learn to create an instance of a VM in Google Compute Engine and deploy a JEE application in it. You’ll install Docker in a VM in Compute Engine and deploy a CourseManagement service in it. But first, you need to create a VM using either the Google Cloud Console web page or Terminal on the host machine.
Creating a Compute Engine VM for the JEE application
Log in to the Google Cloud Console (https://console.cloud.google.com) and go to the Compute Engine | VM Instances page. Click the Create Instance link. Create an instance using Debian GNU/Linux boot disk. Make sure you select the Allow HTTP traffic and Allow HTTPS traffic options.
Select a machine type based on the memory and CPU requirements of the Java runtime, database, and containers. A full application server and database may require more memory than a minimal REST service. Restrict inbound traffic to required ports and avoid exposing management or database ports to the public internet.
Installing Docker on the Compute Engine VM
In the VM instances page, select the instance you want to use and drop down the SSH options (in the Connect column in the table):
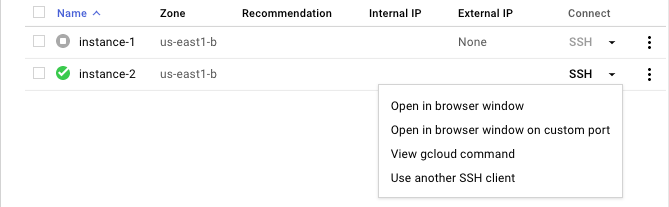
Opening an SSH connection to the Compute Engine VM
Select Open in browser window. This option opens a browser window and opens an SSH shell in the VM instance. Run the following commands in the shell to install Docker:
| Command | Description |
| sudo apt-get update | Gets the latest version of packages and dependencies |
| curl -fsSL get.docker.com -o get-docker.sh | Downloads the Docker installer script |
| sudo sh get-docker.sh | Runs the installer script |
Installer scripts downloaded from the internet should be reviewed before they are run with elevated privileges. For a production VM, prefer the installation procedure and package repository currently documented by Docker for the selected Linux distribution.
Once Docker is installed, you need to execute a few commands so that the Docker command can be called without using sudo (Docker runs as the root):
| Command | Description |
| sudo groupadd docker | Creates a Docker user group. It probably already exists. |
| sudo usermod -aG docker $USER | Adds a current user to the Docker group. |
See https://docs.docker.com/install/linux/linux-postinstall/#manage-docker-as-a-non-root-user for more details.
Membership in the Docker group effectively grants extensive control over the host. Add only trusted administrators to this group. In stricter environments, continue using controlled privilege escalation or consider rootless Docker.
Log out of the shell and log back in (close the shell window and open a new shell window). If all of the preceding commands have been executed successfully, then you should be able to run the docker ps command without sudo.
Next, you need to install docker-compose in the instance (see https://docs.docker.com/compose/install/). Execute the following commands (the version number might be different in the command to install docker-compose):
| Command | Description |
| sudo curl -L https://github.com/docker/compose/releases/download/1.18.0/docker-compose-`uname -s`-`uname -m` -o /usr/local/bin/docker-compose | Downloads docker-compose |
| sudo chmod +x /usr/local/bin/docker-compose | Makes docker-composeexecutable |
The commands above install an older standalone Docker Compose release. Current Docker installations commonly provide Compose as a plugin invoked with docker compose. Check the installed version before selecting a command.
docker --version
docker compose version
The source code for this tutorial can be found at https://github.com/PacktPublishing/Java-EE-8-Development-with-Eclipse-Third-Edition/tree/master/Chapter13. It includes a folder named coursemanagement-docker-compose. Upload all files in that folder to the VM instance. You can either upload from the browser shell window or use the gcloud command from your host machine. In the browser shell, click on the Settings icon in the upper-right corner and select the Upload File option. Upload all of the files that are in the coursemanagement-docker-compose folder. To upload from Terminal, execute the following gcloud command after changing the folder to coursemanagement-docker-compose:
gcloud compute scp * <your-instance-name-here>:~/This command copies all of the files in the current folder (which in this case is coursemanagement-docker-compose) to the user’s home folder in the instance.
If the VM is not in the default zone configured for the CLI, add the appropriate zone to the copy command. Confirm that the active project, instance name, username, and destination path are correct before transferring files.
Whichever method you use to upload the files, make sure that you have the following files in the VM instance:
- course-management-db.dockerfile
- course-management-service.dockerfile
- docker-compose.yml
- course-management-db.sql
- coursemanagementspring-0.0.1-SNAPSHOT.jar
In the browser shell for the VM instance, execute the following command to set up the database and REST service in Docker containers:
docker-compose up -dFor a current Compose plugin installation, the equivalent command normally uses a space rather than a hyphen:
docker compose up -dCheck container status and logs before testing the public endpoint:
docker compose ps
docker compose logs --tail=100
Once the command is executed successfully, browse to http://<instance_external_ip>/course_management/courses. You will just see an empty JSON array, because there is no data in the database. You can find the external IP of your instance from the Compute Engine | VM Instances page.
If the application works inside the VM but cannot be reached through the external IP, check the Compute Engine firewall rule, the container port mapping, the host listening address, and the application server’s configured port. A firewall rule alone does not expose a service that is bound only to a different interface or port.
Run the docker-compose down command to shut down the containers.
Deploying a JEE application in Google App Engine
App Engine is Google’s Platform as a Service (PaaS) offering, similar to Elastic Beanstalk from Amazon. In this section, you will learn how to deploy the CourseManagementREST service using Google App Engine.
Before converting an existing JEE project, confirm that its APIs, servlet specification, Java version, dependencies, file-system behavior, background work, and database access are compatible with the selected App Engine Java runtime. A traditional application that depends on a full Java EE server may require code or packaging changes.
Make a copy of the CourseManagementREST project. Right-click on the project in Eclipse Project Explorer and select Copy. Right-click anywhere in Project Explorer and select Paste. Eclipse will prompt you to name the project. Name it CourseManagementREST-GAE. You will deploy this project using Google App Engine.
Configure the project as an App Engine project. Right-click on the CourseManagementREST-GAE project in Project Explorer and select Configure | Convert to App Engine Standard Project.
Note that if you are creating a new project for deployment to Google App Engine, then go to the File | New | Google App Engine Standard Java Project menu. Alternatively, you can go to the drop-down menu from the Google Cloud Platform icon in the toolbar and select Create New Project | Google App Engine Standard Java Project.
Before you deploy the project, remove web.xml from the src/main/webapp/WEB-INF folder. Google App Engine’s Java platform uses the Jetty server and it does not need web.xml for this deployment.
This instruction is specific to the project structure and runtime used by the original example. Do not remove web.xml from another application unless its framework and target runtime support annotation-based or programmatic configuration without it.
Note that you may see an error stating web.xml is missing and <failOnMissingWebXml> is set to true pom.xml after deleting web.xml. To suppress this error, add the following property in pom.xml: <properties> <failOnMissingWebXml>false</failOnMissingWebXml> </properties>
<properties>
    <failOnMissingWebXml>false</failOnMissingWebXml>
</properties>
To test this application locally, go to the Servers view, right-click on it, and select New | Server. Then, expand the Google group and select App Engine Standard:
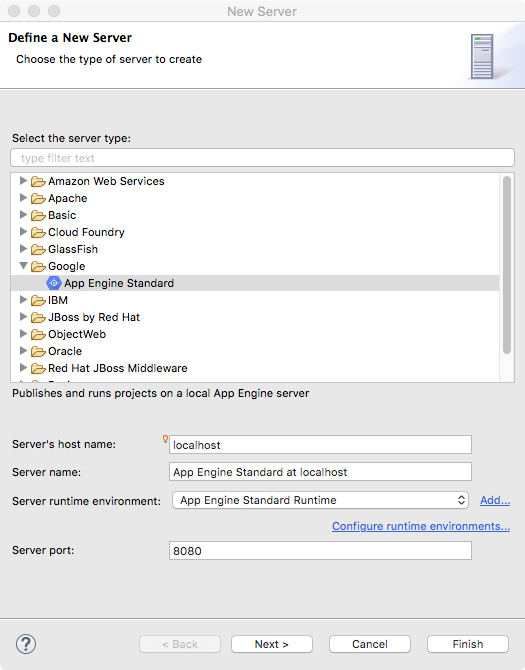
Click Next and add the CourseManagementREST-GAE project for deployment:
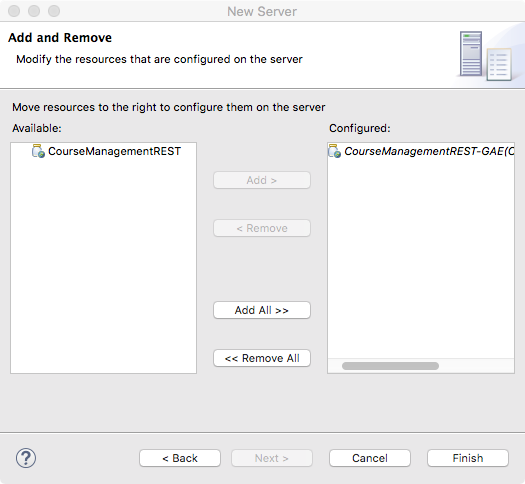
Click Finish and start the server from the Server view. Then, browse to http://localhost:8080/services/course/get/1 to verify that the application has been deployed properly.
If you get errors regarding the JDK version in pom.xml, add the following section in pom.xml: <properties> <maven.compiler.source>1.8</maven.compiler.source> <maven.compiler.target>1.8</maven.compiler.target></properties>
<properties>
    <maven.compiler.source>1.8</maven.compiler.source>
    <maven.compiler.target>1.8</maven.compiler.target>
</properties>
Java 8 is used by the original example. For another application, set the compiler release and App Engine runtime to versions supported by both the application dependencies and the selected Google Cloud runtime. Do not change only the Maven compiler version without confirming runtime compatibility.
Before you deploy this project to Google App Engine, you should ensure that an application has been created in Google App Engine. Browse to https://console.cloud.google.com/appengine and check if any application exists. If not, you can create an application from that page. Alternately, you can run the following command in Terminal:
gcloud app createChoose the App Engine region carefully. The application location affects latency and the location of related services, and it may not be changeable after the App Engine application is created in the project.
To deploy this project to Google App Engine, select the project in Project Explorer and the drop-down menu from the Google Cloud Platform toolbar button:
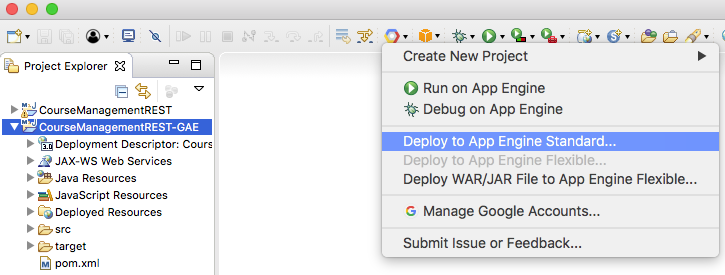
Select the Deploy to App Engine Standard… menu:
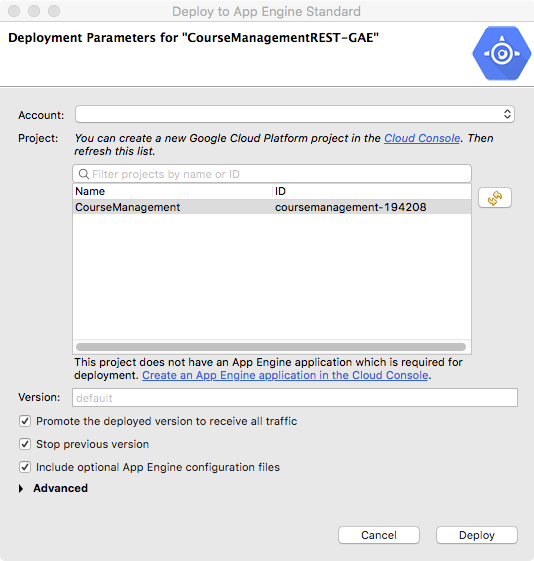
Select your Google account from the drop-down menu and, then, select the Google Cloud project you want the application deployed to.
A project that contains a supported App Engine configuration can also be deployed from its project directory with the Google Cloud CLI:
gcloud app deployReview the service, version, project, and configuration displayed by the CLI before confirming the deployment.
Once the project is deployed, browse to https://<your_project_id>.appsport.com/services/course/get/1 to verify it.
The standard App Engine hostname uses the appspot.com domain. The exact service URL may include a service name, version, region-related routing details, or a custom domain. Use the URL displayed by the deployment command or the App Engine dashboard rather than constructing it manually.
gcloud app browseTo stop the application, you need to disable the application—open https://console.cloud.google.com and go to App Engine | Settings and click the Disable Application button.
Verifying the JEE deployment in Google Cloud
A successful upload or deployment command does not by itself confirm that the application is healthy. Perform the following checks after deployment:
- Open the application’s health endpoint or a known REST endpoint.
- Confirm that the returned HTTP status and response body are expected.
- Check startup logs for dependency, class-loading, database, port, and permission errors.
- Test database connectivity with a non-destructive request.
- Confirm that secrets and environment-specific configuration were not included in the source repository or container image.
- Restart the VM or create a new application version to confirm that the service can recover without manual shell changes.
Common Google Cloud JEE deployment problems
| Problem | What to check |
|---|---|
| The Google Cloud CLI deploys to the wrong project | Run gcloud config get-value project and explicitly set the intended Project ID. |
| The Compute Engine endpoint times out | Check firewall rules, the VM external IP, container port publishing, application listening address, and service status. |
| The container exits immediately | Read container logs and verify Java options, database availability, mounted files, environment variables, and the JAR entry point. |
| App Engine rejects the deployment | Check the Java runtime, application configuration file, project permissions, enabled APIs, region setup, and unsupported dependencies. |
| The application starts but database calls fail | Verify the connection URL, credentials, network access, schema initialization, driver version, and whether the database host is reachable from the runtime. |
| The application works locally but returns an error in Google Cloud | Compare environment variables, Java versions, filesystem assumptions, case-sensitive paths, service accounts, and production logs. |
Google Cloud costs and cleanup after testing
Google Cloud may require billing to be enabled even when a service has a limited free usage allowance. Charges depend on the selected VM, disk, network traffic, managed services, application instances, logging volume, and region. Free usage should not be assumed for every resource or workload.
After testing, stop or delete resources that are no longer needed. Stopping a Compute Engine VM generally stops CPU and memory charges, but attached disks, reserved addresses, snapshots, and other resources may continue to incur charges. For App Engine, inspect deployed versions and traffic allocation, and remove versions that are not required.
Frequently asked questions about deploying JEE applications in Google Cloud
Can a JEE application be deployed on Google Cloud?
Yes. A JEE application can run on a Compute Engine VM with a compatible application server or container. Applications compatible with a supported managed Java runtime may also be adapted for App Engine. Containerized Java applications can additionally be evaluated for other Google Cloud container services, depending on their architecture.
Should I use Compute Engine or App Engine for a JEE application?
Use Compute Engine when the application needs operating-system access, a specific application server, custom networking, or multiple tightly coupled containers. Consider App Engine when the application fits a supported managed Java runtime and you prefer less infrastructure administration.
Is deploying a JEE application on Google Cloud free?
Not necessarily. Some Google Cloud services may provide limited no-cost usage or credits, but eligibility, limits, regions, and included resources can change. Compute, storage, networking, databases, and logs can generate charges. Review the current pricing pages and configure billing budgets and alerts before deployment.
Why is my Compute Engine JEE application not reachable?
The common causes are a missing firewall rule, an incorrect external IP, an unpublished Docker port, an application bound only to localhost, or a stopped container. Test the endpoint from inside the VM first, and then verify each network layer between the application and the public client.
Can I deploy the JEE application without Eclipse?
Yes. Eclipse is used by the original workflow, but it is not mandatory. You can build the project with Maven or Gradle, package it as a JAR, WAR, or container image, and deploy it using the Google Cloud CLI or an automated CI/CD pipeline.
Editorial QA checklist for this Google Cloud JEE tutorial
- Confirm that the Project ID is used wherever a command requires a Google Cloud project identifier.
- Verify that the selected Java version is supported by the application and target Google Cloud runtime.
- Check whether the installed Docker release uses
docker-composeordocker compose. - Confirm that Compute Engine firewall rules expose only the ports required by the JEE service.
- Verify that the App Engine URL uses the correct
appspot.comhostname shown by the current deployment. - Ensure that credentials, database passwords, private keys, and production secrets are not embedded in source files or Docker images.
- Review current Google Cloud and Docker documentation before following legacy Eclipse or Java 8 steps.