Learn multi-container application setup in Docker in this tutorial by Joseph Muli, a DevOps expert.
In a Dockerfile, every line describes a layer. The union filesystem used in Docker allows different directories to overlay transparently, forming a single, coherent filesystem. The foundational layer is always an image, which you build upon. Each additional line with a command (RUN, CMD, etc.) adds a layer to it. The advantage of layers is that as long as the layer has not been modified, it will not bother building that part of the image. Secondly, as an image is pulled from a Docker image registry, it is pulled in layers, thereby mitigating issues like connection cuts during the pulling and pushing of images.
Many applications are built under a common structure: frontend, backend, and database. This tutorial breaks this structure down further to explain how you can set it up.
The Frontend
When you open a web application, the page that you see is a part of the frontend. Sometimes, the frontend has the controller (the logical end) and the view layer (the dumb end). The styling of the layout and content (Read, HTML, and CSS) is the view layer. The content here is managed by the controller.
The controller influences what is presented in the view layer based on the user’s action and/or database changes. Take, for example, an application like Twitter: if someone follows you, your data has changed. The controller will pick up this change and update the view layer with the new number of followers.
The Backend
You may have heard of the term Model-view-controller (MVC). The model sits on the backend side of things in an application. Taking the earlier example of Twitter, the model does not concern itself with the HTML or its layout. It handles the state of the application: the number of followers and people you are following, the tweets, images, videos, and so on.
This is a just summary of what the backend layer includes. The backend mainly deals with the application’s logic. This includes the code that is manipulating the database, which means all the queries come from the backend. However, requests come from the frontend. This happens when a user clicks a button, for example.
You may have also heard of the term API. API is an acronym standing for Application Program Interface. This also sits at the backend. APIs expose the internal workings of an application. This means that the API can also be an application’s backend or logical layer.
Consider the Twitter example for a clearer understanding. Actions such as posting a tweet and searching for tweets can easily be in an API as methods, which can be called from any frontend application if the API is made public.
It is important to note that the Docker and docker-compose CLIs are actually API calls—for instance, when interacting with external resources or content such as Docker Hub.
The Database
The database contains organized data (information) that is easily accessible, managed, and updated. You can have file-based databases and server-based databases.
Server-based databases involve a server process running, accepting requests, and reading and writing the database files themselves. For instance, the databases could be on the cloud. Note that server-based databases are hosted on virtual hosts, mostly on cloud platforms such as Google Cloud Platform and Amazon Web Services. Examples are Amazon RDS and Google Cloud SQL for PostgreSQL.
You can obtain server-based databases from the following links:
- https://aws.amazon.com/rds/postgresql/
- https://cloud.google.com/sql/docs/postgres
In a nutshell, development has always involved building application layers, and shipping has always been a hassle considering the price of cloud platforms and DevOps involved.
Docker and docker-compose help you manage all your application components as a single bundle, which is cheaper, faster, and easier to manage. It also helps you coordinate all the application layers through a single file and in very simple definitions.
It is important to know that developers, over time, have coined different stack variations to summarize the frontend, backend, and database structure of their apps. Here’s a list such stack variations with their meaning. (The tutorial will not delve further than this):
- PREN – PostgresDB, React, Express, Node.js
- MEAN – MongoDB, Express, Angular, Node.js
- VPEN – VueJS, PostgresDB, Express, Node.js
- LAMP – Linux, Apache, MySQL, PHP
With this knowledge of application structures, you can now use the docker-compose CLI effectively.
Using docker-compose
Using docker-compose requires three steps:
- Build an application’s environment as an image using a Dockerfile.
- Use the docker-compose.yml file to define the services your app requires to run.
- Run docker-compose up to run the app.
docker-compose is a command-line interface (CLI) just like the Docker CLI. Running docker-compose gives a list of commands and how to use each of them. Some docker-compose versions are incompatible with some Docker versions.
Here is the docker-compose file:
You can refer to the complete code placed at Code/Lesson-2/example-docker-compose.yml. Go to https://goo.gl/11rwXV to access the code.
docker-compose first run
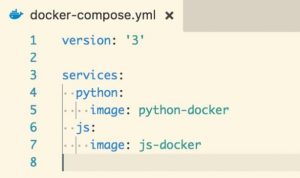
- Create a new directory and name it py-js; you can have a different directory name if you prefer.
- Create a new file in the directory and name it docker-compose.yml. Copy the content of the image above or the example shared on example-docker-compose.yml.
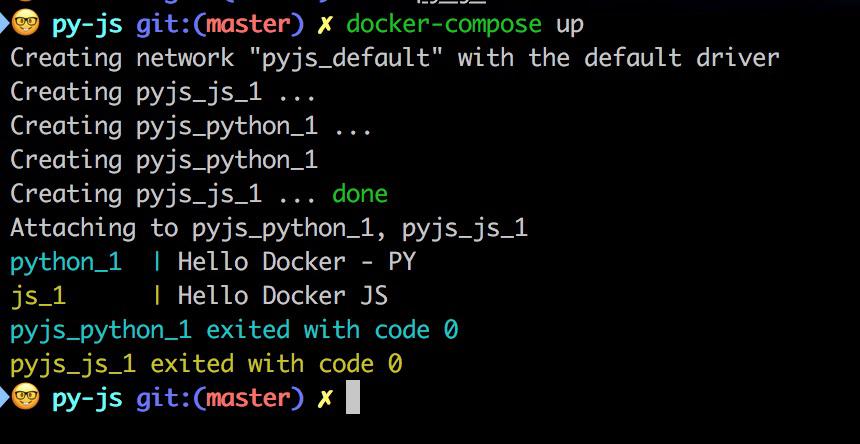
- Run the docker-compose up command from the directory.
Notice the outputs of running both js-docker and python-docker. This is also because you have both images built locally. If you do not have the images, running docker-compose up will result in an error or an attempt to pull it from Docker Hub if it exists online:
Activity — Running WordPress Using docker-compose
This activity is to get you conversant with running docker-compose commands. Suppose you have been asked to build a WordPress website using docker-compose. Here’s how you can go about it:
- Create a new directory and name it sandbox.
- Create a new file and name it docker-compose.yml. Add the code in wordpress-docker-compose.yml or copy the following figure:
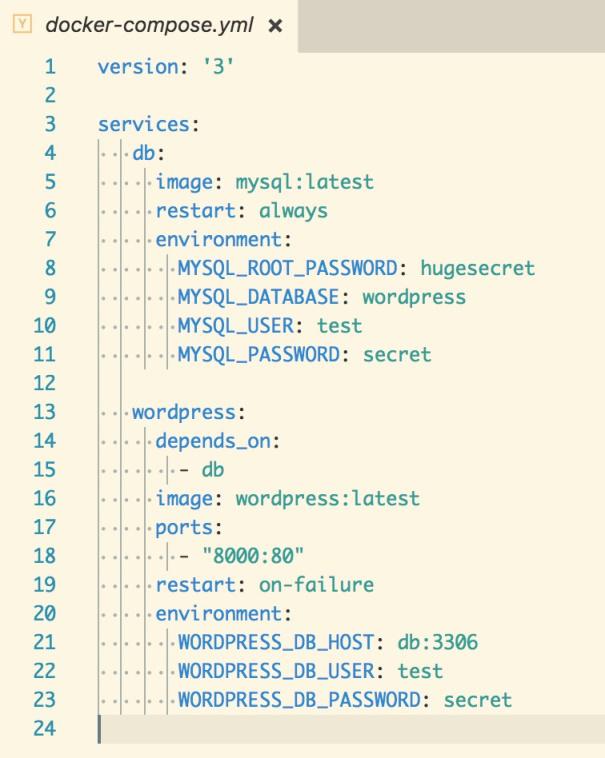
You can refer to the complete code placed at Code/Lesson-2/wordpress-docker-compose.yml. Go to https://goo.gl/t7UGvy to access the code. Please take note that you have to take heed of the indentation in the file. It is advised to use an equal number of tabs and spaces when indenting the lines.
Run docker-compose up in the sandbox directory:

You’ll notice that you have the application running based on one file. This example is the perfect showcase of the power of docker-compose
Run docker ps. You’ll see the containers running:

Open your browser and go to the address at http://0.0.0.0:8000/. You’ll have the WordPress website set up ready. Proceed with the set up and, in an instant, you have a WordPress site up and ready.
The docker-compose file: docker-compose.yml
docker-compose.yml is a YAML file. It defines services, networks, and volumes.
Services are application container definitions that include all components that relate to an application, for example, DB, frontend, or backend. What really weigh in when defining services are the components: networks, volumes, and environment variables. The first line of any docker-compose.yml defines the version of the docker-compose file format.
By running docker -v, you can tell which Docker version is running and thereby know which version to put on the first line of the file.
For docker-compose file format 1.0, the first line was not necessary. Each docker-compose file introduced a new configuration or deprecated an earlier one. If you use version 3.3, the program should be compatible with version 3.0 and above.
Make sure everyone is running version 3 and at least a Docker that’s 1.13.0+.
Next up is services. Use this simplified skeleton:
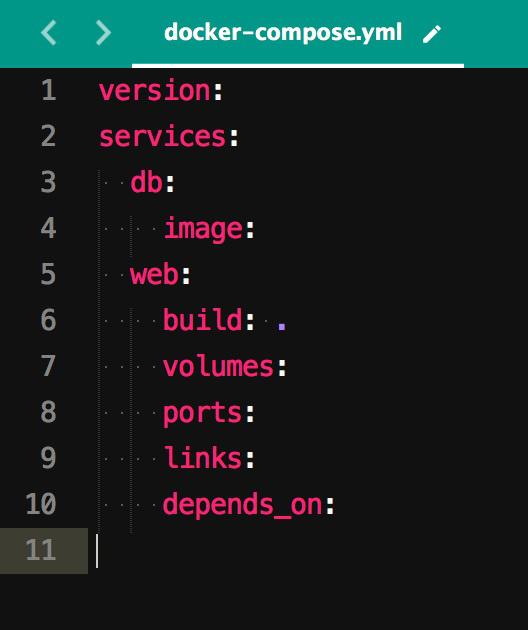
Take heed of the indentation. In the above example, we have two services, that is, db and web. These two are indented just once. The next lines define the image or the Dockerfile from which the image is to be built.
Line 4 will specify the image from which the db service container will run; the db image can be any of the server-based databases.
To confirm whether a stack you want to use exists, run the following: docker search <image or name of your preferred stack> (for example, docker search mongo or docker search postgres).
Line 6 explains that the web services image will be built from the Dockerfile in the location (.) relative to the docker-compose.yml.
We can also define the name of the Dockerfile in line 6. docker-compose will search for the file with a name as listed, for example, in the docker-compose.yml:
Line 5| web:build: Dockerfilevolumes:
Lines 7 to 10 give more definition to the web services. As witnessed in the docker-compose.yml you used to build and run WordPress, there are two services: db and wordpress. In the output of docker ps, these are the container names: sandbox_wordpress_1 and sandbox_db_1.
The first word before the underscore signifies the name of the directory holding the docker-compose.yml. The second word in that container name is the service name, as defined in docker-compose.yml. More context is given in the next section.
The docker-compose CLI
As soon as docker-compose is installed, you can expect a list of options when you run docker-compose. Run docker-compose –v. Note that docker-compose and docker-compose -v, are the only ones that can be run from whichever working directory is open on your terminal command line or Git bash.
The other options in docker-compose are only run in the presence of the docker-compose.yml file.
The docker-compose build command builds images referenced in the docker-compose line: (build: .) in the docker-compose.ym template.
Building images can also be achieved via the docker-compose up command. Take note that this doesn’t happen unless the image has not yet been built yet or if there has been a recent change that affects the container to be run.
- The docker-compose config –services command lists the services as configured in the docker-compose.yml.
- The docker-compose images command lists the images used by the created containers:
- The docker-compose logs command lists the logs from the services:
- The docker-compose logs <service> command lists the logs of a specific service, for example, docker-compose logs db.
- The docker-compose ps command lists the containers running based on docker-compose
- The docker-compose up command builds, creates, recreates, and runs services
Note that in most cases, there is a difference between the results of docker-compose ps and docker ps. Containers that were not running in the context of docker-compose will not be displayed with docker-compose ps. Also note that when running docker-compose up, if one service exits, the entire command exits. Running docker-compose up -d runs docker-compose up in detached mode. That is, the command will be running in the background.