
Learn how to arrange widgets using the grid and form layouts in this tutorial by B.M. Harwani, the founder and owner of Microchip Computer Education.
Using Grid Layout
Grid Layout arranges widgets in a stretchable grid. In this tutorial, you’ll create an application to understand how Grid Layout arranges widgets.
How to do it…
In this application, you will make a simple sign-in form, prompting the user to enter an email address and password, followed by clicking the Submit button. Below the Submit button, there will be two buttons: Cancel and Forgot Password. The application will help you understand how these widgets are arranged in a grid pattern. Perform the following steps to create this application:
- Launch Qt Designer and create an application based on the
Dialog without Buttonstemplate. Then, add two QLabel, twoQlineEdit, and threeQPushButtonwidgets to the form by dragging and dropping twoLabel, twoLine Edit, and threePush Buttonwidgets on the form. - Set the
textproperty of the twoLabelwidgets toNameandEmail Address.
- Set the text property of the three
Push Buttonwidgets toSubmit,Cancel, andForgot Password. - Since the sole purpose of this application is to understand the layout, you don’t need to set the
objectNameproperty of any of the widgets in the application. - To increase the vertical space between the two
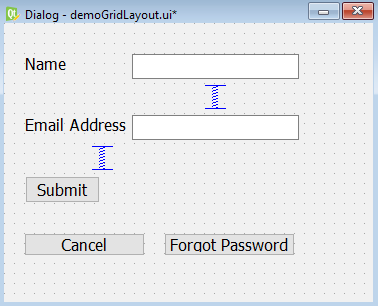
Line Editwidgets, drag theVertical Spacerwidget from theSpacerstab ofWidget Boxand drop it between the twoLine Editwidgets. The vertical spacer will initially take up the blank space between the two Line Edit widgets. - To create vertical space between the second
Line Editwidget and the Submit button, drag theVertical Spacerwidget and drop it between them.
The application will appear as shown in the following screenshot:
- To select all the widgets on the form press the Ctrl key and click all the widgets on the form.
- After selecting all the widgets, right-click the mouse button to open the context menu.
- From the context menu, select the Layout menu option, followed by selecting the Layout in a Grid submenu option.
The widgets will be aligned in grid, as shown in the following screenshot:
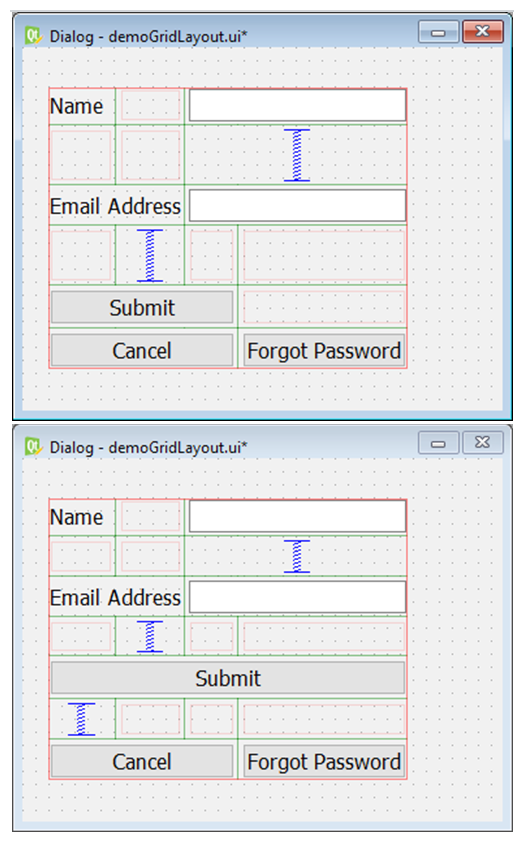
- To increase the vertical space between the Submit and Cancel push buttons, drag the Vertical Spacer widget from the Spacers tab of Widget Box and drop it between them.
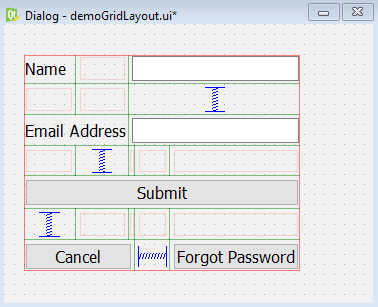
- To increase the horizontal space between the Cancel and Forgot Password push buttons, drag the Horizontal Spacer widget from the Spacers tab and drop it between them.
The form will now appear as shown in the following screenshot:
- Save the application as demoGridLayout.ui.
The user interface created with Qt Designer is stored in a .ui file, which is an XML file, and needs to be converted into Python code. To do the conversion, you need to open a Command Prompt window and navigate to the folder where the file is saved. Then, issue the following command:
C:PyQt5>pyuic5 demoGridLayout.ui -o demoGridLayout.pyThe Python script file demoGridLayout.py may have the following code:
from PyQt5 import QtCore, QtGui, QtWidgets
class Ui_Dialog(object):
    def setupUi(self, Dialog):
        Dialog.setObjectName("Dialog")
        Dialog.resize(369, 279)
        self.widget = QtWidgets.QWidget(Dialog)
        self.widget.setGeometry(QtCore.QRect(20, 31, 276, 216))
        self.widget.setObjectName("widget")
        self.gridLayout = QtWidgets.QGridLayout(self.widget)
        self.gridLayout.setContentsMargins(0, 0, 0, 0)
        self.gridLayout.setObjectName("gridLayout")
        self.pushButton = QtWidgets.QPushButton(self.widget)
        font = QtGui.QFont()
        font.setPointSize(12)
        self.pushButton.setFont(font)
        self.pushButton.setObjectName("pushButton")
        self.gridLayout.addWidget(self.pushButton, 4, 0, 1, 5)
        spacerItem = QtWidgets.QSpacerItem(20, 40, QtWidgets.
        QSizePolicy.Minimum,QtWidgets.QSizePolicy.Expanding)
        self.gridLayout.addItem(spacerItem, 5, 0, 1, 1)
        self.label = QtWidgets.QLabel(self.widget)
        font = QtGui.QFont()
        font.setPointSize(12)
        self.label.setFont(font)
        self.label.setObjectName("label")
        self.gridLayout.addWidget(self.label, 0, 0, 1, 1)
        self.label_2 = QtWidgets.QLabel(self.widget)
        font = QtGui.QFont()
        font.setPointSize(12)
        self.label_2.setFont(font)
        self.label_2.setObjectName("label_2")
        self.gridLayout.addWidget(self.label_2, 2, 0, 1, 2)
        self.lineEdit_2 = QtWidgets.QLineEdit(self.widget)
        font = QtGui.QFont()
        font.setPointSize(12)
        self.lineEdit_2.setFont(font)
        self.lineEdit_2.setObjectName("lineEdit_2")
        self.gridLayout.addWidget(self.lineEdit_2, 2, 2, 1, 3)
        self.lineEdit = QtWidgets.QLineEdit(self.widget)
        font = QtGui.QFont()
        font.setPointSize(12)
        self.lineEdit.setFont(font)
        self.lineEdit.setObjectName("lineEdit")
        self.gridLayout.addWidget(self.lineEdit, 0, 2, 1, 3)
        spacerItem1 = QtWidgets.QSpacerItem(20, 40, QtWidgets.
        QSizePolicy.Minimum,QtWidgets.QSizePolicy.Expanding)
        self.gridLayout.addItem(spacerItem1, 3, 1, 1, 1)
        spacerItem2 = QtWidgets.QSpacerItem(20, 40, QtWidgets.
        QSizePolicy.Minimum,QtWidgets.QSizePolicy.Expanding)
        self.gridLayout.addItem(spacerItem2, 1, 2, 1, 3)
        self.pushButton_2 = QtWidgets.QPushButton(self.widget)
        font = QtGui.QFont()
        font.setPointSize(12)
        self.pushButton_2.setFont(font)
        self.pushButton_2.setObjectName("pushButton_2")
        self.gridLayout.addWidget(self.pushButton_2, 6, 0, 1, 3)
        self.pushButton_3 = QtWidgets.QPushButton(self.widget)
        font = QtGui.QFont()
        font.setPointSize(12)
        self.pushButton_3.setFont(font)
        self.pushButton_3.setObjectName("pushButton_3")
        self.gridLayout.addWidget(self.pushButton_3, 6, 4, 1, 1)
        spacerItem3 = QtWidgets.QSpacerItem(40, 20, QtWidgets.
        QSizePolicy.Expanding,QtWidgets.QSizePolicy.Minimum)
        self.gridLayout.addItem(spacerItem3, 6, 3, 1, 1)
        self.retranslateUi(Dialog)
        QtCore.QMetaObject.connectSlotsByName(Dialog)
    def retranslateUi(self, Dialog):
        _translate = QtCore.QCoreApplication.translate
        Dialog.setWindowTitle(_translate("Dialog", "Dialog"))
        self.pushButton.setText(_translate("Dialog", "Submit"))
        self.label.setText(_translate("Dialog", "Name"))
        self.label_2.setText(_translate("Dialog", "Email Address"))
        self.pushButton_2.setText(_translate("Dialog", "Cancel"))
        self.pushButton_3.setText(_translate("Dialog",
        "Forgot Password"))
if __name__ == "__main__":
    import sys
    app = QtWidgets.QApplication(sys.argv)
    Dialog = QtWidgets.QDialog()
    ui = Ui_Dialog()
    ui.setupUi(Dialog)
    Dialog.show()
    sys.exit(app.exec_())
How it works…
As you can see in the code, a Line Edit widget with the default objectNamelineEdit property and a Label widget with the default objectNamelabel property are placed on the form. Similarly, a second pair, a Label widget with the default objectNamelabel_2 property and a Line Edit widget with the default objectNamelineEdit_2 property are also placed on the form.
The vertical space between the two pairs of Label and Line Edit widgets is increased by placing a vertical spacer called spacerItem1 between them. A Push Button widget is also placed on the form with Submit, objectName, and pushButton. Again, the vertical space between the second Label and the Push Button widget is increased by placing a vertical spacer called spacerItem2 between them.
Two more push buttons with the default objectName properties, pushButton_2 and pushButton_3, are placed on the form. All the widgets are arranged in a stretchable grid layout with the default object name, gridLayout. The vertical space between the two push buttons with the object names, pushButton and pushButton_2, is increased by placing a vertical spacer called spacerItem3 between them.
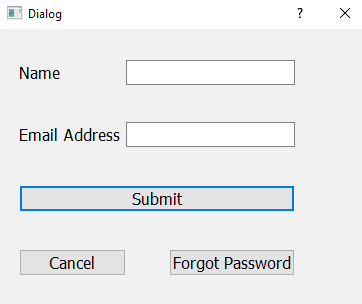
On running the application, you will find that the two pairs of Label and Line Edit widgets, and the Submit, Cancel, and Forgot Password buttons, are arranged in a stretchable grid, as shown in the following screenshot:
Using Form Layout
Form Layout is considered to be the most demanding layout in almost all applications. This two-column layout is required when displaying products and services as well as in accepting feedback or other information from users or customers.
The form layout arranges the widgets in a two-column format. The column on the left has labels or text and the column on the right has empty textboxes. Similarly, the form layout arranges the widgets in the left and right columns. Let’s understand the concept of Form Layout using an application.
How to do it…
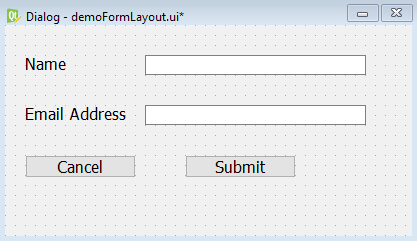
In this application, you will make two columns, one for displaying messages and the other for accepting input from the user. Besides the two pairs of Label and Line Edit widgets for taking input from the user, the application will have two buttons that will also be arranged in the form layout. Here are the steps to create an application that arranges widgets using Form Layout:
- Launch Qt Designer and create an application based on the Dialog without Buttons template. Then, add two QLabel, two QLineEdit, and two QPushButton widgets to the form by dragging and dropping two Label, two Line Edit, and two PushButton widgets on the form.
- Set the text property of the two Label widgets to Name and Email Address.
- Set the text property of the two Push Button widgets to Cancel and Submit.
- Since the purpose of this application is solely to understand the layout you needn’t set the objectName property of any of the widgets in the application.
The application will appear as shown in the following screenshot:
- To select all the widgets on the form, press the Ctrl key and click all the widgets on the form.
- After selecting all the widgets, right-click the mouse button to open the context menu.
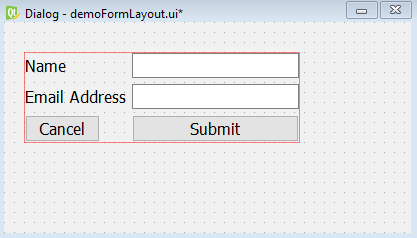
- From the context menu, select the Layout menu option, and then select the Layout in a Form Layout submenu option.
The widgets will be aligned in the Form Layout widget, as shown in the following screenshot:
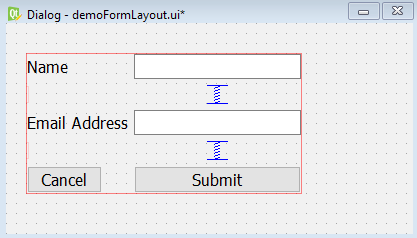
- To increase the vertical space between the two Line Edit widgets, drag the Vertical Spacer widget from the Spacers tab of Widget Box and drop it between them.
- To increase the vertical space between the second Line Edit widget and the Submit button, drag the Vertical Spacer widget from the Spacers tab and drop it between them.
- Select the red rectangle of the Form Layout widget and drag it vertically to increase its height. The two vertical spacers will automatically increase in height to use the empty space in between the widgets.
The form will now appear as shown in the following screenshot:
- Save the application as demoFormLayout.ui.
The user interface created with Qt Designer is stored in a .ui file, which is an XML file, and needs to be converted into Python code. To do the conversion, you need to open a Command Prompt window and navigate to the folder where the file is saved. Then, issue the following command:
C:PyQt5>pyuic5 demoFormLayout.ui -o demoFormLayout.pyThe Python script file, demoFormLayout.py, may have the following code:
from PyQt5 import QtCore, QtGui, QtWidgets
class Ui_Dialog(object):
    def setupUi(self, Dialog):
        Dialog.setObjectName("Dialog")
        Dialog.resize(407, 211)
        self.widget = QtWidgets.QWidget(Dialog)
        self.widget.setGeometry(QtCore.QRect(20, 30, 276, 141))
        self.widget.setObjectName("widget")
        self.formLayout = QtWidgets.QFormLayout(self.widget)
        self.formLayout.setContentsMargins(0, 0, 0, 0)
        self.formLayout.setObjectName("formLayout")
        self.label = QtWidgets.QLabel(self.widget)
        font = QtGui.QFont()
        font.setPointSize(12)
        self.label.setFont(font)
        self.label.setObjectName("label")
        self.formLayout.setWidget(0, QtWidgets.QFormLayout.
        LabelRole,self.label)
        self.lineEdit = QtWidgets.QLineEdit(self.widget)
        font = QtGui.QFont()
        font.setPointSize(12)
        self.lineEdit.setFont(font)
        self.lineEdit.setObjectName("lineEdit")
        self.formLayout.setWidget(0, QtWidgets.QFormLayout.
        FieldRole,self.lineEdit)
        self.label_2 = QtWidgets.QLabel(self.widget)
        font = QtGui.QFont()
        font.setPointSize(12)
        self.label_2.setFont(font)
        self.label_2.setObjectName("label_2")
        self.formLayout.setWidget(2, QtWidgets.QFormLayout.
        LabelRole,self.label_2)
        self.lineEdit_2 = QtWidgets.QLineEdit(self.widget)
        font = QtGui.QFont()
        font.setPointSize(12)
        self.lineEdit_2.setFont(font)
        self.lineEdit_2.setObjectName("lineEdit_2")
        self.formLayout.setWidget(2, QtWidgets.QFormLayout.
        FieldRole, self.lineEdit_2)
        self.pushButton_2 = QtWidgets.QPushButton(self.widget)
        font = QtGui.QFont()
        font.setPointSize(12)
        self.pushButton_2.setFont(font)
        self.pushButton_2.setObjectName("pushButton_2")
        self.formLayout.setWidget(4, QtWidgets.QFormLayout.
        LabelRole,self.pushButton_2)
        self.pushButton = QtWidgets.QPushButton(self.widget)
        font = QtGui.QFont()
        font.setPointSize(12)
        self.pushButton.setFont(font)
        self.pushButton.setObjectName("pushButton")
        self.formLayout.setWidget(4, QtWidgets.QFormLayout.
        FieldRole,self.pushButton)
        spacerItem = QtWidgets.QSpacerItem(20, 40, QtWidgets.
        QSizePolicy.Minimum,QtWidgets.QSizePolicy.Expanding)
        self.formLayout.setItem(1, QtWidgets.QFormLayout.FieldRole,
        spacerItem)
        spacerItem1 = QtWidgets.QSpacerItem(20, 40, QtWidgets.
        QSizePolicy.Minimum,QtWidgets.QSizePolicy.Expanding)
        self.formLayout.setItem(3, QtWidgets.QFormLayout.FieldRole,
        spacerItem1)
        self.retranslateUi(Dialog)
        QtCore.QMetaObject.connectSlotsByName(Dialog)
    def retranslateUi(self, Dialog):
        _translate = QtCore.QCoreApplication.translate
        Dialog.setWindowTitle(_translate("Dialog", "Dialog"))
        self.label.setText(_translate("Dialog", "Name"))
        self.label_2.setText(_translate("Dialog", "Email Address"))
        self.pushButton_2.setText(_translate("Dialog", "Cancel"))
        self.pushButton.setText(_translate("Dialog", "Submit"))
if __name__ == "__main__":
    import sys
    app = QtWidgets.QApplication(sys.argv)
    Dialog = QtWidgets.QDialog()
    ui = Ui_Dialog()
    ui.setupUi(Dialog)
    Dialog.show()
    sys.exit(app.exec_())
How it works…
As you can see in the code, a Line Edit widget with the default objectName lineEdit property and a Label widget with the default objectNamelabels property are placed on the form. Similarly, a second pair, a Label widget with the default objectNamelabel_2 property and a Line Edit widget with the default objectNamelineEdit_2 property are placed on the form. The two push buttons, pushButton and pushButton_2, are also placed on the form. All the six widgets are selected and aligned in a two-column format using the Form Layout widget with the default objectNameformLayout property.
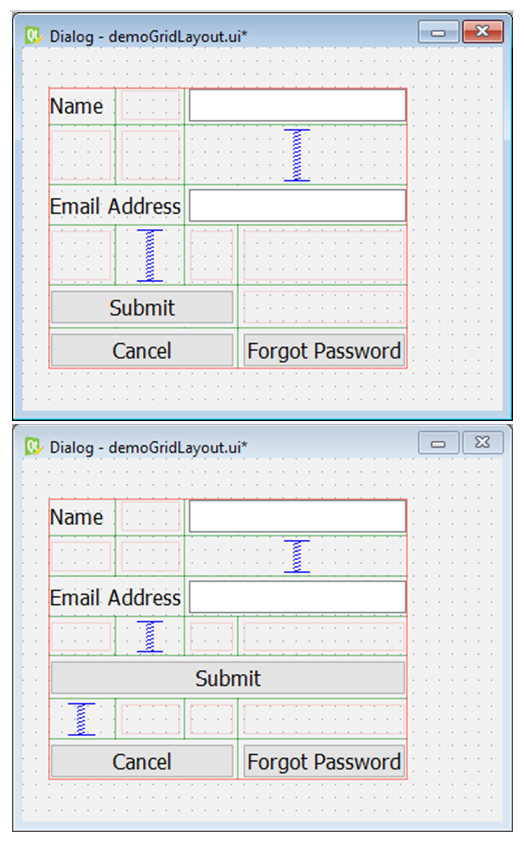
On running the application, you will find that the two pairs of Label and Line Edit widgets, and the Cancel and Submit buttons, are arranged in a Form Layout widget as shown in the following screenshot:
You’ve now learned grid and form layouts. If you found this article interesting and want to learn GUI programming with Python, you can explore Qt5 Python GUI Programming Cookbook. The book will guide you from the very basics of creating a fully functional GUI application using PyQT with only a few lines of code. If you’re an intermediate Python programmer wishing to enhance your coding skills by writing powerful GUIs in Python using PyQT, this book is a must-read!