Git Project Life Cycle
A Git project life cycle describes how a change moves from a developer’s working directory to the local repository and then to a shared remote repository. In a normal project, the cycle includes cloning, editing files, staging changes, committing locally, pushing to the remote repository, and pulling updates made by other developers.
Consider a central repository containing the project files. This is located in a remote location and can be accessed using project URL.
Each developer works on a local copy of that repository. Git records changes as commits, so the project history can be reviewed, compared, reverted, or shared with the rest of the team.
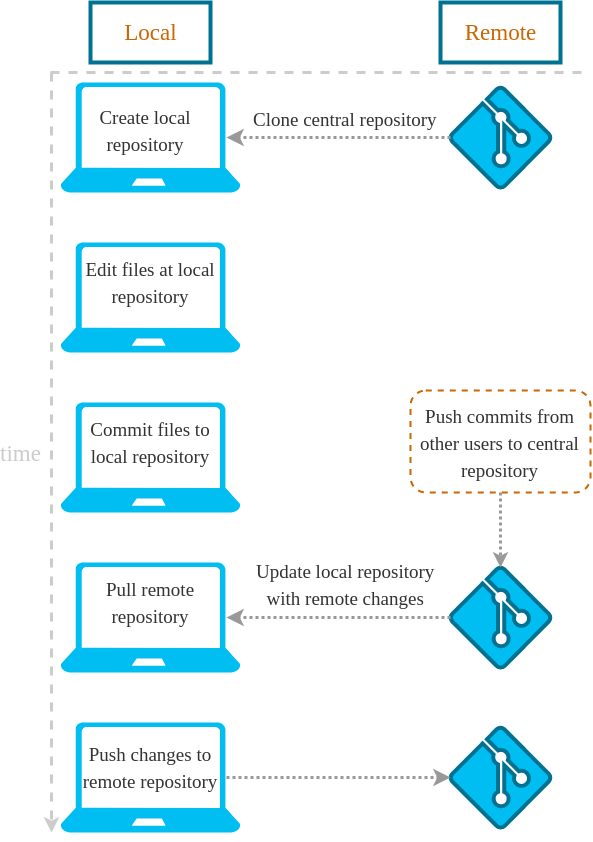
Git project life cycle from a local machine
Clone the remote central repository to create a local repository. Now the local repository contains all project files from remote central repository.
Make changes to the files in the local repository.
Stage the files that should become part of the next commit. Staging is done before committing, and it lets you choose exactly which changes should be recorded.
Commit these changes. The commit operation updates the local git repository only. No connection/changes is made to the remote repository.
Once you are done with all the modifications/commits, you may Push multiple commits to the remote repository.
Other developers/users who have their own clones of the central remote repository can Pull from the remote repository to get your pushed changes.
Main stages in the Git life cycle of a change
A change in Git normally passes through these areas before it becomes part of the shared project history.
| Git stage | What happens | Common command |
|---|---|---|
| Working directory | You create, edit, rename, or delete files in your project folder. | git status |
| Staging area | You select the changes that should go into the next commit. | git add |
| Local repository | You save the staged changes as a commit in your local Git history. | git commit |
| Remote repository | You share your local commits with the central repository. | git push |
| Updated local copy | You bring other developers’ remote changes into your local repository. | git pull |
Clone a remote Git repository to start the project life cycle
The Git project life cycle usually starts by cloning an existing remote repository. Cloning creates a local repository, downloads the project files, and sets up a connection to the remote repository.
git clone https://example.com/project/repository.git
cd repository
After cloning, the developer can inspect files, create a branch, edit code, and start preparing changes for commit.
Check file changes during the Git working directory stage
The working directory is the project folder on your machine. When you edit files, Git notices that the working directory has changed. The git status command shows which files are modified, untracked, staged, or ready to commit.
git statusOn branch main
Changes not staged for commit:
modified: index.htmlThis means the file has been changed in the working directory, but it has not yet been added to the staging area.
Stage selected files before a Git commit
The staging area is also called the index. It is where you prepare the exact set of changes for the next commit. You can stage one file, many files, or all changed files.
git add index.htmlTo stage all modified and new files in the current directory, use the following command.
git add .Staging helps keep commits focused. For example, you can stage only a bug fix and leave unrelated formatting changes for a later commit.
Commit staged changes to the local Git repository
A commit records the staged changes in the local repository. It includes a commit ID, author information, timestamp, and commit message. A commit does not automatically update the remote repository.
git commit -m "Fix header layout"Write commit messages that explain the change clearly. A common convention is to keep the subject line around 50 characters and wrap longer body text around 72 characters. This is often called the 50/72 commit message guideline.
Short summary of the change

Optional longer explanation of why the change was made,
what problem it solves, and any important side effects.
Push local Git commits to the remote repository
After committing locally, use git push to send your commits to the remote repository. This is the step that makes your committed changes available to other developers who use the same remote repository.
git push origin mainIf you are working on a feature branch, replace main with the name of your branch.
git push origin feature/login-formPull remote Git changes into the local repository
Use git pull to bring changes from the remote repository into your local repository. This is common before starting new work, before pushing, or when another developer has already pushed updates.
git pull origin maingit pull is a convenient command that fetches remote changes and then integrates them into the current branch. If the same lines were changed by different developers, Git may ask you to resolve a merge conflict before the life cycle can continue.
Typical Git project life cycle command sequence
The following command sequence shows a simple Git life cycle for one change.
git clone https://example.com/project/repository.git
cd repository

git status
# edit files

git add index.html
git commit -m "Update home page content"
git pull origin main
git push origin main
In team projects, many developers use branches so that new work can be reviewed before it is merged into the main branch.
Git branch workflow inside a project life cycle
A branch allows a developer to work on a feature, fix, or experiment without directly changing the main branch. After the branch is pushed, it can be reviewed and merged using the team’s normal process.
git switch -c feature/contact-page
# edit files

git add .
git commit -m "Add contact page"
git push origin feature/contact-page
After review, the branch may be merged into the main branch. Some teams do this through pull requests or merge requests on a hosting platform, while others merge locally and push the result.
Git fetch, pull, and push in the project life cycle
The commands fetch, pull, and push are often confused because all three communicate with a remote repository. Their purposes are different.
| Command | Direction | Meaning in the Git life cycle |
|---|---|---|
git fetch | Remote to local metadata | Downloads remote changes for inspection without merging them into the current branch. |
git pull | Remote to local branch | Fetches remote changes and integrates them into the current branch. |
git push | Local branch to remote | Uploads local commits to the remote repository. |
Handling merge conflicts during the Git life cycle
A merge conflict can happen when Git cannot automatically combine changes from two sources. For example, two developers may edit the same line in the same file. Git then stops the merge and asks the developer to choose the correct final content.
CONFLICT (content): Merge conflict in index.html
Automatic merge failed; fix conflicts and then commit the result.
The usual steps are to open the conflicted file, edit the conflict markers, test the result, stage the resolved file, and commit the merge resolution.
git status
# edit the conflicted file

git add index.html
git commit
Simple rules for a clean Git project life cycle
- Run
git statusoften to know the current state of your working directory and staging area. - Pull recent remote changes before starting work or before pushing important changes.
- Keep commits focused on one logical change where possible.
- Use clear commit messages that explain what changed.
- Create branches for features, fixes, or experiments instead of doing all work directly on the main branch.
- Review changes before staging them, especially when using
git add .. - Resolve merge conflicts carefully and test the project after conflict resolution.
Common mistakes in the Git project life cycle
- Committing without checking which files are staged.
- Assuming
git commitsends changes to the remote repository. - Working for a long time without pulling remote updates from other developers.
- Pushing directly to the main branch when the team expects feature branches and review.
- Using vague commit messages such as
updateorchanges. - Ignoring merge conflicts instead of resolving and testing them properly.
FAQ on Git project life cycle
What is the Git project life cycle?
The Git project life cycle is the process by which changes move from the working directory to the staging area, then to the local repository as commits, and finally to the remote repository using push. It also includes pulling changes made by other developers.
What are the 5 basic steps of Git?
The 5 basic steps are clone the repository, edit files, stage changes with git add, commit changes with git commit, and push the commits with git push. In team projects, git pull is also used regularly to receive remote changes.
Does git commit update the remote repository?
No. git commit updates only the local repository. To send committed changes to the remote repository, use git push.
What is the difference between git add and git commit?
git add moves selected changes into the staging area. git commit saves the staged changes into the local repository history.
What is the Git 50/72 rule?
The Git 50/72 rule is a commit message style guideline. It suggests keeping the first line of a commit message around 50 characters and wrapping the longer body text around 72 characters for readability.
Editorial QA checklist for Git project life cycle
- Confirm that the tutorial explains working directory, staging area, local repository, and remote repository clearly.
- Check that
git commitis described as a local operation andgit pushas the remote update operation. - Verify that all command-line examples use correct Git command order for clone, add, commit, pull, and push.
- Ensure that branch workflow guidance does not imply that every team must use the same review process.
- Review the FAQ answers for common beginner intent around Git life cycle, Git steps, and the 50/72 commit message guideline.