 TutorialKart.com
Create a C# Project with Visual Studio Code
This tutorial explains how to create, edit, run, and debug a C# console project in Visual Studio Code using the .NET command-line interface. The example project is named HelloWorld, but the same steps apply to other C# console applications.
Requirements for Creating a C# Project in Visual Studio Code
Install the following tools before creating the project:
- Install Visual Studio Code.
- Install a supported .NET SDK. The SDK includes the tools required to create, build, and run C# projects.
- Install a C# extension for Visual Studio Code, such as C# Dev Kit or the C# extension published by Microsoft.
The .NET SDK and the .NET runtime serve different purposes. The runtime can execute compatible applications, while the SDK is required to create and compile a new C# project.
Verify the .NET SDK Installation
Open a terminal and run the following command:
dotnet --versionIf the SDK is installed correctly, the command prints an installed SDK version. You can also list every installed SDK with:
dotnet --list-sdksIf the terminal reports that dotnet is not recognized or cannot be found, install the .NET SDK and restart Visual Studio Code before continuing.
1. Open Visual Studio Code
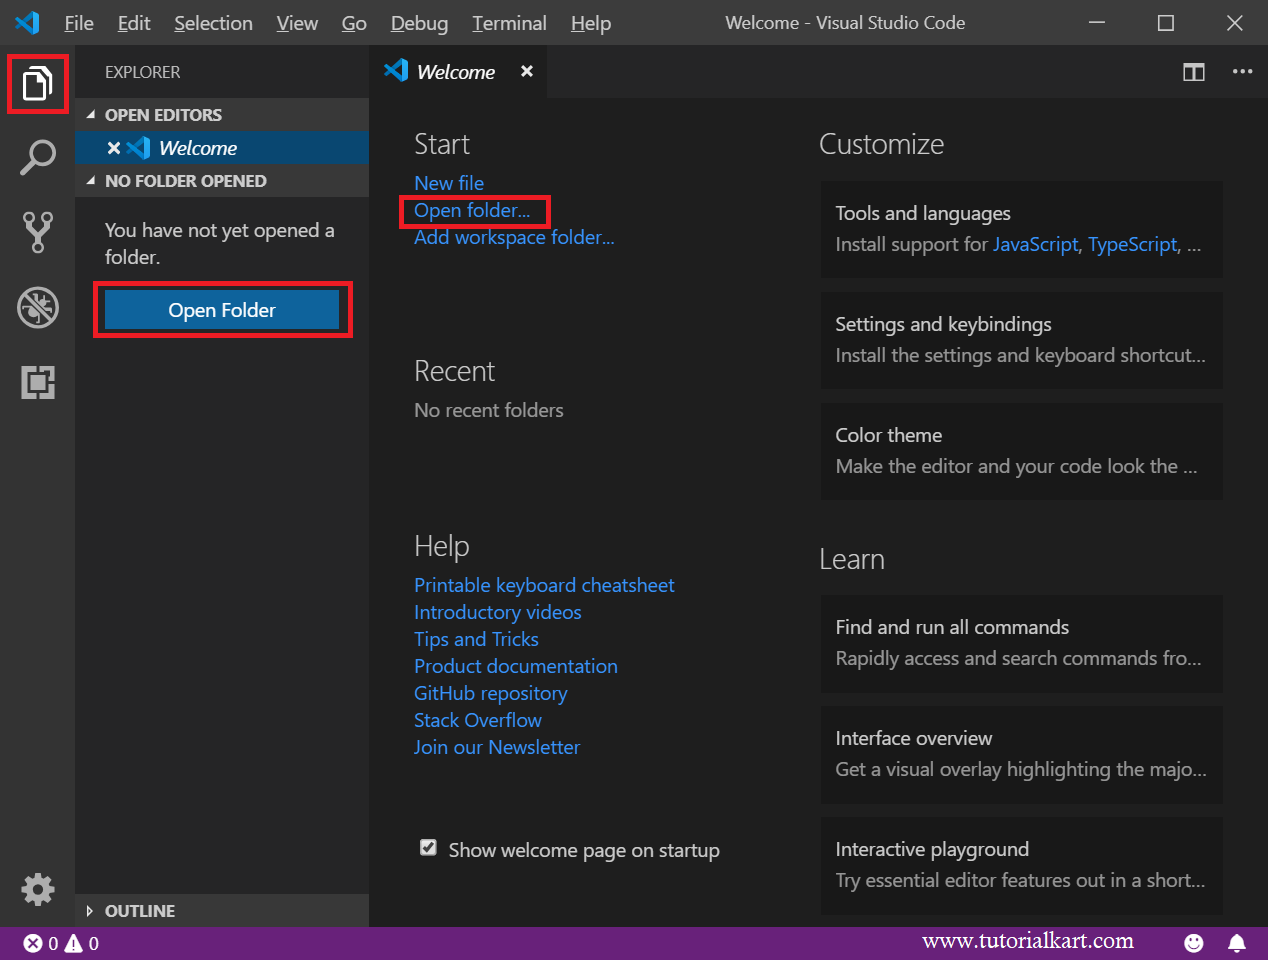
Start Visual Studio Code. On the Welcome page, click Open Folder... under the Start section. You can also select the Explorer icon in the left sidebar and click Open Folder.
2. Create and Open the C# Project Folder
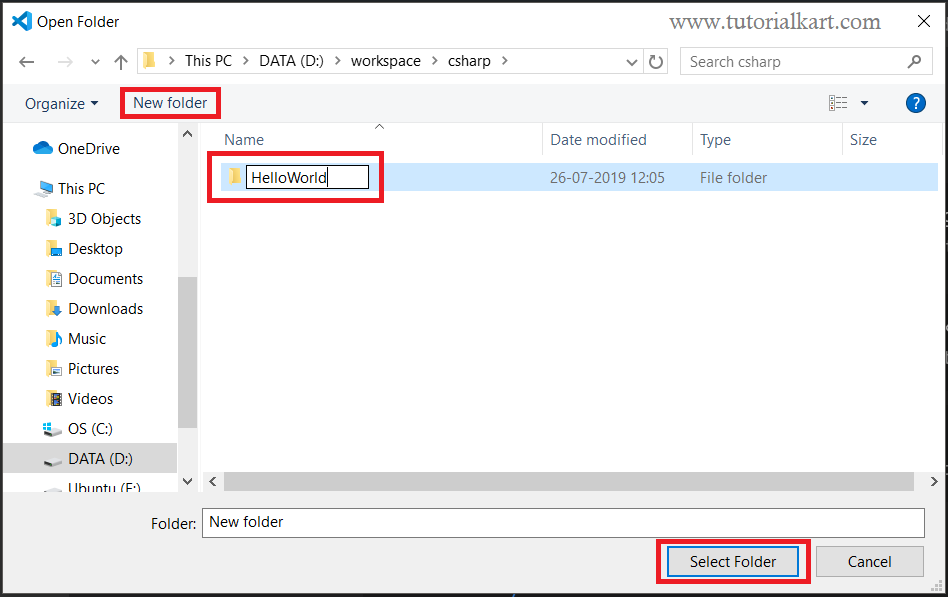
Navigate to the location where you want to store the project. Create a folder named HelloWorld, select it, and click Select Folder.
The folder becomes the Visual Studio Code workspace and will contain the C# project file, source files, and generated build directories.
3. Open the Visual Studio Code Integrated Terminal
Open the Terminal menu and select New Terminal. The integrated terminal normally starts in the folder currently open in Visual Studio Code.
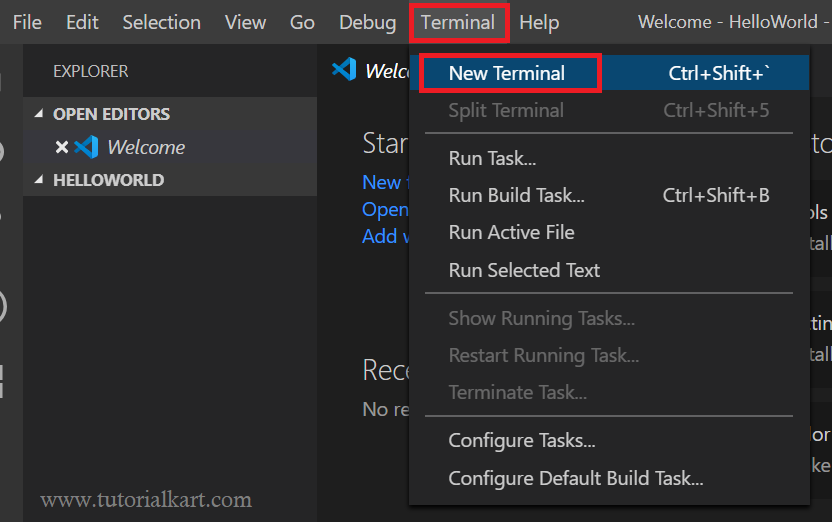
Confirm that the terminal is using the HelloWorld folder before creating the project. If necessary, change to that directory with the appropriate cd command for your operating system.
4. Create the C# Console Project with dotnet new console
Run the following command in the terminal:
dotnet new consoleThe command creates a C# console project in the current folder. The generated files commonly include:
HelloWorld.csproj: the project file containing the target framework and project settings.Program.cs: the main C# source file.obj: an intermediate directory used during dependency restore and compilation.
The exact generated code may vary with the installed .NET SDK. Recent templates usually use top-level statements, while older templates may generate a Program class with a Main method.
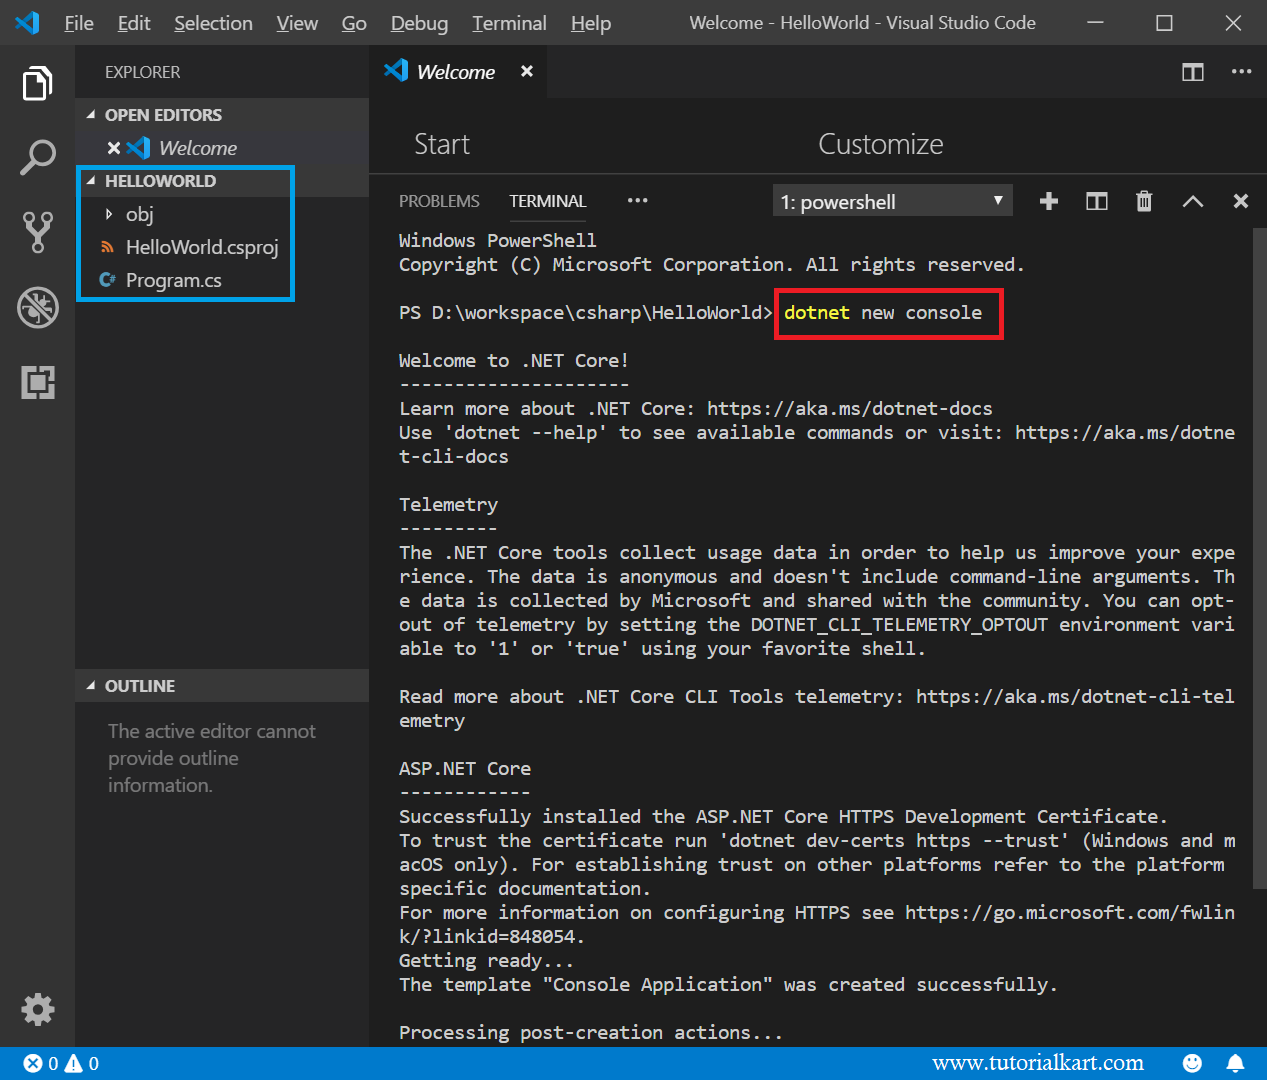
Program.cs contains code to print Hello World to print to the console. In the Output section, it is logged that all the required C# dependencies are installed.
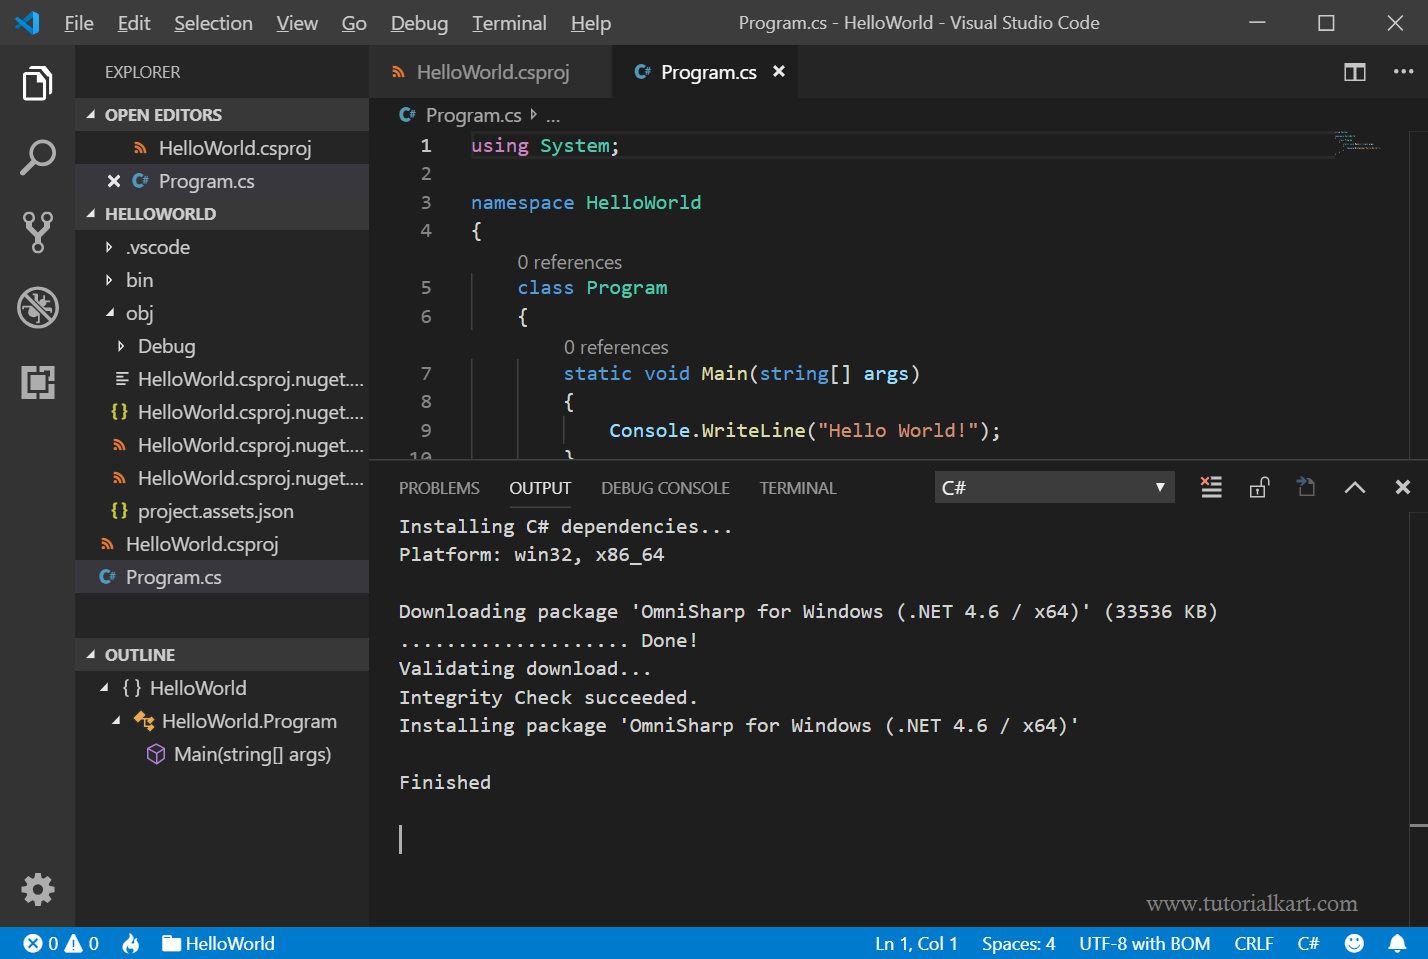
Create the Folder and C# Project with One Command
You can also create a new project directory from its parent folder by passing a project name to the command:
dotnet new console --name HelloWorldThis creates a HelloWorld directory containing the new project. Open that directory in Visual Studio Code before editing or debugging the application.
5. Review and Edit Program.cs
Select Program.cs in the Explorer. A project generated with a recent SDK may contain a top-level statement similar to the following:
Console.WriteLine("Hello, World!");Replace the generated text with your own message:
Console.WriteLine("Hello from Visual Studio Code!");Save the file before running the project. Visual Studio Code can also be configured to save files automatically, but explicitly saving avoids running an older version of the source code.
6. Run the C# Project with dotnet run
Run the project from the integrated terminal with:
dotnet runThe command restores required packages when necessary, builds the project, and then starts the application.
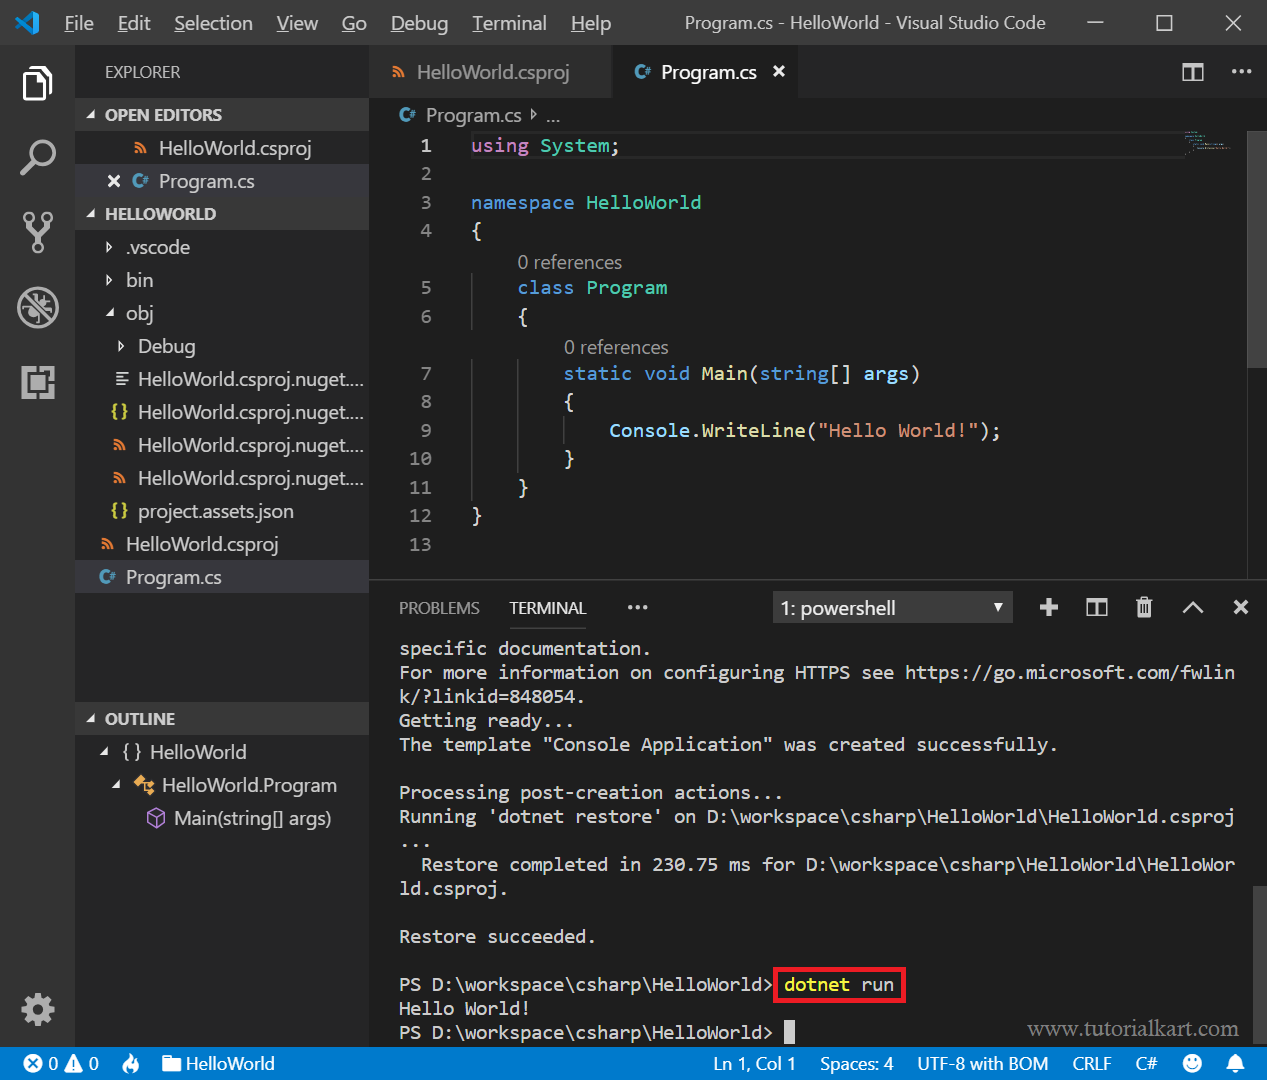
For the updated example, the terminal output is:
Hello from Visual Studio Code!7. Build the C# Project Without Running It
Use dotnet build when you want to compile the project and check for errors without starting the application:
dotnet buildA successful build creates compiled files under the bin directory. The path includes the active build configuration and target framework.
To create a release build, run:
dotnet build --configuration Release8. Debug the C# Project in Visual Studio Code
Open Program.cs and click in the left margin beside a line of code to add a breakpoint. Then open the Run and Debug view and start debugging, or press F5.
When execution reaches the breakpoint, Visual Studio Code pauses the program. You can inspect variables, evaluate expressions, and move through the code using the step-over, step-into, and step-out controls.
If Visual Studio Code asks you to select a debugger or create debug configuration files, choose the available C# or .NET option supplied by the installed extension.
C# Project Files Created by the .NET CLI
After creating and building the project, the folder generally contains the following items:
Program.cs: contains the application source code.HelloWorld.csproj: defines project settings, dependencies, and the target framework.obj: contains temporary restore and build files.bin: contains compiled application files after a successful build or run.
Do not normally edit files inside bin or obj. The .NET build tools regenerate those directories.
Common Visual Studio Code and C# Project Errors
dotnet Command Is Not Recognized
This error usually means that the .NET SDK is not installed or its installation directory is not available in the system path. Install the SDK, close all Visual Studio Code windows, and open the editor again.
No C# IntelliSense or Code Completion
Confirm that a Microsoft C# extension is installed and enabled. Open the folder containing the .csproj file rather than opening only Program.cs. The extension needs the project context to resolve references correctly.
dotnet run Cannot Find a Project
Run the command from the directory containing the .csproj file. You may also provide the project path explicitly:
dotnet run --project HelloWorld.csprojThe Program Runs but Shows Old Output
Save Program.cs and run the command again. Also confirm that the integrated terminal is in the expected project folder and that you are editing the source file belonging to that project.
C# Project Setup Verification Checklist
- Confirm that
dotnet --versionreturns an installed SDK version. - Verify that the opened Visual Studio Code folder contains the project
.csprojfile. - Check that a Microsoft C# extension is installed and enabled.
- Save
Program.csbefore running or debugging the application. - Run
dotnet buildand resolve all compiler errors. - Run
dotnet runfrom the project directory and verify the expected terminal output. - Add a breakpoint and confirm that the debugger pauses on the selected line.
Frequently Asked Questions about C# Projects in Visual Studio Code
Do I need Visual Studio to create a C# project?
No. You can create, build, run, and debug C# projects with Visual Studio Code, a supported .NET SDK, and a suitable C# extension.
What is the difference between dotnet new, dotnet build, and dotnet run?
dotnet new creates a project from a template. dotnet build compiles the project without starting it. dotnet run builds the project when needed and then launches the application.
Why does my new C# project not contain a Main method?
Recent C# console templates may use top-level statements. The compiler generates the entry-point structure automatically, so a visible Main method is not required in the source file.
Can I create more than one C# project in the same folder?
It is clearer to place each project in its own directory. For applications containing multiple related projects, create separate project folders and organize them with a .NET solution file.
C# Project Creation Summary
To create a C# console project in Visual Studio Code, install the .NET SDK and a C# extension, open an empty project folder, run dotnet new console, edit Program.cs, and start the application with dotnet run. You can compile without running by using dotnet build and debug the project through the Visual Studio Code Run and Debug view.
Continue with the main C# Tutorial to learn variables, conditions, loops, methods, classes, collections, exception handling, and other C# programming concepts.