 TutorialKart.com
How to create Entity fields in Dynamics 365?
Entity fields in Dynamics 365 are used to capture data for a record. In older Dynamics 365 Customer Engagement customization screens, these are called entity fields. In the modern Microsoft Dataverse interface, the same concept is usually called a table column. This tutorial explains how to create a custom field for an entity, configure the field properties, and then make the field available on forms and views in the Microsoft Dynamics 365 user interface.
In our previous Dynamics 365 tutorial, we have learned about how to create custom Entity in Dynamics 365. In this tutorial, we will learn about creating custom entity fields in Dynamics 365.
When to create a custom Entity field in Dynamics 365
Create a custom Entity field in Dynamics 365 when the standard fields do not store the information required by your business process. For example, if an Employer entity needs to store the employee age, joining date, department code, or approval status, you can add suitable fields to that entity.
- Use an existing standard field if it already represents the required information.
- Create a new field when the data is specific to your process.
- Choose the data type carefully because some field properties cannot be changed easily after the field is created.
- Add the field to the required form and view after saving it.
- Publish customizations so users can see the new field in Dynamics 365.
Microsoft documentation explains field creation under entity customization for Dynamics 365 Customer Engagement on-premises. For reference, see Create and edit fields in Dynamics 365 Customer Engagement and Create entities in Dynamics 365 Customer Engagement.
Field properties to decide before adding a Dynamics 365 Entity field
| Field setting | What it controls | Example for Employee Age |
|---|---|---|
| Display Name | Label shown to users on forms and views. | Employee Age |
| Name | Schema name generated for the field. It normally includes the publisher prefix. | new_employeeage |
| Field Requirement | Whether users must enter a value. | Optional or Business Required |
| Searchable | Whether the field is available in Advanced Find and search-related customization options. | Yes, if users need to search by age |
| Field Security | Whether field-level security can restrict access to the field. | No for a basic tutorial field |
| Auditing | Whether changes to the field value are tracked when auditing is enabled. | Yes, if the value is important for history |
| Data Type | Controls the kind of value the field stores. | Whole Number |
The example below creates an Employee Age field in the Employer entity. For a real implementation, confirm whether age should be stored directly or calculated from a date of birth field. A calculated value is often easier to maintain than a manually entered age.
Step 1: Open Dynamics 365 customizations for Entity fields
- To create Entity fields in Dynamics 36, Navigate to Settings | Customizations.
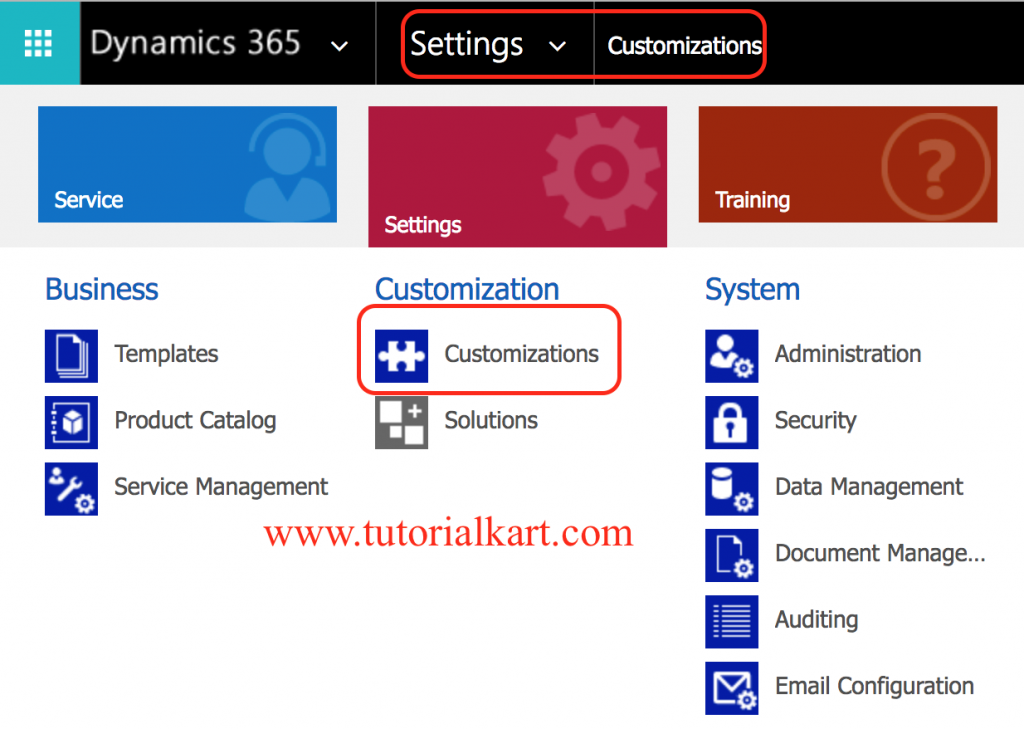
In a production system, create fields inside an unmanaged solution instead of directly customizing the default solution. A solution makes it easier to move the field, related form changes, views, and dependencies from one environment to another.
- Now click on Customize the System as shown below.
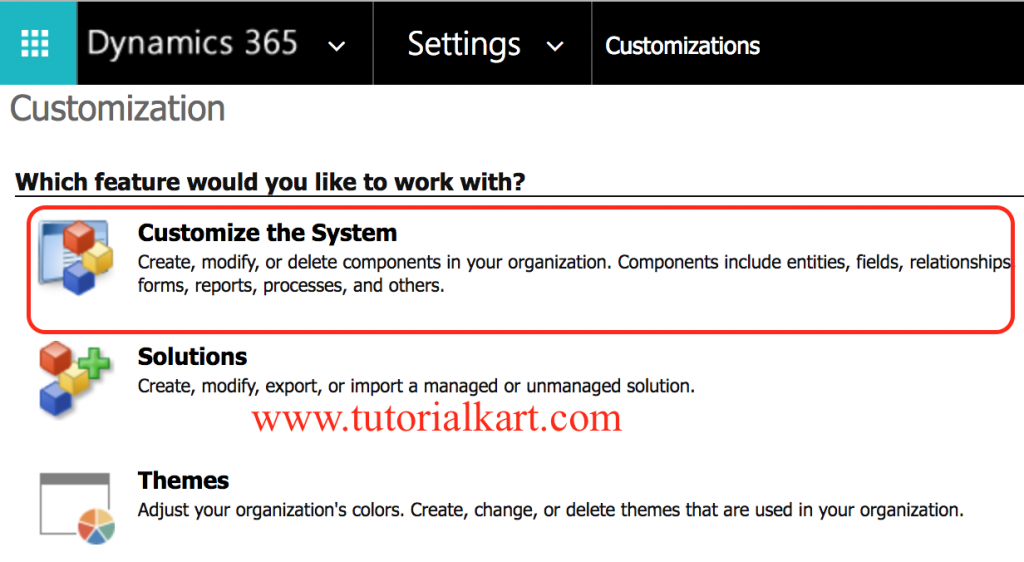
Step 2: Select the Dynamics 365 Entity where the new field is required
- Now go to Components | Entities (expand the entity that you want to create fields).
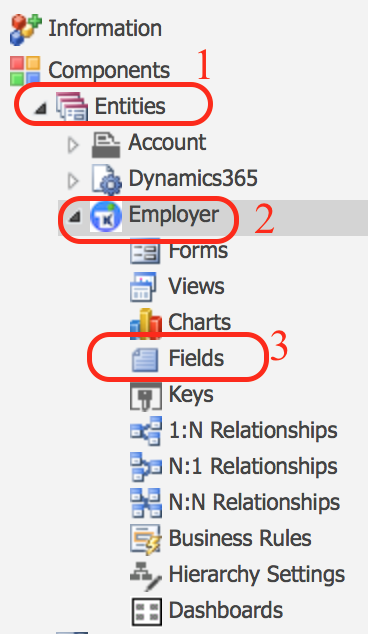
- Click on Fields as shown above.
Choose the correct entity before creating the field. A field created under one entity is not automatically available on another entity. If the same information must appear on related records, you may need a relationship, mapping, calculated field, workflow, Power Automate flow, or plugin depending on the requirement.
Step 3: Create a new field for the selected Dynamics 365 Entity
To create Entity fields in Dynamics 365, Navigate to actions toolbar and click on New button,
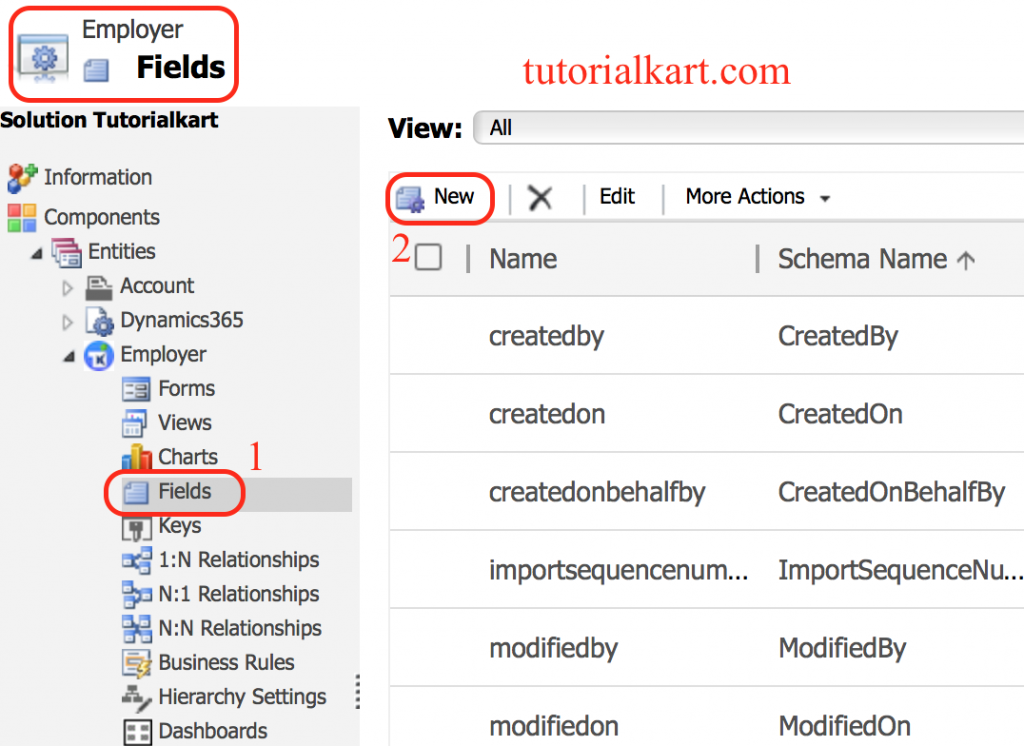
Now a new form will be opened. Enter a Display Name, Field Requirement, Name, searchable, Field security options as shown below.
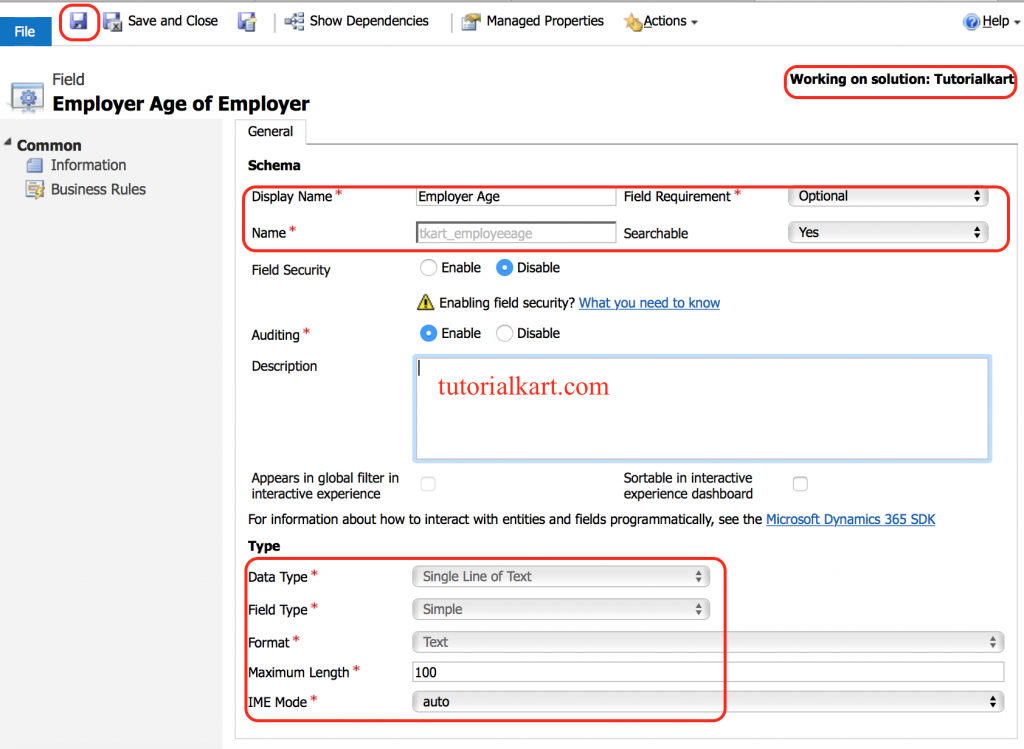
As shown above, we are going to create Employee Age field in Employer entity.
- Enter Display name to generate name.
- Field Requirement, select whether it’s optional, recommended, or required.
- Searchable, select whether to include this field in the list of fields shown in Advanced Find for this entity and also in the field available for customizing the find columns in the Quick Find view and the Lookup view.
- Field Security, enable or disable the feature for this field. More information:
- Enable or disable security for a field.
- For Auditing, enable or disable the feature for this field.
- Select data type as single line of text or Option set or two options or Image.
- Enter fields type as simple or calculated.
- Enter maximum length value.
- Select IME Mode as auto, active, inactive or disabled.
- Now click on Save button
Choosing the right Data Type for a Dynamics 365 Entity field
The Data Type decides how Dynamics 365 stores, validates, and displays the value. Pick the type based on the value you need to capture, not only based on how the field looks on a form.
| Data Type | Use it for | Example |
|---|---|---|
| Single Line of Text | Short text values such as codes, names, and references. | Employee Code |
| Multiple Lines of Text | Longer notes or descriptions. | Internal Comments |
| Whole Number | Integer values without decimals. | Employee Age |
| Decimal Number | Values that need decimal precision. | Rating Score |
| Currency | Money values that should use currency behavior. | Monthly Salary |
| Date and Time | Date-only or date-time information. | Joining Date |
| Two Options | Yes/No style values. | Is Active |
| Option Set | A fixed list of choices. | Employment Type |
| Lookup | A relationship to another entity record. | Department |
After a field is created and used, changing its data type may not be possible without creating a new field and migrating data. Decide the type, requirement level, and security behavior before users start entering values.
Step 4: Save and publish the new Entity field in Dynamics 365
After saving the field we have to publish all the customizations, click on publish all customizations icon present on the action tool bar. Likewise we can create any number of Entity fields in Dynamics 365.
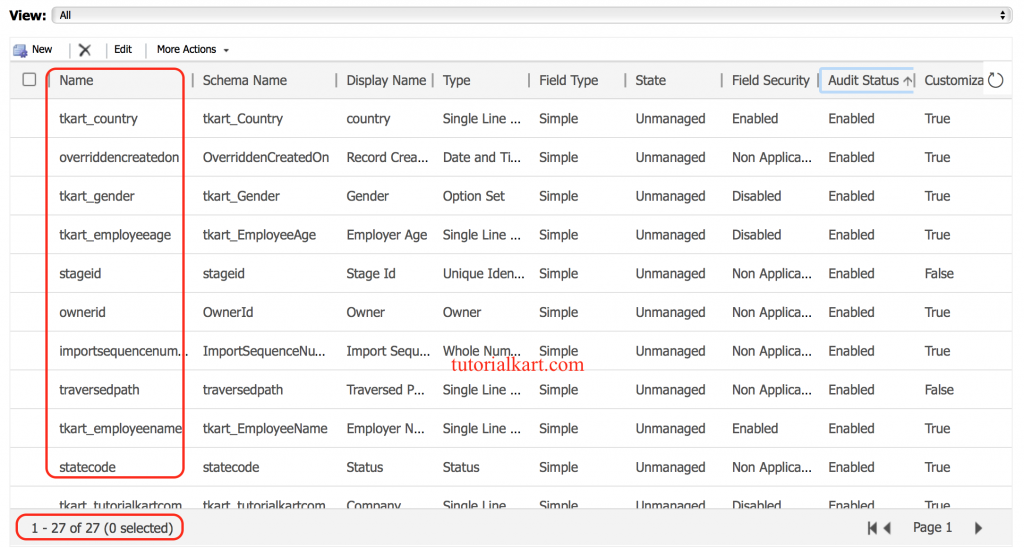
Publishing makes the metadata changes available to users. If the field is saved but not published, some users may not see it in the application immediately.
Step 5: Add the custom Entity field to Dynamics 365 forms and views
Creating the field stores the metadata, but users normally need the field on a form or view before they can work with it. Open the entity form editor and drag the new field to the correct section. Then update the required views if the field should appear in lists or search results.
- Add the field to the main form if users must enter or review it on the record.
- Add the field to Quick Create forms if records are created through Quick Create.
- Add the field to views if users need it in record lists.
- Include the field in Quick Find columns only when it helps users search records.
- Publish the form and view changes after editing them.
Entity field mapping and related records in Dynamics 365
Field mapping is useful when data should be copied from one related record to another during record creation. For example, a value from a parent record can be mapped to a child record if the relationship and field types support mapping. Field mapping does not continuously synchronize values after the record is created. If the source value changes later, use a process, flow, workflow, plugin, or calculated/rollup design based on the requirement.
When importing custom entities and related data, create fields and relationships first, confirm lookup columns, and then import records in an order that respects dependencies. This reduces lookup failures during data import.
Common mistakes while creating Entity fields in Dynamics 365
- Creating a field directly in the default solution when the change should be moved through a managed release process.
- Choosing Single Line of Text for values that should be numbers, dates, currencies, choices, or lookups.
- Making a field Business Required before checking all record creation paths.
- Forgetting to add the field to the required form after creating it.
- Forgetting to publish customizations after saving the field, form, or view.
- Using field-level security without confirming which security profiles need read, update, or create access.
FAQs on creating Entity fields in Dynamics 365
How do I create entity fields in Dynamics 365?
Go to Settings | Customizations, open Customize the System, expand the required entity, select Fields, and click New. Enter the display name, data type, requirement level, security, and auditing options. Save the field and publish customizations.
Why is my new Dynamics 365 Entity field not visible on the form?
A field is not automatically placed on all forms. Open the entity form editor, add the field to the required form section, save the form, and publish customizations.
Can I change the data type of a Dynamics 365 field after creating it?
Some field settings are locked or limited after creation, especially after data exists. If the data type is wrong, you may need to create a new field, migrate values, update forms and views, and retire the old field.
What is the difference between Entity fields and Dataverse columns?
In older Dynamics 365 customization screens, data attributes are commonly called entity fields. In modern Dataverse terminology, entities are tables and fields are columns. The purpose is the same: storing values for records.
Should field security be enabled for every custom field in Dynamics 365?
No. Enable field security only for fields that need restricted read, create, or update access. After enabling it, configure the related field security profiles for the users or teams that need access.
QA checklist for this Dynamics 365 Entity fields tutorial
- The tutorial keeps the older Dynamics 365 term “Entity fields” while explaining the modern “columns” terminology.
- The steps cover navigation from Settings | Customizations to Components | Entities | Fields.
- The Employee Age example uses a suitable numeric field type.
- The article explains that creating a field is separate from adding it to forms and views.
- The publish customization step is included after field, form, and view changes.
- The FAQ answers the search-intent question “how to create entity fields in Dynamics 365?” directly.
Conclusion: Creating custom Entity fields in Dynamics 365
Creating Entity fields in Dynamics 365 starts with selecting the correct entity, clicking New under Fields, choosing the correct data type and field options, saving the field, and publishing the customization. To make the field useful for users, add it to the required forms and views, and confirm security, search, and auditing settings before moving the change to another environment.