How to create Entity Forms in Dynamics 365?
Entity Forms in Dynamics 365 define how users view, enter, and update information for an entity record. In the classic Dynamics 365 Customer Engagement customization area, an entity form lets you arrange fields, tabs, sections, sub-grids, quick view controls, web resources, IFRAMEs, and other controls so that the record screen matches the business process.
In older Dynamics 365 terminology, the data object is called an entity. In newer Microsoft Power Platform and Dataverse terminology, the same concept is commonly called a table. This tutorial uses the classic Dynamics 365 term “entity forms” because the screenshots and navigation belong to the classic customization experience.
In Microsoft Dynamics 365, we can create 4 type of forms they are : Main form, Quick view form, Quick create form and Card form.
Dynamics 365 entity form types used for records
Before creating a form, choose the correct Dynamics 365 form type for the user experience you want to build.
| Form type | Where it is used in Dynamics 365 | Best use |
|---|---|---|
| Main form | Full record page | Primary data entry, record editing, business process work, and detailed record review. |
| Quick Create form | Quick create panel | Creating a record with only the most important fields. |
| Quick View form | Embedded read-only view from a related record | Showing selected fields from a lookup record without opening that record. |
| Card form | Compact cards in selected app experiences | Showing a small summary of a record in a card-style layout. |
This tutorial focuses mainly on creating and designing a Main form, because it is the form type most commonly used when users open a Dynamics 365 record.
Before creating an entity form in Dynamics 365 customization area
Make sure that the entity already exists and that you have the required customization permissions. If the field that you want to place on the form does not exist yet, create the field first and then add it to the form layout. For a custom entity example, see how to create an entity in Microsoft CRM.
- Work in an unmanaged solution when you are still developing the form.
- Use clear form names, such as Account – Sales Main Form, if the entity has multiple forms.
- Keep only necessary fields on the form, because crowded forms are harder for users to complete.
- After saving changes, always publish customizations and test the form with the right security role.
Create a Main form for an entity in Dynamics 365
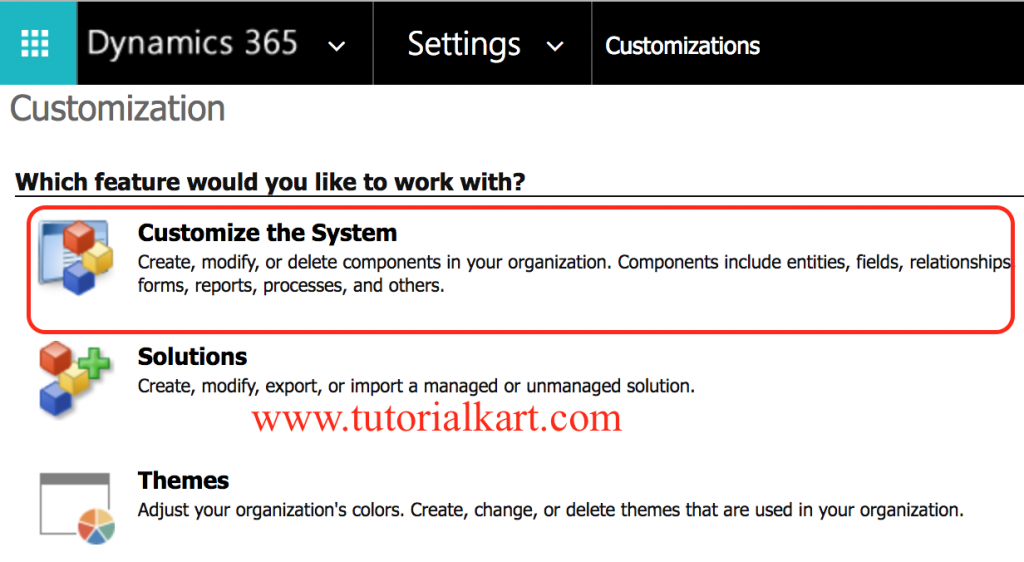
To create entity forms in Dynamics 365, navigate to Settings | Customizations | Customize the System.
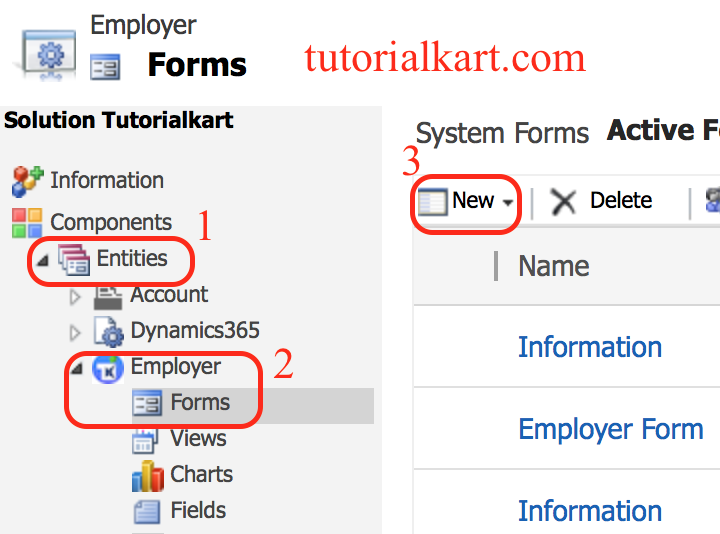
- Navigate to Components | Entities (expand entity) | Forms | New | Main form.
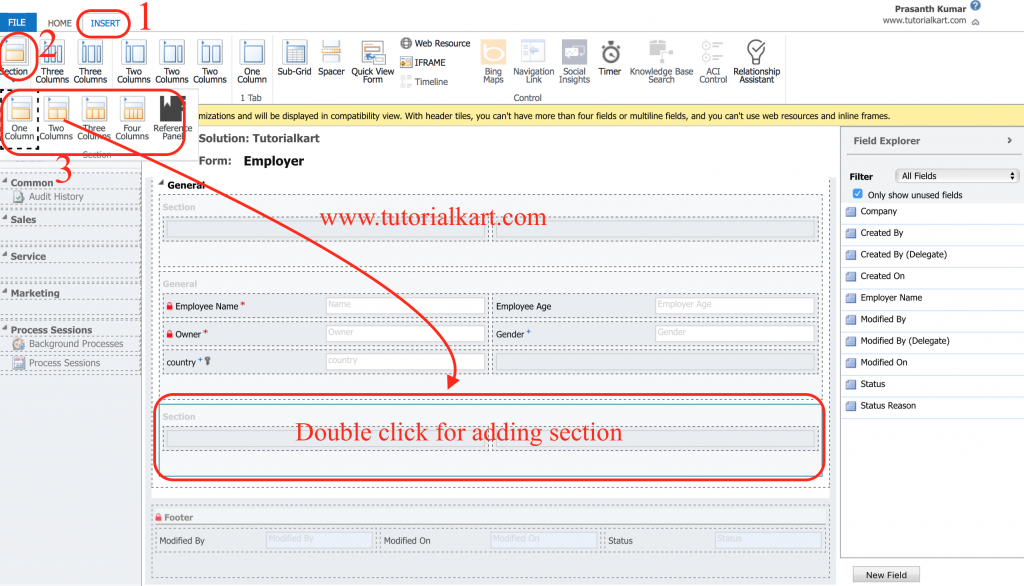
After you choose New | Main form, Dynamics 365 opens the form editor. From the form editor, you can add tabs with one, two, or three columns, and each column can have one or more sections. Every time you add a new tab, you also get at least one new section inside the new tab. In main form, we can add, remove and move tabs, sections, fields, IFRAMES, Bing Maps.
A practical layout normally starts with a summary tab at the top, followed by sections for contact information, business details, related records, and notes. Keep the most frequently updated fields near the top of the form so that users do not need to scroll through the whole record for routine work.
Adding and Removing Sections in Dynamics 365 forms
Sections are used to group controls for related fields. The sections must be within a tab. To add a new section, click the buttons on the Insert tab under the Section group. When you double-click the new added section, the Section Properties dialog appears as shown below.
After adding section group in the main form, now double click on the section to modify the section’s properties.
- Now click on display to enter name, label, Section width.
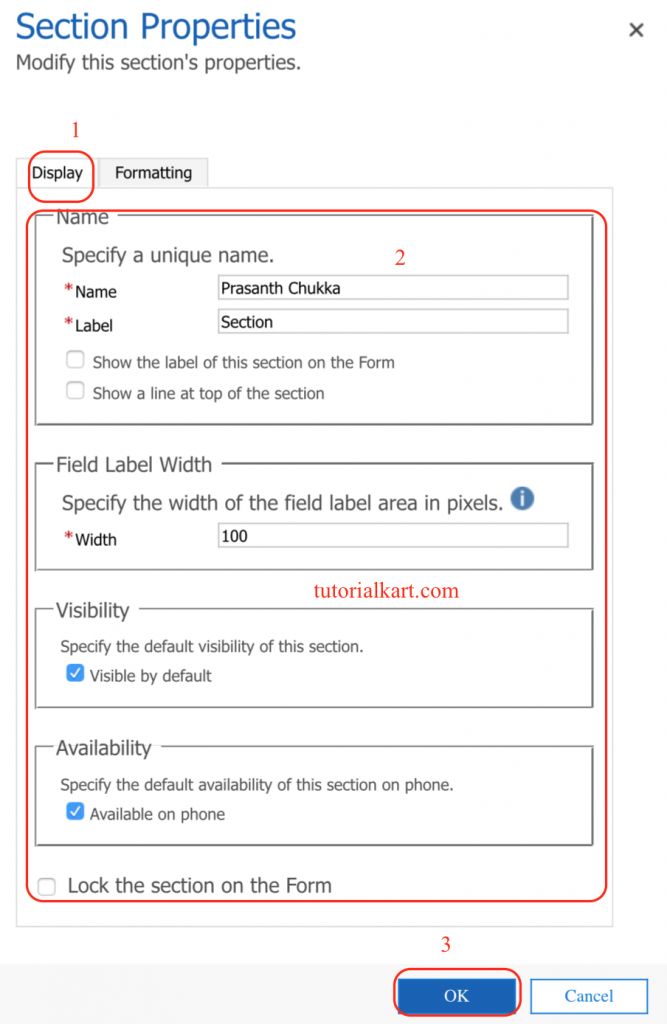
- Now click on Ok button.
To select options such as the number of columns to display data click on Formatting tab as shown below.

- Select the number of columns in sections and select field label alignment.
Use section labels that explain the data inside the section. For example, use Primary Contact Details instead of a vague label such as General. A clear label helps users scan the Dynamics 365 form quickly, especially when the record contains many fields.
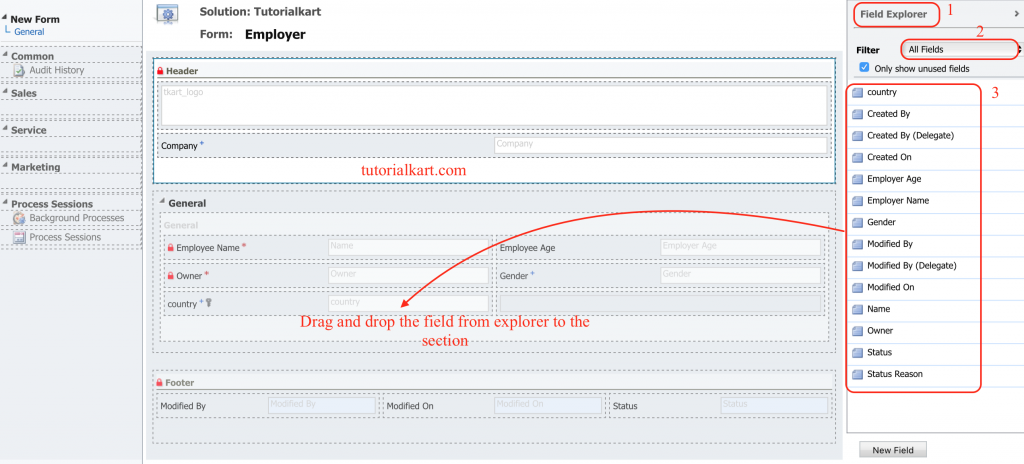
How to add Entity fields to a Form in Dynamics 365?
Fields are used to display the entity fields with input controls. We have to create a custom entity field to add an input control for that field to allow users to create record in Dynamics 365.
To add Entity fields to a Form in Dynamics 365, select the fields from the field explorer list and drop it to the section or tab where you want to add.
When adding fields to the entity form, check whether the field should be required at the business level, whether it should be read-only on the form, and whether it should appear on mobile. Field placement should match the user workflow. For example, a salesperson opening an Account form should see account name, phone, owner, status, and key relationship fields before less frequently used administrative fields.
Configure Dynamics 365 form properties, events, and security
After placing tabs, sections, and fields, review the form properties before publishing. Form properties control the form name, form libraries, event handlers, display behavior, and some record-level options. In a production implementation, these settings are as important as the visible layout.
- Form name: Use a name that tells administrators who should use the form.
- Form order: If an entity has multiple forms, set the form order so the right form opens first.
- Security roles: Enable the form only for the roles that should use it.
- Business rules: Use business rules for simple show, hide, require, and set-value logic where possible.
- JavaScript libraries: Use scripts only when the behavior cannot be handled by standard form features.
If a field is not visible to a user after the form is published, check both the form layout and security. Field-level security, security roles, app access, and form assignment can all affect what the user sees.
Create a Quick Create form in Dynamics 365 for faster record entry
A Quick Create form is useful when users need to create a record without opening the full main form. It should contain only the required fields and the fields needed to create a meaningful record. To create one, go to the entity forms area and choose New | Quick Create Form, then add the required fields and publish the customization.
- Keep the quick create form short.
- Add required fields that prevent incomplete records.
- Avoid sub-grids and heavy custom controls on quick create forms.
- Test the form from the actual lookup or command where users will create the record.
Create a Quick View form in Dynamics 365 to show lookup record details
A Quick View form displays selected information from a related record. For example, an Opportunity form can show a few Account details from the selected customer record. Quick View forms are read-only in the parent form, so they are best for reference information rather than data entry.
To use a Quick View form, first create the quick view form on the related entity. Then open the main form where you want to display it and insert a quick view control connected to the lookup field. Save and publish the form after confirming that the lookup relationship is correct.
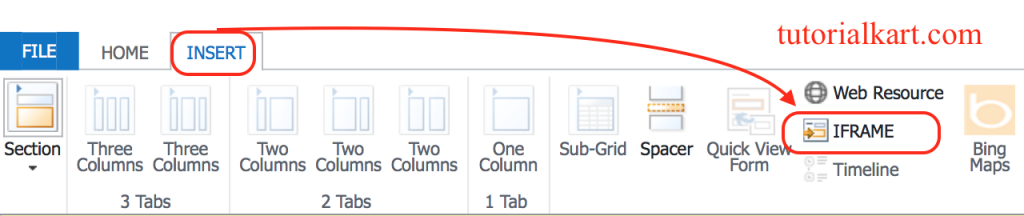
How to add IFRAMES to Entity form sin Dynamics 365?
You can use IFRAMEs to display custom applications or pages inside a form. Doing so is extremely helpful when you want to show content from external applications or when you need to use advanced input/output controls that are not included in the CRM controls toolset.
- Navigate to Insert | IFRAME
- When you click the IFRAME button, you get the Add an IFRAME dialog and enter name for the IFRAME and URL for the application. As below we have enter tutorialkart.com as URL.
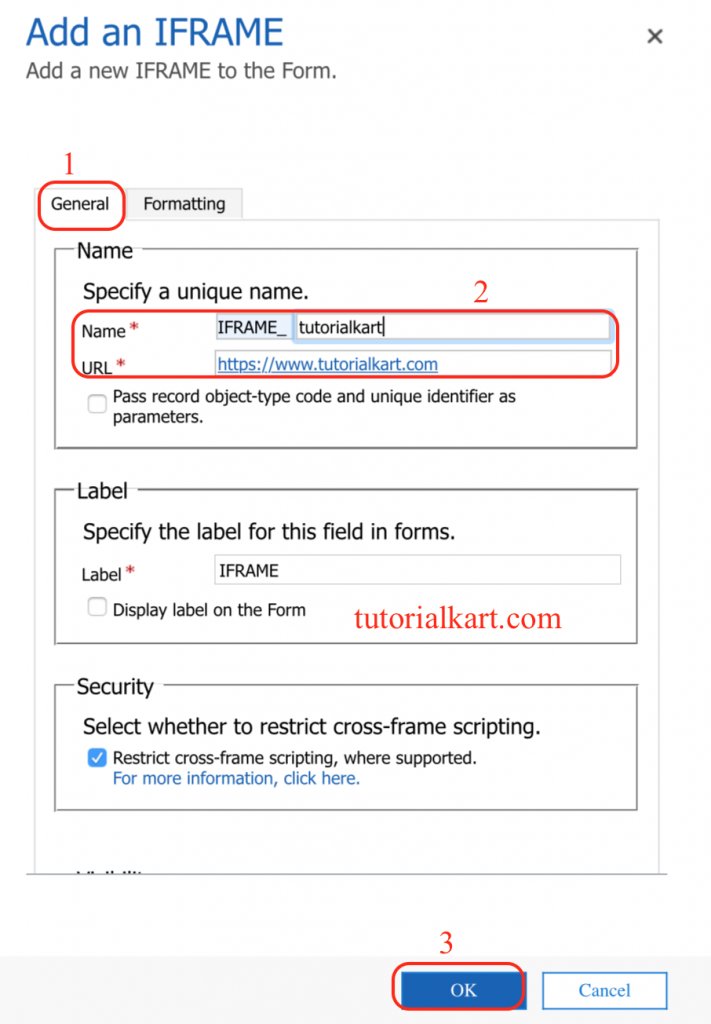
- Finally click on OK button.
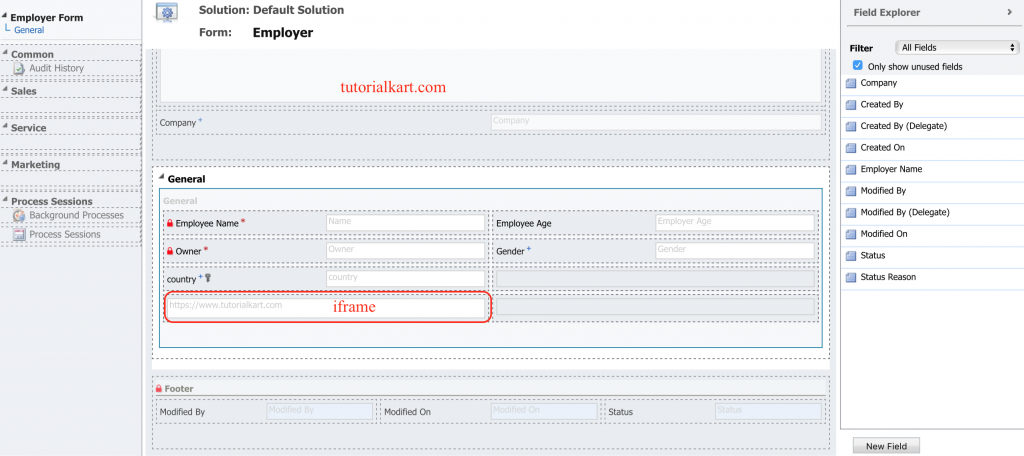
- Finally click onSave button and publish all the customizations.
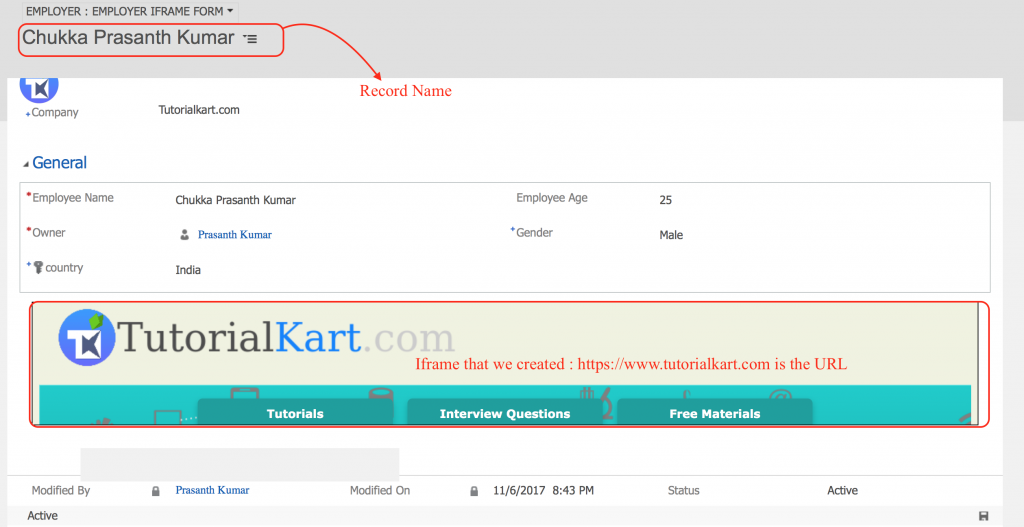
Output :
After publishing, open a record for the entity and confirm that the new form appears as expected. If there are multiple main forms for the same entity, use the form selector to switch between them and check whether the form order and role assignment are correct.
Save and publish Dynamics 365 entity form customizations
Saving the form stores the design changes, but users do not see those changes until the customization is published. After you finish editing the entity form, click Save, then click Publish or use Publish All Customizations if several related changes were made.
- Open the form as a user with the target security role.
- Create a new record and update an existing record to test both scenarios.
- Check required fields, hidden fields, quick view controls, and IFRAME loading.
- Test the form in the model-driven app where users actually work.
- Export the solution after validation if the change must move to another environment.
Common issues when a Dynamics 365 entity form does not appear
If the new entity form is saved but not visible to users, the problem is usually related to publishing, form order, app inclusion, or security roles. Use the checks below before recreating the form.
| Issue | Likely reason | What to check |
|---|---|---|
| Form changes are not visible | Customization was saved but not published | Publish the form or publish all customizations. |
| User cannot see the form | Security role restriction | Check form security roles and user role assignment. |
| Wrong form opens first | Form order is not set correctly | Move the preferred form higher in form order. |
| Fields do not appear | Field was not added, hidden, or restricted | Check form layout, field visibility, and field-level security. |
| IFRAME is blank | URL, browser, or security restriction | Check the URL, HTTPS usage, and whether the external page allows embedding. |
Editorial QA checklist for this Dynamics 365 entity forms tutorial
- Does the tutorial clearly distinguish Main, Quick Create, Quick View, and Card forms?
- Does every step match the classic Dynamics 365 customization navigation shown in the screenshots?
- Are entity fields, sections, tabs, and IFRAME instructions explained in the correct order?
- Does the article warn users to save, publish, and test form changes with the correct security role?
- Are older “entity” terms explained alongside newer Dataverse “table” terminology without changing the original tutorial context?
FAQs on creating Entity Forms in Dynamics 365
How do I create forms in Microsoft Dynamics 365?
To create a form in classic Dynamics 365, go to Settings | Customizations | Customize the System, expand the entity, open Forms, and choose the form type such as Main form, Quick Create form, or Quick View form. Design the form, save it, and publish the customization.
What is the difference between a Main form and a Quick Create form in Dynamics 365?
A Main form is the full record form used for detailed viewing and editing. A Quick Create form is a smaller form used to create a record quickly with only essential fields. Quick Create forms should be kept short and should not replace the full main form.
How do I add fields to an entity form in Dynamics 365?
Open the entity form editor, select the required field from the field explorer, and drag it into the correct tab or section. If the field is not available, create the field on the entity first, then return to the form editor and add it to the layout.
Why is my new Dynamics 365 form not visible to users?
The form may not be published, the user may not have the required security role, the form may not be included in the app, or another form may be higher in the form order. Check publishing, form security, app designer settings, and form order.
Can I use an IFRAME inside a Dynamics 365 entity form?
Yes, an IFRAME can display an external page or application inside a Dynamics 365 form. Use it carefully because browser security, HTTPS settings, and the external page’s embedding policy can affect whether the content loads correctly.