 TutorialKart.com
A workflow in Dynamics 365 is a process automation that runs a defined set of steps when a record is created, updated, assigned, deleted, or when a user runs the process manually. In the classic Dynamics 365 Customer Engagement and Dataverse process designer, workflows are commonly used to send emails, update records, assign records, create related records, and apply business rules without writing plug-in code.
This tutorial explains what a workflow is in Dynamics 365, how asynchronous and real-time workflows differ, and how to create a sample Student Welcome Email workflow. The screenshots in this page use the classic Dynamics 365 workflow designer. For new automation work, Microsoft also recommends reviewing Power Automate flows because many modern Dynamics 365 environments use Power Automate for cloud-based automation. You can compare the current Microsoft guidance here: Dataverse real-time workflows and replace classic workflows with flows.
- What is Workflow in Dynamics 365?
- Types of workflows in Dynamics 365
- Asynchronous workflows in Dynamics 365
- Real-time synchronous workflows in Dynamics 365
- Common Dynamics 365 workflow patterns
- Creating a workflow in Dynamics 365.
- Dynamics 365 workflow FAQ
What is a workflow in Dynamics 365?
A workflow in Dynamics 365 is a series of functions or methods, called steps, that are performed sequentially. The Workflow can change the processing direction by using conditionals, referred to as conditional branches.
A workflow is an excellent tool for managing both data and processes. Using workflow rules in Dynamics 365, we can easily ensure that certain steps are followed and that required business processes are executed. Workflow in Dynamics 365 are two types : Asynchronous workflows and Real-time (synchronous) workflows.
In practical use, a Dynamics 365 workflow answers three questions: what event should start the process, which table or entity should the process run on, and which steps should be completed after the process starts. For example, a workflow can start when a Student record is created, wait for two minutes, check a condition, and then send a welcome email to the student.
Types of workflows in Dynamics 365: asynchronous and real-time
The most important workflow choice in Dynamics 365 is whether the process should run in the background or immediately. This setting affects user experience, error handling, and when the automation result appears on the record.
| Workflow type in Dynamics 365 | How it runs | Best used for |
|---|---|---|
| Asynchronous workflow | Runs in the background after the platform has accepted the operation. | Email notifications, non-urgent updates, follow-up tasks, and processes that do not need to block the user. |
| Real-time workflow | Runs immediately in the event pipeline, either before or after the main operation depending on the trigger. | Validations, immediate record updates, and process logic where the user should see the result straight away. |
If the workflow is not time-critical, prefer a background workflow. If the workflow must validate or update data as part of the user action, a real-time workflow may be more suitable. For new projects, also check whether a Power Automate cloud flow is a better fit for the same business requirement.
Asynchronous workflows in Dynamics 365
Asynchronous workflows in Microsoft Dynamics 365 uses windows service to act as a host application for the workflow engine to work. This Asynchronous workflows must be running ton the Windows CRM server, otherwise the workflow won’t execute.
In a Dynamics 365 online or Dataverse environment, you normally think of asynchronous workflows as background processes. They are suitable when the user does not need to wait for the workflow result before continuing work. A welcome email, follow-up task, or simple record update can often be handled as a background process.
When you create a workflow and keep the Run this workflow in the background option selected, the process is configured as an asynchronous workflow. Because it runs in the background, it is easier to avoid blocking the user interface, but the result may not appear instantly.
Real-time Workflow
Real-time workflows in Dynamics 365 are also known as Synchronous workflows. These are defined using the workflow entity records and specifically designed for non developers. They execute using the Event Execution Pipeline, much like plug-ins, and they can be executed pre-operation, post-operation, or during the core operation. Also, as with plug-ins, you cannot execute a real-time workflow before the Create operation or after the Delete operation.
- Real-tine Workflows cancel and roll back the core platform opertaions.
- Real-tine Workflows can be converted to Asynchronous workflows and vice-versa.
A real-time workflow should be used carefully because it runs as part of the current operation. If the workflow has an error or cancels the operation, the user may be prevented from saving or completing the action. This behavior is useful for important business validation, but it should not be used for slow or non-essential automation.
Common Dynamics 365 workflow patterns used in business processes
Search results for workflow topics often mention sequential, parallel, rules-driven, and state-based workflows. In the Dynamics 365 classic workflow designer, these ideas usually appear as practical process patterns rather than as separate workflow categories.
| Workflow pattern | How it appears in Dynamics 365 | Example |
|---|---|---|
| Sequential workflow | Steps run in order from top to bottom. | Wait for two minutes, check student details, then send an email. |
| Rules-driven workflow | Conditional branches decide what should happen next. | If the student email field contains data, send the email; otherwise stop or create a task. |
| Parallel business work | Separate workflows or steps support different activities around the same record. | One process sends a welcome email while another creates a follow-up task. |
| State-based process | Status or field values control the next action. | When a record status changes to Approved, assign it to a team. |
For a beginner workflow, keep the process sequential and easy to test. Add conditional logic only when the business rule is clear.
How to create a Workflow in Dynamics 365?
In this Dynamics 365 tutorial, we are going to create a real-time workflow that sends an e-mail to any new students after 2 minutes hours of their records being created. Follow the steps given below to create workflow in Dynamics 365.
The example is named Student Welcome Email. It uses a Student entity, waits for two minutes after the Student record is created, checks the required condition, and sends an email. In your own environment, replace Student with the table or entity used by your Dynamics 365 app.
- Navigate to Settings | Solution (Tutorialkart) | Processes | New.
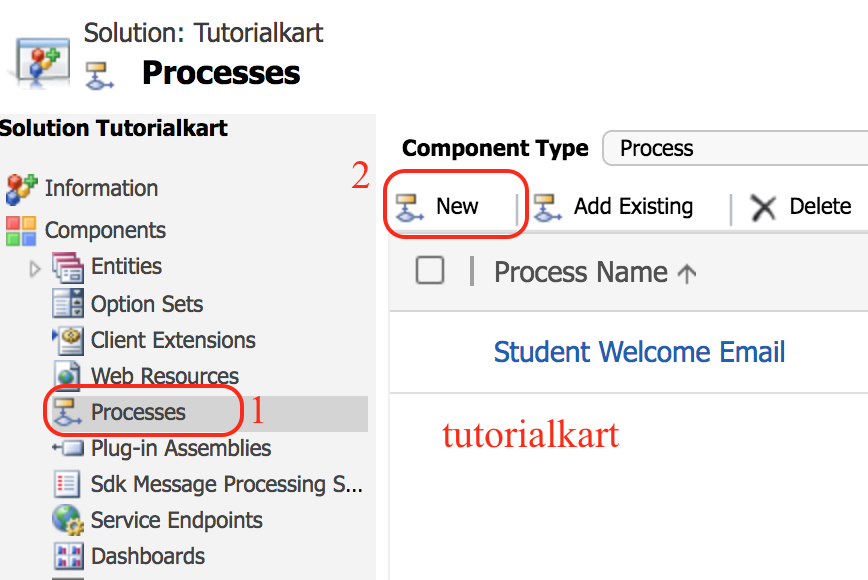
- Click on the New button.
Defining Workflow properties?
The workflow properties identify the process name, category, and entity. These settings matter because a workflow can only run for the selected entity or table.
- Enter process name as “Student Welcome Email“.
- Now select the category as “Workflow” and uncheck the Run this workflow in the background (recommended) checkbox. If this check box is checked, the Workflow in Dynamics 365 will run as an Asynchronous workflow.
- Select the Entity as “Student“.
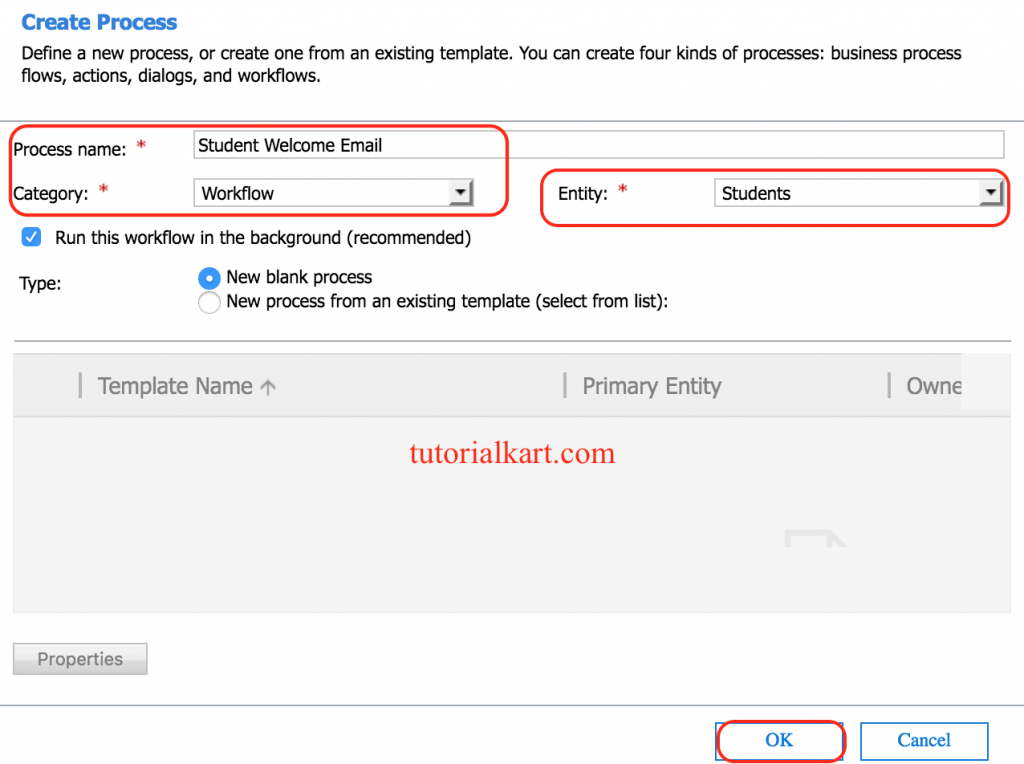
- Now click on Ok button.
Defining the scope of the Workflow
After creating Process in Dynamics 365, now go to the process name and open the process as shown below.
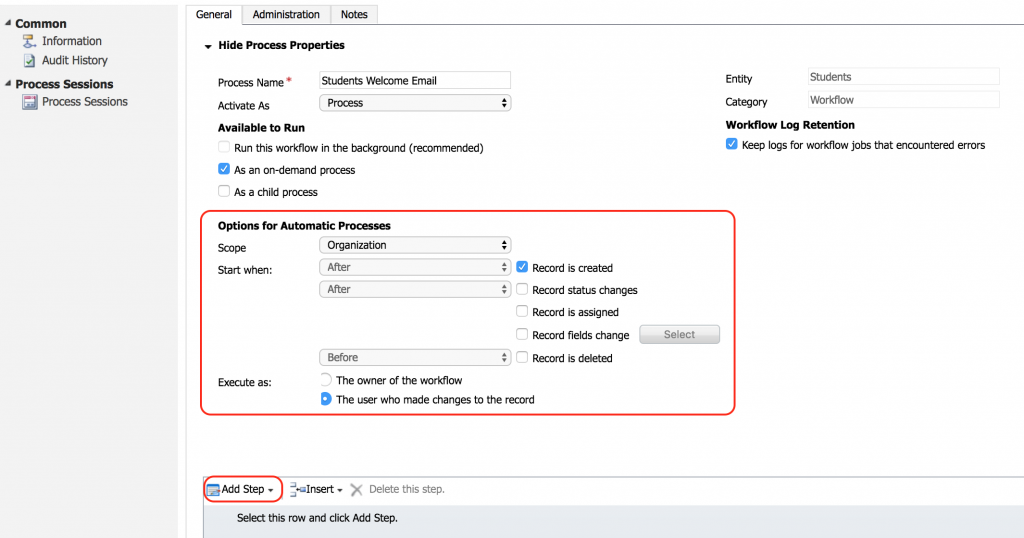
We cannot run Real-time works in Dynamics 365 before records creation or after record deletion, We can select Record is Created and Record Is Deleted options, but we can’t change the start when the drop-down option is in font of them.
Workflow scope controls which records the process can run against. The available scope options can vary by Dynamics 365 version and security configuration, but the idea is the same: a narrow scope limits the workflow to records owned by the user or business unit, while a wider organizational scope can run across more records. Choose the smallest scope that satisfies the business requirement.
| Workflow scope decision | Use this when |
|---|---|
| User-level scope | The workflow should run only for records owned by the user. |
| Business unit-level scope | The workflow should apply within a business unit boundary. |
| Parent-child business unit scope | The workflow should apply across a business unit and its child units. |
| Organization-level scope | The workflow is intended to apply across the full organization. |
Adding Business logic to Workflow in Dynamics 365
In this step, we are going to add business logic to workflow in Dynamics 365 to send an E-mail to students when their record has been created. As shown below click on Add Step | Wait condition.
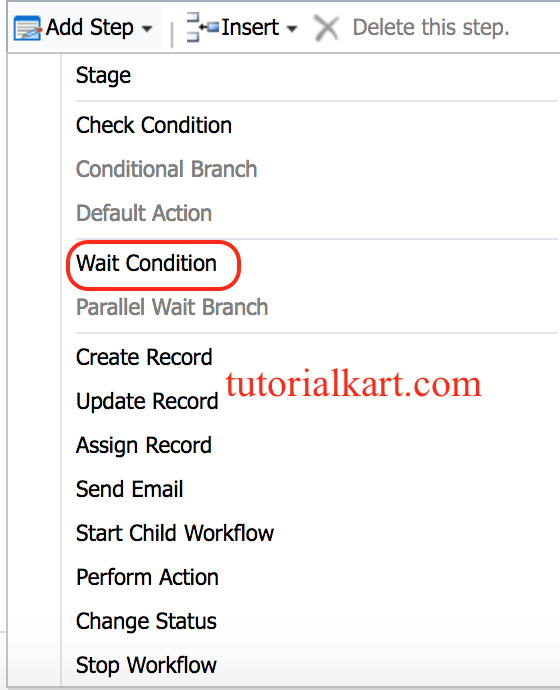
- Click on Wait condition as shown above.
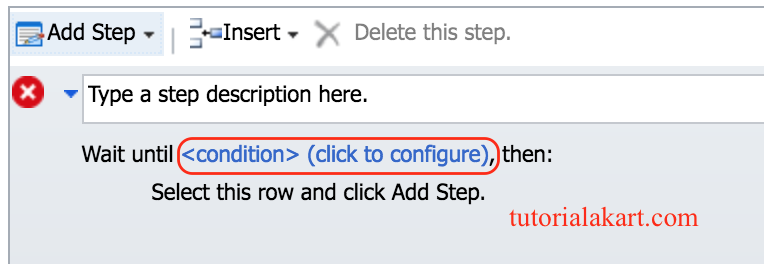
Now we have to add Wait condition, click on <condition> (click to configure) as shown below.
- Click on Select link.
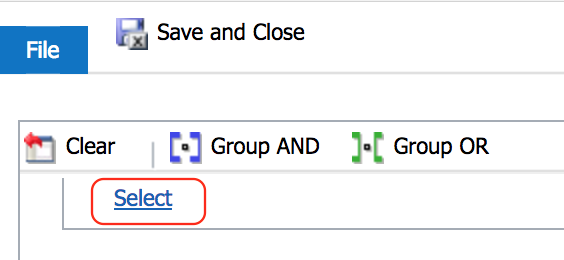
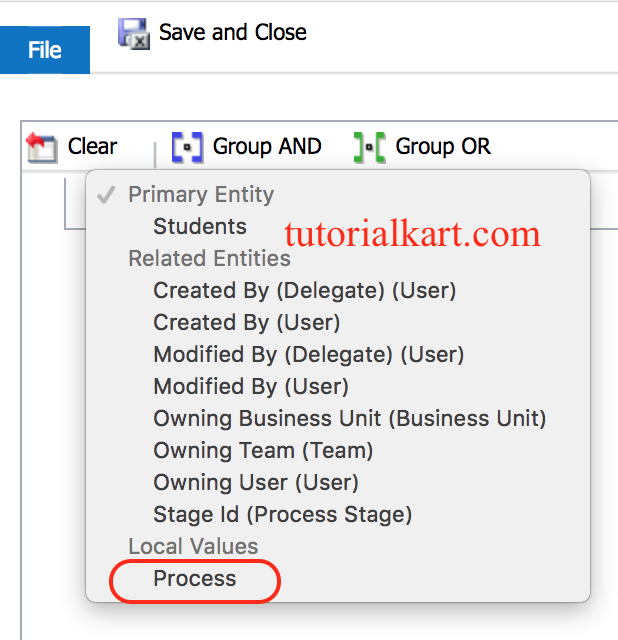
- Select Process in the first column.
- Click on Select to add execution time in the second column.
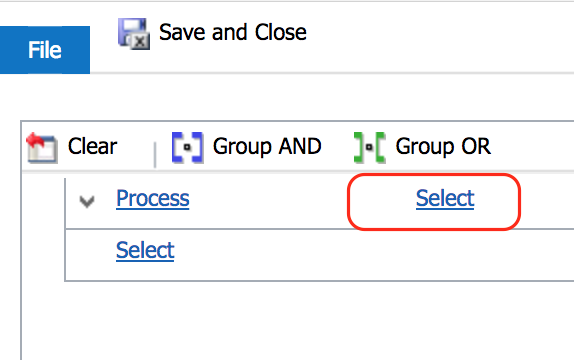
- Select Execution Time in the second column.
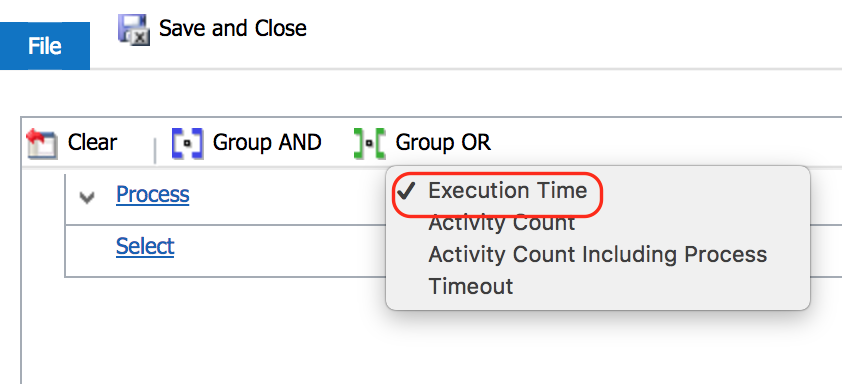
- Click on Select link to add Operator in the third column.
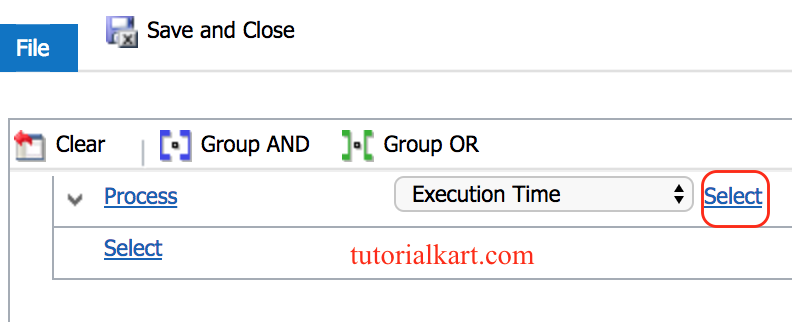
- Select “Equals” in the third column from the drop down list.
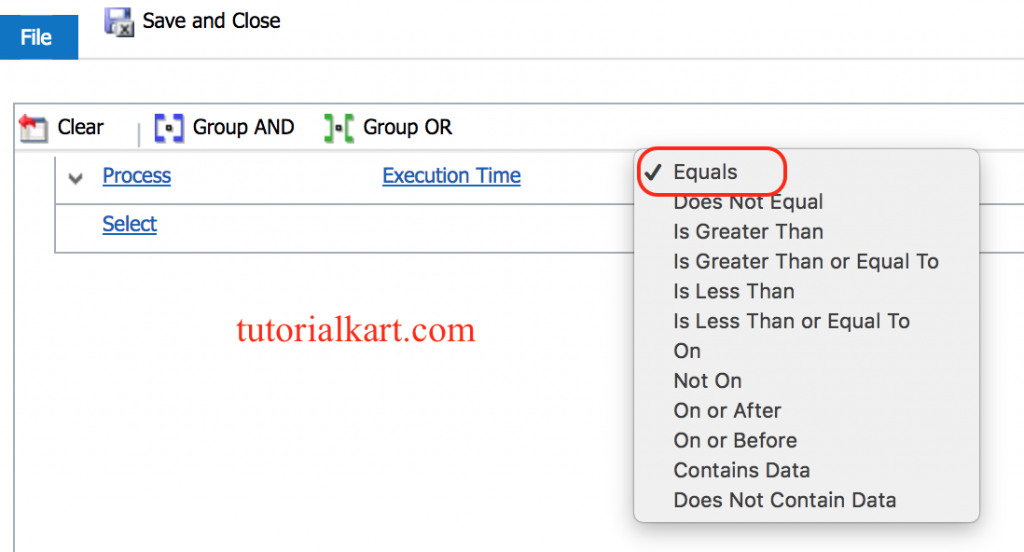
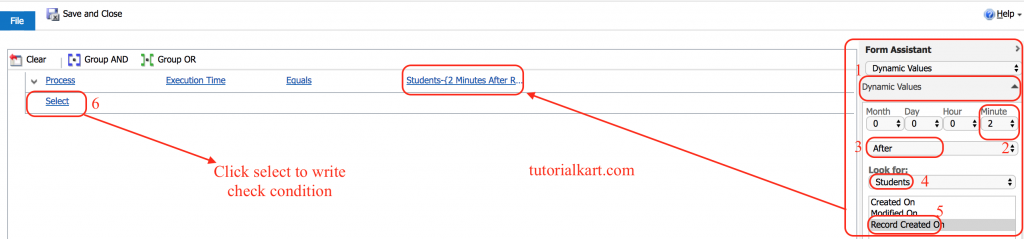
- In the last column, Enter execution value using Form assistance on the right-hand side .
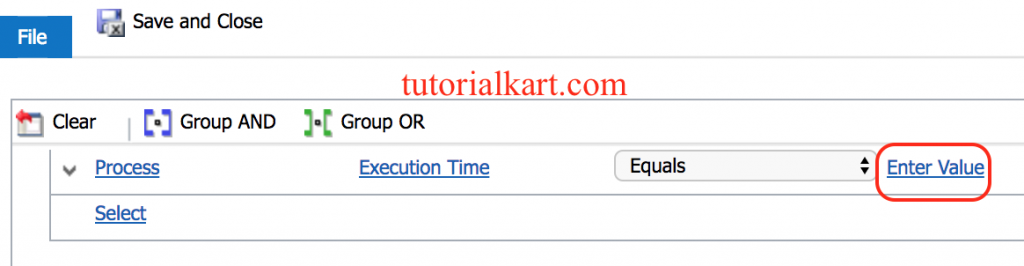
Note : We have to send an E-mail to student wen their new record is created after 2 minutes.
- Select 2 under minutes.
- Select after.
- Select Students entity in Look for process.
- Click on Record Created and the value will be automatically inserted as shown below.
- Click on Save and Close button .
Adding Check condition to Workflow in Dynamics 365
After adding Wait for a Workflow in Dynamics 365, we have to add check condition. To add go back in to your process and click on Select this row and Click Add Step under Wait Condition.
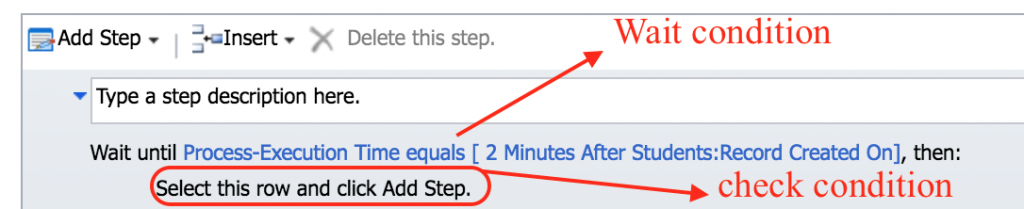
As shown in the above Wait condition add all the steps shown below.
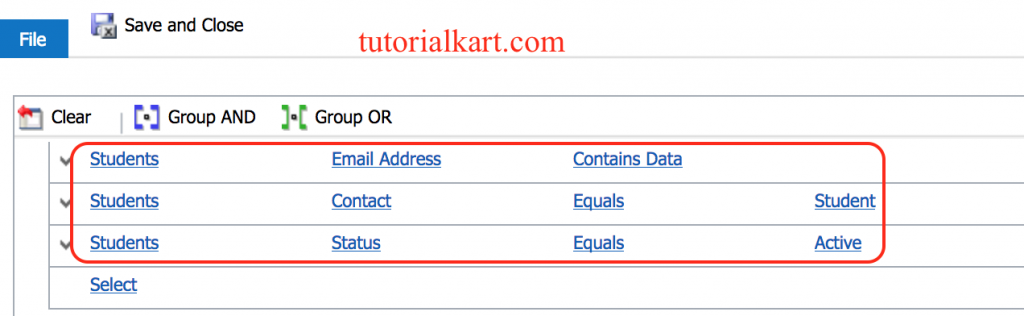
- Click on Save and Close button.
A check condition prevents the workflow from sending an email when the record does not meet the required rule. In this example, you can use the check condition to confirm that the student record has the needed email information before the email step runs.
Adding Email properties to a Workflow
After creating Wait condition and Check Condition, finally we have to Add Step to Send email to students. Navigate to Add Step | Click on Send email.
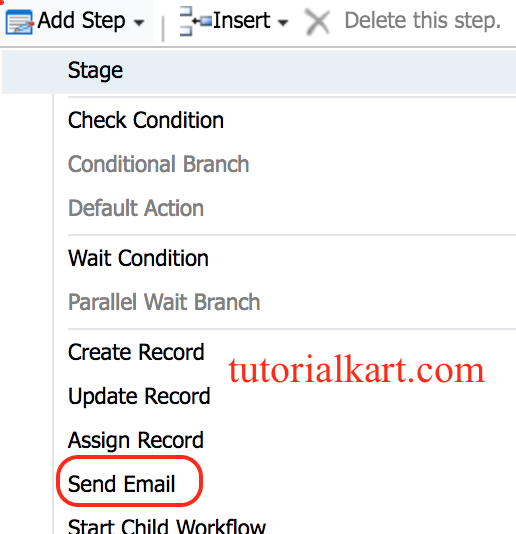
Now a screen will be opened as shown below, Select Create new Message from the drop-down and click on Set Properties.
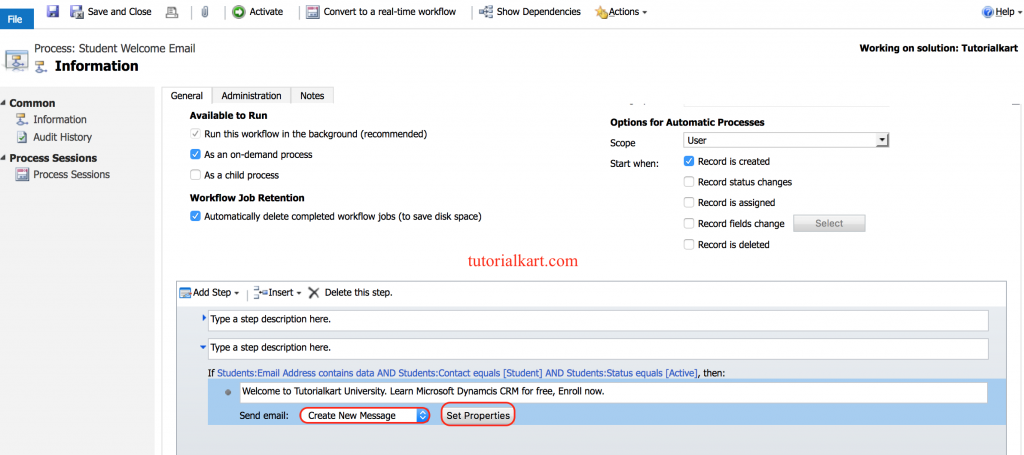
Adding Email details using Form Assistance
- Go to To : using form assistance on the right, select Student under Look for followed by Students on the next drop down.
- Now click on Add button.
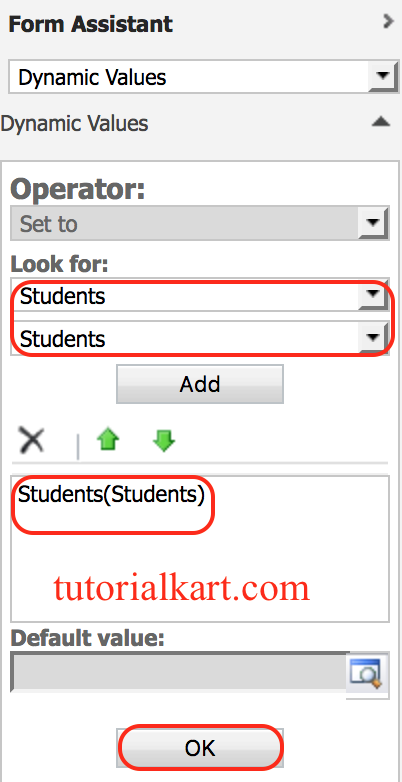
- Finally clic on Ok button.
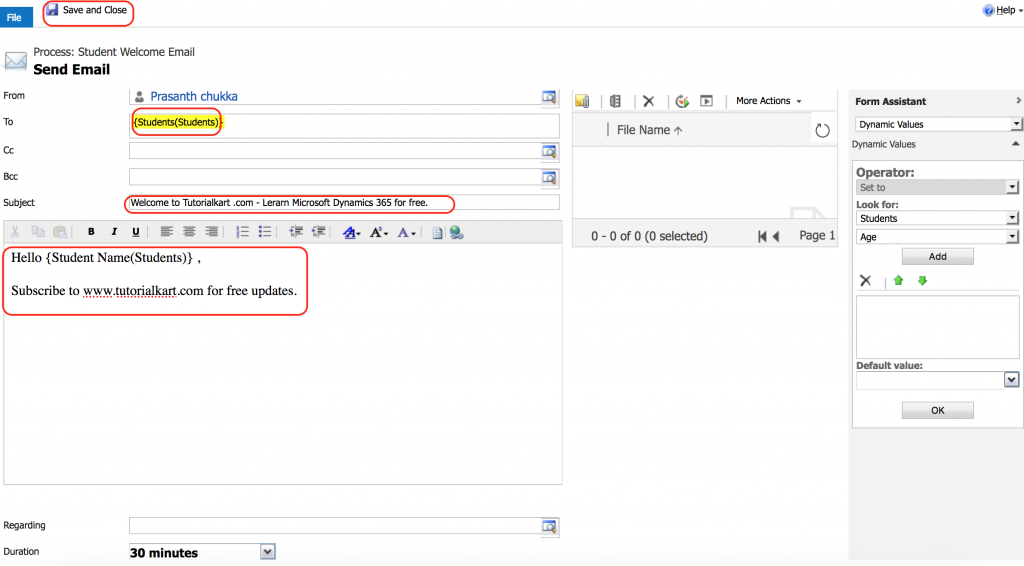
- Enter Email Subject and Enter email body as shown above..
- Finally click on Save and close button.
Before activating the workflow, review the email recipient, subject, and body. If the recipient is built dynamically from the Student record, test with a record that has a valid email address. This avoids a common issue where the workflow runs successfully but no email is delivered because the recipient field is empty or not email-enabled.
How to Activate a Workflow in Dynamics 365?
After successfully creating workflow in Dynamics 365, we have to activate a Student Welcome Email workflow. Navigate Settings | Processes | Click on Activate button.

Now a pop-up window will be opened, showing to confirm the process activation.
- Click on Activate button
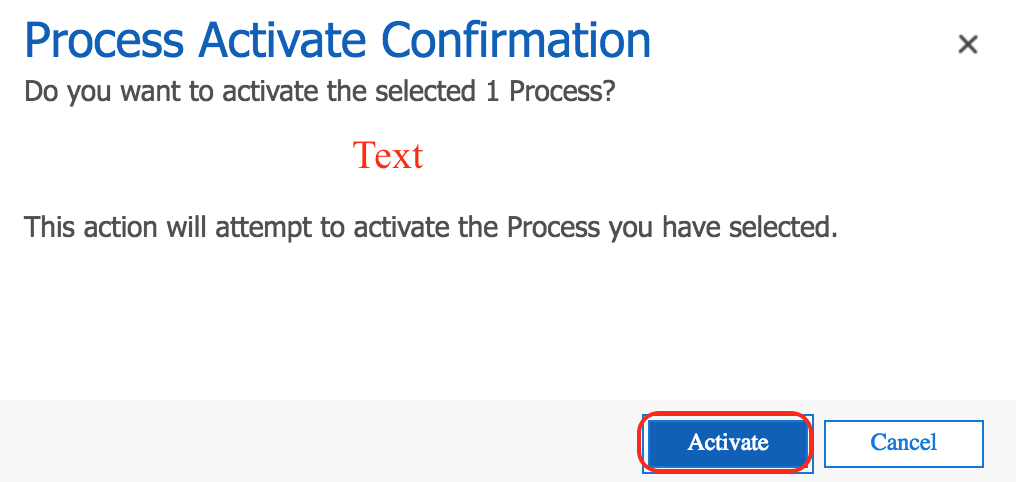
- Finally click on Ok button.
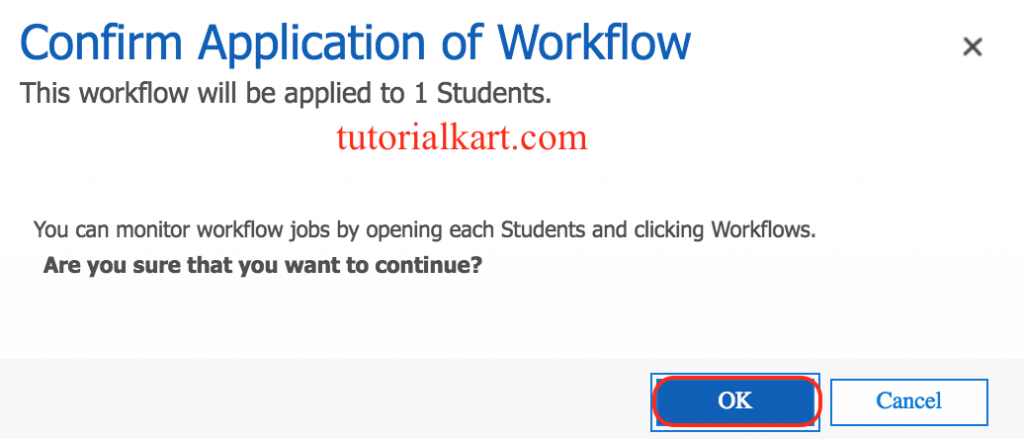
Now the Workflow in Dynamics 365 is activated. When a new student record is created, the Workflow will start waiting. In the above we selected the process as an On-demand process, we have to trigger Workflow manually to send the Welcome email to students.
If you want the workflow to run automatically, confirm the start condition before activation. If the process is configured only as an on-demand process, it must be started manually from the record. If it is configured to start when a record is created, it should trigger automatically when the matching Student record is created.
How to Run Workflow in Dynamics 365?
In this step, we are going to check the working condition of Workflow that we created. Navigate to Student Entity and create a new record.
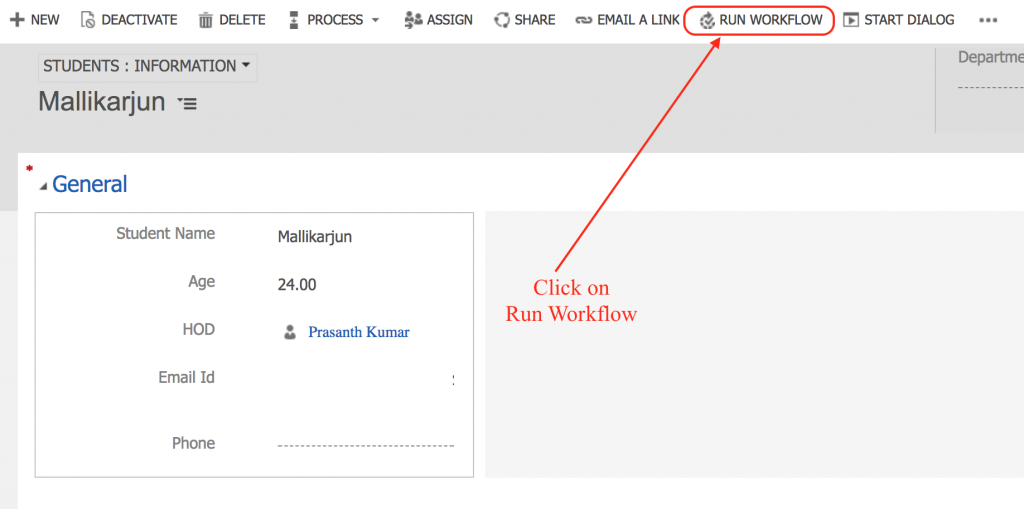
- open the Record and click on Run Workflow.
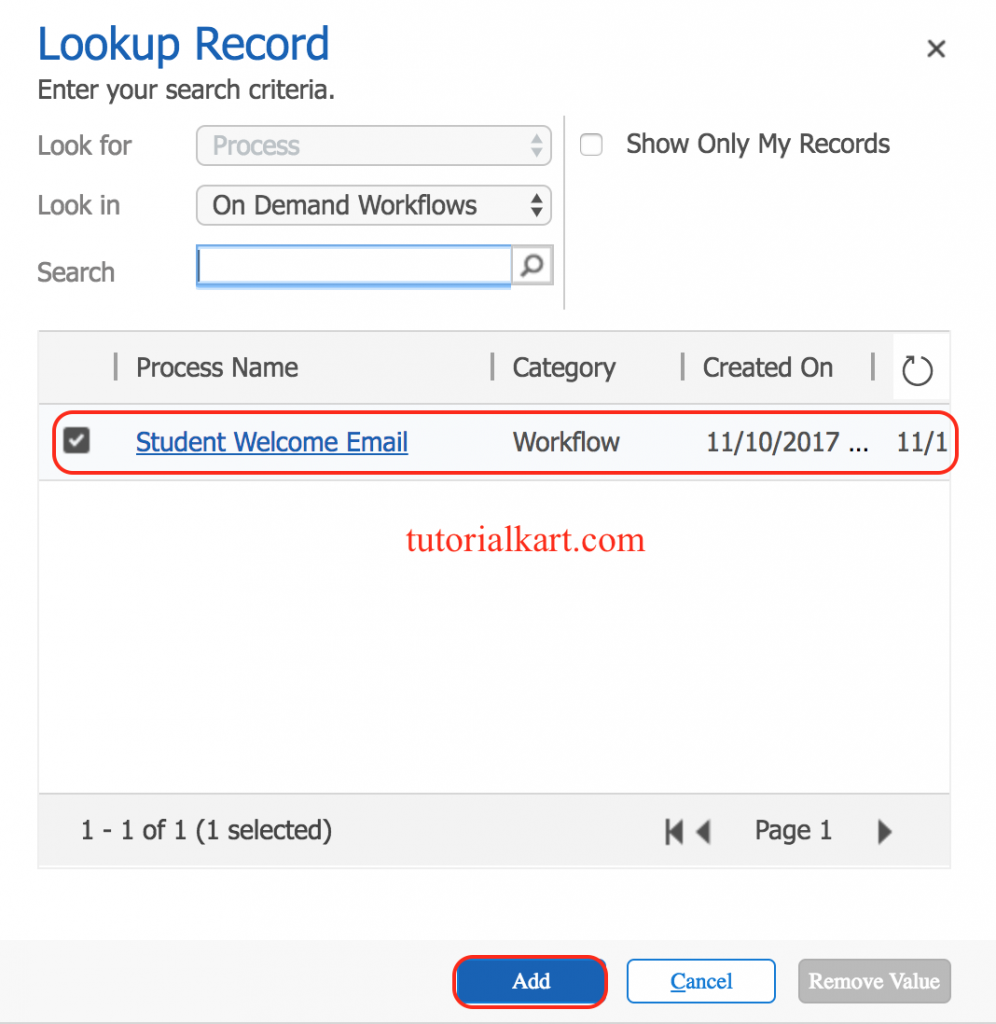
- Select the process name and click on Add button.
- Click on Ok button.
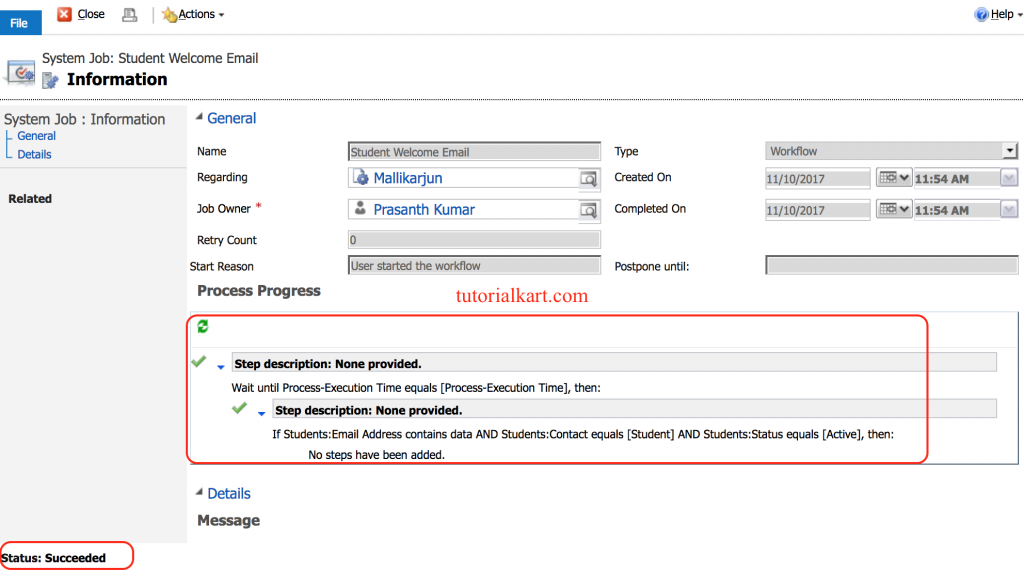
After running the workflow, check the workflow process session or system jobs area if the email does not appear. A completed process session indicates that the workflow logic ran. A waiting, failed, or canceled process session helps you identify whether the issue is with the wait condition, check condition, recipient, permissions, or email configuration.
When to use Dynamics 365 workflow, Power Automate, or plug-ins
Classic Dynamics 365 workflows are still important in many existing systems, especially where real-time workflow behavior is already configured. However, the best automation option depends on the requirement.
| Automation option | Use it when | Avoid it when |
|---|---|---|
| Classic Dynamics 365 workflow | You maintain an existing Customer Engagement or Dataverse process, especially one built in the classic designer. | You are building a new cloud automation that Power Automate can handle more clearly. |
| Power Automate cloud flow | You need modern connectors, approval flows, cloud automation, and easier integration with Microsoft 365 or external services. | You need a specific real-time Dataverse pipeline behavior that a classic real-time workflow or plug-in is designed to handle. |
| Plug-in | You need custom code, complex validation, strict transaction behavior, or developer-controlled execution. | The requirement is simple enough for a workflow or cloud flow. |
Troubleshooting a Dynamics 365 workflow that does not run
If the workflow does not run after activation, check the setup in a structured way instead of recreating the process immediately.
- Confirm that the workflow is activated, not only saved as a draft.
- Check whether it is configured as on-demand only or has an automatic start condition.
- Verify that the workflow entity is the same entity as the record you are testing.
- Check the workflow scope and the owner of the record used for testing.
- Review the wait condition and check condition to make sure the logic can become true.
- Open process sessions or system jobs to inspect failed, waiting, or canceled workflow runs.
- For email steps, confirm that the sender, recipient, and mailbox settings are valid.
Dynamics 365 workflow FAQ
What is a workflow in Dynamics 365?
A workflow in Dynamics 365 is an automation process that performs steps such as sending emails, updating records, assigning records, creating records, or checking conditions when a defined event occurs on a record.
What is the difference between asynchronous and real-time workflow in Dynamics 365?
An asynchronous workflow runs in the background and is better for non-urgent automation. A real-time workflow runs immediately in the event pipeline and can affect whether the current record operation is completed or canceled.
Why is my Dynamics 365 workflow not sending an email?
Common reasons include an inactive workflow, on-demand-only configuration, a false wait or check condition, missing recipient email, mailbox configuration issues, or security permissions. Check the workflow process session or system job details first.
Can I convert a real-time workflow to an asynchronous workflow?
In the classic Dynamics 365 workflow designer, workflows can be configured to run in the background or run in real time. Review the workflow trigger and steps before changing this setting because the timing and user experience will change.
Should I use Power Automate instead of classic Dynamics 365 workflow?
For new automation, Power Automate is often the better option, especially when you need cloud flows, approvals, and connectors. Classic workflows may still be used for existing implementations or specific real-time Dataverse behavior.
Editorial QA checklist for this Dynamics 365 workflow tutorial
- Confirm that the article clearly explains both asynchronous and real-time workflows in Dynamics 365.
- Keep all existing screenshots and image URLs unchanged because they document the original classic workflow designer steps.
- Check that the Student Welcome Email example explains the trigger, wait condition, check condition, email step, activation, and manual run behavior.
- Verify that the article distinguishes classic Dynamics 365 workflows from Power Automate without presenting them as the same feature.
- Ensure the FAQ questions remain specific to Dynamics 365 workflows and do not become generic workflow management questions.
Summary of workflow in Dynamics 365
A workflow in Dynamics 365 automates a business process by running defined steps on a selected entity or table. Asynchronous workflows run in the background, while real-time workflows run immediately as part of the operation. In this tutorial, we created a Student Welcome Email workflow, configured workflow properties, added wait and check conditions, added an email step, activated the process, and tested it from a Student record.