 TutorialKart.com
How to Create and Start a Sprint in a Jira Scrum Board
A sprint is a fixed period in which a Scrum team works on a selected set of issues. In Jira, you first create the sprint in the backlog, add issues to it, enter the sprint details, and then start it. This tutorial walks through the complete process and explains what happens to issues after the sprint begins.
Make sure the Scrum project contains one or more issues before you begin. If the backlog is empty, create issue in JIRA Scrum Board.
Jira Sprint Prerequisites and Permissions
- Open a Jira project that uses a Scrum board. A Kanban board does not use Scrum sprints in the same way.
- Confirm that the project has a backlog and at least one issue that can be assigned to the sprint.
- Make sure your Jira account has permission to manage sprints. If the create or start controls are unavailable, ask a project or Jira administrator to review your permissions.
- Check whether another sprint is already active. Some boards allow parallel active sprints only when that option is enabled.
The screenshots below show an earlier Jira interface. Button placement and labels may differ slightly in newer Jira Cloud or Jira Data Center versions, but the workflow remains the same: open the backlog, create a sprint, add issues, and start it.
Step 1 – Create a Sprint from the Jira Backlog
Log in to Jira, open the required Scrum project, and go to its backlog. Click the Create sprint button. Jira adds an empty sprint container above the backlog issues.
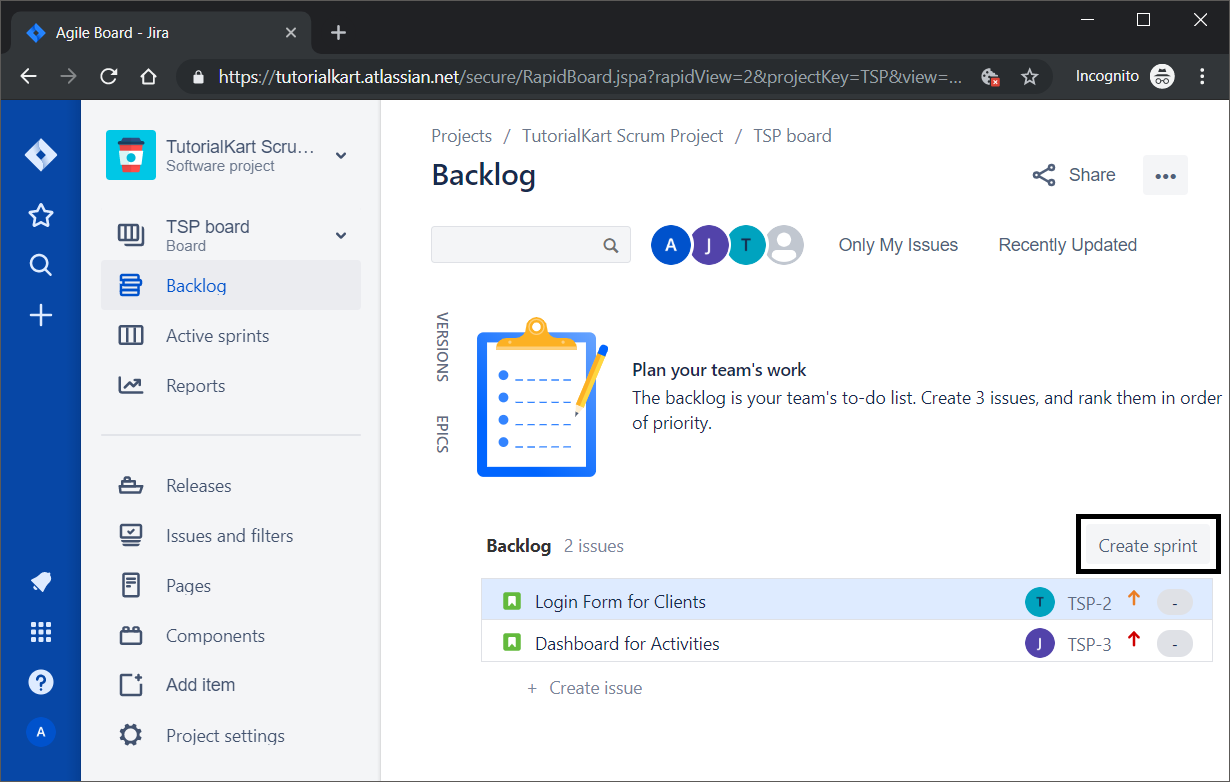
If the button is not visible, confirm that you are viewing the backlog of a Scrum board rather than the active board or a Kanban board.
Step 2 – Add Jira Issues to the New Sprint
After you click Create sprint, the new sprint appears in the backlog as a planning area, shown below as the Plan your sprint box.
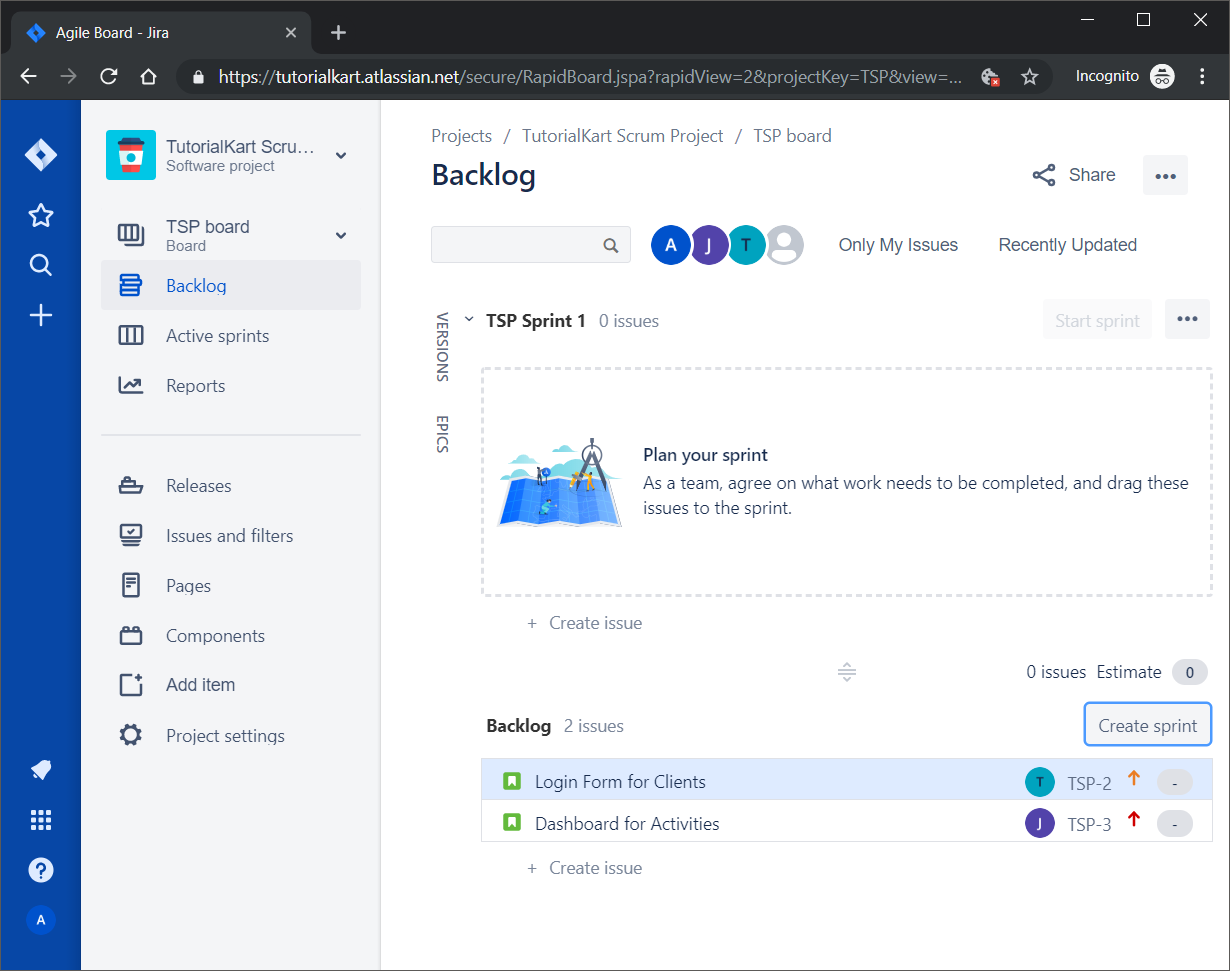
Drag issues from the backlog and drop them into the sprint. Depending on the Jira interface and your permissions, you may also be able to select issues and use a move-to-sprint action.
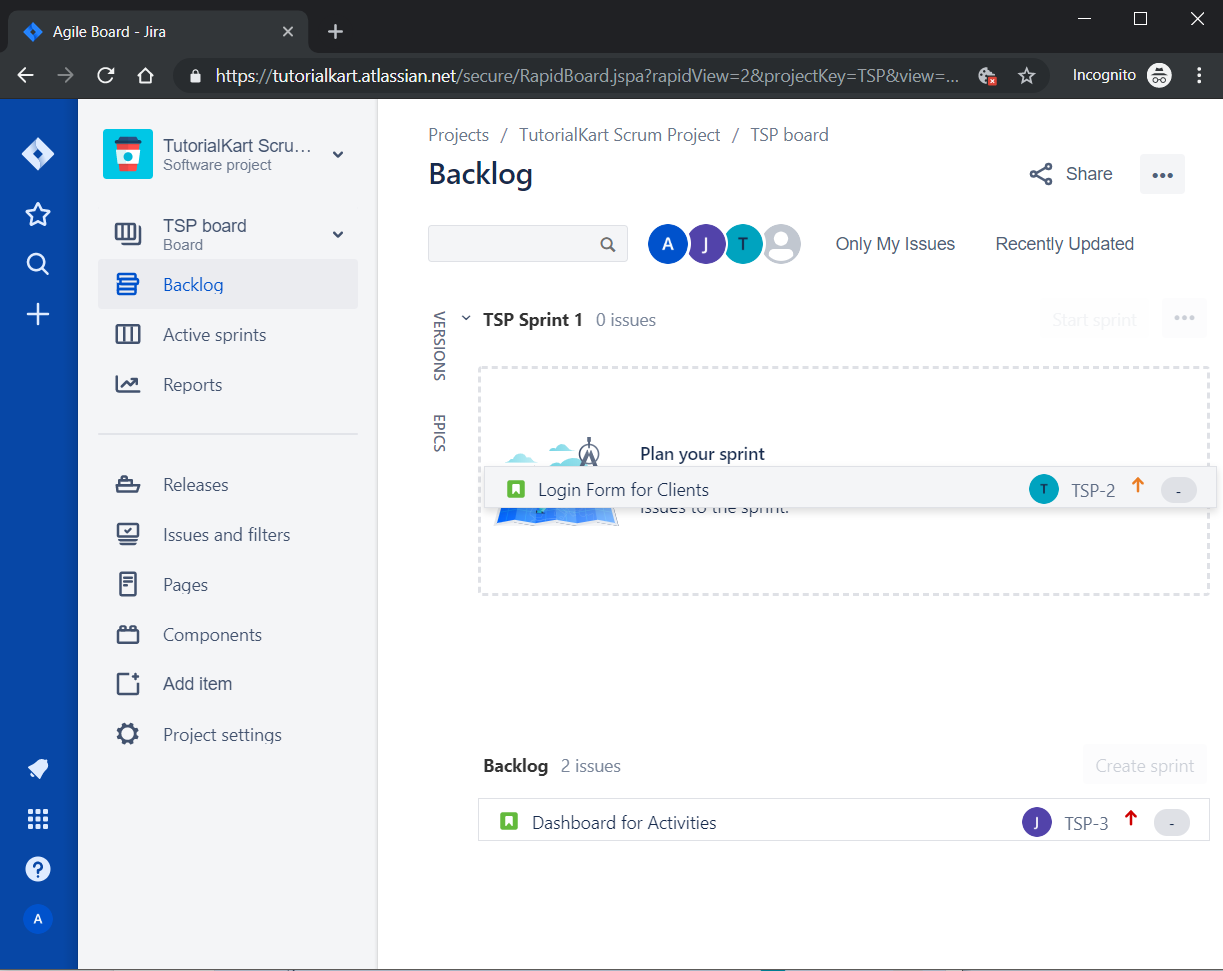
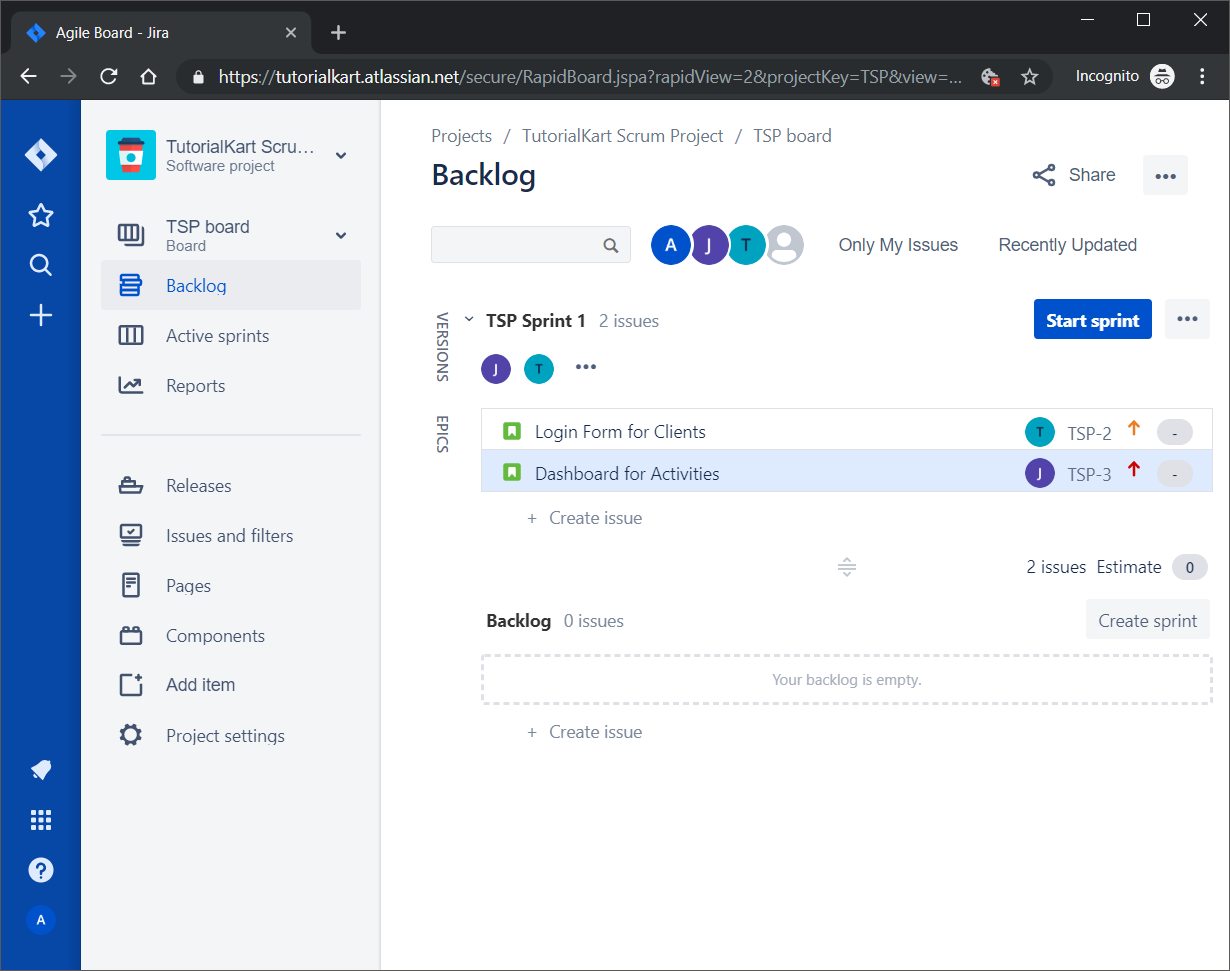
Once an issue is dropped into the sprint area, it becomes part of that sprint plan. The issue has not started yet; it is only assigned to the future sprint.
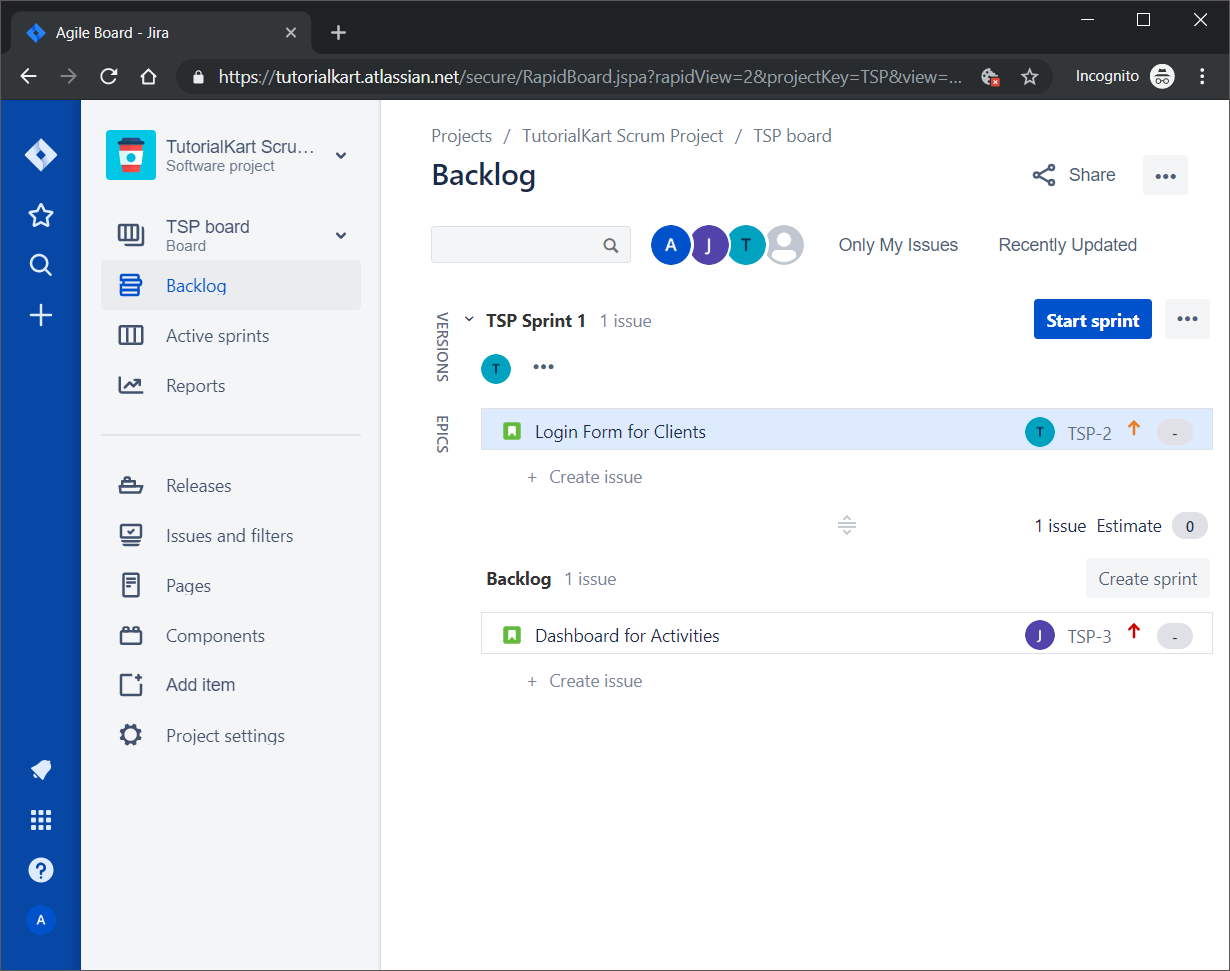
Add all issues that the team expects to work on during the sprint. The screenshot below shows two issues assigned to the same sprint.
Review the Sprint Scope Before Starting
- Check that each issue belongs to the correct project and sprint.
- Confirm that high-priority work is included and ordered appropriately.
- Review estimates, assignees, dependencies, and acceptance criteria where your team uses them.
- Remove issues that are not ready or cannot reasonably be completed during the sprint.
Issues can usually be added or removed after a sprint starts, but changing the scope may affect sprint reporting. Teams commonly agree on the planned scope before starting the sprint.
Step 3 – Start the Planned Jira Sprint
When the sprint contains the required issues, click the Start sprint button.
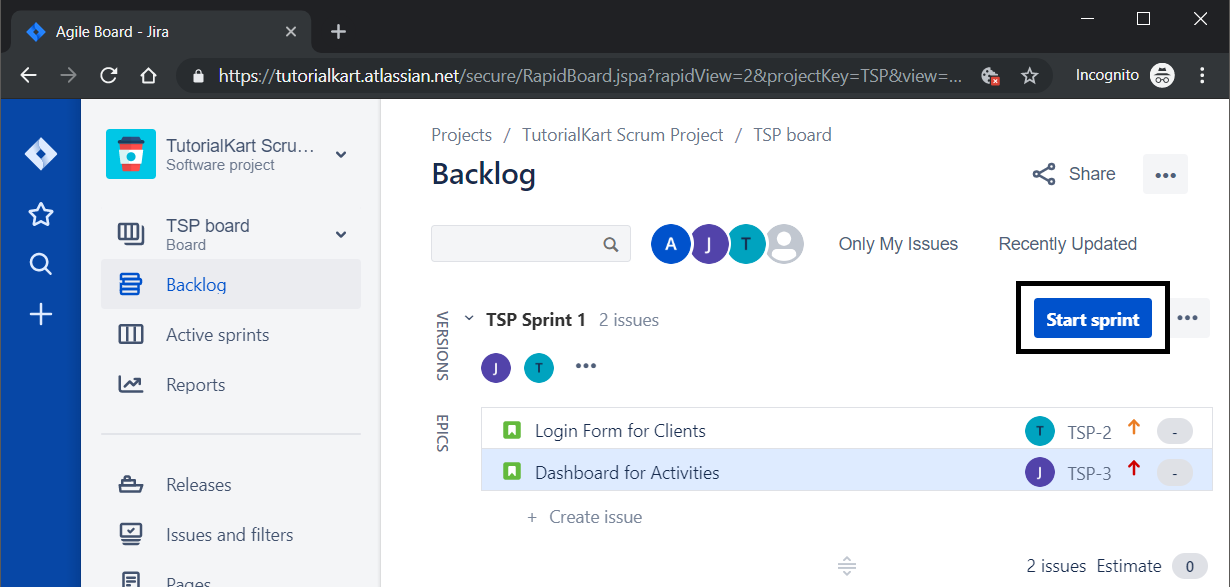
If Jira does not allow the sprint to start, check whether another sprint is active, whether parallel sprints are enabled, and whether you have permission to manage sprints.
Step 4 – Enter the Jira Sprint Name, Duration, Dates, and Goal
After you click Start sprint, Jira opens a dialog for the sprint details.
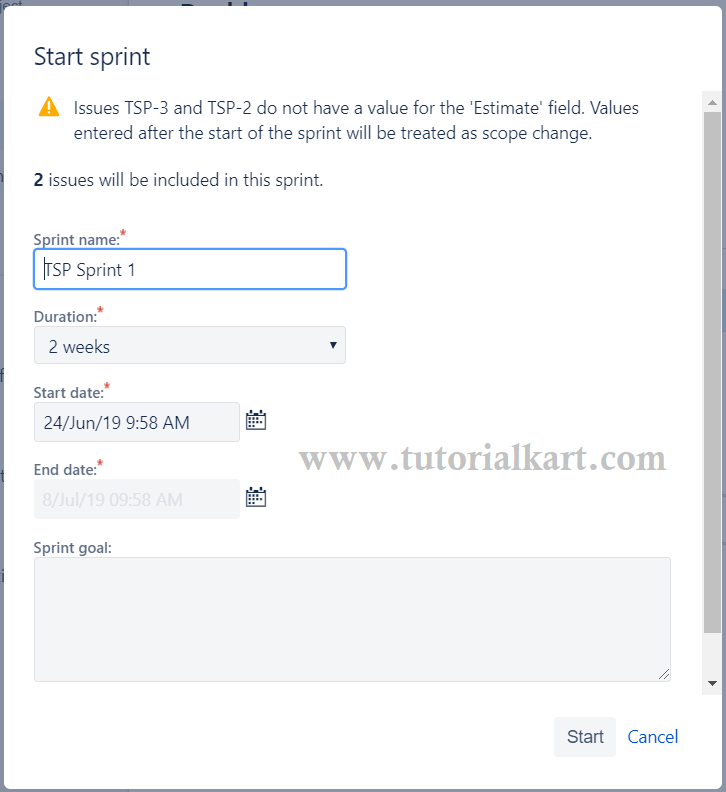
Complete the available fields. The exact fields can vary by Jira version and project configuration:
- Sprint name: Use a clear name that distinguishes the sprint from earlier and future sprints.
- Duration: Select the planned sprint length, such as one, two, three, or four weeks, when those options are available.
- Start date and end date: Verify the dates and times, especially when team members work in different time zones.
- Sprint goal: State the outcome the team intends to achieve rather than listing every issue in the sprint.
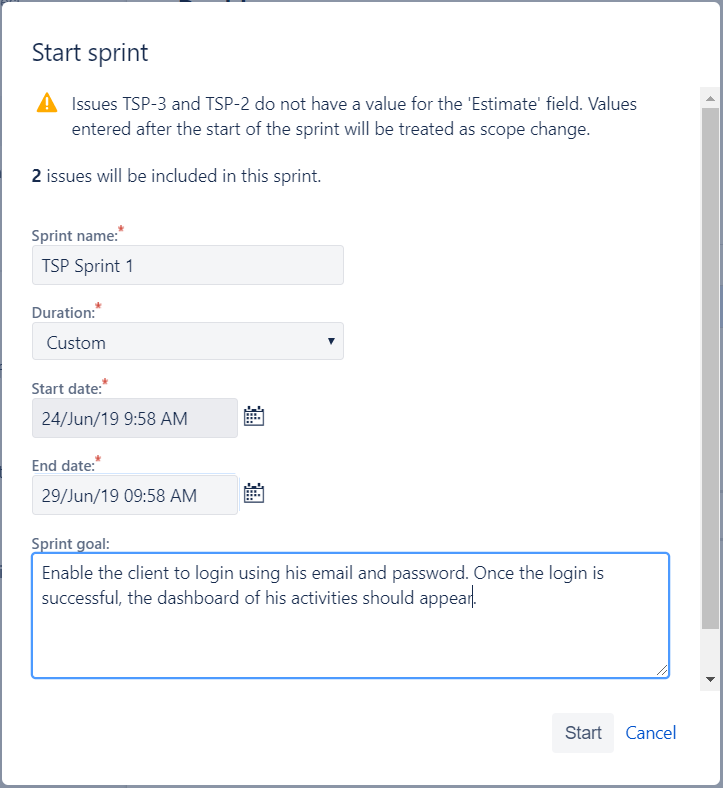
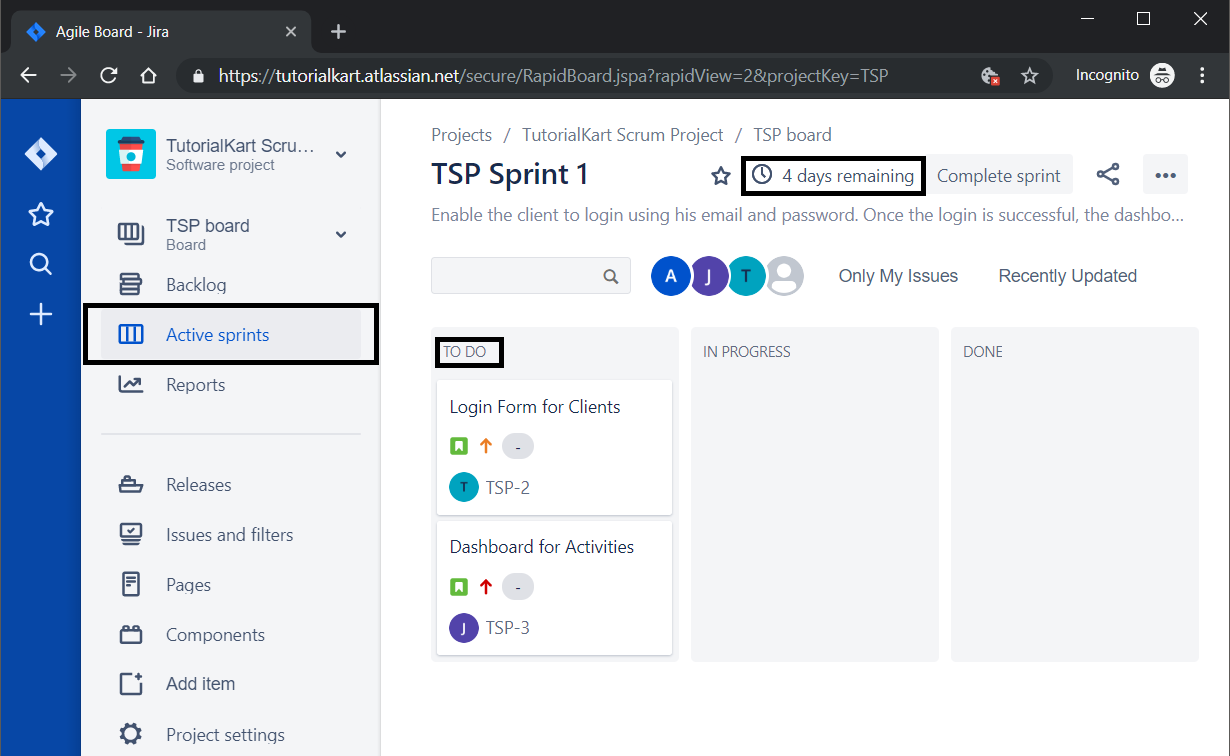
Review the details and click Start. Jira moves the sprint from the backlog to the Active sprints view.
The active sprint displays its issues in workflow columns such as TO DO, IN PROGRESS, and DONE. It may also show the remaining sprint time and other board information configured by the project administrator.
Step 5 – Move Jira Issues Through the Sprint Workflow
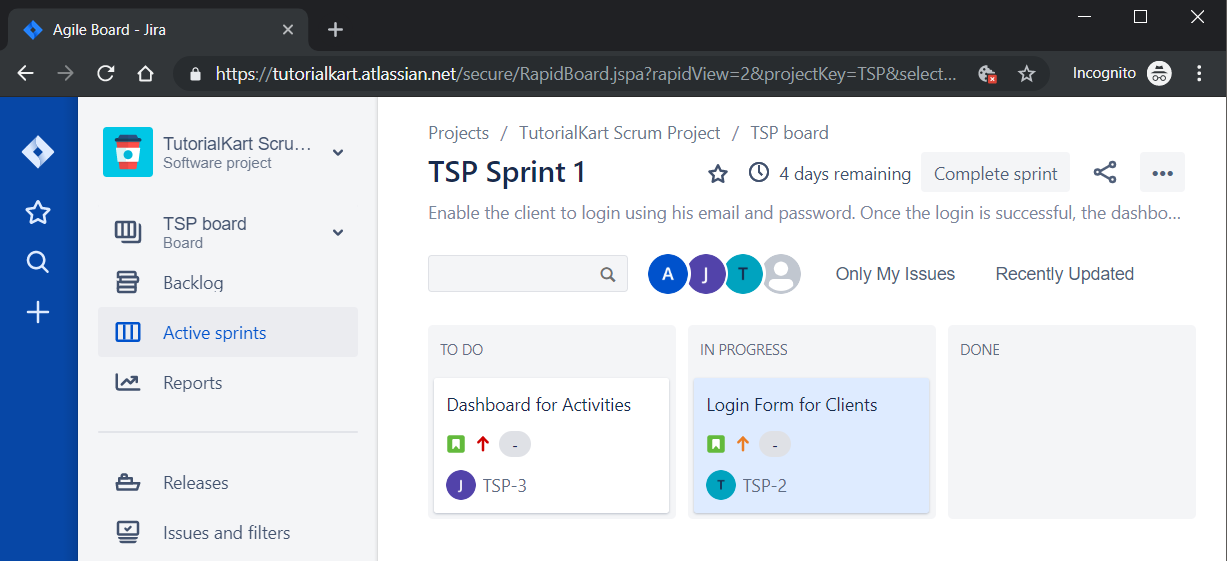
As work progresses, an assignee can update an issue’s status. On the Scrum board, users can usually drag an issue from one workflow column to another when the corresponding status transition is allowed.
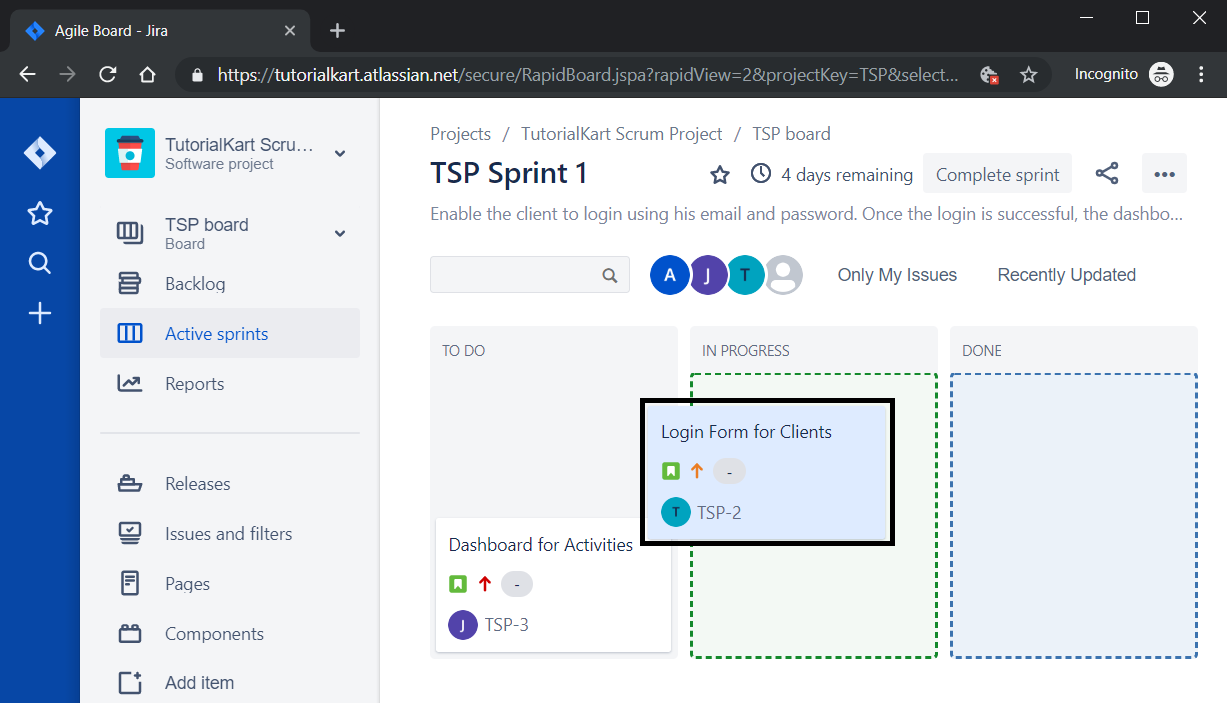
Dropping an issue into another column changes its status according to the status mapped to that column. If an issue cannot be moved, the workflow may require additional information, restrict the transition, or use a status that is not mapped correctly to the board.
In the screenshot above, the issue is dragged from the TO DO column to the IN PROGRESS column.
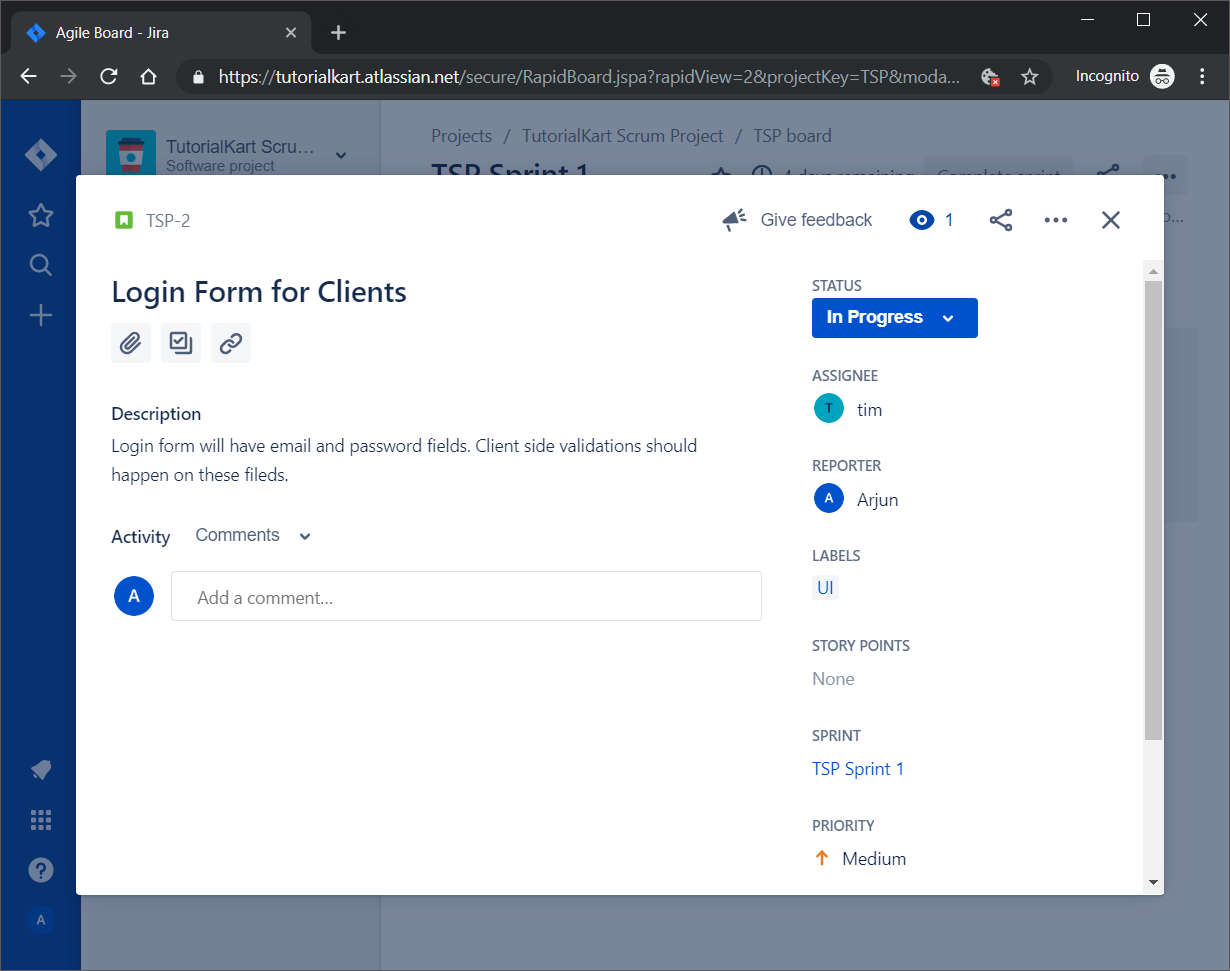
Click the moved issue to open its details. The status now appears as In Progress, confirming that the board movement updated the issue workflow status.
Common Jira Sprint Creation Problems
The Create Sprint Button Is Missing
Open the backlog of a Scrum board and verify your project permissions. The control may not appear on a Kanban board or for a user who cannot manage sprints.
The Start Sprint Button Is Disabled
Check that the sprint contains issues and that another active sprint is not blocking it. On boards that use parallel sprints, an administrator may need to enable the relevant setting.
An Issue Cannot Be Added to the Sprint
Confirm that the issue is visible in the board’s backlog filter and that it is not already assigned to an incompatible sprint. Board filters, issue security, and project permissions can also affect visibility.
An Issue Cannot Move Between Sprint Columns
The issue workflow may not permit the requested transition, or the destination status may require fields to be completed. Ask the project administrator to review the workflow and board-column mappings.
Jira Sprint Creation FAQs
Can I create a sprint without starting it?
Yes. A sprint can remain in the backlog while the team plans its issues, order, estimates, dates, and sprint goal. It becomes active only after a permitted user starts it.
Can I create multiple future sprints in Jira?
Yes. A Scrum backlog can contain multiple planned sprints. Teams often use them for preliminary organization, but issue priorities and scope should be reviewed before each sprint starts.
Can issues be added after a Jira sprint has started?
Users with the required permissions can usually add or remove issues during an active sprint. Jira may record these as scope changes in sprint reports, so the team should make such changes deliberately.
Why does Jira say I do not have permission to manage sprints?
Your account may lack the project permission required to create, start, complete, or edit sprints. A Jira or project administrator must update the relevant permission configuration.
Jira Sprint Setup Review Checklist
- Verify that the instructions refer to a Scrum board and its backlog.
- Confirm that the sprint contains the intended issues before it is started.
- Check that sprint name, dates, duration, and goal are described accurately.
- Make clear that moving a card changes the issue status only when the workflow transition is allowed.
- Retain a note that Jira Cloud and Jira Data Center interfaces may place controls differently.
What Happens After the Jira Sprint Starts
After the sprint starts, the team works from the active Scrum board and moves issues through the configured workflow. The sprint remains active until a permitted user completes it. At that point, completed issues are recorded as finished, while incomplete issues can typically be moved to the backlog or another sprint.