 TutorialKart.com
Microsoft Azure offers different storage services like file storage, blob storage , table storage and Queue to store data in the cloud. These services are created inside an Azure Storage account. In this Azure PowerShell tutorial, we are going to learn about creating a storage account using Azure PowerShell in Azure Cloud Shell.
The original screenshots in this tutorial show the Azure Cloud Shell flow. The recommended PowerShell cmdlet today is New-AzStorageAccount from the Az PowerShell module. Older examples may show New-AzureStorageAccount, which belongs to the older Azure Service Management cmdlets and should not be used for new Azure Resource Manager storage account examples.
Creating Storage Account using Azure Powershell
Before creating a storage account using Azure PowerShell, sign in to portal.azure.com with your Azure account. You can run the commands from Azure Cloud Shell in the browser, or from a local PowerShell terminal after installing the Az module and running Connect-AzAccount. Cloud Shell is simpler for beginners because Azure PowerShell is already available and the session is already connected to your Azure account.
What You Need Before Running New-AzStorageAccount
- An active Azure subscription where you have permission to create resources.
- A resource group to contain the storage account. You can create a new one from PowerShell if required.
- A globally unique storage account name using only lowercase letters and numbers.
- An Azure region such as
eastus,westus,centralindia, or another region available to your subscription. - A replication option such as
Standard_LRS,Standard_GRS, or another SKU suitable for your use case.
Open Azure Cloud Shell in PowerShell Mode
- Now click on Cloud Shell icon shown below.

If Cloud Shell asks you to choose between Bash and PowerShell, select PowerShell. If Cloud Shell asks for storage setup, you can create or mount storage for Cloud Shell files. That Cloud Shell storage is used to persist your scripts and files in the clouddrive folder. It is different from the application storage account that we create later with New-AzStorageAccount.
- Now Powershell terminal will take some time to connect, After successful connection powershell terminal will be appeared as shown below.
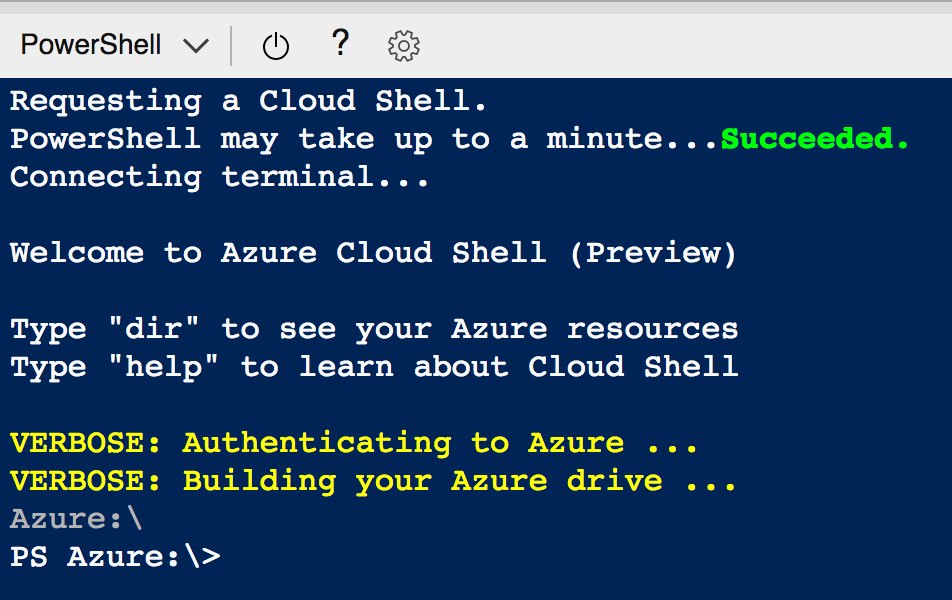
Cloud Shell automatically signs you in. If you have more than one subscription, check the active subscription before creating resources.
Get-AzSubscription

# Optional: set the subscription you want to use
Set-AzContext -Subscription "Your Subscription Name"
Create a Resource Group for the Azure Storage Account
A resource group keeps related Azure resources together. If you already have a resource group, you can use that name in the storage account command. If not, create one first.
$resourceGroupName = "tk-storage-rg"
$location = "eastus"

New-AzResourceGroup `
    -Name $resourceGroupName `
    -Location $location
You can list available Azure locations from PowerShell if you are not sure which region name to use.
Get-AzLocation | Select-Object Location, DisplayNameCreate Azure Storage Account with New-AzStorageAccount
Use the <span style="color: #0000ff;">New-AzStorageAccount</span> cmdlet to create the new storage account. The storage account name must be unique across Azure, must be between 3 and 24 characters, and must contain only lowercase letters and numbers.

The following command creates a general-purpose v2 storage account with locally redundant storage.
$storageAccountName = "tkstorageacct001"
$resourceGroupName = "tk-storage-rg"
$location = "eastus"

New-AzStorageAccount `
    -ResourceGroupName $resourceGroupName `
    -Name $storageAccountName `
    -Location $location `
    -SkuName Standard_LRS `
    -Kind StorageV2 `
    -MinimumTlsVersion TLS1_2 `
    -AllowBlobPublicAccess $false
In this command, Standard_LRS means locally redundant storage. StorageV2 creates a general-purpose v2 storage account, which is the common account type for Blob, File, Queue, and Table storage. AllowBlobPublicAccess $false helps prevent anonymous public access to blobs at the account level.
- Click on enter button after providing the
<span style="color: #0000ff;">New-AzStorageAccount</span>cmdlet on the Powershell terminal. - Now user must provide resource group name, Azure Storage account name, SkuName and Location.
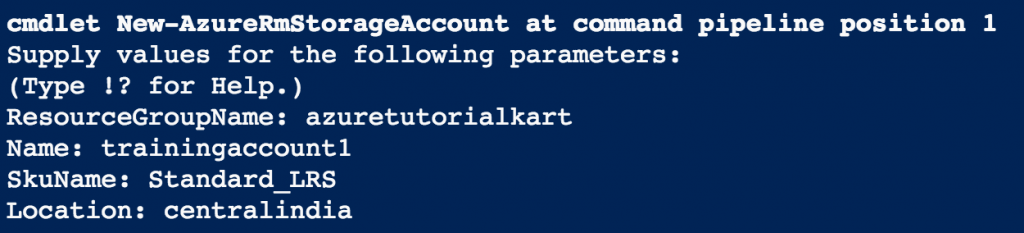
- The Storage account name must contain only number and lowercase letters. If any special characters, spaces or uppercase letters are used an exception will be thrown.
- Finally click on Enter button.
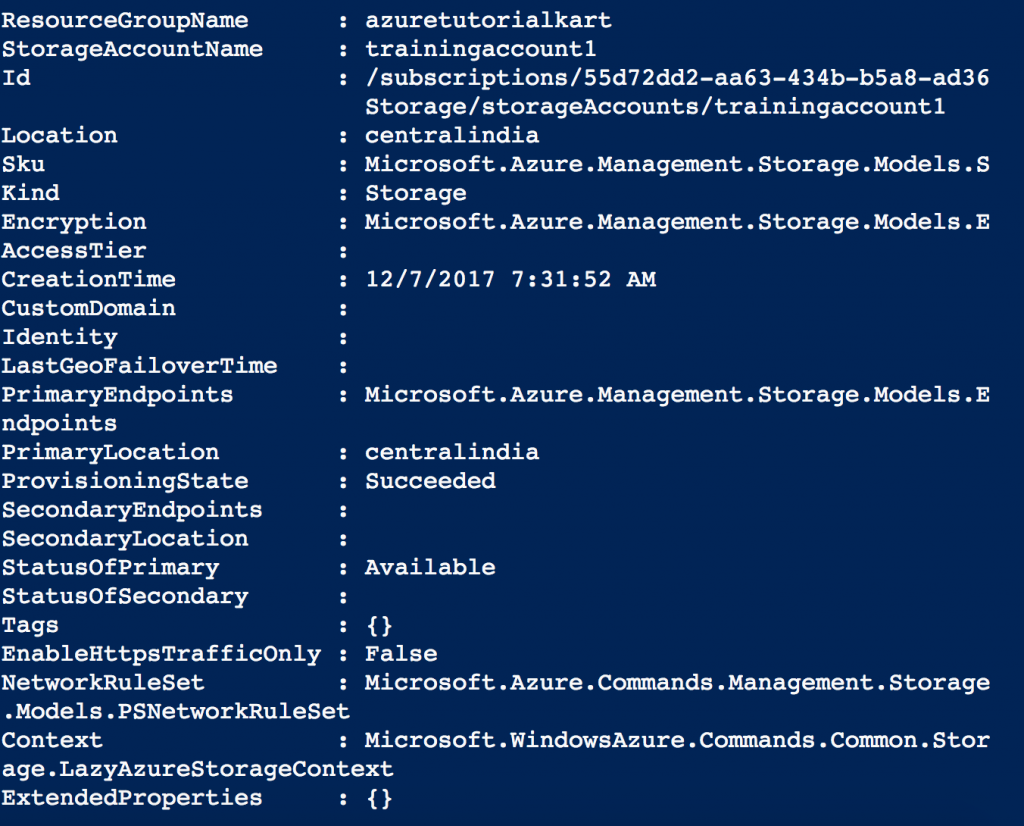
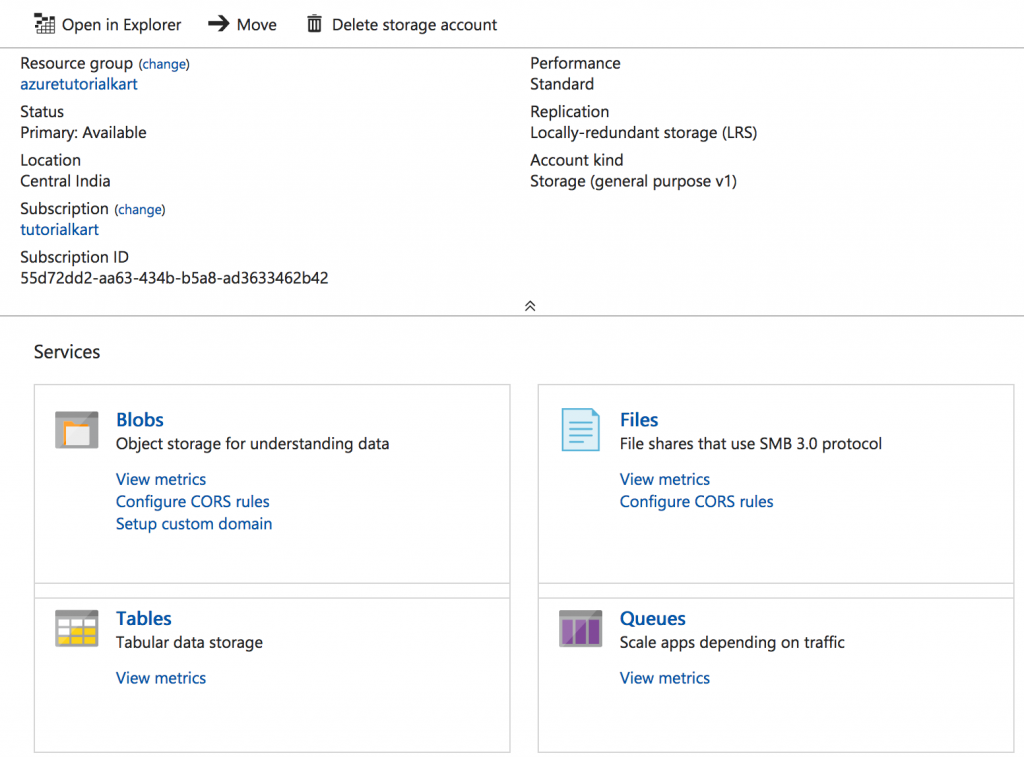
A new Azure Data Storage Account has been created successfully and new default end points are also created for each services offered by the storage account as shown below.
New-AzStorageAccount Parameters Used in This Tutorial
| Parameter | Purpose | Example |
|---|---|---|
-ResourceGroupName | Specifies the resource group where the storage account is created. | tk-storage-rg |
-Name | Specifies the globally unique storage account name. | tkstorageacct001 |
-Location | Specifies the Azure region. | eastus |
-SkuName | Specifies performance and replication type. | Standard_LRS |
-Kind | Specifies the storage account kind. | StorageV2 |
-MinimumTlsVersion | Sets the minimum TLS version accepted by the account. | TLS1_2 |
Verify the Azure Storage Account from PowerShell
After the command completes, verify that the storage account exists and check its location, SKU, and kind.
Get-AzStorageAccount `
    -ResourceGroupName $resourceGroupName `
    -Name $storageAccountName |
    Select-Object StorageAccountName, Location, SkuName, Kind
You can also check the endpoints created for Blob, File, Queue, Table, and other storage services.
(Get-AzStorageAccount `
    -ResourceGroupName $resourceGroupName `
    -Name $storageAccountName).PrimaryEndpoints
Blob : https://tkstorageacct001.blob.core.windows.net/
Queue : https://tkstorageacct001.queue.core.windows.net/
Table : https://tkstorageacct001.table.core.windows.net/
File : https://tkstorageacct001.file.core.windows.net/Connect to Azure Blob Storage using PowerShell
Creating the storage account is the first step. To work with Blob storage, create a storage context and then create a container. The example below uses the signed-in Azure account. Your account must have the required data-plane permission, such as Storage Blob Data Contributor, to create containers using Microsoft Entra authentication.
$context = New-AzStorageContext `
    -StorageAccountName $storageAccountName `
    -UseConnectedAccount

New-AzStorageContainer `
    -Name "demo-container" `
    -Context $context
If you are following older key-based examples, you may see storage account keys used to create the context. For new work, prefer role-based access with Microsoft Entra ID where possible, and avoid sharing account keys in scripts or screenshots.
Create an Azure Storage Account from Azure Portal Instead
If you do not want to use PowerShell, the same storage account can be created from Azure Portal. Go to Storage accounts, select Create, choose the subscription and resource group, enter a storage account name, select the region, performance, and redundancy settings, and then select Review + create. PowerShell is useful when the same setup must be repeated or documented as a script.
Delete Azure Storage Account using Remove-AzStorageAccount
To delete an Azure Storage account, use <span style="color: #0000ff;">Remove-AzStorageAccount</span> cmdlet with the resource group name and storage account name. Deleting a storage account deletes the data stored in that account, so use this command only after confirming that the account is no longer required.
Remove-AzStorageAccount `
    -ResourceGroupName $resourceGroupName `
    -Name $storageAccountName
Common Errors while Creating Azure Storage Account using PowerShell
| Error or Issue | Likely Reason | How to Fix |
|---|---|---|
| Storage account name is not available | The name is already used somewhere in Azure. | Use a different globally unique name. |
| Invalid storage account name | The name contains uppercase letters, spaces, hyphens, or special characters. | Use 3 to 24 lowercase letters and numbers only. |
| Resource group not found | The resource group name is wrong or has not been created. | Create the resource group or check the spelling. |
| Location is not valid | The region name is not valid for the subscription or command. | Run Get-AzLocation and use the location value. |
| Authorization failed | Your account does not have enough permission. | Ask for a suitable Azure role or use a subscription where you can create resources. |
Azure PowerShell Storage Account FAQ
How do I create an Azure storage account using Azure PowerShell?
Use New-AzStorageAccount with the resource group name, storage account name, region, SKU, and account kind. A common beginner example is New-AzStorageAccount -ResourceGroupName "tk-storage-rg" -Name "tkstorageacct001" -Location "eastus" -SkuName Standard_LRS -Kind StorageV2.
How do I create Azure Cloud Shell storage?
When you open Azure Cloud Shell for the first time, Azure may ask whether you want storage for persisted files. Choose the subscription and select the option to create or mount storage. That storage is used by Cloud Shell for your files and is separate from any application storage account you create with PowerShell.
Is Azure Cloud Shell the same as PowerShell?
No. Azure Cloud Shell is a browser-based shell environment in Azure Portal. It can run Bash or PowerShell. PowerShell is the command language and automation environment used in this tutorial to run Azure commands.
How do I connect to Azure Blob storage using PowerShell?
Create a storage context with New-AzStorageContext, then use blob cmdlets such as New-AzStorageContainer, Get-AzStorageBlob, or Set-AzStorageBlobContent. For Microsoft Entra authentication, use -UseConnectedAccount and make sure your account has the required data-plane role.
What is the difference between New-AzureStorageAccount and New-AzStorageAccount?
New-AzureStorageAccount belongs to older Azure PowerShell cmdlets. New-AzStorageAccount is the modern Az PowerShell cmdlet used with Azure Resource Manager. For current scripts, use New-AzStorageAccount.
QA Checklist for Azure Storage Account PowerShell Tutorial
- The tutorial uses
New-AzStorageAccountinstead of the olderNew-AzureStorageAccountcmdlet for new examples. - The storage account name rule is clearly stated: 3 to 24 characters, lowercase letters and numbers only, and globally unique.
- The Cloud Shell storage setup is not confused with the storage account created for Blob, File, Queue, and Table services.
- The example includes a resource group, location, SKU, account kind, and TLS setting.
- The delete command warns that removing a storage account deletes the stored data.
- The Blob storage connection example explains the need for appropriate data-plane permissions.
Conclusion
In this PowerShell tutorial, we have learned about creating Storage Account using Azure PowerShell in Azure Cloud Shell. We opened Cloud Shell, checked the subscription, created a resource group, created a general-purpose v2 storage account with New-AzStorageAccount, verified the account endpoints, and reviewed how to connect to Blob storage. In our next Azure PowerShell tutorial, we will learn about getting the Azure storage account keys using Cloud Shell.