JavaFX Tutorial – We shall learn to install JavaFX in Eclipse IDE to start developing JavaFX Applications and Examples using Help -> Install New Software.
This guide covers the older e(fx)clipse installation method shown in the screenshots and also explains the current JavaFX setup expected in recent Eclipse and JDK versions. If you are using a modern JDK, JavaFX is usually configured through OpenJFX libraries, Maven, Gradle, or VM arguments rather than assumed to be bundled with the JDK.
Install JavaFX in Eclipse IDE
Following is a step by step guide to setup or install JavaFX in Eclipse IDE :
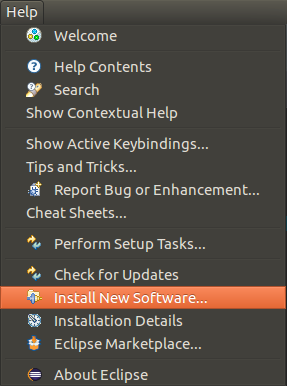
Step 1 : Ecplise – Install New Software
Open Eclipse and click on Main Menu -> Help -> Install New Software .
Step 2 : Search for e(fx)clipse
Select the Eclipse Release related site (here Neon) for “Work with” and enter “e(fx)clipse” in the search bar. Wait for the Eclipse to find e(fx)clipse.
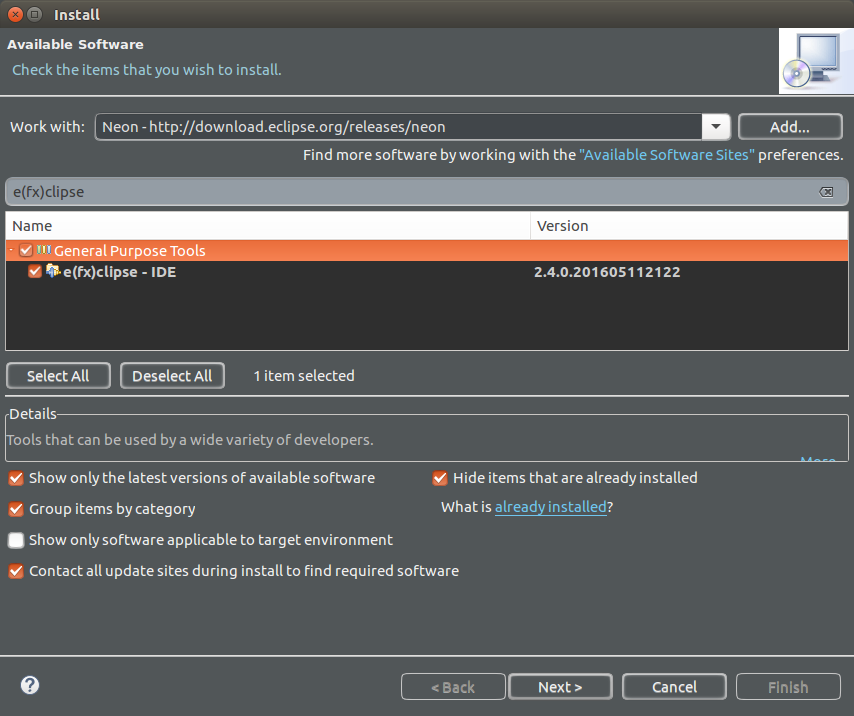
Check the result e(fx)clispe IDE and click on Next.
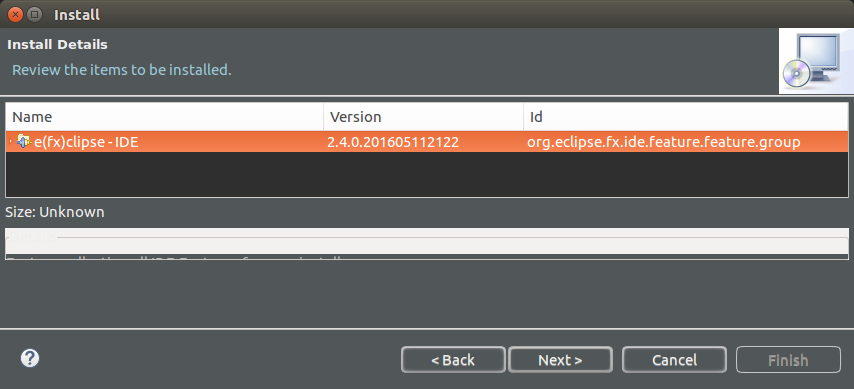
Step 3 : Review
Review the items and click on Next.
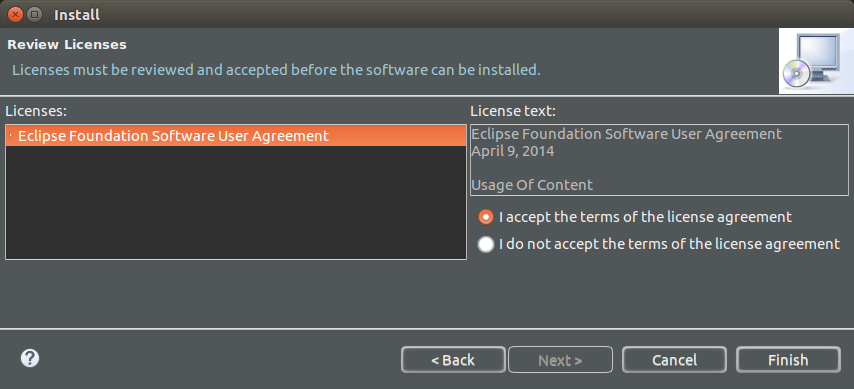
Step 4 : Accept License Agreement
Click on the radio button “I accept the terms of the license agreement” and click on Finish.
Step 5 : Wait for the install
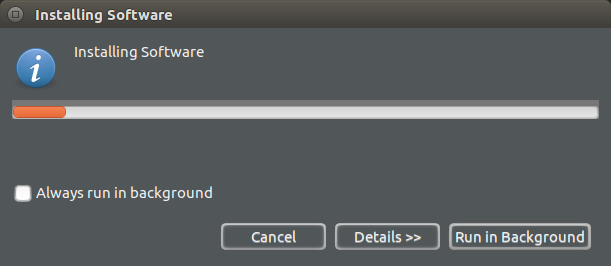
Wait for the install to complete and restart the eclipse.

Step 6 : Verify the installation
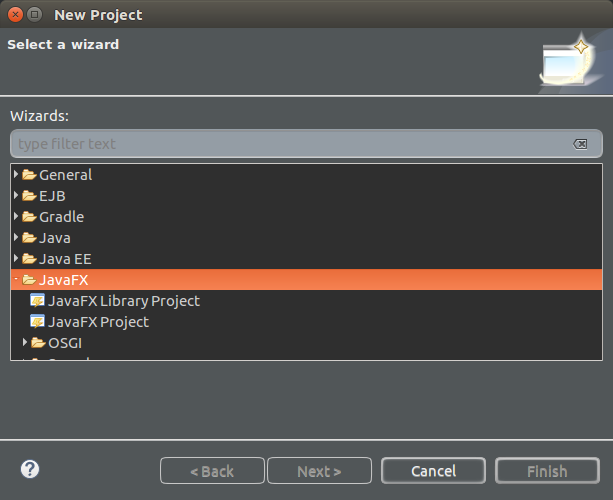
To verify if JavaFX has been installed in Eclipse, Open New Project window (Main Menu -> New -> Project)
Java FX should be listed under wizards.
Modern JavaFX setup in Eclipse with OpenJFX
The e(fx)clipse wizard is useful for older Eclipse-based JavaFX projects, but many current JavaFX projects use OpenJFX directly. In this setup, Eclipse provides the Java editor and build support, while JavaFX libraries are added separately through Maven, Gradle, or a downloaded JavaFX SDK.
The official setup reference is the OpenJFX documentation. It explains platform-specific setup for Eclipse, command-line builds, modular projects, non-modular projects, Maven, and Gradle.
- Use e(fx)clipse when you want Eclipse wizards, templates, and JavaFX project tooling.
- Use Maven or Gradle when you want dependency management and repeatable builds.
- Use the JavaFX SDK manually when you are learning the module path and want to configure the libraries yourself.
JavaFX SDK requirements before configuring Eclipse
Before you create or run a JavaFX project in Eclipse, check these requirements. Most setup problems come from missing JavaFX libraries, an incorrect module path, or using a JDK version that does not match the project configuration.
| Requirement | Why it matters in Eclipse JavaFX setup |
|---|---|
| JDK installed | Eclipse needs a configured JDK to compile and run Java code. |
| JavaFX SDK or build dependency | Modern JavaFX projects need OpenJFX libraries added separately. |
| Correct Eclipse package | Use an Eclipse IDE package suitable for Java developers. |
| Module path or classpath setup | JavaFX modules must be visible when the application starts. |
| Matching platform libraries | JavaFX SDK files are platform-specific, so use the correct package for your operating system. |
Add JavaFX libraries to an Eclipse project manually
If the JavaFX project wizard is not available, you can still create a Java project and add JavaFX libraries manually. This method is useful when Eclipse is installed correctly but the JavaFX wizard is missing.
- Download the JavaFX SDK for your operating system from the official OpenJFX site.
- Extract the SDK to a stable folder on your computer.
- In Eclipse, create a normal Java project.
- Right-click the project and open Build Path -> Configure Build Path.
- Add the JavaFX SDK
libJAR files to the project build path. - Open the Run Configuration and add JavaFX VM arguments so the runtime can locate the JavaFX modules.
A typical VM arguments pattern for a modular JavaFX application is shown below. Replace the path with the actual location of the JavaFX SDK lib folder on your system.
--module-path "/path/to/javafx-sdk/lib" --add-modules javafx.controls,javafx.fxmlOn Windows, the path may look similar to the following example.
--module-path "C:\javafx-sdk\lib" --add-modules javafx.controls,javafx.fxmlCreate a basic JavaFX application in Eclipse
After JavaFX is configured in Eclipse, create a small application to confirm that the build path, module path, and run configuration are working correctly.
import javafx.application.Application;
import javafx.scene.Scene;
import javafx.scene.control.Label;
import javafx.scene.layout.StackPane;
import javafx.stage.Stage;

public class HelloJavaFX extends Application {

    @Override
    public void start(Stage stage) {
        Label label = new Label("Hello JavaFX in Eclipse");
        Scene scene = new Scene(new StackPane(label), 400, 250);

        stage.setTitle("JavaFX Eclipse Example");
        stage.setScene(scene);
        stage.show();
    }

    public static void main(String[] args) {
        launch(args);
    }
}
If the window opens and displays the label, Eclipse can compile and run the JavaFX application. If the project fails during launch, check the run configuration first, because JavaFX runtime errors are often caused by missing VM arguments.
module-info.java for JavaFX projects in Eclipse
If your Eclipse project uses the Java module system, add a module-info.java file and declare the JavaFX modules that the application requires. For a simple controls-based application, javafx.controls is usually required. If your project uses FXML files, add javafx.fxml.
module com.tutorialkart.javafxdemo {
    requires javafx.controls;
    requires javafx.fxml;

    opens com.tutorialkart.javafxdemo to javafx.fxml;
    exports com.tutorialkart.javafxdemo;
}
The opens line is important for FXML controller access. Without it, the JavaFX runtime may not be able to access controller fields and methods through reflection in a modular project.
How to add an FXML file in Eclipse for JavaFX
To add an FXML file in Eclipse, create a file with the .fxml extension inside the project source or resources folder. You can then load it with FXMLLoader from your Java code. FXML is commonly used to keep UI layout separate from Java controller logic.
<?xml version="1.0" encoding="UTF-8"?>
<VBox spacing="10" xmlns:fx="http://javafx.com/fxml"
      fx:controller="com.tutorialkart.javafxdemo.HelloController">
    <Label fx:id="messageLabel" text="JavaFX FXML in Eclipse" />
    <Button text="Click" onAction="#showMessage" />
</VBox>
Keep the controller package name, fx:controller value, fx:id fields, and event method names consistent. Small naming differences are a common reason for FXML load errors.
Fix common JavaFX installation errors in Eclipse
If JavaFX does not run in Eclipse after installation, use the error message to identify whether the problem is related to Eclipse tooling, the Java build path, or the JavaFX runtime path.
| Eclipse JavaFX problem | Likely cause | What to check |
|---|---|---|
| JavaFX project wizard is missing | e(fx)clipse is not installed or not compatible with the Eclipse setup | Check Help -> Install New Software or use manual OpenJFX setup. |
javafx.application.Application cannot be resolved | JavaFX libraries are not on the build path | Add JavaFX SDK JAR files or use Maven/Gradle dependencies. |
JavaFX runtime components are missing | Run configuration cannot find JavaFX modules | Add --module-path and --add-modules VM arguments. |
| FXML file fails to load | Wrong controller path, method name, or module access | Check fx:controller, fx:id, event handler names, and opens in module-info.java. |
| Application starts but UI looks wrong | CSS file not loaded or resource path is wrong | Check stylesheet path and resource folder placement. |
JavaFX in Eclipse with Maven or Gradle
For larger JavaFX applications, Maven or Gradle is usually easier to maintain than manually adding JAR files. A build tool keeps the dependency list clear and makes the project easier to import on another computer.
When using Maven or Gradle, follow the OpenJFX build-tool instructions for the JavaFX version you choose. Eclipse can import Maven and Gradle projects, and the JavaFX dependencies are then managed by the build file instead of manual build-path entries.
JavaFX Eclipse installation FAQ
How do I install JavaFX in Eclipse?
You can install JavaFX tooling in Eclipse using e(fx)clipse from Help -> Install New Software, or you can configure OpenJFX manually by adding JavaFX SDK libraries and VM arguments. For modern projects, Maven or Gradle is often the cleanest setup.
Why is JavaFX not recognized in Eclipse?
JavaFX is usually not recognized when the JavaFX libraries are missing from the build path or when the run configuration does not include the JavaFX module path. Add the required OpenJFX libraries and check the VM arguments.
What IDE is best for JavaFX development?
Eclipse, IntelliJ IDEA, and NetBeans can all be used for JavaFX development. Eclipse works well when you configure OpenJFX correctly or use e(fx)clipse tooling. The best choice depends on your preferred Java workflow and build tool.
How do I add an FXML file in Eclipse?
Create a file with the .fxml extension in your project, define the UI layout in XML, and load it with FXMLLoader. Make sure the fx:controller value points to the correct Java controller class.
Do I need e(fx)clipse to run JavaFX in Eclipse?
No. e(fx)clipse provides helpful project tooling and wizards, but JavaFX applications can also run in Eclipse with manually configured OpenJFX libraries or with Maven and Gradle dependencies.
JavaFX Eclipse setup editorial QA checklist
- Confirm that the article does not state that JavaFX is bundled with every modern JDK.
- Check that all existing Eclipse screenshots and image URLs are preserved exactly.
- Verify that e(fx)clipse instructions are marked as Eclipse tooling setup and not the only way to run JavaFX.
- Test that VM arguments use
--module-pathand--add-modulescorrectly for SDK-based setup. - Confirm that FXML examples mention controller names,
fx:id, event handlers, and modularopensaccess.
Conclusion
In this tutorial, we have learned how to install JavaFX in Eclipse using the e(fx)clipse installation flow and how to handle modern OpenJFX configuration when the JavaFX libraries must be added separately. Once Eclipse can create and run a basic JavaFX window, you can continue with your first JavaFX Application – A Hello World Basic JavaFX Example Application.