An Azure Web App is an app hosted on Azure App Service, Microsoft Azure’s managed web hosting platform for websites, web APIs, and backend services. This tutorial shows how to create an empty Azure Web App from the Azure portal, choose the right basic settings, open the default azurewebsites.net URL, and verify that the new app is ready for deployment.
What is Azure Web App in Azure App Service?
Azure Web App is used to host websites and web applications without managing the underlying web server. Azure App Service handles common hosting tasks such as web server management, platform updates, HTTPS support, scaling options, deployment integration, monitoring, and application settings.
Azure Web Apps can run applications built with common stacks such as .NET, Java, Node.js, PHP, Python, and container-based workloads. A Web App is different from Azure Static Web Apps: Azure Web App is usually chosen for dynamic server-side applications, APIs, CMS sites, and apps that need server runtime configuration, while Static Web Apps is mainly used for static front-end apps with optional serverless APIs.
An empty Azure Web App is a useful starting point when you want Azure to create the hosting container first and deploy application code later from Visual Studio, Visual Studio Code, GitHub, Azure DevOps, FTP, ZIP deploy, or another supported deployment method.
Before creating an empty Azure Web App in the Azure portal
Before you create the Web App, decide the values for these Azure App Service settings. These choices affect the app URL, cost, runtime compatibility, and where the app runs.
| Azure Web App setting | What it means | Practical guidance |
|---|---|---|
| App name | The public hostname prefix for the app. | Use a globally unique name. Azure appends .azurewebsites.net to this name. |
| Subscription | The Azure billing account where the resource is created. | Select the subscription where you want the App Service charges and resource ownership to appear. |
| Resource group | A logical container for related Azure resources. | Create a new resource group for tutorials or test apps so cleanup is easier later. |
| Runtime stack | The language and platform version used by the app. | Choose the stack that matches the application you plan to deploy later. |
| Operating system | Windows or Linux hosting for the Web App. | Choose the OS supported by your runtime, framework, and deployment package. |
| Region | The Azure datacenter region for the App Service plan. | Choose a region close to most users or close to dependent services such as databases. |
| App Service plan | The compute plan that provides CPU, memory, scaling, and pricing tier. | Use a free or low-cost tier for learning; choose a production-ready tier for live apps. |
How to create an empty Azure Web App from the Azure portal
Microsoft Azure Web Apps allows us to create a new hosted website quickly. In this Azure tutorial, we are going to create an empty Azure Web App. Sign in to the Azure portal with an account that has permission to create resources in the selected subscription.
In the current Azure portal, the usual path is Create a resource > Web App. In older portal screens, the same flow may appear as +New | Web + mobile | Web App, as shown below.
- To create Azure Web App, Navigate to +New | Web + mobile | Web App as shown below.
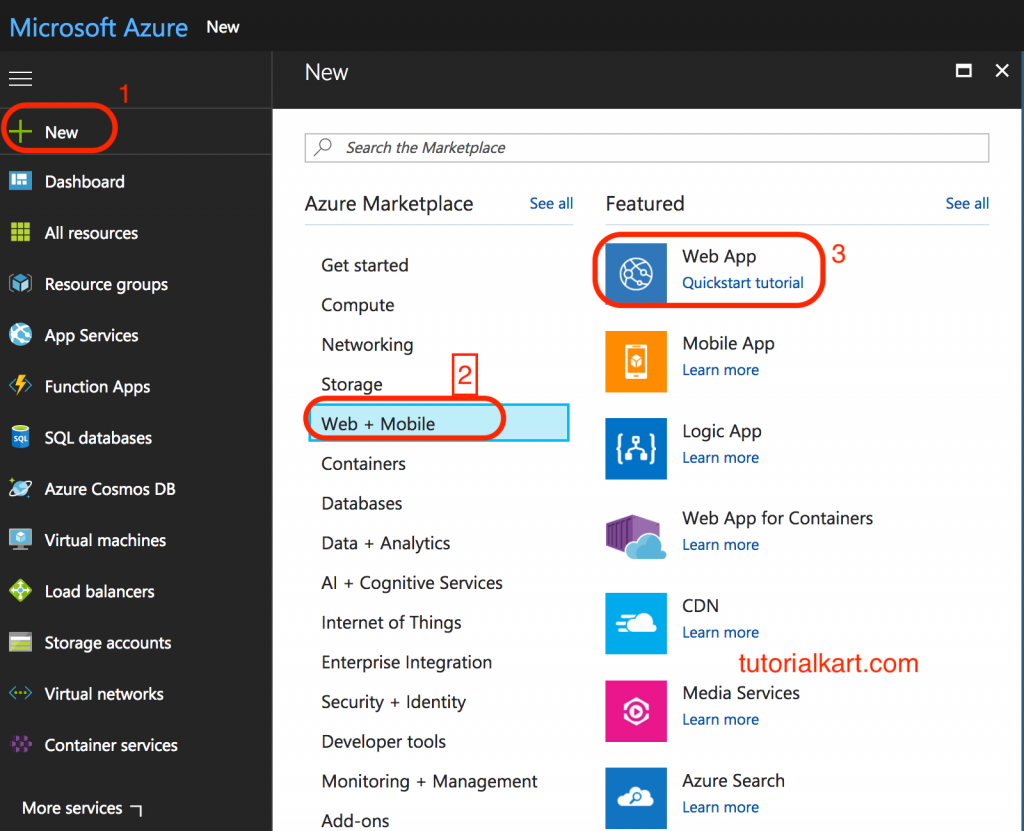
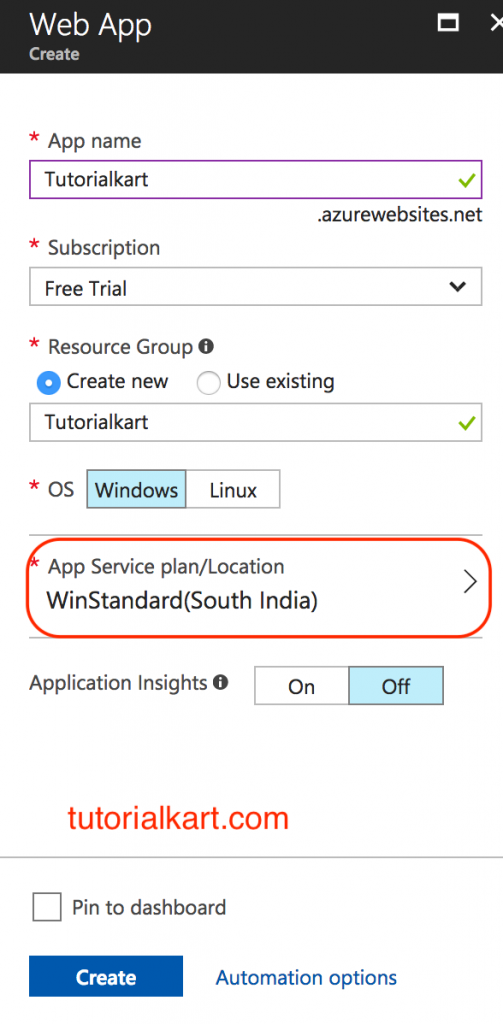
When we click on Web App as shown above, a pop up will be opened where user must enter App name, Subscription, Resource group, Operating System and App service plan.
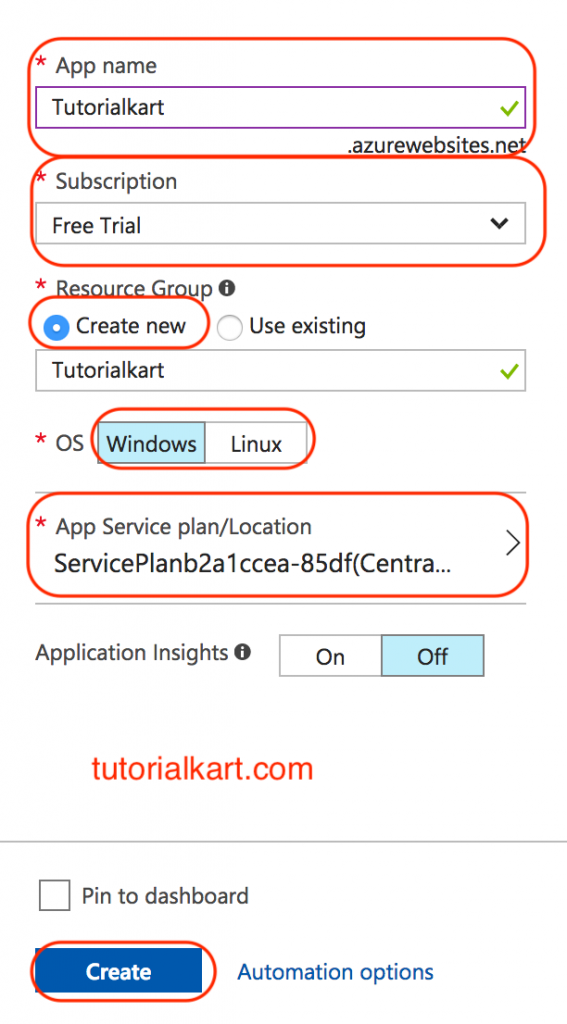
Enter a unique Azure Web App name for the azurewebsites.net URL
- Enter the name for your web app and the App name will be the URL for your website. The URL must be unique, where azurewebsites.net is appended to it as shown above.
For example, if the app name is tutorialkart, the default website address becomes https://tutorialkart.azurewebsites.net. If the name is already taken, Azure asks you to choose another name. Use lowercase letters, numbers, and hyphens for a clean URL.
Select the Azure subscription, runtime stack, and operating system
- Select your Subscription pricing options. In this example, we selected Free trail.
- Select Operating System (OS).
The subscription decides where the Azure Web App is billed. The runtime stack should match the application you plan to deploy later, such as .NET, Node.js, Java, PHP, or Python. The operating system can be Windows or Linux, depending on the selected stack and your hosting requirements.
Create or select a resource group for the Azure Web App
- Now select an existing resource group or create a new one. To create new resource group, select Create new.
- Now a new Resource group will be created with Web App name “Tutorialkart”.
A resource group keeps related Azure resources together. For a learning example, creating a new resource group is the safest option because you can delete the whole group later to remove the Web App and its related resources in one action.
Choosing an App Service plan for an empty Azure Web App
Every Azure Web App runs inside an App Service plan. The plan defines the region, pricing tier, compute resources, scaling limits, and some platform features available to the app.
Selecting App Service Plan.
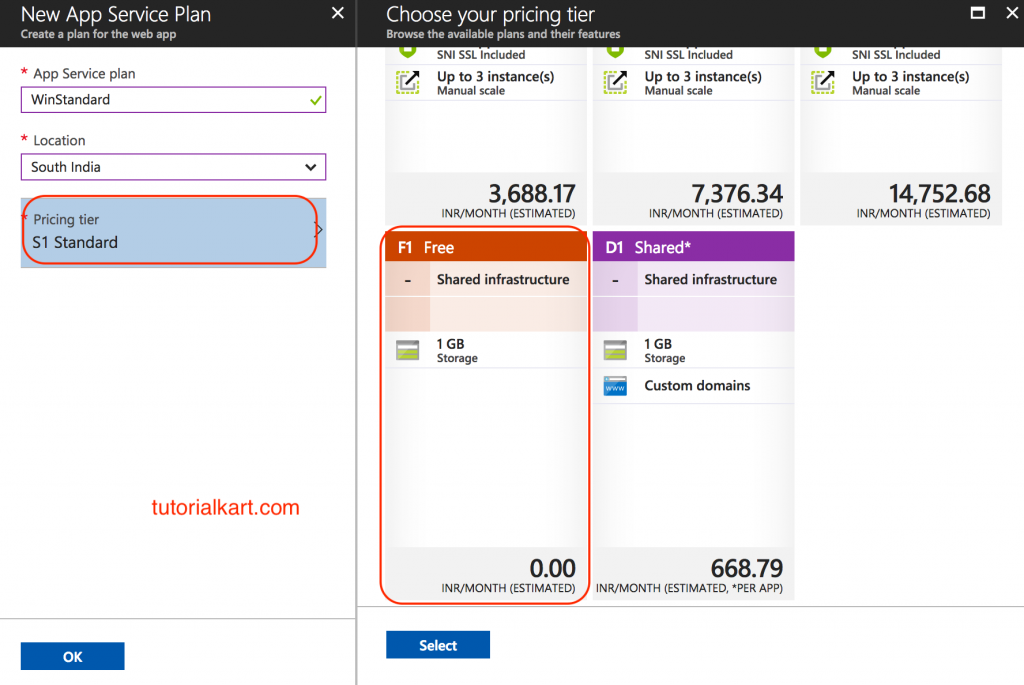
Now we are going to create new App Service plan as “Winstandard”.
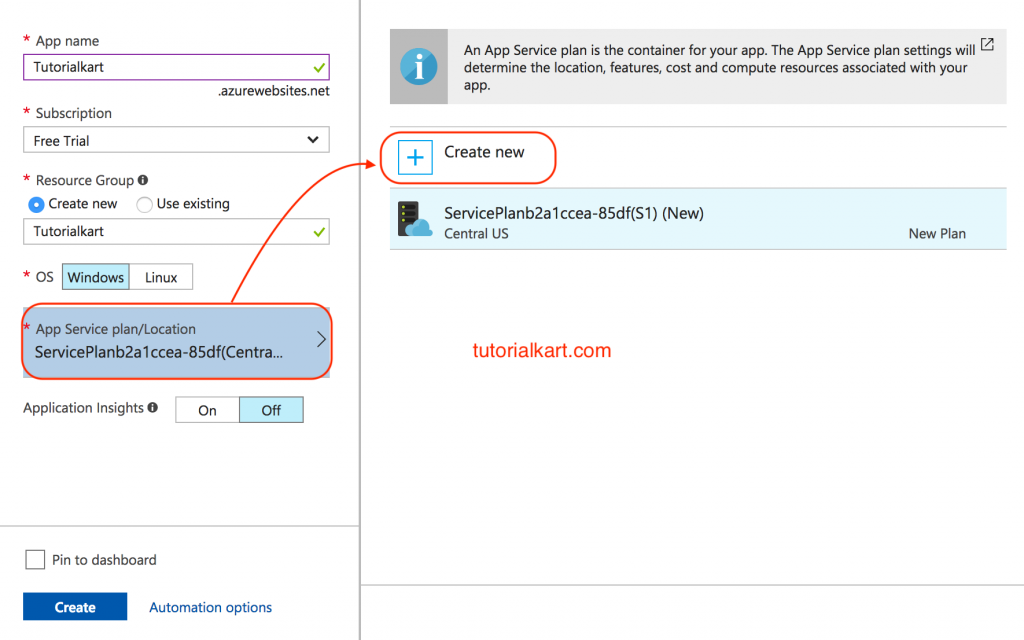
Now we have to select app service plan / location for our app. It is recommended that we have to set close to the part of the world from which we expect most of your web traffic to emanate.
- Enter App Service plan as WinStandard.
- Select Location.
- Choose your pricing tier as shown below.

- As shown above, we have selected App Service plan as F1 Free plans. Click on Select button.
The F1 Free tier is suitable for basic learning and testing. For production websites, review the App Service pricing tier carefully because production requirements often need features such as custom domains, scaling, stronger compute capacity, backups, deployment slots, or higher availability options.
Review and create the Azure Web App deployment
- After completing all the settings, click create button.
Before selecting Create, review the app name, resource group, region, operating system, runtime stack, and App Service plan. This is especially important when you have multiple subscriptions or when the selected plan is not a free tier.
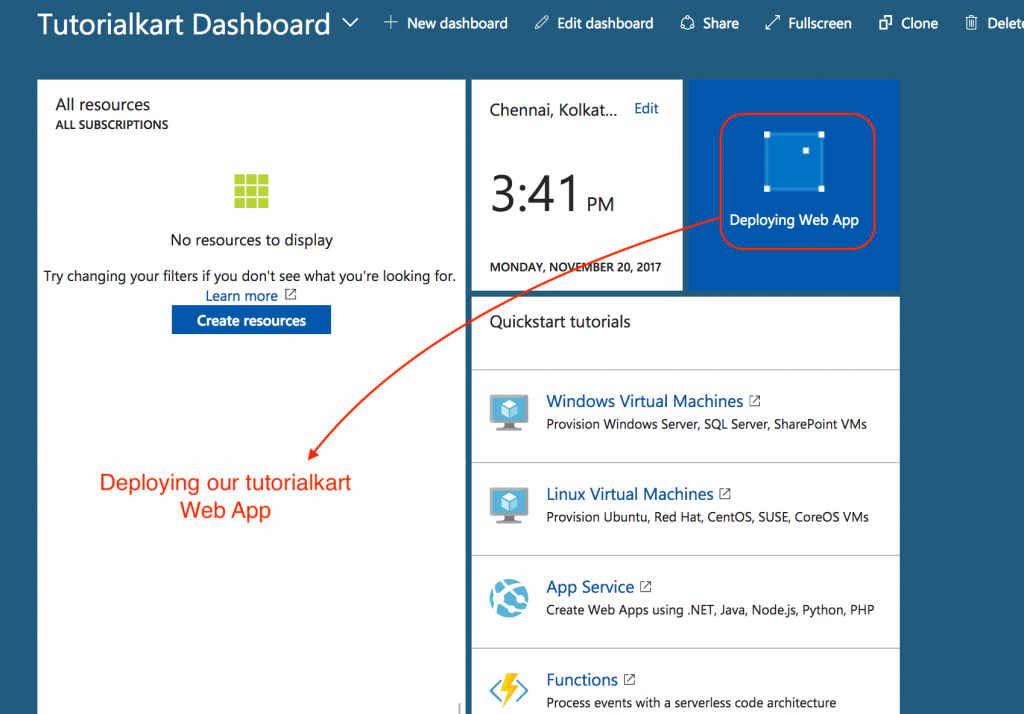
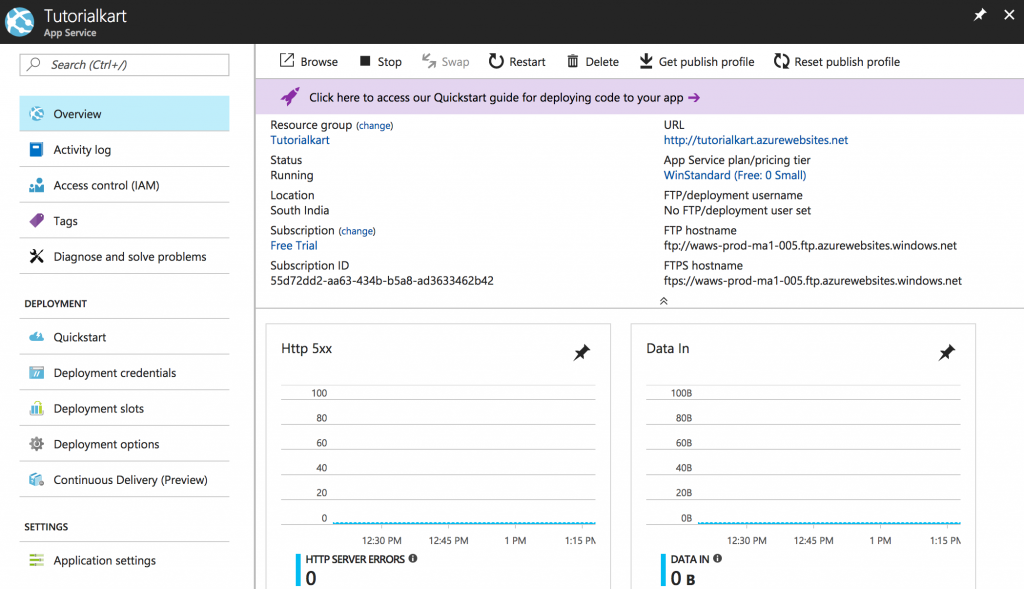
Now we see our app is deploying and in few second we will get a notification that our web app is created successfully. Open web app in Azure portal as shown below.
Open the default Azure Web App URL after deployment
When an Azure Web App is opened, we can see the app’s settings and perform traffic monitoring. We can view a lot of useful information about the app’s availability and performance by scrolling through the rest of the web app page and clicking sections.
From the Web App Overview page, select the app URL or the Browse option. Because this tutorial creates an empty Web App, you may see an Azure default landing page until you deploy your own application files.
Important Azure Web App settings to check before deploying code
After creating the empty Azure Web App, check these sections in the Azure portal before deploying a real website or application.
- Overview: Confirms app status, resource group, default domain, region, and App Service plan.
- Deployment Center: Connects the Web App to GitHub, Azure Repos, Bitbucket, local Git, or another deployment source.
- Configuration: Stores application settings, connection strings, runtime options, and platform settings.
- Authentication: Lets you configure built-in authentication when your app needs sign-in through supported identity providers.
- Custom domains: Used when you want to map your own domain instead of using the default
azurewebsites.netaddress. - TLS/SSL settings: Used for certificates and HTTPS-related configuration.
- Log stream: Helps you view live application logs while testing deployments.
- Scale up: Changes the App Service plan pricing tier when the app needs more features or capacity.
Azure Web App setup QA checklist
- The Azure Web App name is unique and the default
azurewebsites.netURL opens successfully. - The selected runtime stack matches the application that will be deployed later.
- The operating system is correct for the framework, package type, or container requirement.
- The App Service plan tier is suitable for the purpose: learning, testing, staging, or production.
- The region is close to the expected users or related Azure resources such as databases.
- The Web App is in the intended resource group so cleanup and access management are simple.
- Application settings and connection strings are not hard-coded in deployed source files.
- Logging is enabled or easy to access before the first deployment test.
Azure Web App creation FAQs
Is Azure Web App the same as Azure App Service?
Azure Web App is one type of app that runs on Azure App Service. App Service is the managed platform, while the Web App is the hosted website, web API, or web application you create inside that platform.
Can I create an Azure Web App without deploying application code immediately?
Yes. You can create an empty Azure Web App first and deploy code later. Until your code is deployed, the app usually shows a default Azure landing page or a basic placeholder response.
Why must the Azure Web App name be unique?
The app name becomes part of the default public URL, such as https://app-name.azurewebsites.net. Because that hostname is shared across Azure, the name must be unique.
Which App Service plan should I choose for a tutorial Web App?
For a simple tutorial or learning exercise, a free or low-cost plan is usually enough. For production, choose a plan based on required compute capacity, scaling, custom domains, deployment slots, backups, and availability needs.
How do I remove the Azure Web App after testing?
If you created a separate resource group for the tutorial, delete that resource group from the Azure portal after confirming that it does not contain anything else you need. This removes the Web App and related resources inside the group.
Useful Azure App Service reference links
- Azure App Service overview
- Azure App Service plans
- Configure an App Service app
- Get started with Azure App Service
Azure Web App creation summary
In this Microsoft Azure tutorial, we learned what an Azure Web App is, how it fits into Azure App Service, and how to create an empty Azure Web App from the Azure portal. We selected the app name, subscription, resource group, operating system, region, and App Service plan, then opened the created Web App from the Azure portal. In the next step, you can deploy application code to this Web App using Deployment Center, Visual Studio, Visual Studio Code, GitHub Actions, Azure DevOps, or another supported deployment option.