How to purge an Azure CDN endpoint cache
In this Azure tutorial, we will learn how to purge an Azure CDN endpoint from the Azure portal and how to set the Cache-Control header for Azure Blob Storage content using Azure Storage Explorer.
An Azure CDN endpoint stores cached copies of static content such as images, CSS, JavaScript, documents, and media files on edge servers. When the original file changes, the CDN may continue serving the cached copy until its time-to-live (TTL) expires. The TTL is usually controlled by the Cache-Control response header from the origin. A purge request tells the CDN edge servers to remove the cached copy so that the next request can fetch the latest version from the origin.
Purging an Azure CDN endpoint does not delete the file from Azure Blob Storage, a web app, or any other origin. It only invalidates cached content on the CDN edge nodes. Use purge when you replaced a file at the same URL, corrected an incorrectly cached asset, or need a changed file to be refreshed before the configured TTL expires.
Azure CDN purge paths, wildcard paths, and purge all
Before purging, decide whether you need to remove one file, a folder of assets, or the whole endpoint cache. For production sites, it is usually safer to purge exact paths or a folder wildcard instead of clearing the entire endpoint cache.
| Purge target | Example path | When to use it |
|---|---|---|
| Single file | /css/site.css | Use when one CSS, JavaScript, image, or document file was replaced. |
| Folder wildcard | /images/* | Use when all files below one folder must be refreshed. |
| All cached content | /* or Purge all | Use only when most cached files are stale, because the origin may receive more traffic after the purge. |
/css/site.css
/scripts/app.js
/images/*
/*
Path matching is based on the URL path after the domain name. Keep the leading slash, match the case of the file path, and include the correct folder structure. For example, to purge https://example.azureedge.net/assets/logo.png, use /assets/logo.png.
Steps to purge an Azure CDN endpoint in the Azure portal
To purge an Azure CDN endpoint from the Azure portal, follow these steps.
- Navigate to the Azure portal and select your Azure CDN profile that contains the CDN endpoint.
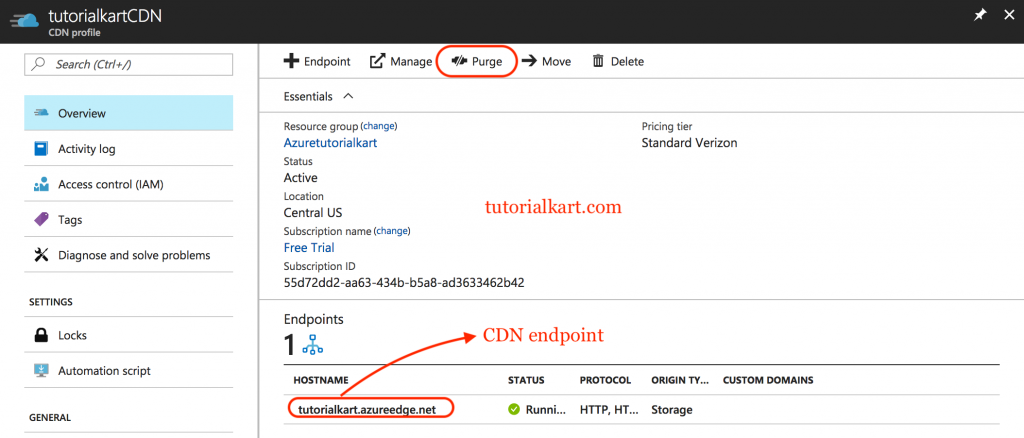
- Open the Azure CDN profile and click the Purge button.
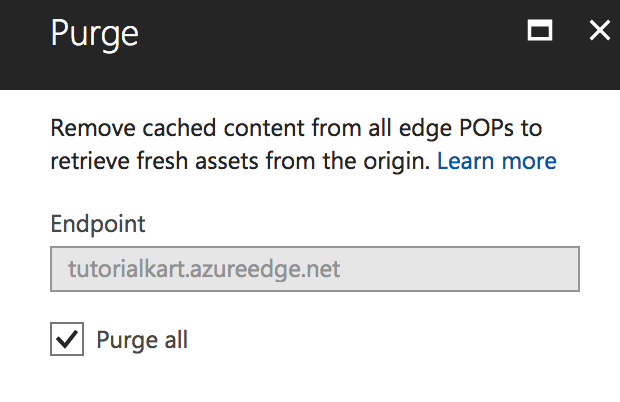
- Select the endpoint from the dropdown list.
- To clear the whole endpoint cache, select the Purge all check box.
- To purge selected files, enter one content path per line, such as
/css/site.cssor/images/*. - Review the paths carefully, especially when using wildcards.
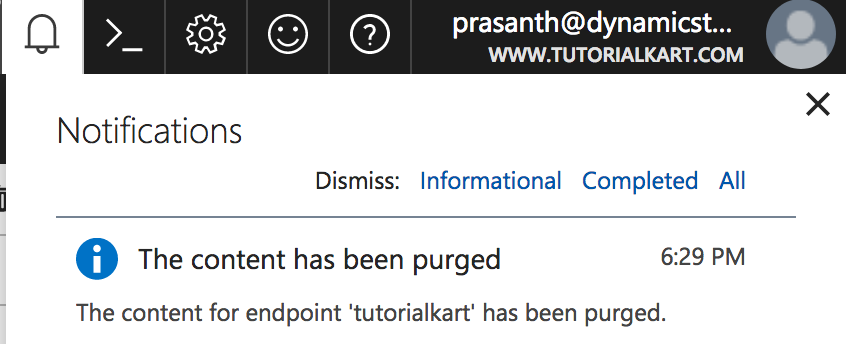
- Click the Purge button to submit the purge request.
Purge completion time can vary by Azure CDN profile, provider, number of paths, and current service conditions. Older Azure CDN from Verizon profiles commonly completed simple purge requests in a few minutes, but you should verify the refreshed content instead of relying only on a fixed time estimate.
Azure CLI command to purge an Azure CDN endpoint
You can also purge cached content from the command line with Azure CLI. This is useful for deployment scripts where CSS, JavaScript, image, or generated static files are updated automatically.
az cdn endpoint purge \
  --resource-group <resource-group-name> \
  --profile-name <cdn-profile-name> \
  --name <endpoint-name> \
  --content-paths "/css/site.css" "/images/*"
Use --content-paths "/*" only when you intentionally want to clear the full endpoint cache. The Azure CLI reference for az cdn endpoint purge lists the current parameters and options.
If your site uses Azure Front Door Standard or Premium instead of a classic Azure CDN endpoint, use the Front Door profile’s Purge cache option or the matching Front Door command/API. Azure Front Door cache purge is managed from the Front Door profile, not from the Azure CDN endpoint screen. Microsoft provides a separate guide for Azure Front Door cache purging.
How to verify that Azure CDN served the refreshed content
After the purge request completes, test the CDN URL directly instead of testing only from a browser tab that may have its own local cache. A private window, a changed query string, or a response-header check can help confirm whether the file is being refreshed from the CDN and origin.
curl -I "https://<cdn-endpoint-hostname>/css/site.css"Check the response headers for values such as Cache-Control, Age, ETag, Last-Modified, and any CDN-specific cache status headers available for your profile. Header names can differ by CDN product and provider, so use them as troubleshooting clues rather than assuming one fixed header format.
Setting Azure Blob Storage Cache-Control headers using Azure Storage Explorer
Azure CDN caching behavior depends heavily on the response headers sent by the origin. When Azure Blob Storage is the origin, the blob’s CacheControl property becomes the HTTP Cache-Control response header. A well-chosen value reduces the need for repeated manual CDN purges.
Using Azure Storage Explorer, we can view and edit Azure Blob Storage resource properties such as CacheControl. Follow the steps below to set the Cache-Control header on a blob in Azure Storage.
Select your operating system from the dropdown and install Storage Explorer on your local system.
- Using Azure Storage Explorer, we can access multiple accounts and subscriptions across Azure, Azure Stack, and sovereign clouds.
- We can create, delete, view, and edit storage resources.
- We can view and edit Blob storage, Queue storage, Table storage, and File storage.
Open Microsoft Azure Storage Explorer and connect to your Azure account. After signing in, expand the storage account and open the blob container that stores the CDN origin files.
- Navigate to Storage accounts (tutorialkart) | Storage container (blob container).
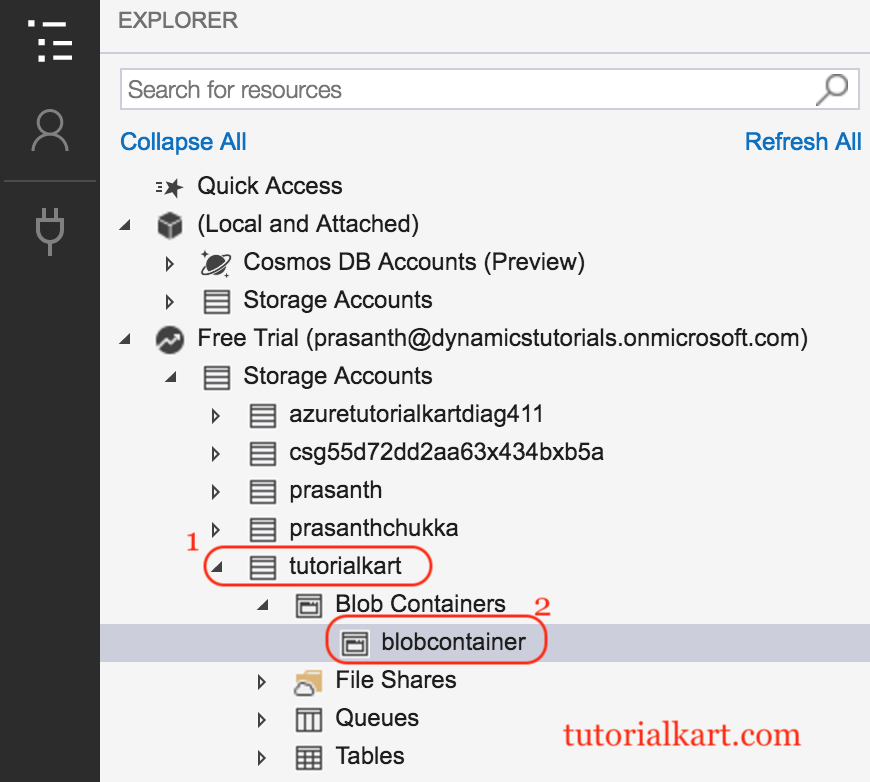
- Open the blob container, select the blob whose CDN cache behavior you want to control, and then open Properties from the context menu.
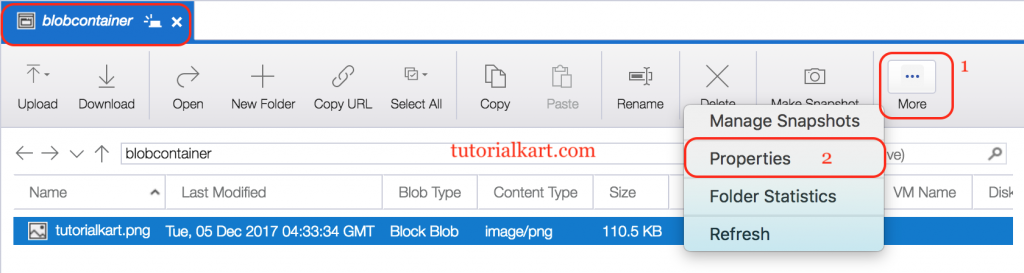
- Scroll to the CacheControl property or the HTTP headers section.
- Enter the required cache-control value, such as
public, max-age=3600. - Save the blob properties.
- If the blob was already cached by Azure CDN, purge the matching CDN path so the CDN retrieves the new response header from the origin.
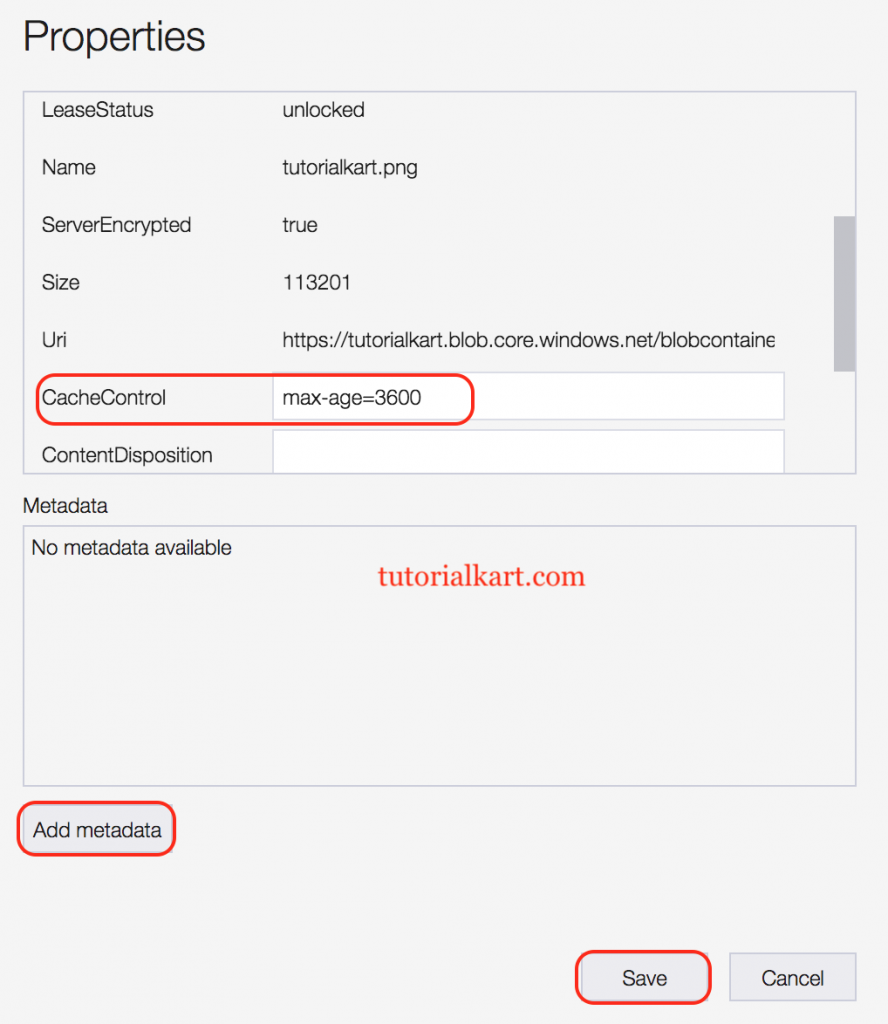
CacheControl is a blob property that maps to a standard HTTP header. Do not treat it as ordinary custom metadata if your Storage Explorer version shows separate sections for properties, HTTP headers, and metadata.
Cache-Control values for Azure CDN and Blob Storage
The right cache-control value depends on how often the file changes and whether the URL is versioned. Files with versioned names can safely use longer caching. Files that keep the same URL should use a shorter TTL or be purged after updates.
| Cache-Control value | Best fit | CDN behavior to expect |
|---|---|---|
public, max-age=300 | Files that may change during the day | CDN can cache the file for about 5 minutes before rechecking. |
public, max-age=3600 | Images, scripts, or documents that update occasionally | CDN can cache the file for about 1 hour. |
public, max-age=31536000, immutable | Versioned assets such as app.8f3a.js | CDN and browsers can cache for a long time because the URL changes when the content changes. |
no-cache | Content that should be revalidated before reuse | Clients should check with the origin before using a stored response. |
no-store | Sensitive content that should not be stored | Clients and shared caches should not store the response. |
Why purged Azure CDN content can still look old
If the content still appears old after an Azure CDN purge, the issue is often outside the purge request itself. Check the following points before submitting repeated purge requests.
- Browser cache: The browser may still have a local cached copy. Test in a private window or use response headers.
- Wrong purge path: The CDN path must match the URL path exactly, including folders and case.
- Origin file not updated: Purge only clears CDN cache. It cannot replace an old file at the origin.
- Query string behavior: If your CDN caches query strings separately, make sure you test the same URL variant that users request.
- Long browser TTL: A CDN purge does not necessarily clear every user’s browser cache. Versioned file names are more reliable for CSS and JavaScript releases.
- Different product: Azure Front Door and Azure CDN have different purge screens and commands.
Azure CDN purge checklist before changing production cache
- Confirm the Azure CDN profile and endpoint name before purging.
- Use exact content paths for small updates and folder wildcards only when necessary.
- Avoid Purge all unless most cached content must be refreshed.
- Check that the origin file and the origin response headers are already correct.
- For Azure Blob Storage origins, verify the blob
CacheControlproperty before purging. - Test the CDN URL directly after purge, not only through a browser page that may be locally cached.
- For repeated deployments, prefer versioned asset file names and automate targeted purge commands.
Azure CDN endpoint purge FAQs
How do I purge Azure CDN cache for one file?
Open the Azure CDN profile, select Purge, choose the endpoint, and enter the file path such as /images/logo.png. Do not enter the full domain unless the purge tool specifically asks for a URL. For Azure CLI, pass the path in --content-paths.
How long does an Azure CDN purge take?
The time can vary by CDN product, provider, number of paths, and service conditions. A simple purge may finish in a few minutes, but you should confirm the result by checking the CDN URL and response headers.
Does purging Azure CDN delete files from Azure Blob Storage?
No. Purging Azure CDN only removes cached copies from CDN edge servers. The original blob, web app file, or origin resource remains unchanged.
Should I use Purge all or a wildcard path in Azure CDN?
Use a specific file path when only one asset changed. Use a folder wildcard such as /assets/* when a folder changed. Use Purge all only when the entire endpoint cache needs to be refreshed, because the origin may receive more requests after the purge.
Is clearing Azure Storage Explorer cache the same as purging Azure CDN?
No. Clearing a local cache in Azure Storage Explorer affects the desktop tool experience. Purging Azure CDN affects cached content on CDN edge servers. Changing a blob’s CacheControl property also does not remove old CDN copies until the CDN refreshes or the matching path is purged.