Create Table in MySQL Database
The MySQL CREATE TABLE statement is used to create a new table inside a database. A table stores data in rows and columns, and each column must be defined with a name, data type, and optional rules such as PRIMARY KEY, NOT NULL, DEFAULT, UNIQUE, CHECK, or FOREIGN KEY.
In this tutorial, we will create a students table in a MySQL database named school. You will learn how to create the table using SQL commands in the MySQL command line, and also how to create the same kind of table using MySQL Workbench.
The examples begin with a simple table and then add practical table-design features such as default values, unique email addresses, restricted grade values, and foreign key relationships.
MySQL CREATE TABLE Prerequisites for the school Database
Before you create a table in MySQL, make sure that MySQL Server is installed and running, and that you can connect to it from MySQL command line, MySQL Shell, or MySQL Workbench.
- You must have permission to create tables in the selected database.
- The database where the table will be created must already exist, or you must create it first.
- In this tutorial, the database name used in all examples is
school.
If the school database does not exist, you can create it first:
CREATE DATABASE school;Then select the database before creating the table.
MySQL CREATE TABLE Syntax
The basic syntax to create a table in MySQL is:
CREATE TABLE table_name (
    column_name data_type column_constraints,
    column_name data_type column_constraints,
    table_constraints
);
For example, a column definition such as name VARCHAR(100) NOT NULL tells MySQL to create a column named name, store character data up to 100 characters, and reject rows where the value is missing.
| Part of CREATE TABLE | Purpose in MySQL |
|---|---|
CREATE TABLE students | Creates a new table named students. |
id INT | Creates an integer column named id. |
AUTO_INCREMENT | Automatically generates the next numeric value for a key column. |
PRIMARY KEY | Identifies each row uniquely. |
NOT NULL | Prevents the column from storing NULL values. |
DEFAULT | Sets a value automatically when no value is supplied. |
Step 1: Select the MySQL Database Before Creating the Table
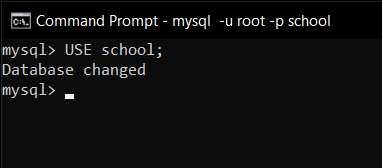
First, select the school database where the table will be created. Use the following SQL command:
USE school;This makes school the active database. Any table you create after this command will be created inside the school database unless you specify another database name explicitly.
You can also create a table by qualifying the database name directly, for example CREATE TABLE school.students (...). However, using USE school; keeps the examples shorter and easier to follow.
Step 2: Create a Basic students Table in MySQL
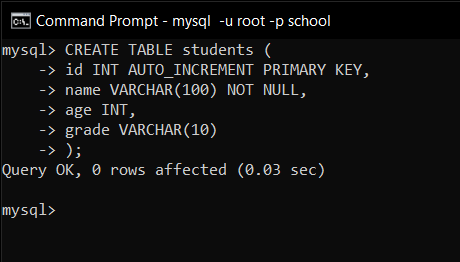
To create a table named students, use the following SQL command:
CREATE TABLE students (
    id INT AUTO_INCREMENT PRIMARY KEY,
    name VARCHAR(100) NOT NULL,
    age INT,
    grade VARCHAR(10)
);
This command creates a table with the following columns:
- id: A unique identifier for each student, automatically incremented.
- name: The student’s name, which cannot be null.
- age: The student’s age, which is optional.
- grade: The student’s grade level (e.g., “10th”, “11th”).
Verify the students Table After CREATE TABLE Runs
To confirm that the table was created, use the following command:
SHOW TABLES;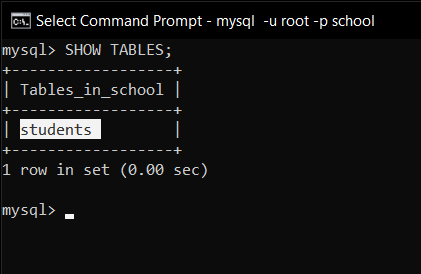
The output should include the students table. To view the table structure, use:
DESCRIBE students;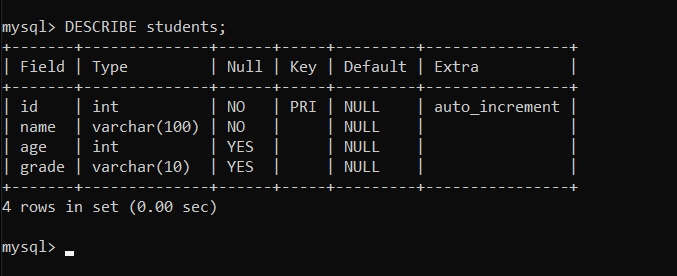
You can also use SHOW CREATE TABLE when you want to see the exact SQL definition MySQL stored for the table.
SHOW CREATE TABLE students;Create a MySQL Table Only If It Does Not Already Exist
If you run CREATE TABLE students again when the table already exists, MySQL returns an error. To avoid this, use IF NOT EXISTS.
CREATE TABLE IF NOT EXISTS students (
    id INT AUTO_INCREMENT PRIMARY KEY,
    name VARCHAR(100) NOT NULL,
    age INT,
    grade VARCHAR(10)
);
This is useful in scripts where the table may already be present. It does not compare the existing table structure with the new definition; it only prevents the statement from failing because the table name already exists.
Step 3: Create a MySQL Table with Constraints
Constraints enforce rules for data integrity. For example, to create the students table with a unique constraint and a default value:
Note: If you already created the students table in the previous step and want to recreate it with a different structure, delete the table first with DROP TABLE students;. Use this only when you no longer need the existing table data.
CREATE TABLE students (
    id INT AUTO_INCREMENT PRIMARY KEY,
    name VARCHAR(100) NOT NULL,
    email VARCHAR(100) UNIQUE,
    age INT DEFAULT 18,
    grade VARCHAR(10) CHECK (grade IN ('10th', '11th', '12th'))
);- email: Ensures unique email addresses for students.
- age: Defaults to 18 if no value is provided.
- grade: Restricts values to “10th”, “11th”, or “12th”.

Attempting to insert invalid data into the grade column will result in an error in MySQL versions that enforce CHECK constraints. For older MySQL versions where CHECK was parsed but not enforced, use application validation or another database rule to prevent invalid values.
Insert a Row into the MySQL students Table
Insert data into this table using:
INSERT INTO students (name, email, age, grade)
VALUES ('John Doe', 'john.doe@example.com', 17, '11th');
To view the data, use:
SELECT * FROM students;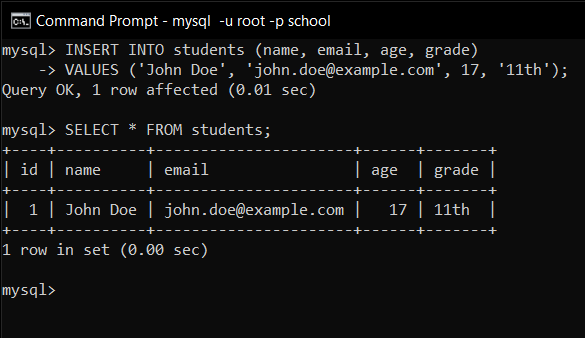
Test the DEFAULT Value in the MySQL students Table
Because the age column has DEFAULT 18, MySQL uses 18 when you omit the age value in an insert statement.
INSERT INTO students (name, email, grade)
VALUES ('Mary Smith', 'mary.smith@example.com', '10th');

SELECT name, age, grade
FROM students
WHERE email = 'mary.smith@example.com';
The selected row will show age as 18 because no age was supplied during insertion.
Step 4: Create MySQL Tables with a Foreign Key Relationship
To establish relationships between tables, use foreign keys. For example, create a classes table and reference it in the students table:
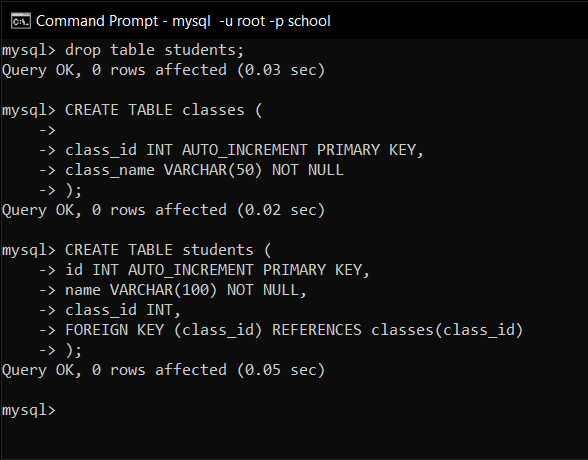
Note: If you already created the students table in the previous examples and want to recreate it with a foreign key, delete the existing table first with DROP TABLE students;. Do not use DROP DATABASE unless you want to delete the entire database and all tables inside it.
CREATE TABLE classes (
    class_id INT AUTO_INCREMENT PRIMARY KEY,
    class_name VARCHAR(50) NOT NULL
);

CREATE TABLE students (
    id INT AUTO_INCREMENT PRIMARY KEY,
    name VARCHAR(100) NOT NULL,
    class_id INT,
    FOREIGN KEY (class_id) REFERENCES classes(class_id)
);
Here, the class_id column in the students table references the class_id column in the classes table. This ensures referential integrity.
Insert Data into MySQL Tables with a Foreign Key
Insert data into the related tables:
INSERT INTO classes (class_name) VALUES ('Math 101');

INSERT INTO students (name, class_id) VALUES ('Alice', 1);
To view the data, use:
SELECT students.name, classes.class_name
FROM students
JOIN classes ON students.class_id = classes.class_id;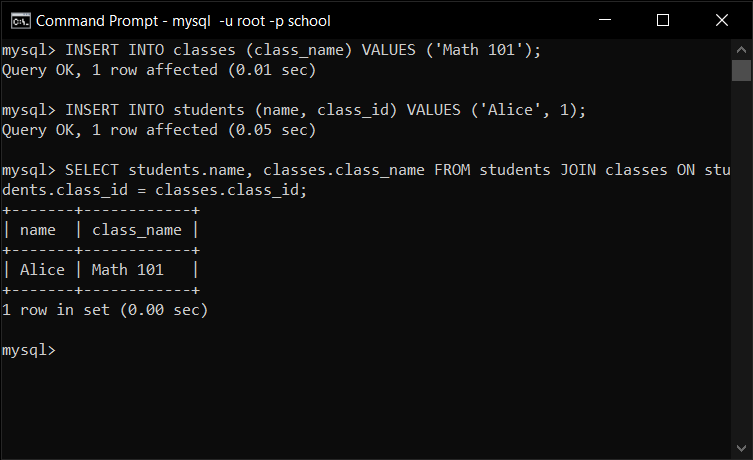
When a foreign key is used, the referenced value must exist in the parent table. In this example, students.class_id must match an existing classes.class_id value unless class_id is allowed to be NULL.
Foreign Key Rule with ON DELETE and ON UPDATE
You can define what happens when a referenced class row is updated or deleted. For example, the following table definition deletes related student rows when the parent class is deleted.
CREATE TABLE students (
    id INT AUTO_INCREMENT PRIMARY KEY,
    name VARCHAR(100) NOT NULL,
    class_id INT,
    CONSTRAINT fk_students_classes
        FOREIGN KEY (class_id)
        REFERENCES classes(class_id)
        ON UPDATE CASCADE
        ON DELETE CASCADE
);
Use cascading actions only when they match the data rules of your application. In many school systems, you may prefer ON DELETE RESTRICT or ON DELETE SET NULL instead of deleting student records automatically.
Create a MySQL Table from Command Prompt
To create a table in MySQL using command prompt or terminal, first log in to the MySQL server. Replace root with your MySQL username if needed.
mysql -u root -pAfter you enter your password and reach the MySQL prompt, select the database and run the CREATE TABLE statement.
USE school;

CREATE TABLE students (
    id INT AUTO_INCREMENT PRIMARY KEY,
    name VARCHAR(100) NOT NULL,
    age INT,
    grade VARCHAR(10)
);
If the statement succeeds, MySQL returns a success message similar to this:
Query OK, 0 rows affectedThen run SHOW TABLES; or DESCRIBE students; to confirm that the table was created correctly.
Useful MySQL Data Types for CREATE TABLE Columns
Choosing the right data type helps MySQL store and validate data correctly. The following data types are commonly used while creating tables.
| MySQL data type | Use it for | Example column |
|---|---|---|
INT | Whole numbers | age INT |
VARCHAR(n) | Variable-length text | name VARCHAR(100) |
DATE | Calendar dates | admission_date DATE |
DECIMAL(p,s) | Exact decimal values | fee DECIMAL(10,2) |
BOOLEAN | True/false style values | is_active BOOLEAN |
TEXT | Long text content | remarks TEXT |
Use VARCHAR for short text such as names, emails, and grades. Use TEXT only when the value may be much longer and does not need a fixed maximum length in the same way.
Using MySQL Workbench to CREATE TABLE
MySQL Workbench provides a graphical interface for creating tables in a database. It is helpful when you want to define columns, indexes, and foreign keys visually, while still being able to review the generated SQL before applying it.
In the following steps, we will go through the step-by-step process of creating a table in MySQL Workbench. We’ll use a school database as an example and create a students table with different columns and constraints.
Prerequisite: Ensure MySQL Workbench is installed on your system, and you have a connection to a MySQL server where the database exists or can be created.
Step 1: Connect MySQL Workbench to the MySQL Server
Launch MySQL Workbench and connect to your MySQL server by clicking on the appropriate connection from the home screen. If you do not have a connection set up, click the + button next to MySQL Connections, fill in the required connection details, and test the connection.
Step 2: Select the school Schema in MySQL Workbench
Once connected, locate the “Schemas” panel on the left-hand side of MySQL Workbench. This panel displays the databases available on the server. Expand the school database (or create one if it doesn’t exist). If the school database isn’t available, right-click anywhere in the Schemas panel and select Create Schema to create it.
To set the database as active, right-click on the school schema and select Set as Default Schema.
Step 3: Open the MySQL Workbench Create Table Tool
In the “Schemas” panel, expand the school schema and locate the Tables folder. Right-click on the Tables folder and select Create Table....
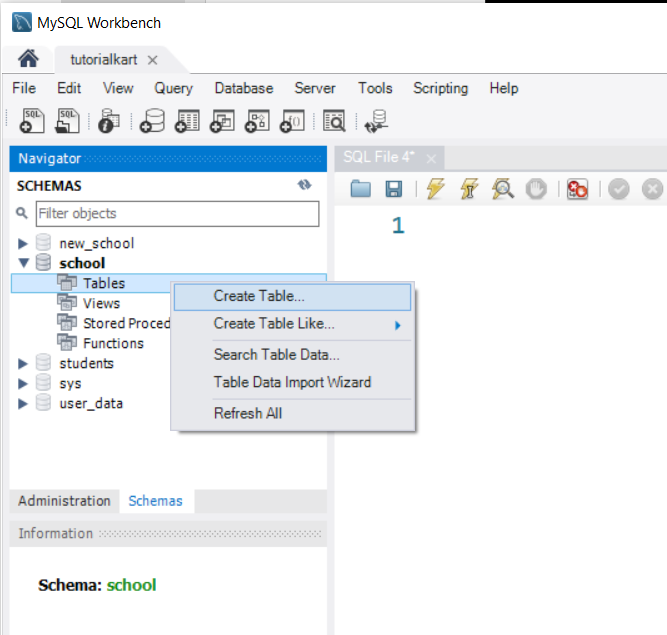
This will open the table creation interface in the main Workbench editor.
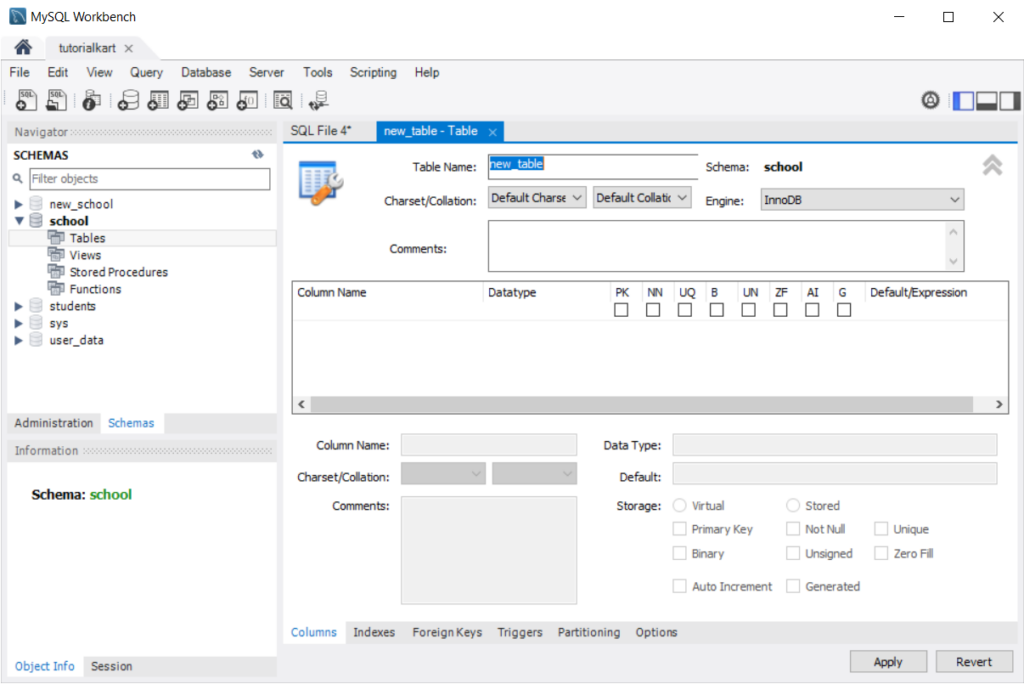
Step 4: Enter the students Table Name in MySQL Workbench
In the table creation interface, provide a name for the new table in the Table Name field. For example, enter students.
Use clear table names that describe the data stored in the table. For this example, students is better than a vague name such as data or info.
Step 5: Add id, name, age, and grade Columns in MySQL Workbench
Below the Table Name field, use the grid to define the columns for the table. Fill in the following details for each column:
- Column Name: Specify the name of the column, such as
id,name,age, andgrade. - Datatype: Select the datatype for the column, such as
INT,VARCHAR(100), orDATE. - PK (Primary Key): Check this option for the column that will serve as the primary key, such as
id. - AI (Auto Increment): Enable this option for the primary key column to auto-increment its values.
- NN (Not Null): Check this option for columns that cannot contain
NULLvalues, such asname.
For example, define the following columns:
| Column | Definition in Workbench |
|---|---|
id | INT, PK, AI, NN |
name | VARCHAR(100), NN |
age | INT, optional |
grade | VARCHAR(10), optional |
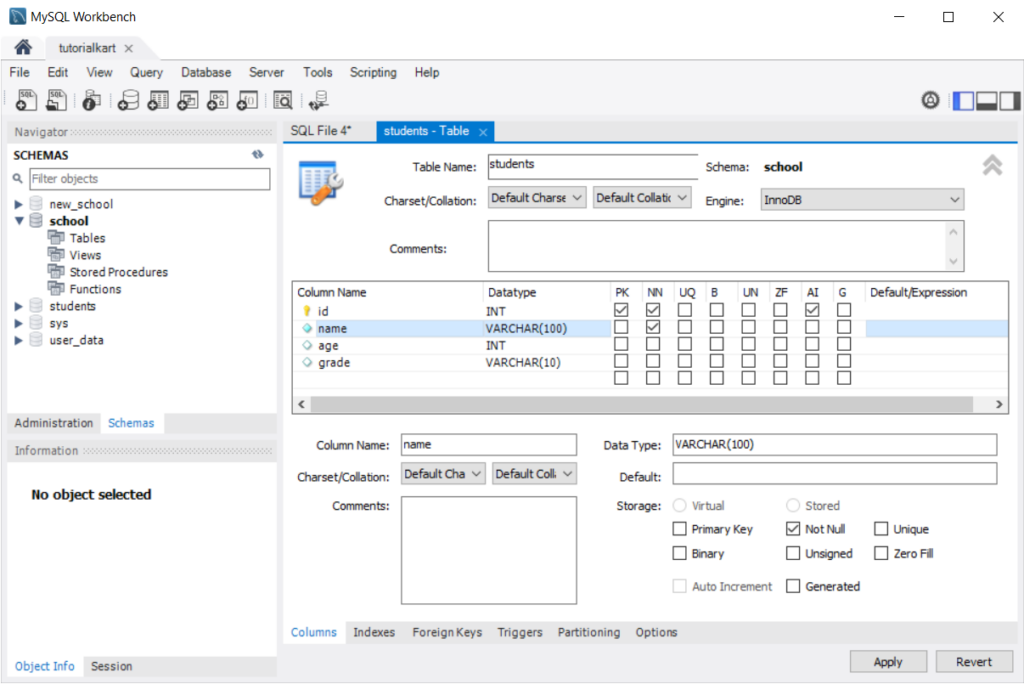
Click Finish.
Step 6: Add MySQL Constraints or Default Values in Workbench
To add constraints like unique keys, foreign keys, or default values, use the tabs in the table creation interface:
- Indexes: Add unique or composite keys.
- Foreign Keys: Define relationships with other tables.
- Default Values: Specify default values for columns in the
Defaultcolumn of the grid.
For example, to set a default value for the grade column, enter 'Unknown' in the Default field.
Step 7: Review the Generated MySQL CREATE TABLE Script
Once all columns and constraints are defined, click Apply in the bottom-right corner of the interface. MySQL Workbench will generate the SQL script for creating the table.
Review the SQL script to ensure it matches your requirements. For example, the generated SQL might look like this:
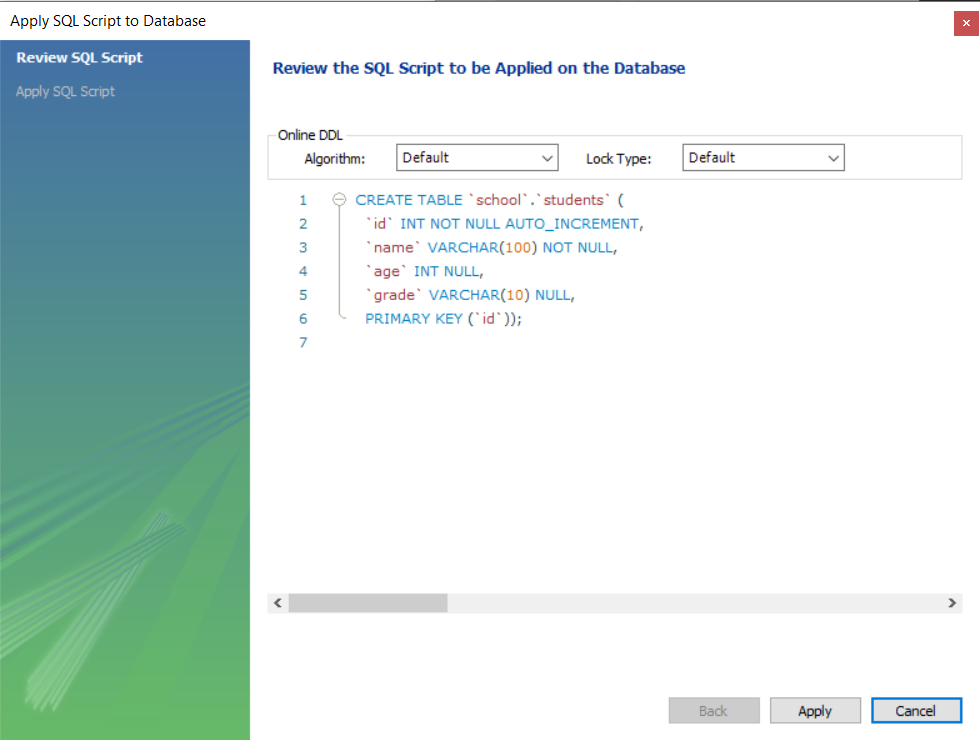
Click Apply again to execute the script and create the table.
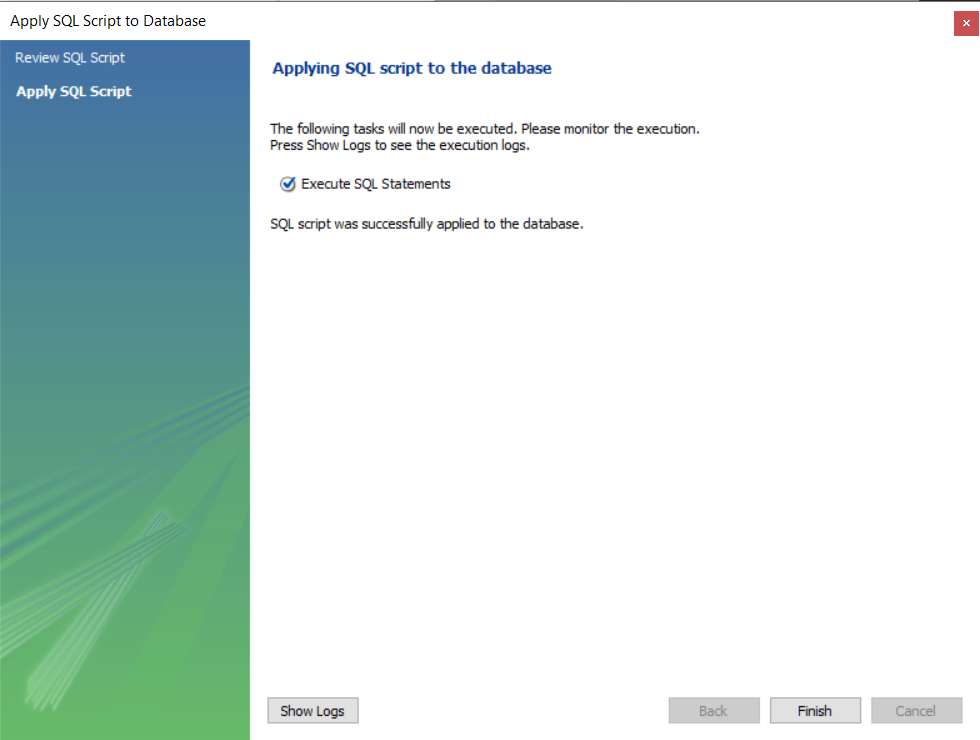
Click Finish to close the dialog.
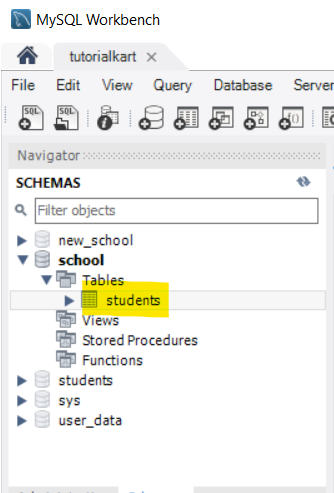
Step 8: Verify the MySQL Table in Workbench
After the table is created, verify its existence by expanding the Tables folder under the school schema in the “Schemas” panel. You can also view the table structure by right-clicking the table name and selecting Table Inspector.
Common MySQL CREATE TABLE Errors and Fixes
The following issues are common when creating a table in MySQL for the first time.
| Problem | Likely cause | Fix |
|---|---|---|
ERROR 1046: No database selected | You did not select a database before running CREATE TABLE. | Run USE school; first, or use CREATE TABLE school.students (...). |
ERROR 1050: Table already exists | A table with the same name already exists. | Use a different table name, use CREATE TABLE IF NOT EXISTS, or drop the existing table if it is no longer needed. |
| Foreign key creation fails | The referenced column is missing, not indexed, or has an incompatible data type. | Ensure the parent table exists first and both columns use compatible definitions. |
| Invalid default value | The default value does not match the column data type. | Use a default value that matches the column type, such as a number for INT or quoted text for VARCHAR. |
When troubleshooting, run SHOW TABLES;, DESCRIBE table_name;, and SHOW CREATE TABLE table_name;. These commands show what MySQL actually created.
MySQL CREATE TABLE Editorial QA Checklist
- Confirm that the database is selected with
USE school;before the table examples are tested. - Check that every column in the
CREATE TABLEstatement has a valid MySQL data type. - Verify that
AUTO_INCREMENTis used with a key column such asPRIMARY KEY. - Ensure foreign key examples create the parent table before the child table.
- Use
DROP TABLE students;when recreating only the table, notDROP DATABASE.
FAQs on Creating Tables in MySQL
How do I add a table to a MySQL database?
Select the database with USE database_name; and then run a CREATE TABLE statement. For example, use USE school; followed by CREATE TABLE students (...);.
How do I create a table in MySQL step by step?
First create or select the database, then decide the table name, define each column with a data type, add constraints such as PRIMARY KEY or NOT NULL, run the CREATE TABLE statement, and verify the result with SHOW TABLES; or DESCRIBE table_name;.
How do I create a table in MySQL using command prompt?
Open command prompt or terminal, log in with mysql -u root -p, enter your password, run USE school;, and then execute your CREATE TABLE SQL statement.
What is the difference between CREATE DATABASE and CREATE TABLE in MySQL?
CREATE DATABASE creates a database container. CREATE TABLE creates a table inside a database. A database can contain many tables.
Can I create a MySQL table without a primary key?
Yes, MySQL allows a table without a primary key. However, most application tables should have a primary key so that each row can be identified reliably.