Filter Transformation in Informatica is an active transformation used in Informatica PowerCenter mappings to pass only the rows that satisfy a filter condition. Rows that do not satisfy the condition are removed from the data flow and are not sent to the connected target or downstream transformation.
Filter Transformation in Informatica PowerCenter
A Filter transformation evaluates each incoming row using the condition that you define with ports, operators, operands, and functions. The condition returns TRUE or FALSE. If the result is TRUE, the Integration Service passes the row to the next object in the mapping. If the result is FALSE, the row is dropped from the pipeline.
Filter transformation is useful when a mapping should load only selected records, such as employees above a salary limit, active customers, records from a specific department, or transactions within a required range. Because it changes the number of rows that continue through the mapping, it is classified as an active transformation.
How the Informatica Filter Transformation Works
The Filter transformation works row by row. For each input row, Informatica evaluates the expression in the filter condition property. Only rows for which the expression is true are passed through the output ports of the transformation.
- Input: rows received from a Source Qualifier or another transformation.
- Condition: an expression such as SAL >= 2000, DEPTNO = 10, or STATUS = ‘ACTIVE’.
- Output: only the rows that meet the condition.
- Dropped rows: rows that fail the condition are not loaded into the connected target from that path.
SAL >= 2000The above condition passes only those employee rows where the salary value is greater than or equal to 2000.
Filter Transformation with Employee Salary Example
In this filter transformation example, we are going to create a mapping that loads only employees whose salary is greater than or equal to 2000. Based on the source type and requirement, filtering can be handled in different places. If the source is relational and the condition can be pushed to the database, a Source Qualifier filter can reduce rows at the source query level. If the source is a flat file or the condition must be applied inside the mapping, use a Filter transformation.
- Creating Mapping.
- Creating Transformation.
- Adding filter condition.
- Creating workflow.
- Creating session.
- Validating the session.
- Run workflow.
- Monitor workflow.
Source Qualifier Filter vs Filter Transformation in Informatica
Both Source Qualifier filter and Filter transformation can reduce rows, but they are used at different stages of the mapping. A Source Qualifier filter is applied while reading data from a relational source. A Filter transformation is applied after data has entered the mapping pipeline.
| Filtering method | Where it is applied | When to use it |
|---|---|---|
| Source Qualifier filter | At source query level for relational sources | Use when the database can filter rows before sending them to Informatica. |
| Filter transformation | Inside the mapping pipeline | Use for flat files, transformation-based conditions, or when filtering must happen after other logic. |
Creating Filter Transformation Mapping
To create a mapping for this transformation, select the required source and target definitions. In this example, the source is EMP and the target is T_EMP.
Drag and drop the source table and target table from the Repository Navigator window to the Mapping Designer workspace. When the source table is added to the workspace, Informatica automatically creates SQ_EMP. SQ means Source Qualifier.
The basic mapping flow for this example is:
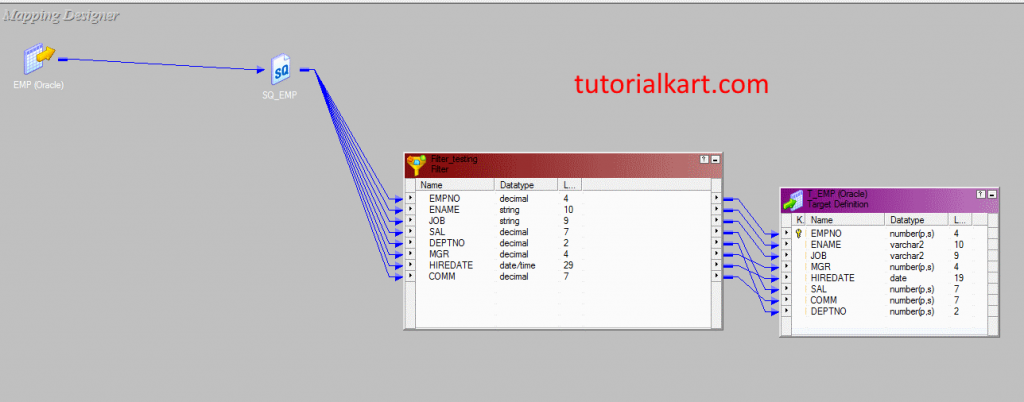
EMP source → SQ_EMP → Filter transformation → T_EMP targetCreating Filter Transformation
Navigate to the Transformation menu to create the Filter transformation. A new window will open with transformation options. Select the transformation type as Filter and enter a meaningful name, such as FIL_EMP_SALARY.
Use a clear transformation name so that the mapping is easy to read later. In real projects, names such as FIL_ACTIVE_CUSTOMERS, FIL_VALID_ORDERS, or FIL_HIGH_VALUE_TXNS make the mapping logic easier to understand.
Adding SAL >= 2000 Filter Condition in Informatica
In this example, our purpose is to filter employees whose salary is greater than or equal to 2000. Select the required fields from SQ_EMP and drop those fields into the Filter transformation.
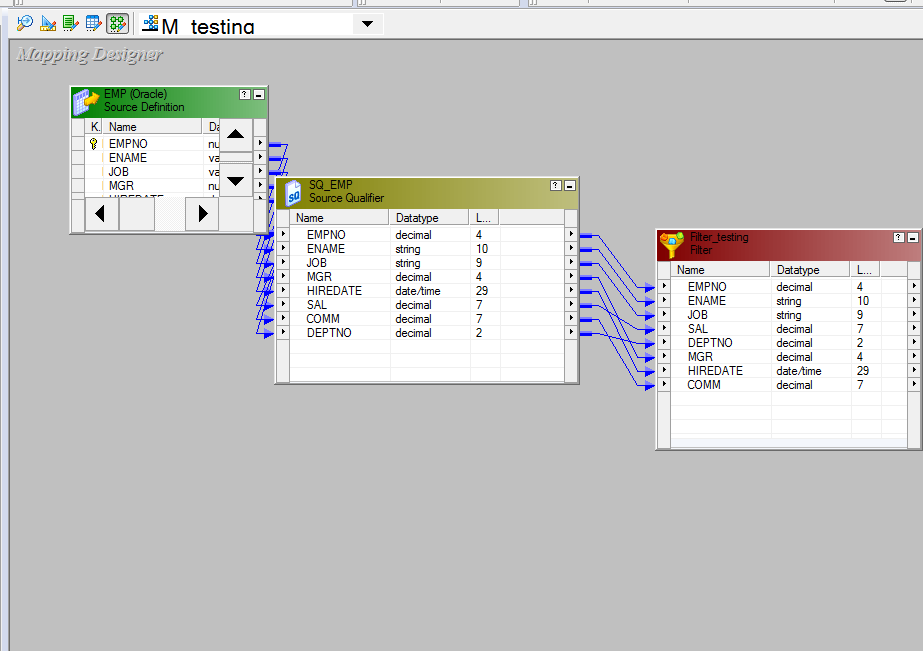
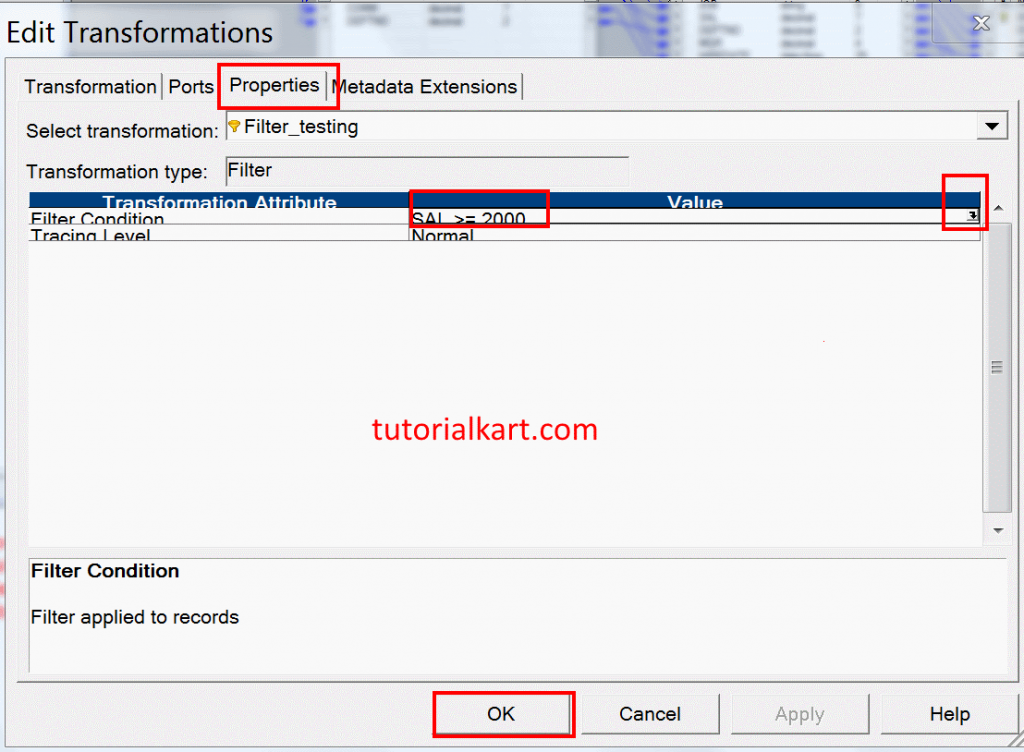
Double-click the Filter transformation header and open the Properties tab. In the filter condition property, open the Expression Editor. Select the Ports tab, double-click SAL, and enter the condition as shown below.
SAL >= 2000- Click Validate to check whether the condition is valid.
- Apply the condition after successful validation.
- Save the mapping before moving to workflow creation.
Make sure the condition matches the business rule. If the requirement is to load employees with salary greater than 2000, use SAL > 2000. If the requirement includes employees whose salary is exactly 2000, use SAL >= 2000.
Adding Ports from Filter Transformation to Target Table
Already we have added the target table from the navigator to the workspace window. Select the required ports from the Filter transformation and drop the ports into the target table T_EMP as shown below.
- Go to the Repository menu and click Save.
Filter Transformation Rules for NULL Values and Expressions
When a filter condition uses a nullable port, handle NULL values carefully. If SAL contains NULL, the expression SAL >= 2000 will not evaluate as a matching salary record. If the mapping must treat NULL salary as zero or apply a specific rule, include that rule in the expression.
NOT ISNULL(SAL) AND SAL >= 2000The above condition is more explicit because it passes only those rows where the salary is not NULL and the salary is greater than or equal to 2000.
Router Transformation vs Filter Transformation in Informatica
A common question is whether to use Router transformation or Filter transformation. Use a Filter transformation when the mapping needs one condition and one passing output path. Use a Router transformation when the same input rows must be separated into multiple groups, such as high salary, medium salary, low salary, and default rows.
| Feature | Filter transformation | Router transformation |
|---|---|---|
| Number of output groups | One passing output group | Multiple output groups plus optional default group |
| Main use | Remove rows that do not match one condition | Split rows into several condition-based paths |
| Example | Load employees with SAL >= 2000 | Send employees to different targets by salary range |
Creating Workflow and Session for Filter Transformation
Now we are going to create a workflow for the filter transformation mapping. To create the workflow in Informatica PowerCenter, open Informatica PowerCenter Workflow Manager.
- Navigate to Tools | Workflow Designer | Create and enter the workflow name.
Now create a session for the mapping. A session in Informatica is a set of instructions that defines how and when the Integration Service moves data from the source definition to the target definition. To create a session, go to Tasks | Create.
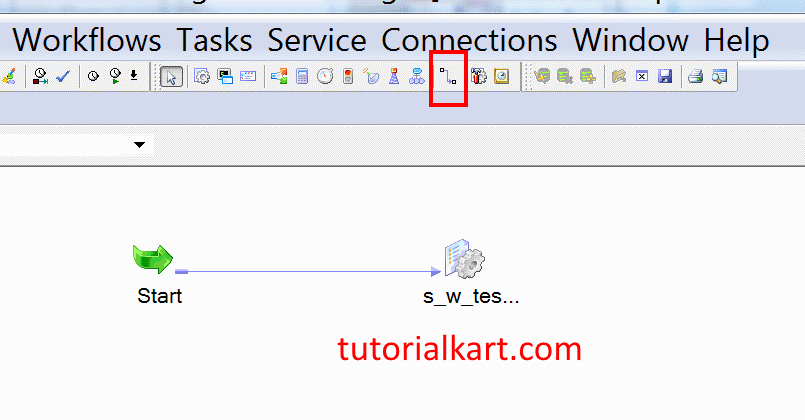
Enter a name for your session and connect it with the workflow using the link task, as shown below. Now configure the mapping for the session by editing the session. Double-click the session and navigate to the Mappings tab.
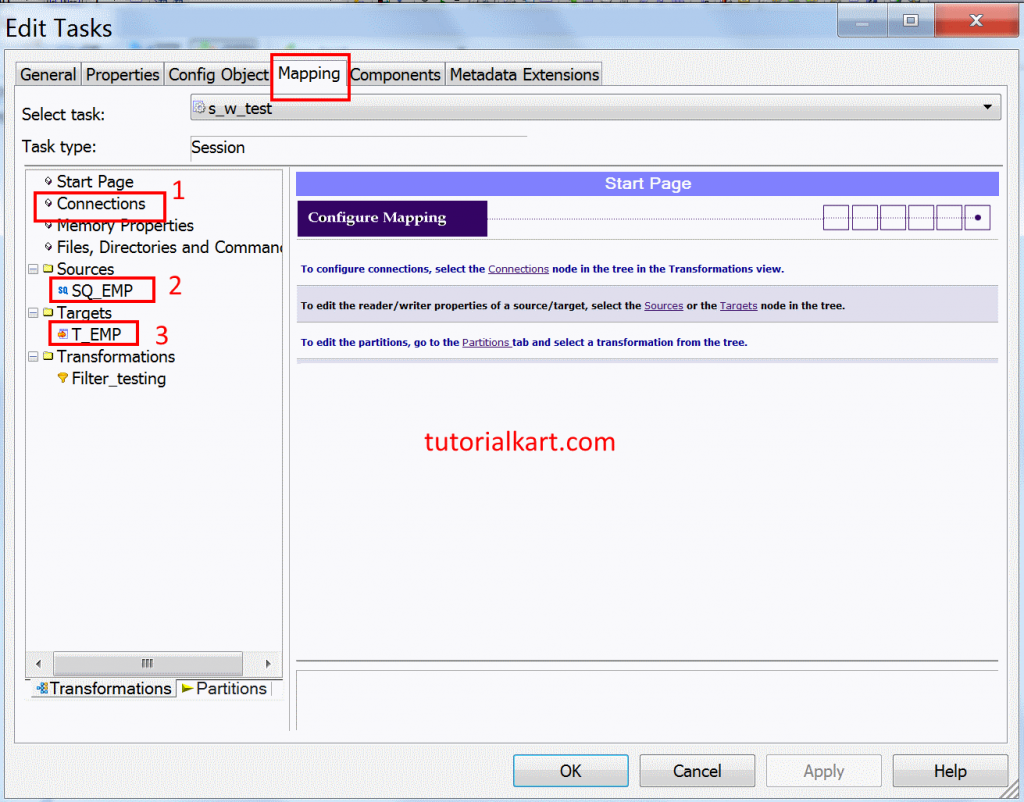
- Click on Connection and select the required value as shown below.
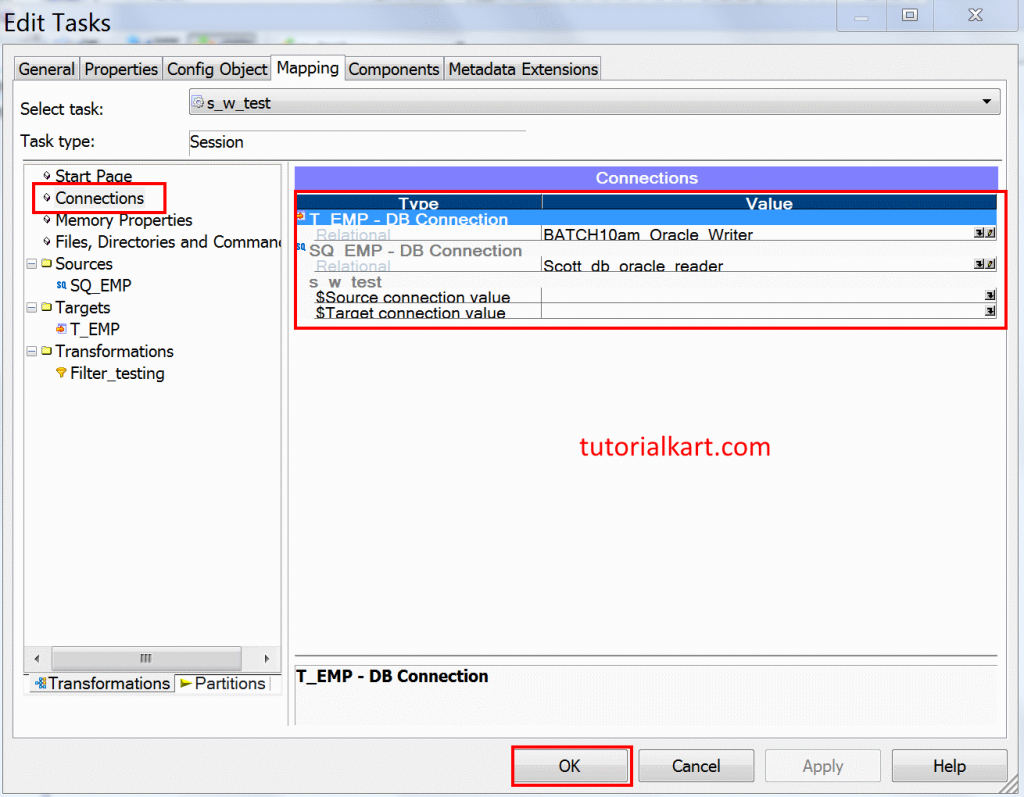
- Select the database connection for source and target.
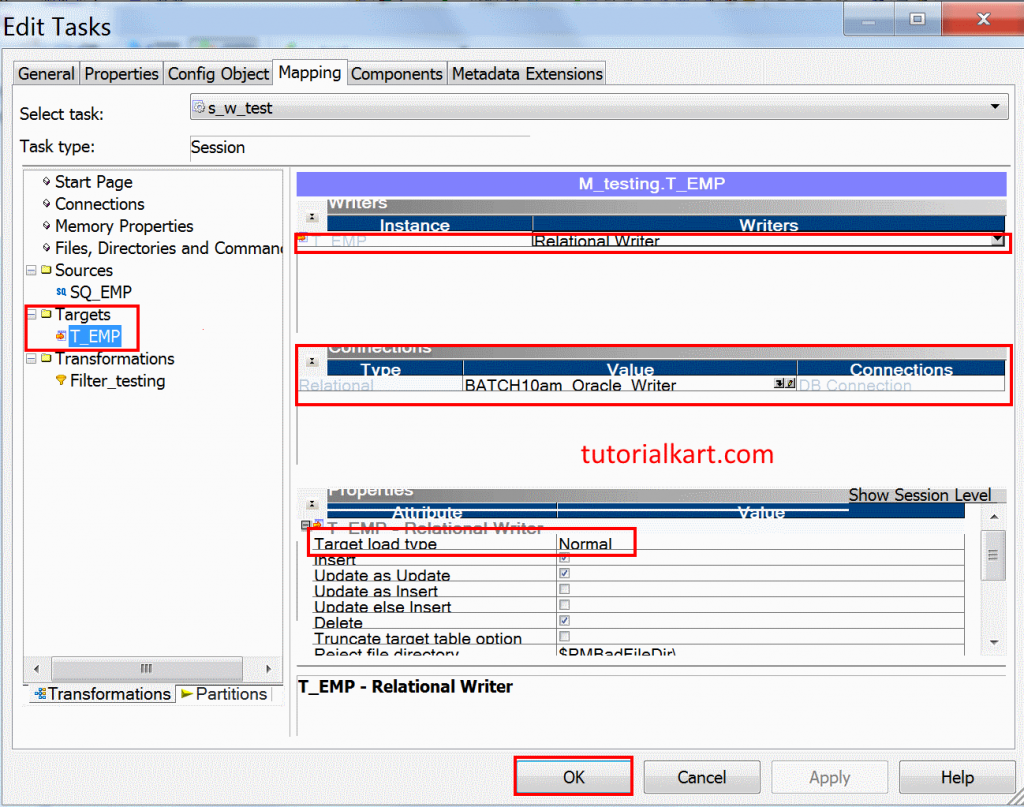
- In the target settings, change the target load type from bulk to normal if required by your connection and target table setup.
- Click OK after completing the session configuration.
- Go to the workflow and click Validate to check whether the workflow and session are valid.
- Save the workflow settings.
Run Filter Transformation Workflow
To run a workflow in Informatica PowerCenter, navigate to the Workflow menu and click Start Workflow. The workflow will be executed, and the status can be monitored in Workflow Monitor. Open Informatica PowerCenter Workflow Monitor to check whether the workflow completed successfully.
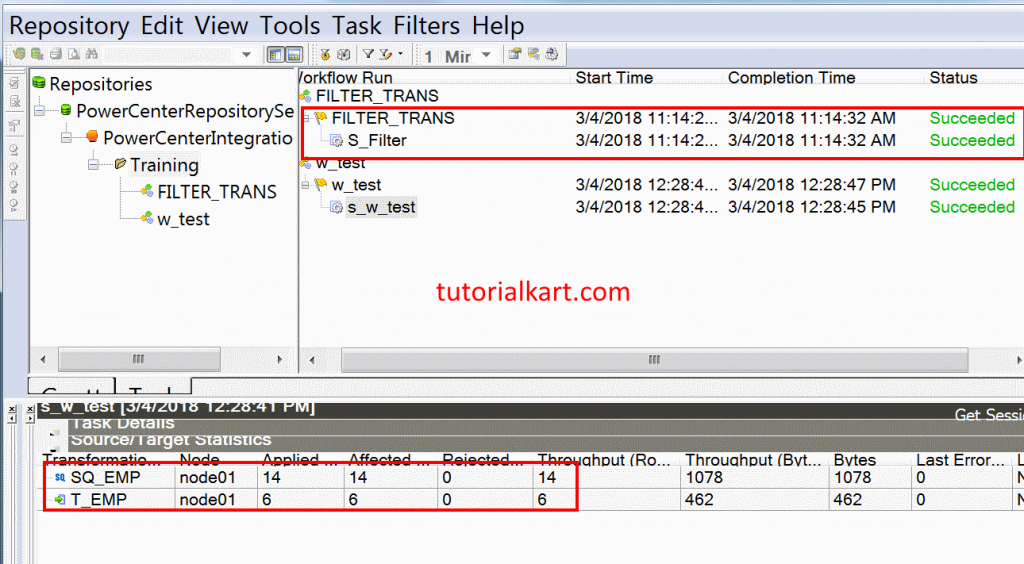
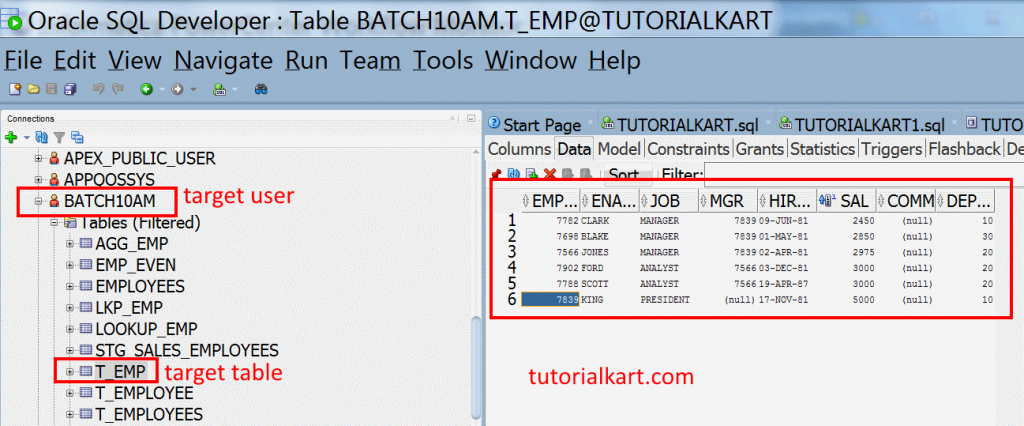
As shown above, the source table has 14 rows. After applying the Filter transformation with the condition SAL >= 2000, 6 rows are loaded successfully into the target table. The remaining rows do not pass through this filter path because they do not meet the salary condition.
Source rows read: 14
Rows passed by filter condition SAL >= 2000: 6
Rows loaded into T_EMP: 6
Check Filter Transformation Output in SQL Developer
Open SQL Developer in your local machine and open the target table as shown below. The target table should contain only those employee records that satisfied the filter condition.
Common Mistakes While Using Filter Transformation in Informatica
- Using the wrong comparison operator: Check whether the rule needs > or >=. These conditions can produce different outputs.
- Ignoring NULL values: A nullable port can affect the result of the filter condition. Add explicit NULL handling when needed.
- Using Filter instead of Router for multiple paths: If records must be divided into several output groups, Router is usually more suitable.
- Filtering too late in the mapping: If unwanted rows can be removed at the source query level, filtering earlier can reduce unnecessary processing.
- Not validating the expression: Always validate the filter condition before saving and running the workflow.
Editorial QA Checklist for This Filter Transformation Mapping
- The mapping flow clearly shows EMP → SQ_EMP → Filter → T_EMP.
- The filter condition is consistent everywhere as SAL >= 2000.
- The explanation states that Filter transformation is an active transformation.
- The output count matches the example: 14 source rows and 6 loaded rows.
- The tutorial explains when to use Source Qualifier filter, Filter transformation, and Router transformation.
Filter Transformation in Informatica FAQs
How does Filter transformation work in Informatica?
Filter transformation checks each incoming row against a filter condition. If the condition returns true, the row is passed to the next transformation or target. If the condition returns false, the row is dropped from that mapping path.
Is Filter transformation active or passive in Informatica?
Filter transformation is an active transformation because it can change the number of rows that pass through the mapping. Rows that do not meet the condition are removed from the flow.
What is the difference between Router and Filter transformation?
Filter transformation passes rows through one condition-based output path. Router transformation can split rows into multiple groups based on multiple conditions. Use Filter for one filtering rule and Router for multiple output groups.
When should I use Source Qualifier filter instead of Filter transformation?
Use a Source Qualifier filter when the source is relational and the database can filter rows before sending data to Informatica. Use a Filter transformation when the source is a flat file, when the condition depends on mapping logic, or when filtering must happen after another transformation.
What happens to rows rejected by a Filter transformation?
Rows that do not satisfy the Filter transformation condition are not passed to the connected output path. They are not loaded into the target connected after the Filter transformation unless the mapping separately captures them through another design.