 TutorialKart.com
ODBC stands for Open Database Connectivity. It is a standard interface through which an application can communicate with a database by using an installed ODBC driver. In Informatica, an ODBC data source can be used to connect to a source or target database, import table metadata, and support data-reading or data-writing operations when the selected Informatica component supports ODBC.
This tutorial explains how to create Oracle source and target ODBC connections on Windows. The screenshots use older Oracle and DataDirect driver versions, but the required connection properties remain similar. Use the driver version, Oracle service details, and credentials supplied for your environment.
ODBC Connection Requirements for Informatica
An ODBC connection depends on three parts: the database, an ODBC driver compatible with that database, and a Data Source Name, commonly called a DSN. The DSN stores connection properties under a recognizable name so that Informatica can use them without requiring the operator to enter every property repeatedly.
- Install a supported ODBC driver for the source or target database.
- Confirm that the Informatica runtime machine can reach the database host and port.
- Collect the database host name, listener port, service name or SID, username, and password.
- Check whether the Informatica process is 32-bit or 64-bit and configure the DSN with the matching ODBC Administrator and driver architecture.
- Use a source account with permission to read the required tables or views.
- Use a target account with only the permissions required to load the target tables.
The DSN must be available on the machine where the relevant Informatica client or runtime process executes. Creating a DSN on a developer workstation does not automatically create it on an Informatica server.
Create a Windows System DSN for Informatica
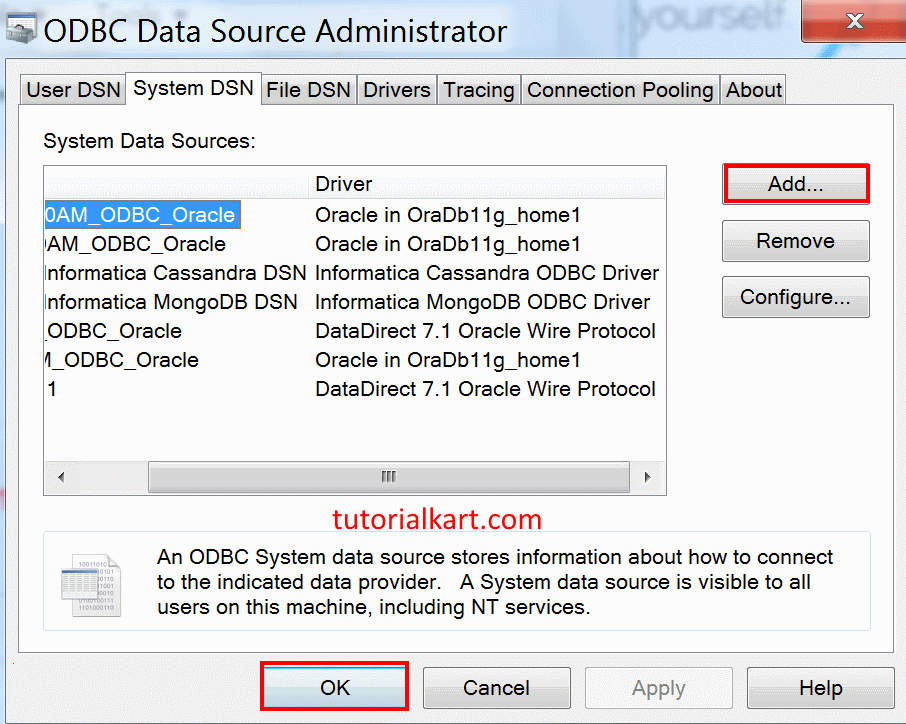
For a Windows-based Informatica service, a System DSN is generally more appropriate than a User DSN because it is available to Windows services and other users on that machine. Open the ODBC Data Source Administrator and select the System DSN tab.
On older Windows versions, the navigation path is Start | Settings | Control Panel | Administrative Tools | Data Sources (ODBC). On current Windows versions, search for ODBC Data Sources and open the 32-bit or 64-bit administrator required by the Informatica process.
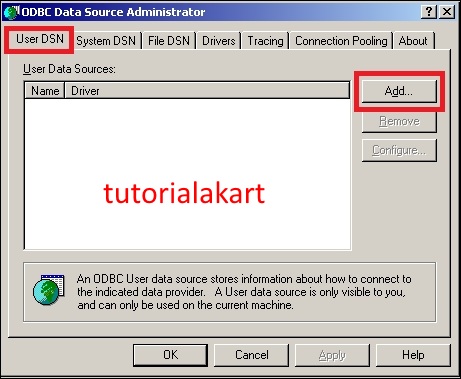
Select System DSN, click Add, and choose the driver for the database to which Informatica must connect. The available drivers depend on what has been installed on the computer.
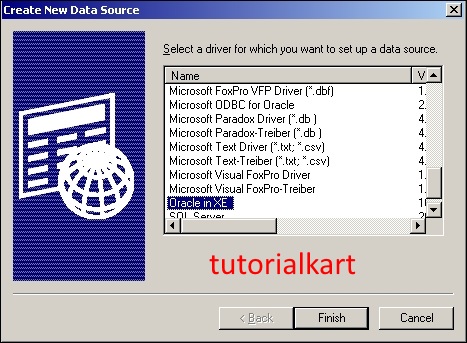
Enter the properties requested by the selected Oracle ODBC driver. Property names vary between driver vendors, but an Oracle DSN commonly requires the following information:
- Data Source Name: a unique DSN name that Informatica users can identify.
- Description: an optional explanation of the database and connection purpose.
- TNS service name, service name, or SID: the Oracle database identifier expected by the selected driver.
- Host and port: the Oracle listener address when the driver uses direct connection properties.
- User ID: the Oracle account used for the source or target operation.
The value XE is often associated with older Oracle Database Express Edition installations, but it is not a universal default. Obtain the correct service name or SID from the Oracle administrator or the database connection configuration.
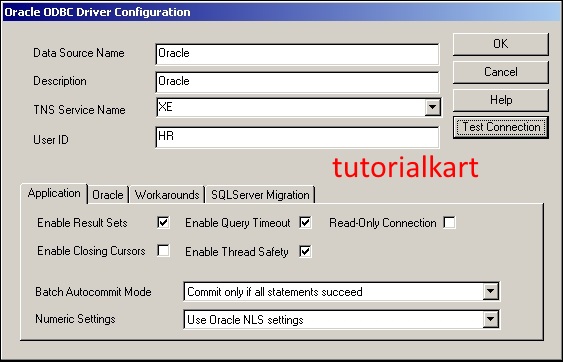
Click the driver’s connection-test option and enter the Oracle username and password when prompted. A successful test confirms that the driver can reach Oracle and authenticate the account from this machine. Click OK to save the DSN.
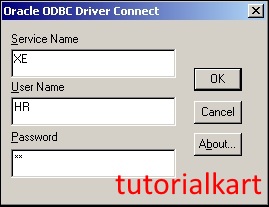
A successful ODBC test does not prove that the account can read or modify every required table. Object permissions must also be checked with the same database account that Informatica will use.
Create the Oracle Source ODBC DSN for Informatica
The following example creates a source DSN with a DataDirect Oracle Wire Protocol driver. Driver names and version numbers differ by Informatica and driver installation, so select the supported Oracle ODBC driver available on your machine.
- In the System DSN tab, click the Add button to create the Oracle source data source.
In this legacy example, select the DataDirect 7.1 Oracle Wire Protocol driver. A Wire Protocol driver communicates directly with the database protocol and may not require a separate Oracle client. Confirm the requirements of the installed driver rather than assuming that every Oracle ODBC driver works this way.
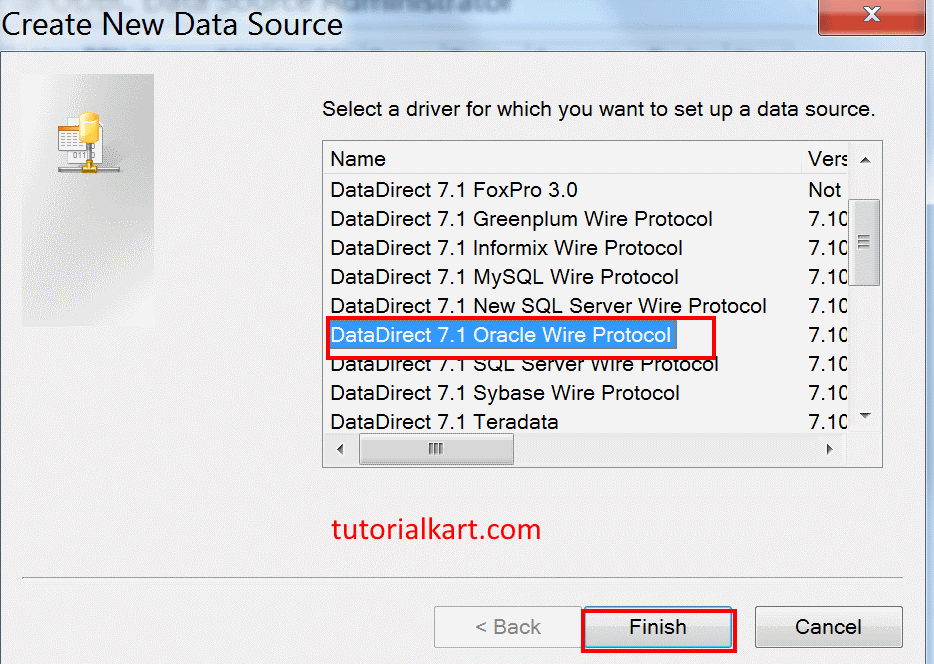
- Click the Finish button to open the driver’s Oracle connection-property window.
Enter the following example properties for the source ODBC connection:
- Data Source Name: SCOTT_ODBC_Oracle
- Host: localhost
- Port Number: 1521
- SID: ORCL
These are sample values only. Use localhost only when Oracle is running on the same computer as the ODBC driver. Port 1521 is commonly used by Oracle Listener, but the actual listener may use a different port. Enter either the SID or service name required by the chosen driver and database configuration.
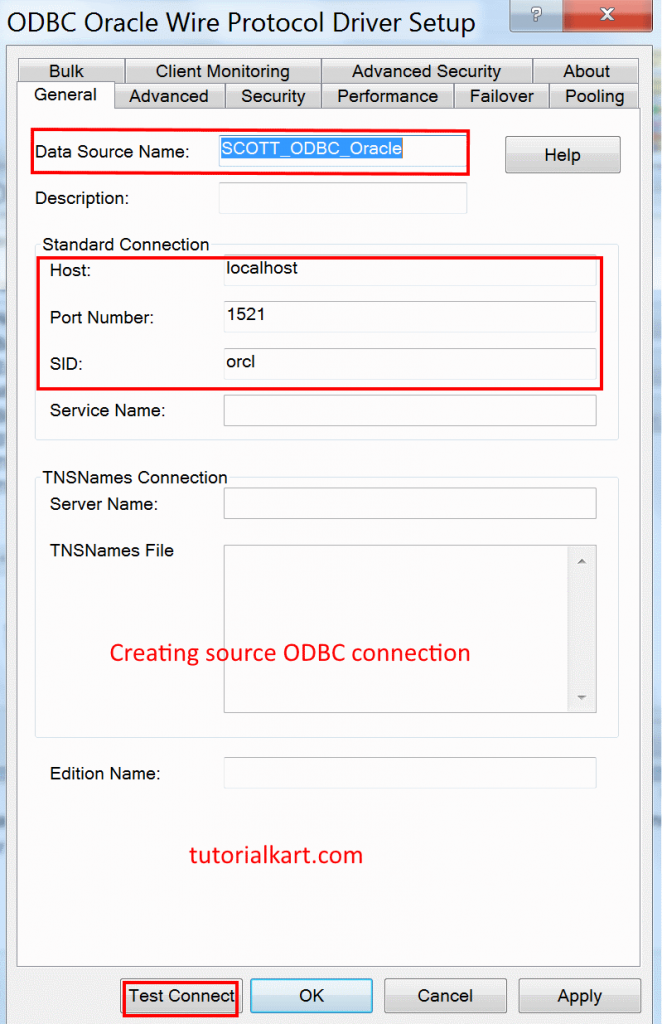
- Click Test Connect. When the authentication window opens, enter the username and password for the Oracle source account.
- Example username: SCOTT
- Example password: Tiger
The SCOTT account and its historical sample password are used only to illustrate this older training database. Modern Oracle installations may not include or unlock this sample account. Use a dedicated source account and do not store or publish production credentials.
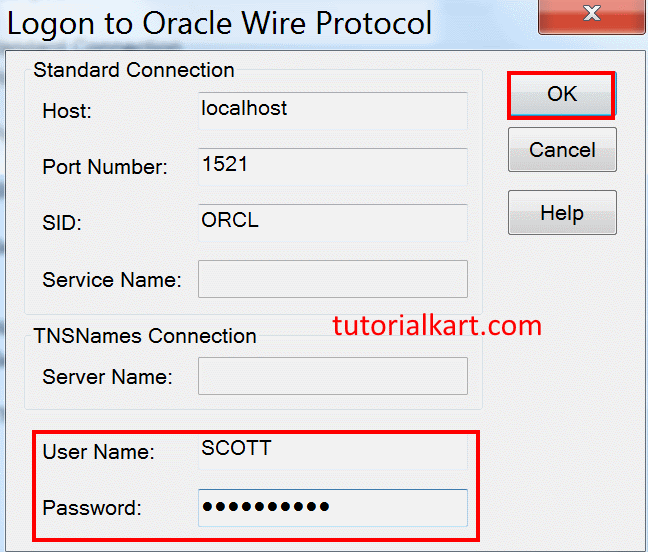
- Click OK to run the test. The driver displays a confirmation if it reaches Oracle and authenticates successfully.
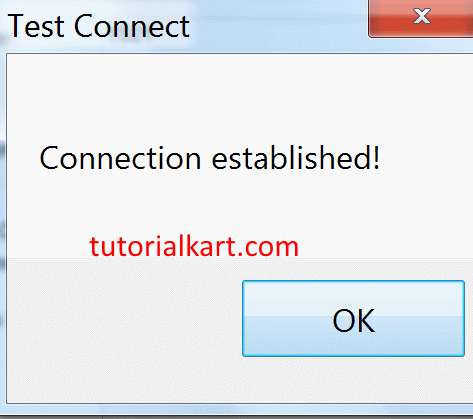
After the test succeeds, verify that the source account can select from every table or view that will be imported or read by Informatica. If an object belongs to another Oracle schema, the account may require a direct SELECT grant on that object.
Create the Oracle Target ODBC DSN for Informatica
Create a separate System DSN for the target, even when the source and target are on the same Oracle server. A distinct target DSN makes the connection purpose clear and allows the target to use a different account with controlled write permissions.
- Data Source Name: Batch10am_ODBC_Oracle
- Host: localhost
- Port: 1521
- SID: tutorialkart
Replace these example values with the target database endpoint. Do not copy the source SID into the target DSN unless both connections genuinely use that same Oracle instance.
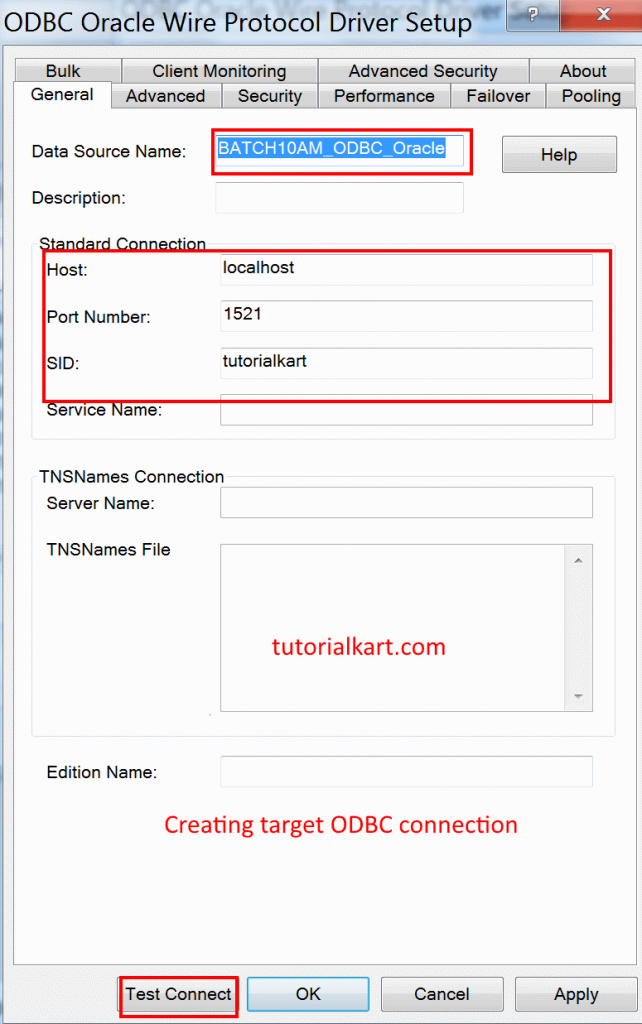
Click Test Connect, enter the target database username and password, and click OK. The target account must have permission to access the intended schema and perform the operations required by the mapping or session, such as inserting, updating, deleting, or reading target rows.
Use the ODBC DSN in Informatica PowerCenter
Creating a Windows DSN does not by itself create an Informatica relational connection. The DSN supplies database connectivity, while Informatica stores the connection settings used by repository tools and runtime sessions.
- Open the PowerCenter repository tool used for the task, such as Source Analyzer or Target Designer.
- Select the option to import source or target metadata from a database.
- Choose ODBC as the connection method when applicable.
- Select or enter the configured source or target DSN.
- Enter the database username and password.
- Connect and select the required schema, tables, or views.
- Import the definitions and verify their column names, data types, precision, scale, and keys.
- Create the required relational connection in Workflow Manager and assign it to the session.
- Run a small test load and review the session log before processing production data.
The DSN name and driver configuration must also exist on the PowerCenter Integration Service machine if the runtime session uses that DSN. A DSN configured only on the Windows client may allow metadata import but still cause the server-side session to fail.
ODBC DSN Setup on Linux Informatica Servers
Linux does not use the Windows ODBC Data Source Administrator. An administrator normally installs the required 64-bit or 32-bit ODBC driver and configures driver and DSN entries in the files used by the installed ODBC driver manager. The exact file names, environment variables, and library paths depend on the driver manager, driver vendor, Informatica version, and service account.
- Install the database ODBC driver supported by the Informatica runtime.
- Configure the driver library and DSN in the ODBC configuration used by the Informatica service account.
- Set any required library-path and ODBC environment variables in the Informatica service environment.
- Test the DSN while signed in as the same operating-system account that runs the Informatica service.
- Restart the relevant Informatica service after changing environment settings when required.
Do not copy a Windows DSN configuration directly to Linux. Use the property names and file locations documented for the installed Linux driver.
Troubleshoot Informatica ODBC Connection Errors
- DSN is not listed: check whether it was created as a System DSN and whether the correct 32-bit or 64-bit ODBC Administrator was used.
- Specified driver could not be loaded: confirm that the driver is installed, its architecture matches the Informatica process, and its libraries are available to the service account.
- Data source name not found: verify that the same DSN exists on the Informatica runtime server, not only on the client workstation.
- Connection test times out: check the host, port, listener status, DNS resolution, routing, and firewall access from the runtime machine.
- Oracle service cannot be resolved: verify the service name, SID, TNS configuration, or direct-connect properties required by the driver.
- Authentication fails: check the username, password, account lock status, password expiry, and selected Oracle service.
- Connection works but tables are missing: confirm the object owner, schema filter, synonyms, and direct object privileges assigned to the source user.
- Target load fails after connecting: verify the target account’s object permissions, constraints, tablespace quota, and required sequence access.
Frequently Asked Questions About Informatica ODBC Connections
Should Informatica use a User DSN or System DSN?
A System DSN is generally suitable for a Windows Informatica service because it is available beyond a single interactive user account. A User DSN is limited to the Windows user who created it and may not be visible to the service account.
Why does an Informatica session fail when the ODBC test succeeds?
The ODBC test may have been performed on a client workstation while the session runs on another server. The runtime server must have a compatible driver and the same required DSN configuration. The database account must also have permission to perform the session’s actual table operations.
Does Informatica require separate ODBC DSNs for source and target databases?
Separate DSNs are appropriate when the endpoints, schemas, credentials, or connection purposes differ. Even if both connect to the same database instance, separate names can make source and target assignments clearer and support different account privileges.
How do I choose between 32-bit and 64-bit ODBC drivers for Informatica?
The driver architecture must match the Informatica component that loads it, not merely the Windows operating-system architecture. Confirm whether the relevant Informatica client or runtime service is 32-bit or 64-bit, then use the corresponding driver and ODBC Administrator.
Informatica ODBC Connection QA Checklist
- Confirm that the installed ODBC driver supports the database and Informatica environment.
- Verify that the driver architecture matches the Informatica client or runtime process.
- Create the DSN on every machine where the relevant Informatica process will use it.
- Check the source and target DSN names, hosts, ports, service names, or SIDs.
- Test each DSN while using the same network path and service account as the Informatica runtime.
- Verify source-table read privileges with the configured source database user.
- Verify target-table write privileges with the configured target database user.
- Confirm that imported metadata matches the current database column definitions.
- Run a limited source-to-target load and review the Informatica session log.
- Remove sample credentials and unnecessary database privileges before deployment.