Install Node.js on Windows 10 or Windows 11
This tutorial explains how to install Node.js and npm on Windows. For most users, the simplest method is the official Windows Installer (.msi). A manual ZIP installation is also covered because it is useful when you need a portable installation or cannot run an installer.
Node.js runs JavaScript outside the browser, while npm is the package manager installed with the standard Node.js Windows installer. The same steps apply to current 64-bit editions of Windows 10 and Windows 11.
Choose a Node.js Windows Installation Method
- Official Windows Installer (.msi): recommended for a straightforward installation. It installs Node.js, npm, and normally updates the Windows PATH automatically.
- Node version manager: useful when different projects require different Node.js versions. Microsoft documents the use of nvm-windows for native Windows development.
- ZIP archive: useful for a manual or portable setup. You must extract the files and configure PATH yourself.
For a first installation, use the official installer from the Node.js download page. Choose an LTS release unless your project specifically requires a Current release or a particular older version.
Install Node.js on Windows with the Official Installer
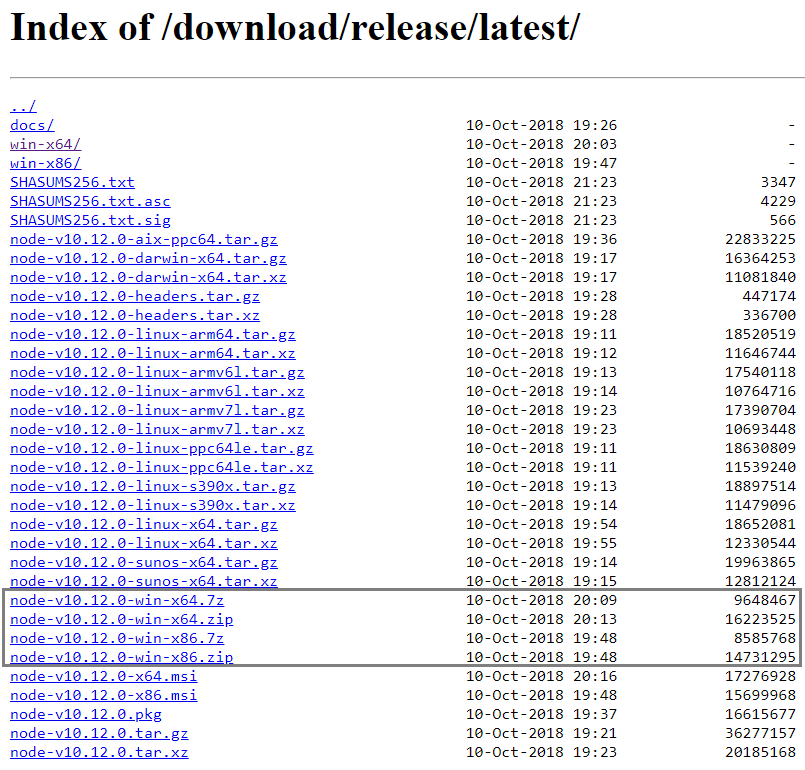
1. Download the Node.js Windows Installer
Open the official Node.js download page and select the Windows Installer for your system architecture. On most current Windows computers, this is the 64-bit x64 installer. Windows on ARM devices may require the ARM64 build when it is offered for the selected release.
Latest releases of Node.js are available at https://nodejs.org/download/release/latest/.
2. Run the Node.js Setup Wizard
Open the downloaded .msi file. Accept the licence terms, keep the default installation folder unless you have a specific requirement, and retain the default features. Make sure the option that adds Node.js to PATH remains enabled, then complete the installation.
The installer normally includes npm. Additional build tools are not required for ordinary JavaScript projects, but some npm packages with native modules may require a compiler toolchain later.
3. Open a New Command Prompt or PowerShell Window
Close terminals that were open before installation and start a new Command Prompt, PowerShell, or Windows Terminal session. A new session is needed so that it reads the updated PATH value.
4. Verify Node.js and npm on Windows
Run the following commands. Each command should print an installed version number.
node --version
npm --version
You may also run node to open the Node.js REPL. Enter a JavaScript expression such as 2 + 3, and type .exit to leave the shell.
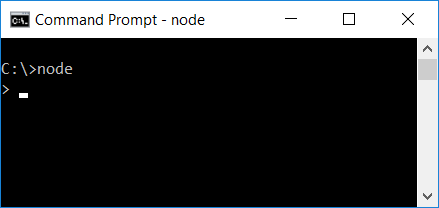
Open Command Prompt and run the command node. Node Shell would be started.
5. Check the Installed Node.js Version
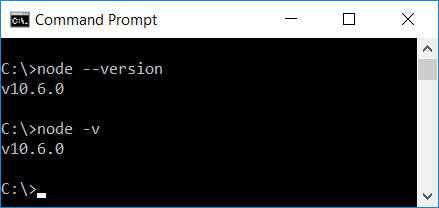
To check Node Version, run either node -v or node --version in the command prompt.
Install Node.js from a ZIP Archive on Windows
The ZIP method does not use the setup wizard. It is a manual installation, so you must select the correct build, extract it, and add its folder to the Windows PATH.
1. Check the Windows System Architecture
You can get information about your OS architecture. Open Command Prompt and run the following command.
wmic OS get OSArchitecture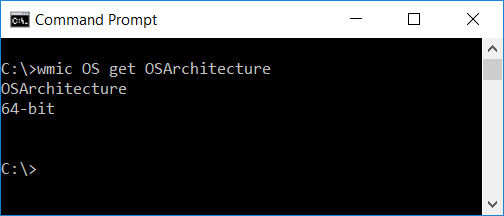
On newer Windows installations where wmic is unavailable, open Settings > System > About and check System type. You can also run the following PowerShell command.
$env:PROCESSOR_ARCHITECTUREBased on the architecture of your Windows Operating System, download the appropriate .zip or .7z file.
To know your windows architecture (x64 or x86), run the command wmic OS get OSArchitecture in Command Prompt.
The PC is running on x64, we have chosen x64.zip file to download.
2. Extract the Node.js ZIP File
Extract the zip file and copy the nodejs folder to C:\Program Files.
If Windows asks for administrator permission when copying to C:\Program Files, approve the prompt. You may instead use another permanent directory that you can write to, but avoid moving the folder after adding it to PATH.
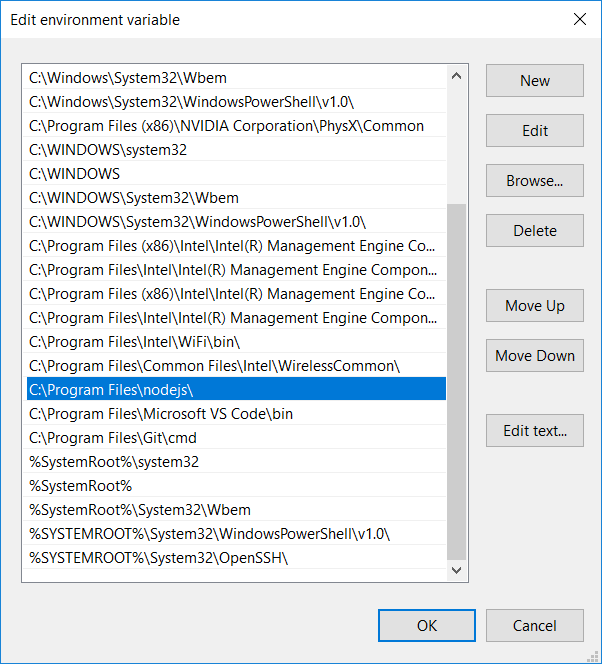
3. Add the Node.js Folder to the Windows PATH
Now we should let the PC know that we have a program called node at location “C:\Program Files\nodejs”
Add this location to System Environment Path variable.
- Search Windows for Edit the system environment variables.
- Select Environment Variables.
- Under User variables or System variables, select Path and choose Edit.
- Add the directory that contains
node.exe, such asC:\Program Files\nodejs. - Confirm the dialogs, then open a new terminal window.
4. Verify the Manual Node.js Installation
Open a new Command Prompt and run these commands to confirm that Windows can find the executable.
where node
node --version
A ZIP distribution may require separate npm setup depending on the archive and release selected. For a standard installation that includes npm, prefer the official Windows Installer.
Run a First Node.js Program on Windows
Create a file named app.js with the following JavaScript code.
console.log("Node.js is working on Windows.");Open a terminal in the folder containing the file and run:
node app.jsThe result should be:
Node.js is working on Windows.Install an npm Package on Windows
To confirm that npm works, create a project directory, initialize a package file, and install a package locally.
mkdir node-test
cd node-test
npm init -y
npm install lodash
The command creates a package.json file and installs the package under node_modules. Use local installation for project dependencies unless a tool specifically documents a global installation.
Use Node.js in Visual Studio Code on Windows
Visual Studio Code does not install Node.js by itself. Install Node.js on Windows first, restart Visual Studio Code, and open its integrated terminal. Run node --version and npm --version there. If the commands work in a new Command Prompt but not in VS Code, close all VS Code windows and reopen the application so it reloads PATH.
Troubleshoot Node.js Installation Problems on Windows
“node is not recognized” after installation
Open a new terminal and run where node. If no path is returned, confirm that the Node.js installation directory is present in PATH. With the standard installer, the usual directory is C:\Program Files\nodejs\.
npm is not recognized but node works
Check the installation folder for the npm command files, then rerun the official installer and keep the npm package manager feature selected. Avoid downloading npm from an unrelated website.
Windows finds more than one Node.js installation
Run where node and where npm. Multiple results can indicate an older installer-based copy, a version-manager copy, or a manually extracted copy. Remove obsolete PATH entries and keep one installation strategy active to avoid version conflicts.
PowerShell blocks an npm script
If PowerShell reports an execution-policy error for an npm script, use Command Prompt temporarily or review your organisation’s PowerShell policy before changing security settings. Do not weaken a managed policy without approval.
Node.js on Windows FAQs
Should I install the Node.js LTS or Current release on Windows?
Choose an LTS release for general development and long-lived projects. Choose Current only when you need its newer platform features and your project supports that release line.
Does installing Node.js also install npm on Windows?
Yes. The official Node.js Windows Installer normally installs npm with Node.js. Verify both tools with node --version and npm --version.
Can I install Node.js on Windows 11 using these steps?
Yes. The official installer process is the same for supported Windows 10 and Windows 11 systems. Select the installer that matches the computer’s architecture.
Do I need to install Node.js separately for Visual Studio Code?
Install Node.js in Windows, not inside Visual Studio Code. VS Code uses the Node.js and npm commands available through the Windows PATH.
When should I use nvm-windows instead of the Node.js installer?
Use a version manager when you regularly switch between Node.js versions for different projects. For one version and a simple setup, the official installer is usually easier. Do not combine a version-manager installation with an old installer-based copy unless you understand and manage the resulting PATH entries.
Node.js Windows Installation QA Checklist
- The download comes from the official Node.js website or another documented, trusted source.
- The selected build matches the Windows architecture.
- A new terminal recognizes both
nodeandnpm. where nodepoints to the intended installation and does not reveal an unwanted duplicate.- A small
app.jsfile runs successfully withnode app.js.
Conclusion
In this NodeJS Tutorial, we have learnt how to install Node.js on Windows OS. In our next tutorial, we shall get started with Basic Node.js Application Example.