How to Add an External JAR File to Android Studio Dependencies
An external JAR file contains compiled Java classes that an Android application can use as a local library. To add one in Android Studio, place the file in the application module’s libs directory and declare it as a Gradle dependency.
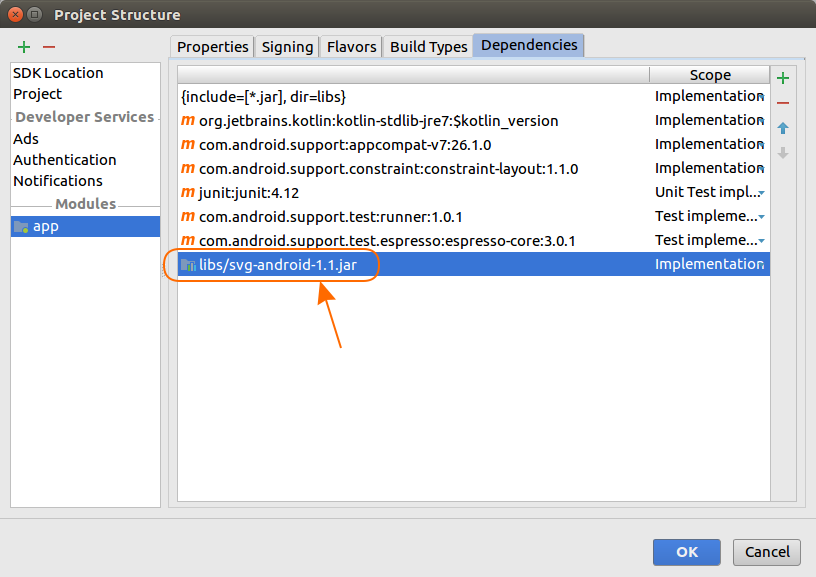
This tutorial demonstrates the process with a file named svg-android-1.1.jar. The screenshots show the Project Structure method, while the Gradle examples provide a direct alternative for current Android Studio projects.
Place the External JAR in the App Module
Step 1: Open the Project window and locate the app module. Copy or drag svg-android-1.1.jar into the app/libs directory.

If the libs directory does not exist, right-click the app module, create a directory named libs, and then place the JAR file inside it. Confirm that the file is under the module rather than the project-level directory.
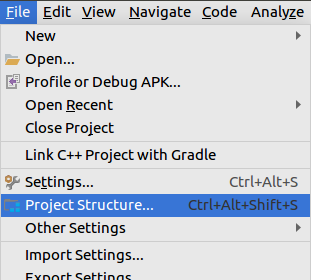
Add the JAR Through Android Studio Project Structure
Step 2: Open File > Project Structure. The location and appearance of this option can vary slightly between Android Studio versions.
Step 3: Select Modules, choose the app module, and open its Dependencies section. Click the add button shown with a plus symbol.
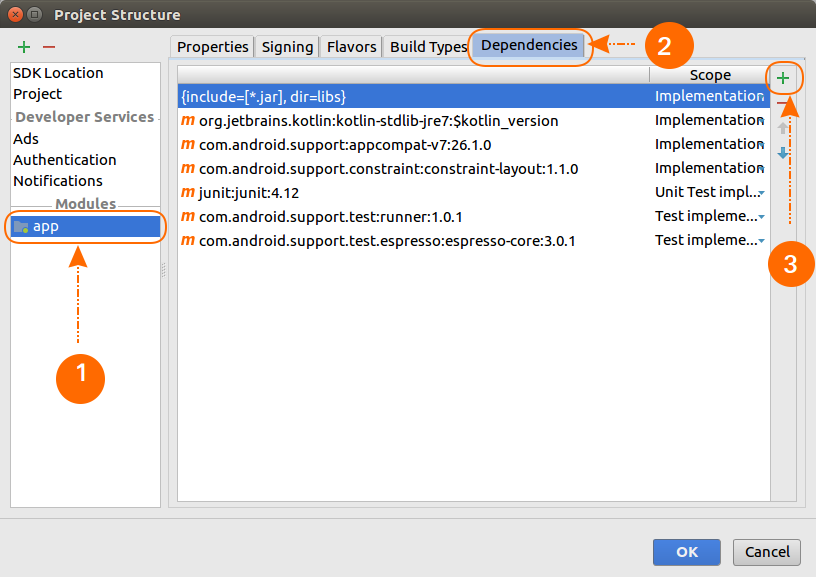
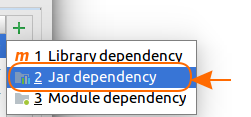
Step 4: Select JAR Dependency. In some Android Studio versions, this option may be named JARs or Directories or File dependency.
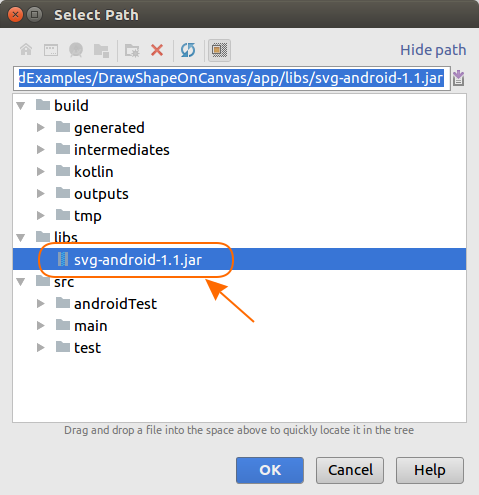
Step 5: Browse to the app/libs directory and select the JAR file.
Step 6: Confirm that the JAR appears in the app module’s dependency list. Use the implementation dependency configuration unless the library must be exposed to another module that depends on this module.
Apply the change and allow Android Studio to synchronize the project with Gradle. After synchronization and compilation complete, the application module can import accessible classes from the JAR.
Add a Local JAR Directly in the Gradle Build File
You can declare the local JAR without using the Project Structure window. Open the module-level build file, normally app/build.gradle.kts or app/build.gradle, and add the corresponding dependency.
Kotlin DSL Dependency for a Single JAR
dependencies {
    implementation(files("libs/svg-android-1.1.jar"))
}
Groovy DSL Dependency for a Single JAR
dependencies {
    implementation files('libs/svg-android-1.1.jar')
}
After editing the build file, click Sync Project with Gradle Files or use the synchronization prompt displayed by Android Studio.
Include Every JAR in the libs Directory
If the module contains several local JAR files, a file-tree dependency can include every file ending in .jar under app/libs.
Kotlin DSL File-Tree Dependency
dependencies {
    implementation(fileTree("libs") { include("*.jar") })
}
Groovy DSL File-Tree Dependency
dependencies {
    implementation fileTree(dir: 'libs', include: ['*.jar'])
}
Use either the single-file declaration or the file-tree declaration for the same JAR. Declaring the file through both forms can add it twice and lead to duplicate-class errors.
Verify the Android Gradle Dependency
Build the app module and import one of the library’s public classes in the appropriate Kotlin or Java source file. You can also inspect the module’s dependency report from the project’s root directory.
./gradlew :app:dependenciesOn Windows Command Prompt, run the wrapper as gradlew.bat :app:dependencies. Search the report for the local file dependency if you need to confirm that Gradle has included it.
JAR, AAR, and Repository Dependencies in Android Projects
- JAR: Suitable for compiled Java or Kotlin bytecode and related resources stored in the JAR, but it does not package Android resources such as layouts, drawables, or an Android manifest in the same way as an Android library.
- AAR: Designed for Android libraries and can contain Android resources, a manifest, native libraries, and compiled classes.
- Repository dependency: Prefer the library’s documented Maven repository coordinate when one is available. Gradle can then resolve the selected version and its declared transitive dependencies.
A local JAR does not automatically tell Gradle which additional libraries it requires. If the JAR depends on other artifacts, add those dependencies separately using the documentation supplied by the library publisher.
Troubleshooting External JAR Dependencies in Android Studio
JAR Classes Remain Unresolved
Confirm that the JAR is inside app/libs, the dependency is declared in the app module rather than only at the project level, and Gradle synchronization completed successfully. Then rebuild the project and verify the package name used by the import statement.
Duplicate Class Error After Adding the JAR
A duplicate-class error usually means the same classes are available from more than one dependency. Check whether the JAR was declared both individually and through fileTree, or whether another repository dependency already contains the library.
JAR Works in One Module but Not Another
Gradle dependencies apply to the module in which they are declared. Add the dependency to each module that directly needs it, or configure a shared Android or Java library module with the appropriate dependency exposure.
Android Resources Are Missing from the Library
If the library is expected to provide layouts, drawables, manifest entries, or other Android resources, verify that the publisher supplies an AAR or a Maven dependency. A plain JAR is generally not the correct package for an Android library containing those resources.
External JAR Dependency FAQs
How do I add a JAR file as a library in Android Studio?
Copy the JAR into the app module’s libs directory and add it as an implementation file dependency through Project Structure or the module-level Gradle build file. Synchronize Gradle afterward.
Should I use implementation files or fileTree for a local JAR?
Use implementation(files(…)) when you want to name and manage a specific JAR. Use fileTree when every JAR in the libs directory should be included. Do not include the same file using both declarations.
Does an external JAR include its own dependencies?
Not necessarily. A local JAR may use classes from other libraries, but Gradle cannot infer those dependencies from a simple file declaration. Add any required supporting libraries separately unless they have already been bundled into the JAR.
Can an Android AAR be added using the same JAR declaration?
An AAR is an Android library package and should be added using an AAR-compatible local or repository dependency configuration. Do not rename an AAR to JAR because the two formats package different content.
External JAR Integration QA Checklist
- The JAR file is stored under the intended module’s libs directory.
- The module-level Gradle file contains one dependency declaration for the JAR.
- Gradle synchronization and the app module build finish without dependency errors.
- The imported class and package names match those contained in the JAR.
- Any transitive libraries required by the JAR are declared separately.
- An AAR or repository dependency is used instead if the library requires Android resources.
Using the Added JAR in the Android App Module
After the dependency is synchronized and the module builds successfully, import the required public classes from the JAR and use them in the application code. If Android Studio cannot resolve a class, check the module configuration and the library’s package structure before changing the dependency declaration.
For more Android development topics, continue with the Kotlin Android Tutorial.