 TutorialKart.com
Kotlin Android AlertDialog
An Android AlertDialog displays a modal message or choice that requires the user’s attention. A dialog can contain a title, message, action buttons, a selectable list, or a custom layout. While it is visible, the user normally interacts with the dialog before returning to the underlying activity or fragment.
Use an alert dialog for a short decision, confirmation, warning, or selection. Avoid placing lengthy forms or large amounts of content in a dialog; a dedicated screen is usually easier to use for those tasks.
AlertDialog title, message, and action buttons
A standard Android alert dialog can contain the following elements:
- Title: Identifies the decision or information presented by the dialog.
- Message: Gives the user enough context to choose an action.
- Positive button: Confirms the proposed action, such as Delete, Save, or Continue.
- Negative button: Declines the action or closes the dialog without applying it.
- Neutral button: Provides an alternative that is neither confirmation nor rejection, such as Remind Me Later.
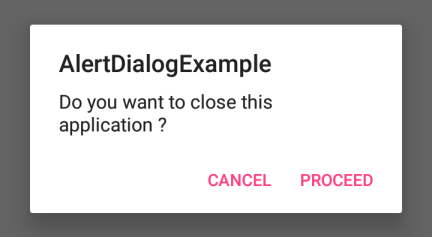
Steps to create an AlertDialog in Kotlin
- Create an
AlertDialog.Builderusing an activity or another theme-aware UI context. - Set a concise title and message that explain the requested decision.
- Add positive, negative, or neutral buttons as required.
- Place the application action inside the appropriate button listener.
- Configure whether the dialog can be canceled by the Back button or by touching outside it.
- Call
show()on the builder or on the createdAlertDialog.
The setter methods of AlertDialog.Builder return the builder, so they can be chained. Dialog creation and other UI updates must run on the main thread.
Modern Kotlin AlertDialog example in an Activity
The following example uses androidx.appcompat.app.AlertDialog and View Binding. When the user taps the button, the activity asks for confirmation before closing. The negative button dismisses the dialog automatically.
package com.example.alertdialog

import android.os.Bundle
import androidx.appcompat.app.AlertDialog
import androidx.appcompat.app.AppCompatActivity
import com.example.alertdialog.databinding.ActivityMainBinding

class MainActivity : AppCompatActivity() {

    private lateinit var binding: ActivityMainBinding

    override fun onCreate(savedInstanceState: Bundle?) {
        super.onCreate(savedInstanceState)

        binding = ActivityMainBinding.inflate(layoutInflater)
        setContentView(binding.root)

        binding.btnShowAlert.setOnClickListener {
            showCloseConfirmationDialog()
        }
    }

    private fun showCloseConfirmationDialog() {
        AlertDialog.Builder(this)
            .setTitle("Close application?")
            .setMessage("Do you want to close this application?")
            .setPositiveButton("Close") { _, _ ->
                finish()
            }
            .setNegativeButton("Cancel", null)
            .show()
    }
}
Passing null as the negative-button listener is sufficient when the button only needs to dismiss the dialog. Use an explicit listener when canceling must also perform another operation.
Original Kotlin Android AlertDialog example
In this example Kotlin Android application, an alert dialog is displayed when the user wants to close the application. If the user clicks Cancel, the alert dialog is dismissed. If the user clicks Proceed, the activity is closed.
activity_main.xml
<?xml version="1.0" encoding="utf-8"?>
<LinearLayout xmlns:android="http://schemas.android.com/apk/res/android"
    xmlns:tools="http://schemas.android.com/tools"
    android:layout_width="match_parent"
    android:layout_height="match_parent"
    android:gravity="center"
    tools:context=".MainActivity">
    <Button
        android:id="@+id/btnShowAlert"
        android:layout_width="wrap_content"
        android:layout_height="wrap_content"
        android:text="Show Alert"/>
</LinearLayout>
MainActivity.kt
package com.tutorialkart.alertdialogexample
import android.support.v7.app.AppCompatActivity
import android.os.Bundle
import kotlinx.android.synthetic.main.activity_main.*
import android.app.AlertDialog
import android.content.DialogInterface
class MainActivity : AppCompatActivity() {
    override fun onCreate(savedInstanceState: Bundle?) {
        super.onCreate(savedInstanceState)
        setContentView(R.layout.activity_main)
        // when button is clicked, show the alert
        btnShowAlert.setOnClickListener {
            // build alert dialog
            val dialogBuilder = AlertDialog.Builder(this)
            // set message of alert dialog
            dialogBuilder.setMessage("Do you want to close this application ?")
                    // if the dialog is cancelable
                    .setCancelable(false)
                    // positive button text and action
                    .setPositiveButton("Proceed", DialogInterface.OnClickListener {
                        dialog, id -> finish()
                    })
                    // negative button text and action
                    .setNegativeButton("Cancel", DialogInterface.OnClickListener {
                        dialog, id -> dialog.cancel()
                    })
            // create dialog box
            val alert = dialogBuilder.create()
            // set title for alert dialog box
            alert.setTitle("AlertDialogExample")
            // show alert dialog
            alert.show()
        }
    }
}
This original example uses the older Android Support Library import and Kotlin Android synthetic view access. In a current Android project, use AndroidX and View Binding, as shown in the modern example above. The original code is retained here for readers maintaining older projects.
Run the Android application on a device or emulator. Tapping the Show Alert button displays the confirmation dialog.
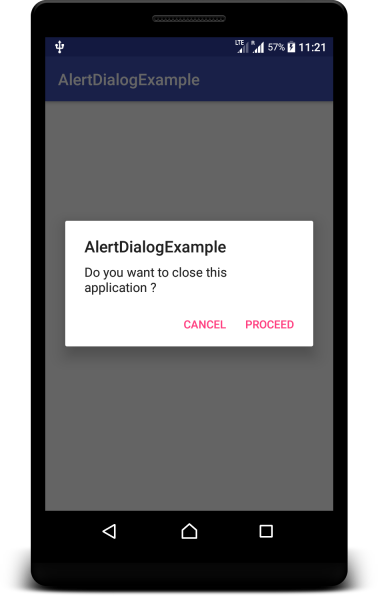
Show an AlertDialog from an Android Fragment
Inside a fragment, use a valid activity context while the fragment is attached. Calling requireContext() from a click listener or another lifecycle-safe point provides that context.
private fun showDeleteDialog() {
    AlertDialog.Builder(requireContext())
        .setTitle("Delete item?")
        .setMessage("This item will be removed.")
        .setPositiveButton("Delete") { _, _ ->
            deleteItem()
        }
        .setNegativeButton("Cancel", null)
        .show()
}
Do not use an application context to create a normal UI dialog because it does not carry the activity theme or window association required by the dialog. For dialogs that must survive configuration changes or need more lifecycle control, place the dialog in a DialogFragment.
Create a reusable AlertDialog with DialogFragment
A DialogFragment lets the FragmentManager manage the dialog. The following example sends the confirmed result to its parent fragment through the Fragment Result API.
import android.app.Dialog
import android.os.Bundle
import androidx.appcompat.app.AlertDialog
import androidx.core.os.bundleOf
import androidx.fragment.app.DialogFragment

class DeleteConfirmationDialog : DialogFragment() {

    override fun onCreateDialog(savedInstanceState: Bundle?): Dialog {
        return AlertDialog.Builder(requireContext())
            .setTitle("Delete item?")
            .setMessage("This action cannot be undone.")
            .setPositiveButton("Delete") { _, _ ->
                parentFragmentManager.setFragmentResult(
                    REQUEST_KEY,
                    bundleOf(CONFIRMED_KEY to true)
                )
            }
            .setNegativeButton("Cancel", null)
            .create()
    }

    companion object {
        const val REQUEST_KEY = "delete_confirmation"
        const val CONFIRMED_KEY = "confirmed"
    }
}
Show the dialog from a fragment as follows:
DeleteConfirmationDialog().show(
    parentFragmentManager,
    "DeleteConfirmationDialog"
)
Display a list of choices with AlertDialog setItems()
Use setItems() when the user must select one action from a short list. The dialog dismisses after an item is selected.
val options = arrayOf("Camera", "Gallery", "Files")

AlertDialog.Builder(this)
    .setTitle("Choose an image source")
    .setItems(options) { _, selectedIndex ->
        when (selectedIndex) {
            0 -> openCamera()
            1 -> openGallery()
            2 -> openFilePicker()
        }
    }
    .setNegativeButton("Cancel", null)
    .show()
For a persistent single choice, use setSingleChoiceItems(). For multiple independent choices, use setMultiChoiceItems() and provide a separate confirmation button.
Use a custom layout in an Android AlertDialog
A custom dialog layout is appropriate when a title and message are not sufficient. Inflate the layout with its generated binding class and pass the root view to setView().
<LinearLayout xmlns:android="http://schemas.android.com/apk/res/android"
    android:layout_width="match_parent"
    android:layout_height="wrap_content"
    android:orientation="vertical"
    android:padding="24dp">

    <EditText
        android:id="@+id/nameInput"
        android:layout_width="match_parent"
        android:layout_height="wrap_content"
        android:hint="Name"
        android:inputType="textPersonName" />

</LinearLayout>val dialogBinding = DialogNameBinding.inflate(layoutInflater)
AlertDialog.Builder(this)
.setTitle("Enter a name")
.setView(dialogBinding.root)
.setPositiveButton("Save") { _, _ ->
val name = dialogBinding.nameInput.text.toString().trim()
saveName(name)
}
.setNegativeButton("Cancel", null)
.show()The standard positive button dismisses the dialog after its listener runs. If input must be validated without closing the dialog, create the dialog first and replace the positive button’s click listener after calling show().
Validate custom AlertDialog input before dismissal
val dialogBinding = DialogNameBinding.inflate(layoutInflater)

val dialog = AlertDialog.Builder(this)
    .setTitle("Enter a name")
    .setView(dialogBinding.root)
    .setPositiveButton("Save", null)
    .setNegativeButton("Cancel", null)
    .create()

dialog.setOnShowListener {
    dialog.getButton(AlertDialog.BUTTON_POSITIVE).setOnClickListener {
        val name = dialogBinding.nameInput.text.toString().trim()

        if (name.isEmpty()) {
            dialogBinding.nameInput.error = "Enter a name"
        } else {
            saveName(name)
            dialog.dismiss()
        }
    }
}

dialog.show()
Control AlertDialog cancellation and dismissal
By default, a dialog can normally be canceled using the Back button or by touching outside it. Use setCancelable(false) only when the user must explicitly choose one of the displayed actions. A non-cancelable dialog should still provide a safe way to leave it.
dialog.dismiss()closes the dialog.dialog.cancel()closes a cancelable dialog and also invokes its cancel listener.setOnCancelListenerhandles cancellation through the Back button or an outside touch.setOnDismissListenerruns whenever the dialog is dismissed, regardless of the cause.
Common Kotlin AlertDialog errors
| AlertDialog problem | Likely cause | Correction |
|---|---|---|
| Dialog has the wrong theme or cannot attach to a window | An application context was used | Use the activity context or requireContext() in an attached fragment |
| Dialog appears more than once after rotation | It was shown directly from repeated lifecycle or state callbacks | Use DialogFragment or guard the one-time UI event |
| Custom form closes despite invalid input | The standard positive-button listener dismisses automatically | Attach a custom click listener after show() |
| Application crashes while showing the dialog | The activity or fragment is no longer in a valid UI state | Show it only while the screen is active and attached |
| Older example imports cannot be resolved | The project uses AndroidX instead of the old Support Library | Use androidx.appcompat.app.AlertDialog and View Binding |
Kotlin AlertDialog accessibility and content guidelines
- Use a title that states the decision, such as “Delete file?” instead of a vague title such as “Warning.”
- Label buttons with specific actions such as Delete, Discard, or Save instead of Yes and No where possible.
- Keep the message concise and explain consequences that are not clear from the button labels.
- Do not rely only on color to communicate a destructive or disabled action.
- Test the dialog with larger font sizes, screen readers, keyboard navigation, and both portrait and landscape layouts.
Kotlin AlertDialog editorial QA checklist
- Confirm that every AlertDialog example uses an activity or theme-aware fragment context.
- Verify that positive and negative button labels describe their actual AlertDialog actions.
- Check whether canceling, dismissing, and confirming produce distinct intended results.
- Test custom AlertDialog validation to ensure invalid input does not dismiss the dialog.
- Verify that fragment-based dialogs do not appear twice after configuration changes.
- Confirm that current examples use AndroidX and View Binding while the retained legacy example is clearly identified.
Kotlin Android AlertDialog FAQs
Which context should AlertDialog.Builder use in Kotlin?
Use the current activity context. In an activity, pass this when it refers to the activity. In an attached fragment, use requireContext(). Avoid the application context for a normal UI dialog.
How do I stop an AlertDialog from closing when validation fails?
Create the dialog with a positive button that initially has a null listener. After showing the dialog, obtain the positive button with getButton() and attach a listener that calls dismiss() only after the input is valid.
Should a fragment use AlertDialog or DialogFragment?
A simple dialog can be created with AlertDialog.Builder(requireContext()). Use DialogFragment when the dialog needs reusable behavior, FragmentManager integration, result delivery, or better handling across configuration changes.
How do I display selectable items in an Android AlertDialog?
Use setItems() for a short action list, setSingleChoiceItems() when one choice should remain selected, or setMultiChoiceItems() when the user can select several values.
Why is kotlinx.android.synthetic unresolved in an AlertDialog example?
Kotlin Android synthetic view access is an older approach and is not used in current projects. Enable View Binding and access the views through the generated binding class instead.
Kotlin Android AlertDialog tutorial summary
An Android AlertDialog is suitable for short confirmations, warnings, and choices. Build it with a valid UI context, assign clear action labels, and use a DialogFragment when lifecycle management is required. Custom layouts can collect small amounts of input, but their positive-button behavior must be adjusted when validation should prevent dismissal.
Refer to the Android dialog documentation for platform guidance. Continue with this Kotlin Android Tutorial for related Android examples.