 TutorialKart.com
Kotlin Android ListView Example
Android ListView displays a vertically scrollable collection of rows. The data is supplied through an adapter, which creates a row view for each item currently needed on the screen.
In this tutorial, we shall display the elements of a Kotlin array in a ListView using ArrayAdapter. We shall then add a ListView item click listener that reads the selected position and value.
The original example below uses the Android Support Library because it was created for an older Android project. The ListView and ArrayAdapter concepts remain valid. A current AndroidX version of the activity is also provided later in this tutorial.
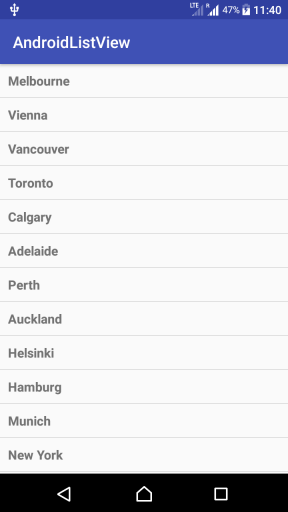
An example ListView widget in an Android screen looks as shown in the following screenshot.
How ListView and ArrayAdapter Work in Kotlin
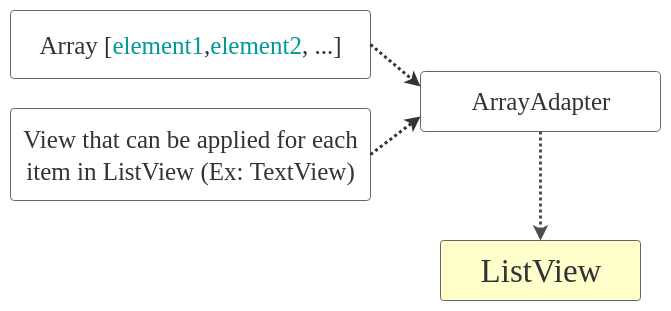
A ListView does not store or format the data by itself. It asks a ListAdapter for the row views that should be displayed. In this example, ArrayAdapter connects an array of city names to a TextView-based row layout.
- Data source: the Kotlin array containing the city names.
- Adapter:
ArrayAdapter, which connects the array to the row views. - Row layout:
listview_item.xml, which defines how one city name appears. - ListView: the scrollable container that requests rows from the adapter.
Example Project for an Android ListView
Create a Kotlin Android Application with Empty Activity and follow the steps provided below to implement Android ListView. We shall use MainActivity , that is created by default while creating project, to implement ListView.
The project contains MainActivity.kt, the activity layout, and a separate layout for each ListView row.
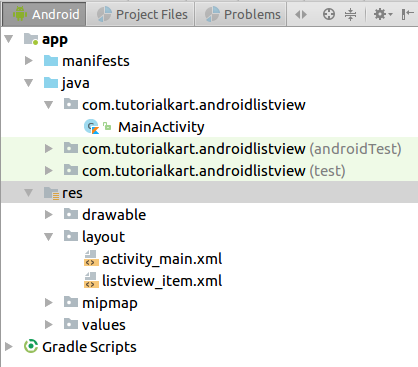
Steps to Display a Kotlin Array in ListView
Step 1: Create ListView in activity_main.xml layout file.
android/res/layout/activity_main.xml
<?xml version="1.0" encoding="utf-8"?>
<android.support.constraint.ConstraintLayout xmlns:android="http://schemas.android.com/apk/res/android"
    xmlns:tools="http://schemas.android.com/tools"
    android:layout_width="match_parent"
    android:layout_height="match_parent"
    tools:context="com.tutorialkart.androidlistview.MainActivity">

    <ListView
        android:id="@+id/listview_1"
        android:layout_width="match_parent"
        android:layout_height="wrap_content" />

</android.support.constraint.ConstraintLayout>
Step 2: Have an array of elements, in the MainActivity.kt class file, to be displayed as ListView.
var array = arrayOf("Melbourne", "Vienna", "Vancouver", "Toronto", "Calgary", "Adelaide", "Perth", "Auckland", "Helsinki", "Hamburg", "Munich", "New York", "Sydney", "Paris", "Cape Town", "Barcelona", "London", "Bangkok")Step 3: Create a resource under android/res/layout that could be used for each element of the array while displaying in ListView.
android/res/layout/listview_item.xml
<?xml version="1.0" encoding="utf-8"?>
<!-- Each List Item is displayed as TextView defined below -->

<TextView xmlns:android="http://schemas.android.com/apk/res/android"
    android:id="@+id/label"
    android:layout_width="fill_parent"
    android:layout_height="fill_parent"
    android:padding="10dip"
    android:textSize="16dip"
    android:textStyle="bold" >
</TextView>
Step 4: Initialize an Adapter (ArrayAdapter) with application context, resource to be used as View for each element of the list, and the array of elements itself as arguments.
Step 5: Set the adapter created in the previous step to the ListView.
Assembling all these steps, content of MainActivity.kt file would be as shown in the following.
MainActivity.kt
package com.tutorialkart.androidlistview

import android.support.v7.app.AppCompatActivity
import android.os.Bundle
import android.widget.ArrayAdapter
import android.widget.ListView


class MainActivity : AppCompatActivity() {

    var array = arrayOf("Melbourne", "Vienna", "Vancouver", "Toronto", "Calgary", "Adelaide", "Perth", "Auckland", "Helsinki", "Hamburg", "Munich", "New York", "Sydney", "Paris", "Cape Town", "Barcelona", "London", "Bangkok")

    override fun onCreate(savedInstanceState: Bundle?) {
        super.onCreate(savedInstanceState)
        setContentView(R.layout.activity_main)

        val adapter = ArrayAdapter(this,
                R.layout.listview_item, array)

        val listView:ListView = findViewById(R.id.listview_1)
        listView.setAdapter(adapter)
    }
}
Run the Kotlin Android ListView Example Application. Following would be the output.
ListView is scrollable by default. As rows move off the screen, ListView can reuse their views for new positions instead of creating every row again.
Current AndroidX Version of the ListView Activity
New Android Studio projects use AndroidX rather than the old Android Support Library. If your activity extends AndroidX AppCompatActivity, the equivalent implementation can be written as follows. This version uses the same listview_1 ID and listview_item.xml resource as the example above.
package com.tutorialkart.androidlistview

import android.os.Bundle
import android.widget.ArrayAdapter
import android.widget.ListView
import androidx.appcompat.app.AppCompatActivity

class MainActivity : AppCompatActivity() {

    private val cities = arrayOf(
        "Melbourne", "Vienna", "Vancouver", "Toronto",
        "Calgary", "Adelaide", "Perth", "Auckland",
        "Helsinki", "Hamburg", "Munich", "New York",
        "Sydney", "Paris", "Cape Town", "Barcelona",
        "London", "Bangkok"
    )

    override fun onCreate(savedInstanceState: Bundle?) {
        super.onCreate(savedInstanceState)
        setContentView(R.layout.activity_main)

        val listView = findViewById<ListView>(R.id.listview_1)
        val adapter = ArrayAdapter(
            this,
            R.layout.listview_item,
            cities
        )

        listView.adapter = adapter
    }
}
In Kotlin, assigning listView.adapter = adapter is the property-style equivalent of calling listView.setAdapter(adapter).
Implementing a ListView Item Click Listener
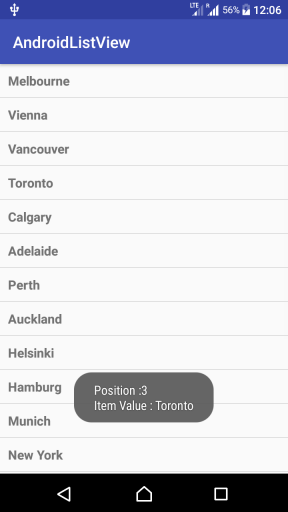
Now we shall implement ListView Item Click Listener to trigger execution of a specific code when an item is clicked. For this example, we shall display item position and text with Toast.
MainActivity.kt
package com.tutorialkart.androidlistview

import android.support.v7.app.AppCompatActivity
import android.os.Bundle
import android.view.View
import android.widget.ArrayAdapter
import android.widget.ListView
import android.widget.Toast
import android.widget.AdapterView
import android.widget.AdapterView.OnItemClickListener

class MainActivity : AppCompatActivity() {

    var array = arrayOf("Melbourne", "Vienna", "Vancouver", "Toronto", "Calgary", "Adelaide", "Perth", "Auckland", "Helsinki", "Hamburg", "Munich", "New York", "Sydney", "Paris", "Cape Town", "Barcelona", "London", "Bangkok")

    override fun onCreate(savedInstanceState: Bundle?) {
        super.onCreate(savedInstanceState)
        setContentView(R.layout.activity_main)

        val adapter = ArrayAdapter(this,
                R.layout.listview_item, array)

        val listView:ListView = findViewById(R.id.listview_1)
        listView.setAdapter(adapter)

        listView.onItemClickListener = object : OnItemClickListener {

            override fun onItemClick(parent: AdapterView<*>, view: View,
                            position: Int, id: Long) {

                // value of item that is clicked
                val itemValue = listView.getItemAtPosition(position) as String

                // Toast the values
                Toast.makeText(applicationContext,
                        "Position :$position\nItem Value : $itemValue", Toast.LENGTH_LONG)
                        .show()
            }
        }

    }
}
Run this Android Application, and a list of items would be displayed as a ListView. Now, if user clicks on any of the item, its position is displayed, since we have set onItemClickListener for the ListView.
Kotlin Lambda for ListView Item Clicks
The same item click behavior can be expressed more concisely with a Kotlin lambda. Add this after assigning the adapter to the ListView:
listView.onItemClickListener =
    AdapterView.OnItemClickListener { parent, _, position, _ ->
        val selectedCity = parent.getItemAtPosition(position) as String

        Toast.makeText(
            this,
            "Position: $position\nItem Value: $selectedCity",
            Toast.LENGTH_LONG
        ).show()
    }
The callback supplies the clicked position and item ID. Reading the value from parent.getItemAtPosition(position) keeps the click handler connected to the data currently held by the adapter.
Updating ListView Data After Adding an Item
Use a mutable collection if the list must change while the activity is running. After modifying that collection, notify the adapter so that ListView requests updated row views.
val cities = mutableListOf("Melbourne", "Vienna", "Vancouver")
val adapter = ArrayAdapter(this, R.layout.listview_item, cities)

listView.adapter = adapter

cities.add("Toronto")
adapter.notifyDataSetChanged()
Calling notifyDataSetChanged() is necessary when the existing collection is changed directly. ArrayAdapter methods such as add() and remove() can also be used to manage its data.
Using Custom Rows with a ListView Adapter
ArrayAdapter is suitable when each row primarily displays a text value. If a row needs several views, such as an image, title, and description, create a custom adapter by extending ArrayAdapter or BaseAdapter and implement its row-binding logic.
When implementing getView(), reuse the supplied convertView when it is not null. Reusing row views avoids unnecessary layout inflation while the user scrolls. The Android ListView API reference describes this adapter and view-reuse behavior.
ListView or RecyclerView for an Android List?
ListView remains useful for straightforward, vertically scrolling lists and for maintaining existing View-based applications. For a new screen with complex rows, multiple view types, item animations, or more control over layout and updates, Android recommends RecyclerView for dynamic lists. In Jetpack Compose applications, use lazy lists such as LazyColumn instead of placing a ListView in a composable hierarchy.
Common Kotlin ListView Problems
- The ListView is empty: confirm that the collection contains items and that the adapter has been assigned to the correct ListView.
- A row layout causes an exception: ensure the resource supplied to the three-argument ArrayAdapter is a TextView root. For a layout containing several views, also provide the ID of the TextView that receives each item.
- New items do not appear: modify the same collection used by the adapter and call
notifyDataSetChanged(). - Only part of the list scrolls: avoid placing ListView inside another vertically scrolling container and give it an appropriate height.
- Clicks are not received: check whether focusable controls inside a custom row are consuming the touch event.
Kotlin Android ListView FAQs
What is an ArrayAdapter in Kotlin Android?
ArrayAdapter is an adapter implementation that turns collection items into row views. It is commonly used when each ListView row displays a single text value.
How do I get the clicked ListView item?
Set onItemClickListener and call parent.getItemAtPosition(position) inside the callback. Cast the returned object to the type stored in the adapter.
Why does notifyDataSetChanged not update my ListView?
This usually happens when a different collection was modified after the adapter was created. Update the collection used by the adapter, or use the adapter’s own add(), remove(), and clear() methods.
Should a new Kotlin Android app use ListView?
ListView is adequate for a simple View-based list, but RecyclerView provides more flexibility for complex or frequently changing lists. Jetpack Compose projects normally use LazyColumn or another Compose lazy layout.
Kotlin ListView Example QA Checklist
- Confirm that
listview_1exists in the activity layout and matches the ID used byfindViewById. - Verify that the ArrayAdapter receives the activity context, the intended row resource, and the correct data collection.
- Check that a text-only custom row has a TextView root or that a TextView ID is supplied to ArrayAdapter.
- Test scrolling with enough items to extend beyond the screen.
- Tap the first, middle, and last rows to verify that the click position and value are correct.
- When editing mutable data, confirm that the adapter is notified and the visible rows refresh.
Kotlin Android ListView Example Summary
In this Kotlin Android Tutorial – Android ListView Example, we have learned how to display array elements in a ListView with ArrayAdapter, assign a custom TextView row layout, handle item clicks, and refresh the list after its data changes. For more advanced View-based lists, consider RecyclerView and a dedicated adapter.