 TutorialKart.com
Android Studio is the official integrated development environment, or IDE, for Android application development. It provides the tools needed to create projects, write Kotlin or Java code, design user interfaces, manage Android SDK packages, run apps on devices, inspect logs, and debug application behavior.
This walkthrough explains the main Android Studio windows and actions a beginner uses while creating and running an Android app. The screenshots were captured in an earlier Android Studio version, so some icons and menu locations may look different in current releases. The underlying project, editing, build, run, and debugging workflows remain applicable.
Android Studio IDE features for Android app development
Android Studio is based on IntelliJ IDEA. Developers who have used another IntelliJ-based IDE will recognize its code editor, project navigation, refactoring tools, run configurations, and debugging windows.
Android Studio adds tools specifically for Android development, including the Android SDK Manager, Device Manager, layout editors, Compose previews, APK analysis, Logcat, profilers, and integration with the Gradle build system.
- Create Android projects from activity templates.
- Edit Kotlin, Java, XML, Gradle, and resource files.
- Design XML layouts visually or preview Jetpack Compose interfaces.
- Run applications on an Android Emulator or physical device.
- Debug code with breakpoints and inspect application logs.
- Download and manage Android SDK platforms and build tools.
- Build debug APKs, signed APKs, and Android App Bundles.
Android Studio main window and tool windows
The Android Studio main window is divided into areas for navigation, editing, building, running, and inspecting an application. Tool windows may be opened, closed, resized, or moved, so the exact arrangement can vary between installations.
- Menu bar: Provides project, editing, navigation, build, run, refactoring, version-control, and settings commands.
- Main toolbar: Provides quick access to the selected run configuration, target device, Run, Debug, and other commonly used actions.
- Project tool window: Displays modules, source files, resources, manifests, Gradle scripts, and generated project groups.
- Editor window: Opens Kotlin, Java, XML, Gradle, and other project files for editing.
- Tool-window bars: Open panels such as Logcat, Build, Problems, Terminal, Device Manager, and Profiler.
- Status bar: Shows background tasks, inspections, file information, and IDE status.
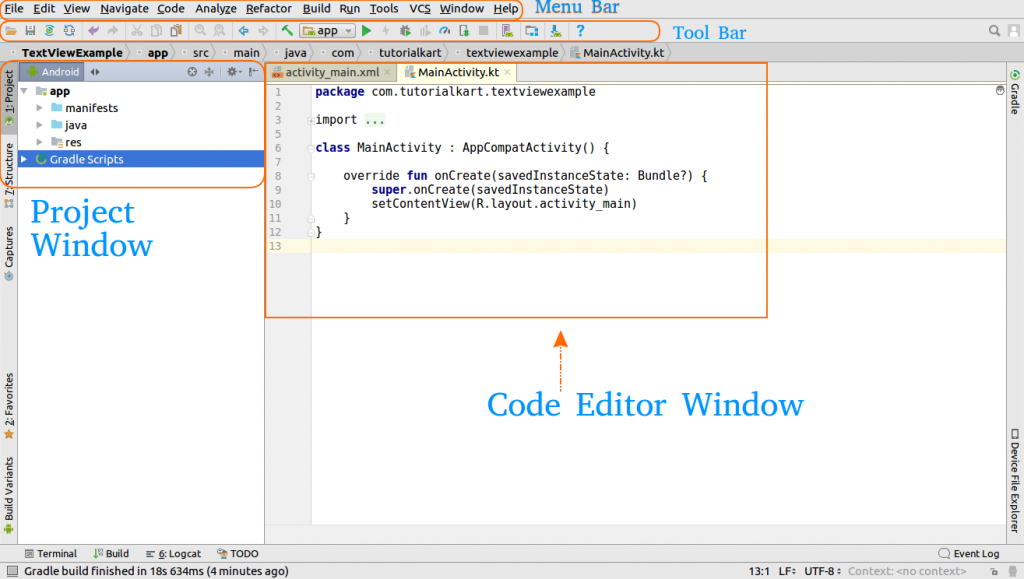
Click a file in the Project tool window to open it in the editor. Multiple files can remain open in editor tabs. Tool windows at the edges of the IDE can be expanded when needed and collapsed to provide more editing space.
Android Studio Project view and Android project files
The Project tool window can present the same files through different views. The Android view groups files by their role in an Android application, while the Project view follows the underlying directory structure more closely.
- manifests: Contains
AndroidManifest.xml, where application components and required permissions are declared. - kotlin+java: Contains Kotlin and Java source files, including activities, fragments, Compose functions, and tests.
- res: Contains resources such as layouts, strings, colors, drawables, icons, menus, and themes.
- Gradle Scripts: Contains project and module build configuration files, settings, properties, and dependency declarations.
A typical application has at least one app module. Larger projects may contain additional application, library, feature, or test modules.
Android Studio File menu for creating and opening projects
The File menu contains commands for creating projects, opening existing work, managing settings, and closing the current project. Commonly used items include:
- New: Creates a new Android Studio project, module, activity, resource file, Kotlin class, or another supported project item.
- Open: Opens an existing project from its project directory.
- Open Recent: Displays recently opened projects and reopens the selected one.
- Settings or Preferences: Opens IDE configuration. The label and menu location can vary by operating system.
- Project Structure: Opens settings for modules, SDK configuration, dependencies, and related project options.
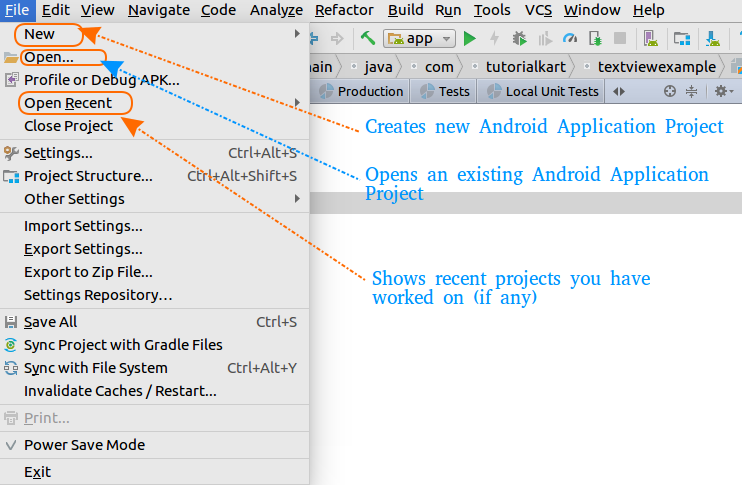
When opening a downloaded project, select the project root rather than an individual source file. Android Studio then imports the Gradle configuration and may request any SDK components required by the project.
Android Studio code editor for Kotlin, Java, XML, and Gradle
The code editor provides syntax highlighting, code completion, navigation, inspections, formatting, quick fixes, and refactoring. A colored marker or underline may indicate a compilation error, warning, spelling issue, or suggested improvement. Place the pointer over the highlighted code or use the available quick-fix action to inspect the message.
- Use code completion to inspect available classes, functions, properties, and resources.
- Navigate to a declaration to see where a class, method, resource, or variable is defined.
- Use Find Usages before changing an item referenced in several files.
- Use refactoring commands to rename symbols and update supported references safely.
- Format the current file with the IDE formatter instead of aligning code manually.
Android XML Layout Editor and visual design tools
For applications that use XML layouts, Android Studio can open a layout resource in a text editor, a visual Design editor, or a split view. The names and positions of these controls vary by Android Studio version.
In Design mode, UI elements can be selected from the Palette and placed in the layout preview. The Attributes panel is used to edit supported properties of the selected view. The preview controls can change the device, orientation, API level, theme, locale, and other preview settings without running the app.
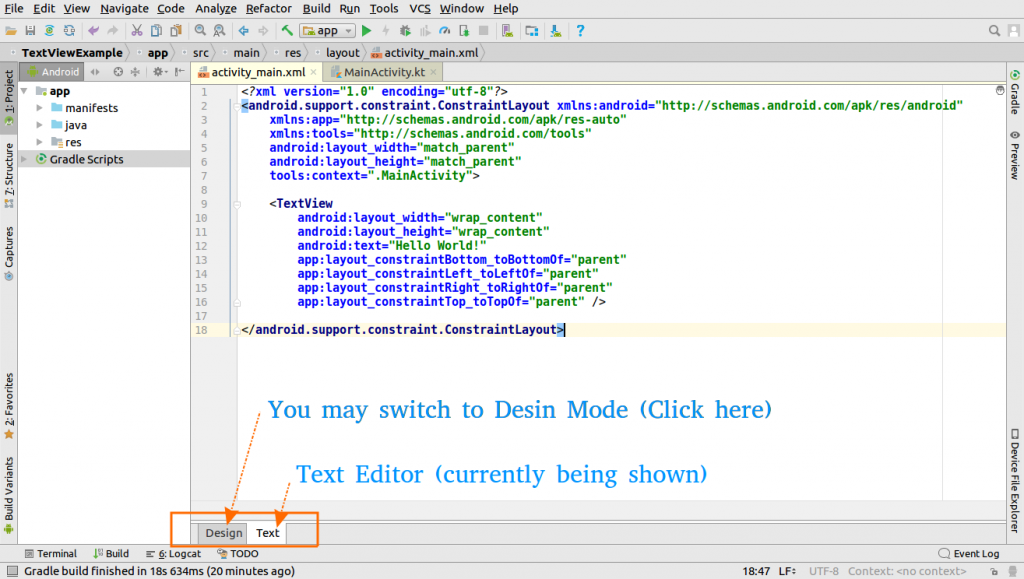
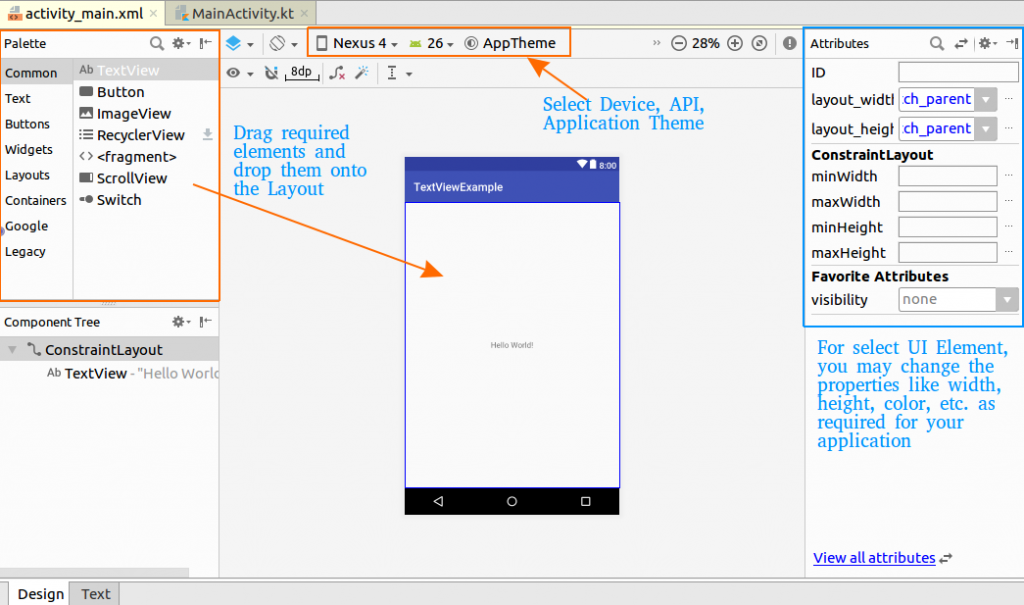
The preview helps inspect layout behavior, but the application should still be tested on an emulator or physical device. Runtime data, device settings, system insets, font scaling, and different screen sizes can produce results that are not fully represented by a single editor preview.
Jetpack Compose Preview in Android Studio
Current Android projects may build their interfaces with Jetpack Compose instead of XML layouts. A composable function annotated for preview can be displayed in Android Studio’s Compose preview panel. Depending on the project and IDE version, the preview can show multiple devices, themes, font scales, and UI states.
XML Layout Editor and Compose Preview serve similar design-time purposes, but they belong to different UI systems. Use the tool that matches the application’s source code rather than expecting every project to contain XML layout files.
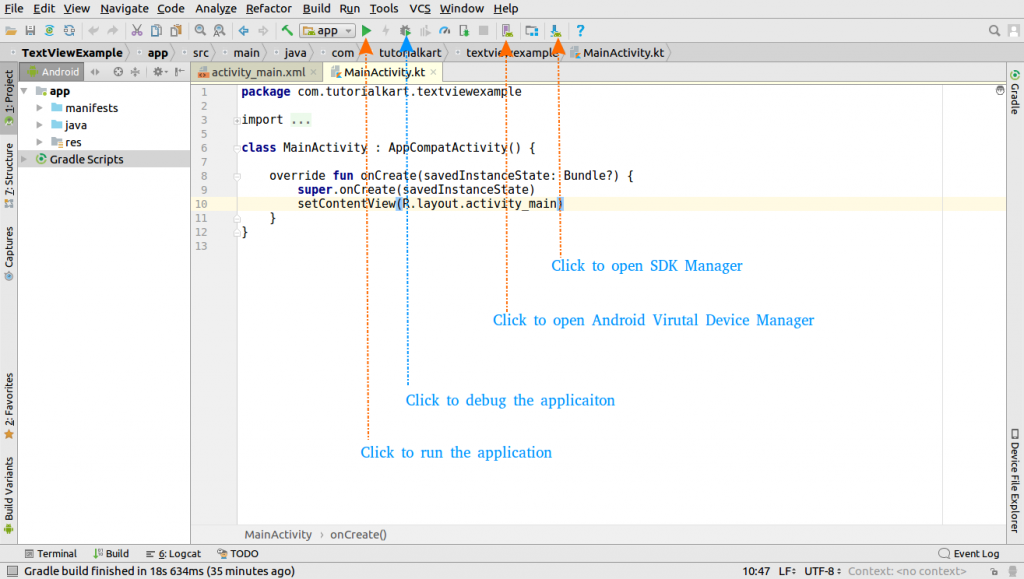
Android Studio toolbar for Run, Debug, SDK, and devices
The main toolbar provides quick access to actions used when building and testing an Android application. Its contents can change according to the Android Studio version and selected UI layout.
- Run: Builds the selected run configuration, installs the app on the chosen device, and starts its launch activity.
- Debug: Starts the app with debugger support so execution can pause at breakpoints.
- Run configuration: Selects the application, test, or other configuration to execute.
- Target device: Selects a connected physical device or configured Android Virtual Device.
- Device Manager: Creates and manages Android Virtual Devices. Older releases referred to this workflow as AVD Manager.
- SDK Manager: Installs and updates Android SDK platforms, build tools, emulator components, and related packages.
Run an Android app on an emulator or physical device
Before running an app, select the application run configuration and a target device. The target can be an Android Virtual Device created in Device Manager or a physical Android device that has been prepared for development.
- Open the Android project and wait for the Gradle synchronization and indexing tasks to finish.
- Select the app run configuration from the toolbar.
- Select a running emulator, start an available virtual device, or connect a physical device.
- Click Run.
- Review the Build window if compilation fails, or use Logcat when the installed app reports a runtime problem.
Connected physical devices appear in the device selector after Android debugging has been enabled and the computer has been authorized on the device. Virtual devices created through Device Manager appear as available emulator targets.
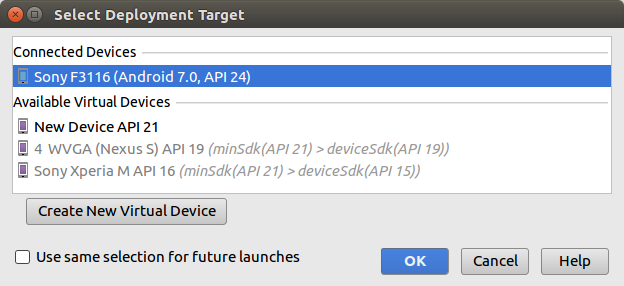
If no device is listed, verify that an emulator has been created or that the physical device is recognized by the operating system. For a physical device, also check Developer options, USB debugging, the USB connection mode, and the authorization prompt displayed by Android.
Android Studio Build, Logcat, and Debug windows
Android Studio separates build-time and runtime diagnostics into different tool windows:
- Build: Shows Gradle tasks, compiler messages, resource-processing errors, and packaging results.
- Problems: Collects supported inspections and issues detected in project files.
- Logcat: Displays logs from the selected Android device and application process.
- Debug: Shows threads, stack frames, variables, watches, and breakpoint controls during a debugging session.
- Profiler: Provides tools for investigating supported CPU, memory, network, and energy behavior.
- Terminal: Opens a command-line session rooted at or near the project directory, depending on the IDE configuration.
Use the Build window for code that does not compile or package successfully. Use Logcat and the debugger for an application that builds but crashes or behaves incorrectly while running.
Gradle synchronization and Android project builds
Android Studio uses Gradle to resolve dependencies, compile source code, process resources, run configured checks, and package application artifacts. A Gradle synchronization reads the build configuration and updates Android Studio’s project model.
Run or accept a Gradle synchronization after changing plugins, dependencies, repositories, modules, SDK settings, or certain build options. If synchronization fails, read the first relevant error in the Build or synchronization output before changing project files.
Build an APK or Android App Bundle in Android Studio
Running an application creates and installs a development build, but Android Studio can also generate artifacts for testing or distribution. The available Build menu actions depend on the Android Studio and Android Gradle Plugin versions.
- Debug APK: Intended for development and testing. It is normally signed with a debug key managed by the development environment.
- Signed APK: Can be generated for distribution channels that accept APK files.
- Signed Android App Bundle: Produces an AAB file for publishing workflows that use app bundles.
Release signing requires a keystore and its credentials. Store release keys and passwords securely because losing the required signing material can affect future application updates.
Android Studio navigation tips for beginners
- Use the IDE’s action search when you know an action name but not its menu location.
- Use project-wide search to locate text across Kotlin, Java, XML, and Gradle files.
- Use declaration and usage navigation to follow relationships between code and resources.
- Read inspection messages before applying a suggested quick fix.
- Allow indexing and Gradle synchronization to finish before diagnosing missing completion or unresolved project symbols.
- Use Android Studio’s keymap settings to inspect shortcuts for the current operating system.
Android Studio IDE FAQs
Is Android Studio required to build an Android app?
Android applications can be built with command-line tools and Gradle, but Android Studio provides the official integrated workflow for editing, SDK management, emulators, previews, debugging, profiling, and project builds.
Can Android Studio create apps with both Kotlin and Java?
Yes. Android Studio supports Android projects containing Kotlin, Java, or both languages. The languages can interoperate within the same application when the project is configured appropriately.
What is the difference between Device Manager and SDK Manager?
Device Manager creates and controls Android Virtual Devices used by the emulator. SDK Manager installs Android platforms, build tools, emulator packages, system images, and other SDK components.
Why does an Android Studio project perform a Gradle sync?
Gradle synchronization reads the project’s build configuration, resolves declared dependencies, and updates Android Studio’s understanding of modules, source sets, SDK levels, and build variants.
Where does Android Studio place a generated APK?
Generated APK files are normally placed under the relevant module’s build/outputs/apk/ directory, organized by build variant. Android Studio may also provide a notification or link that opens the artifact location after a successful build.
Android Studio walkthrough QA checklist
- Confirm that current terminology such as Device Manager is distinguished from older AVD Manager labels shown in legacy screenshots.
- Verify that instructions cover both Android Emulator and physical-device run targets.
- Confirm that Build errors and runtime Logcat messages are explained as separate diagnostic sources.
- Check that XML Layout Editor guidance is not presented as the only UI workflow and that Jetpack Compose Preview is acknowledged.
- Verify that APK and Android App Bundle descriptions distinguish development builds from signed release artifacts.
- Confirm that menu and toolbar locations are described as version-dependent where appropriate.
- Test all retained screenshots and links in the published WordPress page.
Android Studio IDE walkthrough summary
Android Studio combines project navigation, code editing, visual UI tools, Gradle builds, device management, application deployment, logging, and debugging in one development environment. A beginner should first become familiar with the Project and editor windows, then learn how to select a device, run the app, inspect Build output, and use Logcat for runtime issues. In this Kotlin Android Tutorial, we covered the Android Studio windows and options used in that basic workflow.