Create RadioGroup and RadioButtons Programmatically in Kotlin Android
A RadioGroup is used to group multiple RadioButton views so that the user can select one option from a set of choices. You can define a RadioGroup in an XML layout file, or you can create a RadioGroup programmatically in Kotlin and add RadioButtons to it at runtime.
Creating RadioButtons programmatically is useful when the options are not fixed in the XML layout. For example, the choices may come from an API response, a local database, a settings screen, or a list built while the app is running.
In this tutorial, we will create a RadioGroup with RadioButtons programmatically in Android, add this RadioGroup to a LinearLayout in the layout file, and then see how to read the selected RadioButton value in Kotlin.
How Programmatic RadioGroup Creation Works in Kotlin Android
The basic steps are:
- Get the parent layout from the XML file using
findViewById(). - Create a
RadioGroupobject using the Activity context. - Set the RadioGroup orientation as vertical or horizontal.
- Create each
RadioButtonin Kotlin code. - Assign a unique ID to each RadioButton.
- Add the RadioButtons to the RadioGroup.
- Add the RadioGroup to the parent layout using
addView().
A RadioGroup is designed for single-choice selection. When RadioButtons are placed inside the same RadioGroup, selecting one RadioButton clears the previously selected RadioButton in that group.
Quick Code – Create a RadioGroup
A quick snippet of code to create a new RadioGroup and RadioButtons in Kotlin Android programmatically
val rg = RadioGroup(this)
rg.orientation = RadioGroup.VERTICAL
val options = arrayOf("Option 1", "Option 2", "Option 3", "Option 4")
for (i in options.indices) {
    // create a radio button
    val rb = RadioButton(this)
    // set text for the radio button
    rb.text = options[i]
    // assign an automatically generated id to the radio button
    rb.id = View.generateViewId()
    // add radio button to the radio group
    rg.addView(rb)
}
The important point in this snippet is the ID assignment. Each RadioButton should have a unique ID, especially when you want to know which option is selected. View.generateViewId() creates a safe ID at runtime.
Example 1 – Create a RadioGroup and RadioButtons
Create Android Application with Kotlin Support and replace activity_main.xml and MainActivity.kt with the following files.
activity_main.xml
<?xml version="1.0" encoding="utf-8"?>
<android.support.constraint.ConstraintLayout xmlns:android="http://schemas.android.com/apk/res/android"
    xmlns:app="http://schemas.android.com/apk/res-auto"
    xmlns:tools="http://schemas.android.com/tools"
    android:layout_width="match_parent"
    android:layout_height="match_parent"
    tools:context="com.tutorialkart.myapplication.MainActivity">
    <LinearLayout
        android:id="@+id/ll_main_layout"
        android:layout_width="match_parent"
        android:layout_height="match_parent"
        android:gravity="center"
        android:orientation="vertical">

    </LinearLayout>

</android.support.constraint.ConstraintLayout>
The XML layout contains an empty LinearLayout. The RadioGroup is not defined in XML. It will be created in MainActivity.kt and added to this LinearLayout at runtime.
MainActivity.kt
package com.tutorialkart.myapplication

import android.support.v7.app.AppCompatActivity
import android.os.Bundle
import android.view.View
import android.widget.LinearLayout
import android.widget.RadioButton
import android.widget.RadioGroup

class MainActivity : AppCompatActivity() {

    override fun onCreate(savedInstanceState: Bundle?) {
        super.onCreate(savedInstanceState)
        setContentView(R.layout.activity_main)

        val ll_main = findViewById(R.id.ll_main_layout) as LinearLayout

        val options = arrayOf("Option 1", "Option 2", "Option 3", "Option 4")

        // create a radio group
        val rg = RadioGroup(this)
        rg.orientation = RadioGroup.VERTICAL
        for (i in options.indices) {
            // create a radio button
            val rb = RadioButton(this)
            // set text for the radio button
            rb.text = options[i]
            // assign an automatically generated id to the radio button
            rb.id = View.generateViewId()
            // add radio button to the radio group
            rg.addView(rb)
        }
        // add radio group to the linear layout
        ll_main.addView(rg)
    }
}
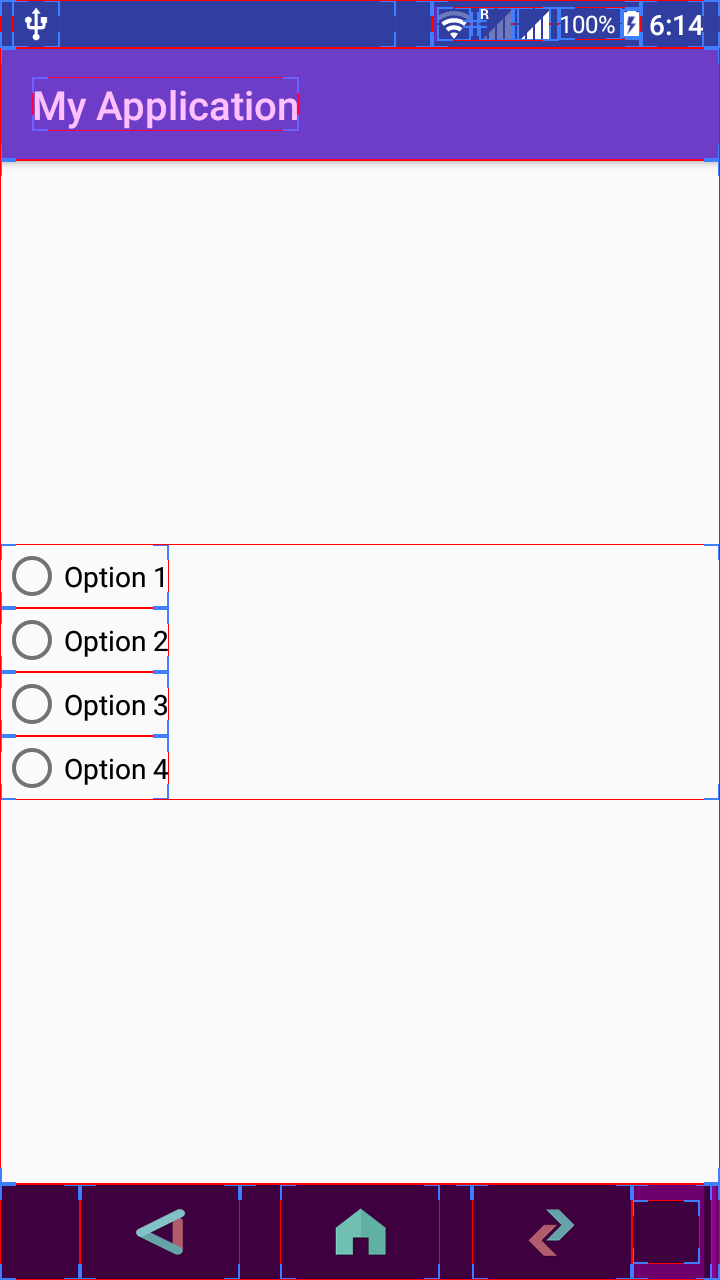
Following is the Output with RadioGroup. The layout bounds are specified to know the positioning of RadioGroup in the layout.
AndroidX Kotlin Code for Creating RadioGroup and RadioButtons
The earlier example uses the older Android support package imports because the original project was created with that setup. In current Android projects, AndroidX imports are normally used. The RadioGroup and RadioButton creation logic remains the same.
MainActivity.kt with AndroidX imports
package com.tutorialkart.myapplication

import android.os.Bundle
import android.view.View
import android.widget.LinearLayout
import android.widget.RadioButton
import android.widget.RadioGroup
import androidx.appcompat.app.AppCompatActivity

class MainActivity : AppCompatActivity() {

    override fun onCreate(savedInstanceState: Bundle?) {
        super.onCreate(savedInstanceState)
        setContentView(R.layout.activity_main)

        val mainLayout = findViewById<LinearLayout>(R.id.ll_main_layout)

        val radioGroup = RadioGroup(this).apply {
            orientation = RadioGroup.VERTICAL
            layoutParams = LinearLayout.LayoutParams(
                LinearLayout.LayoutParams.WRAP_CONTENT,
                LinearLayout.LayoutParams.WRAP_CONTENT
            )
        }

        val options = arrayOf("Small", "Medium", "Large")

        for (option in options) {
            val radioButton = RadioButton(this).apply {
                id = View.generateViewId()
                text = option
            }
            radioGroup.addView(radioButton)
        }

        mainLayout.addView(radioGroup)
    }
}
In this version, findViewById<LinearLayout>() avoids the explicit cast. The apply block keeps related RadioGroup and RadioButton property assignments together.
Set a Default Selected RadioButton in Kotlin RadioGroup
If one option should be selected when the screen opens, keep the ID of that RadioButton and call check() on the RadioGroup. This is better than setting isChecked on multiple RadioButtons because the RadioGroup manages single selection for the whole group.
val radioGroup = RadioGroup(this)
val optionIds = mutableListOf<Int>()

val options = arrayOf("Cash", "Card", "UPI")

for (option in options) {
    val radioButton = RadioButton(this).apply {
        id = View.generateViewId()
        text = option
    }

    optionIds.add(radioButton.id)
    radioGroup.addView(radioButton)
}

radioGroup.check(optionIds[0])
Here, the first option is selected by default. You can change the index based on the option that should be initially checked.
Get Selected RadioButton Text from Programmatic RadioGroup
To read the selected option, use the RadioGroup’s checkedRadioButtonId. If no RadioButton is selected, the value is -1. When a valid ID is available, find the selected RadioButton and read its text.
val selectedId = radioGroup.checkedRadioButtonId

if (selectedId != -1) {
    val selectedRadioButton = findViewById<RadioButton>(selectedId)
    val selectedText = selectedRadioButton.text.toString()
}
If the RadioGroup is inside a dialog or another container, use the correct parent view to find the RadioButton. The selected ID belongs to a view that must be available in the current view hierarchy.
Handle RadioButton Selection Change in Kotlin
You can listen for changes using setOnCheckedChangeListener. This is useful when the screen needs to update immediately after the user selects a different option.
radioGroup.setOnCheckedChangeListener { group, checkedId ->
    val selectedRadioButton = group.findViewById<RadioButton>(checkedId)
    val selectedText = selectedRadioButton.text.toString()
}
The listener gives you the RadioGroup and the checked RadioButton ID. From there, you can read the text, store the selected value, enable another button, or update another part of the screen.
Create Horizontal RadioGroup Programmatically in Android
By default, a RadioGroup can be arranged vertically or horizontally. Use RadioGroup.HORIZONTAL when options should appear in one row.
val radioGroup = RadioGroup(this).apply {
    orientation = RadioGroup.HORIZONTAL
}

val yesButton = RadioButton(this).apply {
    id = View.generateViewId()
    text = "Yes"
}

val noButton = RadioButton(this).apply {
    id = View.generateViewId()
    text = "No"
}

radioGroup.addView(yesButton)
radioGroup.addView(noButton)
Use a horizontal RadioGroup only when the option labels are short and there is enough width on the screen. For longer labels, a vertical RadioGroup is usually easier to read.
Add LayoutParams and Spacing to Programmatic RadioButtons
When you add RadioButtons dynamically, you can also set layout parameters, margins, padding, and text properties in Kotlin. The layout parameter class should match the parent layout. Since these RadioButtons are added to a RadioGroup, use RadioGroup.LayoutParams.
val radioButton = RadioButton(this).apply {
    id = View.generateViewId()
    text = "Option with spacing"
    setPadding(8, 8, 8, 8)
    layoutParams = RadioGroup.LayoutParams(
        RadioGroup.LayoutParams.WRAP_CONTENT,
        RadioGroup.LayoutParams.WRAP_CONTENT
    ).apply {
        setMargins(0, 8, 0, 8)
    }
}
If the RadioGroup itself is added to a LinearLayout, then the RadioGroup should use LinearLayout.LayoutParams. If a RadioButton is added to a RadioGroup, then the RadioButton should use RadioGroup.LayoutParams.
Common Mistakes with Dynamic RadioGroup and RadioButtons
- Not assigning IDs to RadioButtons: Without unique IDs, it becomes difficult to read or manage the selected option reliably.
- Adding RadioButtons directly to the parent layout: If RadioButtons are not inside the same RadioGroup, Android will not automatically enforce single selection among them.
- Using the wrong LayoutParams class: Use
RadioGroup.LayoutParamsfor RadioButtons inside a RadioGroup andLinearLayout.LayoutParamsfor a RadioGroup inside a LinearLayout. - Forgetting to call addView(): Creating a RadioGroup or RadioButton object does not display it until it is added to a parent view.
- Reading selected text without checking selection: Check whether
checkedRadioButtonIdis-1before reading the selected RadioButton.
QA Checklist for Kotlin Android RadioGroup Programmatic Tutorial
- Confirm that the parent
LinearLayoutID in Kotlin matches the ID inactivity_main.xml. - Verify that every dynamically created RadioButton receives a unique ID using
View.generateViewId(). - Check that all related RadioButtons are added to the same RadioGroup for single-choice behavior.
- Use
RadioGroup.VERTICALorRadioGroup.HORIZONTALbased on the screen design. - Test the selected value using
checkedRadioButtonIdbefore saving or submitting the form.
FAQs on Creating RadioGroup Programmatically in Kotlin Android
How do I create a RadioGroup programmatically in Kotlin?
Create a RadioGroup object using the Activity context, set its orientation, create RadioButton objects, assign unique IDs to them, add the RadioButtons to the RadioGroup, and finally add the RadioGroup to a parent layout.
How do I add RadioButtons dynamically to a RadioGroup?
Create each RadioButton inside a loop or method, set its ID and text, and call radioGroup.addView(radioButton). This keeps all options inside the same group.
How do I get the selected RadioButton value from a programmatic RadioGroup?
Use radioGroup.checkedRadioButtonId. If it is not -1, find the selected RadioButton using that ID and read its text using selectedRadioButton.text.toString().
How do I select a default RadioButton in Kotlin code?
Assign an ID to the RadioButton and call radioGroup.check(radioButton.id). This marks that option as selected when the screen appears.
Why are multiple RadioButtons getting selected at the same time?
This usually happens when the RadioButtons are not inside the same RadioGroup. Add all related RadioButtons to one RadioGroup so Android can manage single selection automatically.
Conclusion – Create RadioGroup and RadioButtons in Kotlin Android
In this Kotlin Android Tutorial, we have learnt how to create a RadioGroup programmatically in Android, and add this RadioGroup with RadioButtons to a LinearLayout in layout file.
The key points are to create the RadioGroup with a valid context, add all related RadioButtons to the same RadioGroup, assign unique IDs, and use checkedRadioButtonId when you need to read the selected option. This approach works well when the RadioButton options are decided at runtime.