 TutorialKart.com
In this Android Tutorial, we shall learn how to pick a date in an Android app using Kotlin and DatePickerDialog. We shall set OnClickListener to a Button, open the date picker when the button is clicked, save the selected date in a Calendar object, and display the formatted date in a TextView.
This example is useful when your XML-based Android screen needs a simple date field, such as date of birth, booking date, reminder date, or any form input where the user should select a date instead of typing it manually.
Following is a quick view of what we finally achieve in this tutorial.
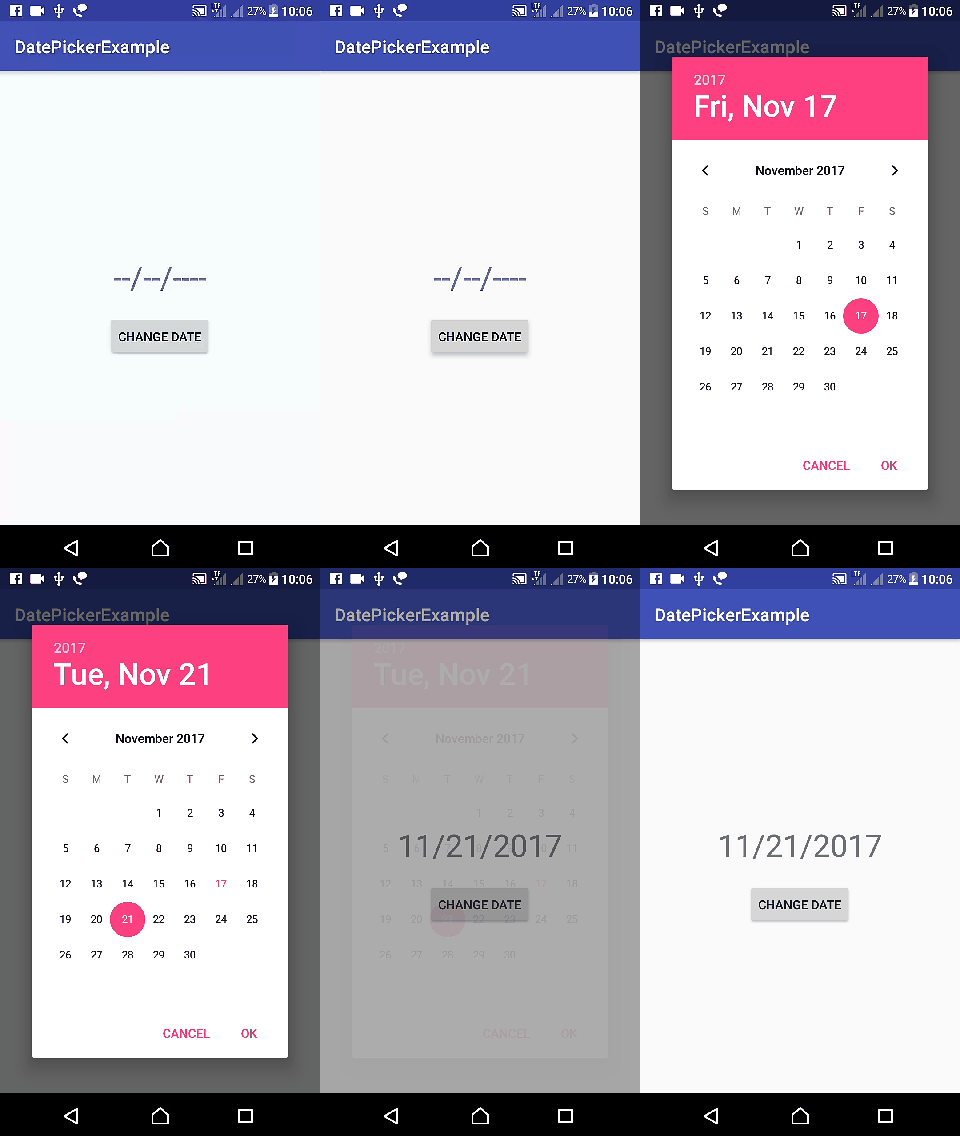
Android DatePickerDialog Kotlin example for XML layout
Android DatePicker – Kotlin Example : To pick a date from a DatePicker using DatePickerDialog, Create an Android Application with Kotlin Support and replace activity_main.xml and MainActivity.kt with the following content. And then we shall see an explanation about the code.
activity_main.xml
<?xml version="1.0" encoding="utf-8"?>
<LinearLayout xmlns:android="http://schemas.android.com/apk/res/android"
    xmlns:tools="http://schemas.android.com/tools"
    android:layout_width="match_parent"
    android:layout_height="match_parent"
    android:gravity="center"
    android:orientation="vertical"
    tools:context="com.tutorialkart.datepickerexample.MainActivity">

    <TextView
        android:id="@+id/text_view_date_1"
        android:layout_width="wrap_content"
        android:layout_height="wrap_content"
        android:textSize="35dp"
        android:padding="20dp" />

    <Button
        android:id="@+id/button_date_1"
        android:layout_width="wrap_content"
        android:layout_height="wrap_content"
        android:text="Change Date" />

</LinearLayout>
MainActivity.kt
package com.tutorialkart.datepickerexample

import android.support.v7.app.AppCompatActivity
import android.os.Bundle
import android.widget.TextView
import android.view.View
import android.widget.Button
import java.util.*
import android.app.DatePickerDialog
import android.widget.DatePicker
import java.text.SimpleDateFormat
import kotlinx.android.synthetic.main.activity_main.*

class MainActivity : AppCompatActivity() {

    var button_date: Button? = null
    var textview_date: TextView? = null
    var cal = Calendar.getInstance()

    override fun onCreate(savedInstanceState: Bundle?) {
        super.onCreate(savedInstanceState)
        setContentView(R.layout.activity_main)

        // get the references from layout file
        textview_date = this.text_view_date_1
        button_date = this.button_date_1

        textview_date!!.text = "--/--/----"

        // create an OnDateSetListener
        val dateSetListener = object : DatePickerDialog.OnDateSetListener {
            override fun onDateSet(view: DatePicker, year: Int, monthOfYear: Int,
                                   dayOfMonth: Int) {
                cal.set(Calendar.YEAR, year)
                cal.set(Calendar.MONTH, monthOfYear)
                cal.set(Calendar.DAY_OF_MONTH, dayOfMonth)
                updateDateInView()
            }
        }

        // when you click on the button, show DatePickerDialog that is set with OnDateSetListener
        button_date!!.setOnClickListener(object : View.OnClickListener {
            override fun onClick(view: View) {
                DatePickerDialog(this@MainActivity,
                        dateSetListener,
                        // set DatePickerDialog to point to today's date when it loads up
                        cal.get(Calendar.YEAR),
                        cal.get(Calendar.MONTH),
                        cal.get(Calendar.DAY_OF_MONTH)).show()
            }

        })
    }

    private fun updateDateInView() {
        val myFormat = "MM/dd/yyyy" // mention the format you need
        val sdf = SimpleDateFormat(myFormat, Locale.US)
        textview_date!!.text = sdf.format(cal.getTime())
    }

}
What is happening in MainActivity.kt ?
- Get the references of Views in layout file.
- Create an OnDateSetListener. We shall use Calendar object to store the selected date, and we shall call a method to update a TextView with the selected date.
- Set OnClickListener to a Button, and On Click, display DatePickerDialog to pick the date. Pass in today’s date in the constructor, so that when the dialog appears, it initially points to current date.
Modern AndroidX DatePickerDialog Kotlin version without synthetic view access
The older sample above shows the core idea clearly, but many current Android projects use AndroidX imports and avoid Kotlin synthetic view access. The following version uses findViewById(), keeps the selected date in one Calendar instance, and updates the TextView whenever the user selects a date.
You may use the same activity_main.xml layout from the previous section because the view IDs are the same: text_view_date_1 and button_date_1.
package com.tutorialkart.datepickerexample

import android.app.DatePickerDialog
import android.os.Bundle
import android.widget.Button
import android.widget.TextView
import androidx.appcompat.app.AppCompatActivity
import java.text.SimpleDateFormat
import java.util.Calendar
import java.util.Locale

class MainActivity : AppCompatActivity() {

    private lateinit var dateTextView: TextView
    private val selectedDate: Calendar = Calendar.getInstance()
    private val dateFormatter = SimpleDateFormat("MM/dd/yyyy", Locale.US)

    override fun onCreate(savedInstanceState: Bundle?) {
        super.onCreate(savedInstanceState)
        setContentView(R.layout.activity_main)

        dateTextView = findViewById(R.id.text_view_date_1)
        val changeDateButton: Button = findViewById(R.id.button_date_1)

        dateTextView.text = "--/--/----"

        changeDateButton.setOnClickListener {
            showDatePickerDialog()
        }
    }

    private fun showDatePickerDialog() {
        val dateSetListener = DatePickerDialog.OnDateSetListener { _, year, month, dayOfMonth ->
            selectedDate.set(Calendar.YEAR, year)
            selectedDate.set(Calendar.MONTH, month)
            selectedDate.set(Calendar.DAY_OF_MONTH, dayOfMonth)
            updateDateInView()
        }

        DatePickerDialog(
            this,
            dateSetListener,
            selectedDate.get(Calendar.YEAR),
            selectedDate.get(Calendar.MONTH),
            selectedDate.get(Calendar.DAY_OF_MONTH)
        ).show()
    }

    private fun updateDateInView() {
        dateTextView.text = dateFormatter.format(selectedDate.time)
    }
}
How DatePickerDialog returns year, month, and day in Kotlin
DatePickerDialog.OnDateSetListener gives three important values: year, month, and dayOfMonth. The year and day values are straightforward, but the month value follows the Calendar convention where January is 0, February is 1, and December is 11.
In this tutorial, we do not manually add 1 to the selected month because the value is stored back into a Calendar object and then formatted using SimpleDateFormat. The formatter converts the internal month value into the correct display string.
val dateSetListener = DatePickerDialog.OnDateSetListener { _, year, month, dayOfMonth ->
    selectedDate.set(Calendar.YEAR, year)
    selectedDate.set(Calendar.MONTH, month) // January is 0, December is 11
    selectedDate.set(Calendar.DAY_OF_MONTH, dayOfMonth)
}
Display the selected Android DatePicker value in a different date format
The example uses MM/dd/yyyy, which displays dates such as 11/17/2026. You can change the pattern passed to SimpleDateFormat based on how you want the selected date to appear in the UI.
| Kotlin date format pattern | Example display | When to use it |
|---|---|---|
MM/dd/yyyy | 11/17/2026 | Numeric month, day, and year |
dd/MM/yyyy | 17/11/2026 | Day-first numeric format |
dd MMM yyyy | 17 Nov 2026 | Readable date labels in forms |
EEEE, dd MMM yyyy | Tuesday, 17 Nov 2026 | Full weekday display |
private val dateFormatter = SimpleDateFormat("dd MMM yyyy", Locale.getDefault())

private fun updateDateInView() {
    dateTextView.text = dateFormatter.format(selectedDate.time)
}
Set minimum and maximum date in Android DatePickerDialog using Kotlin
Many date fields should not allow every possible date. For example, a booking screen may allow only future dates, while a date-of-birth screen may block future dates. You can set date limits through the datePicker.minDate and datePicker.maxDate properties before calling show().
private fun showLimitedDatePickerDialog() {
    val dateSetListener = DatePickerDialog.OnDateSetListener { _, year, month, dayOfMonth ->
        selectedDate.set(year, month, dayOfMonth)
        updateDateInView()
    }

    val dialog = DatePickerDialog(
        this,
        dateSetListener,
        selectedDate.get(Calendar.YEAR),
        selectedDate.get(Calendar.MONTH),
        selectedDate.get(Calendar.DAY_OF_MONTH)
    )

    // Allow dates from today to 90 days from today
    dialog.datePicker.minDate = System.currentTimeMillis()

    val maxDate = Calendar.getInstance()
    maxDate.add(Calendar.DAY_OF_YEAR, 90)
    dialog.datePicker.maxDate = maxDate.timeInMillis

    dialog.show()
}
Use DatePickerDialog or Jetpack Compose DatePicker in Kotlin Android apps
Use DatePickerDialog when your screen is built with XML views, Activity, Fragment, TextView, and Button. It is a simple choice for classic Android layouts and existing projects.
If your app is built with Jetpack Compose and Material 3, use the Compose date picker components instead of mixing XML view code into a composable screen. The Android Developers documentation for Compose date pickers is a useful reference when working with Compose UI: Date pickers in Compose.
Common Android DatePicker Kotlin mistakes and fixes
- Selected month looks wrong: Remember that
Calendar.MONTHis zero-based. Format theCalendardate instead of manually building a string from the raw month value. - TextView does not update: Make sure
updateDateInView()is called insideonDateSet()after setting the year, month, and day. - App uses old synthetic imports: Replace
kotlinx.android.syntheticwithfindViewById(), View Binding, or another supported view access method. - DatePicker opens with the wrong date: Pass the values from the same
Calendarobject that stores the currently selected date. - Date format changes unexpectedly: Use the correct
Localefor your app. For fixed backend-style formatting, use a fixed locale; for user-facing display, considerLocale.getDefault().
Android DatePicker Kotlin tutorial QA checklist
- The button opens a
DatePickerDialogon click. - The selected year, month, and day are saved to a
Calendarobject. - The displayed date is formatted using
SimpleDateFormator another deliberate date formatter. - The tutorial explains that the DatePicker month value is zero-based.
- Any minimum or maximum date rules are applied before
dialog.show(). - The sample code avoids deprecated synthetic view access when used in a modern AndroidX project.
Android DatePicker Kotlin FAQ
What is the use of DatePicker in Android Kotlin?
A DatePicker lets the user select a date from a calendar-style control instead of typing the date manually. In Kotlin Android apps, it is commonly opened through DatePickerDialog and used for form fields such as date of birth, appointment date, reminder date, or booking date.
Why is the month value different in Android DatePickerDialog?
The month value follows the Calendar convention. January is 0, February is 1, and December is 11. Store the value in a Calendar object and format it with a formatter to avoid display mistakes.
How do I show the current date when DatePickerDialog opens?
Pass the current Calendar.YEAR, Calendar.MONTH, and Calendar.DAY_OF_MONTH values to the DatePickerDialog constructor. If you keep the user’s selected date in the same Calendar object, the dialog can reopen with the last selected date.
How can I restrict dates in Android DatePicker using Kotlin?
Create the DatePickerDialog, then set dialog.datePicker.minDate and dialog.datePicker.maxDate before calling dialog.show(). Both properties expect time in milliseconds.
Should I use DatePickerDialog in Jetpack Compose?
For XML layouts, DatePickerDialog is suitable. For Jetpack Compose screens, prefer the Material 3 Compose date picker APIs so the date input follows Compose state and UI patterns.