 TutorialKart.com
How to Create a Layout XML File in Android Studio
Android layout XML files define the visual structure of screens, dialogs, list items, and reusable interface components. In a standard Android project, these files are stored in the app/src/main/res/layout directory.
This tutorial explains how to create a layout XML file in the Android Studio res/layout folder, select its root element, and verify that the file can be referenced from an activity or fragment.
Step 1: Open the Project Window in Android View
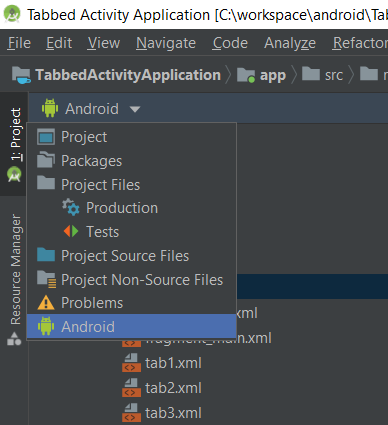
Open the Project tool window on the left side of Android Studio. From the view selector at the top of the window, choose Android.
The Android view groups project files by their purpose, making the resource directories easier to locate.
Step 2: Locate the Android res/layout Folder
In Android view, expand the app module and then expand the res node.
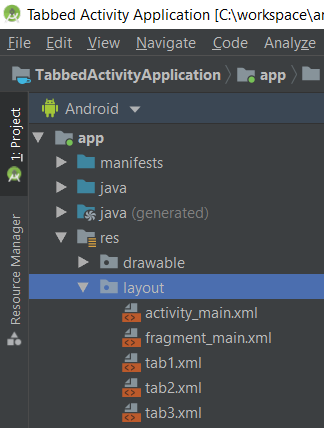
You should see the layout directory under res. Its physical project path is normally:
app/src/main/res/layoutIf the layout directory is missing, right-click the res directory, select New > Android Resource Directory, choose layout as the resource type, and create the directory.
Step 3: Create a New Layout XML Resource File
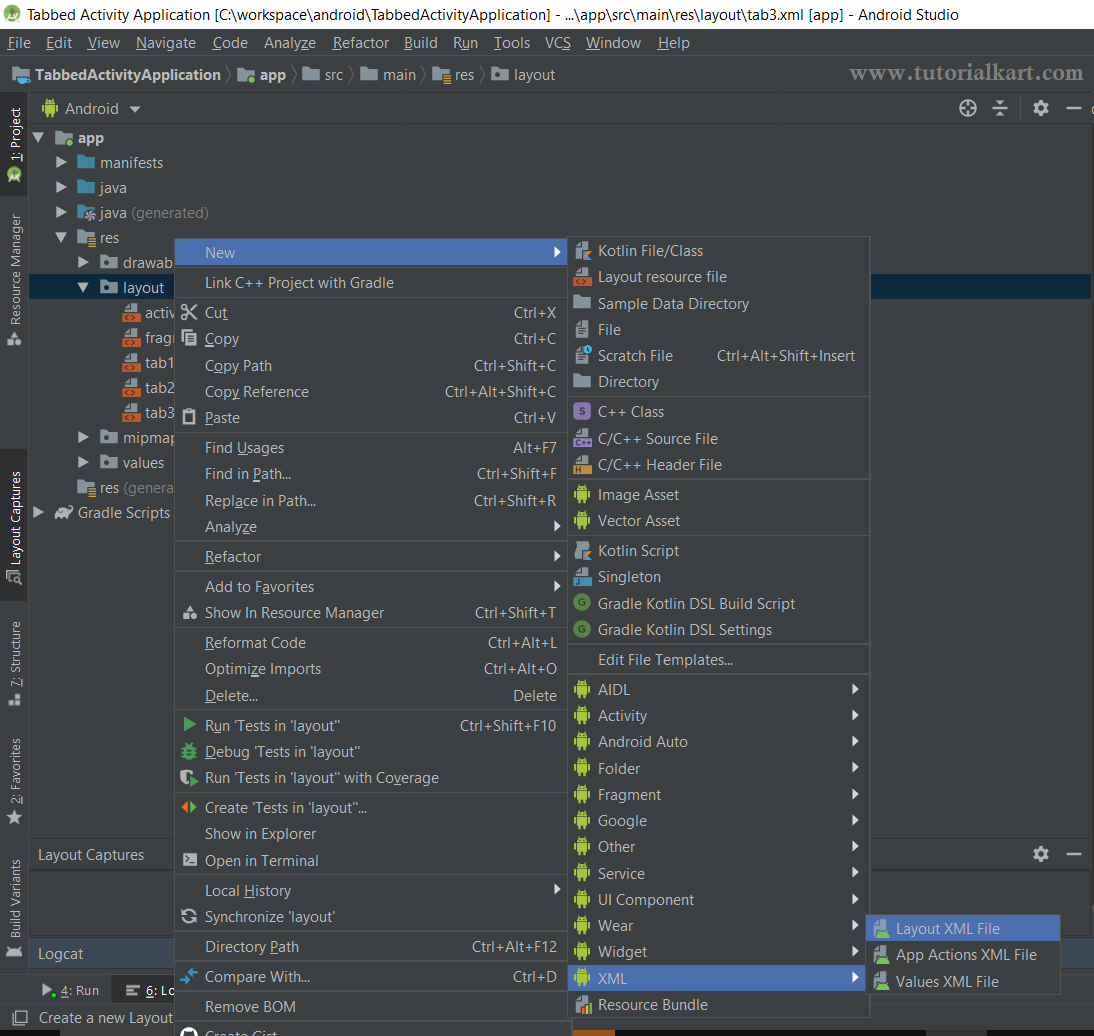
Right-click the layout directory and select New > Layout Resource File. In some Android Studio versions, the option may appear under New > XML > Layout XML File.
Step 4: Enter the Layout File Name and Root Element
In the new resource file dialog, enter a name for the layout and select its root element. Then click Finish or OK, depending on the Android Studio version.
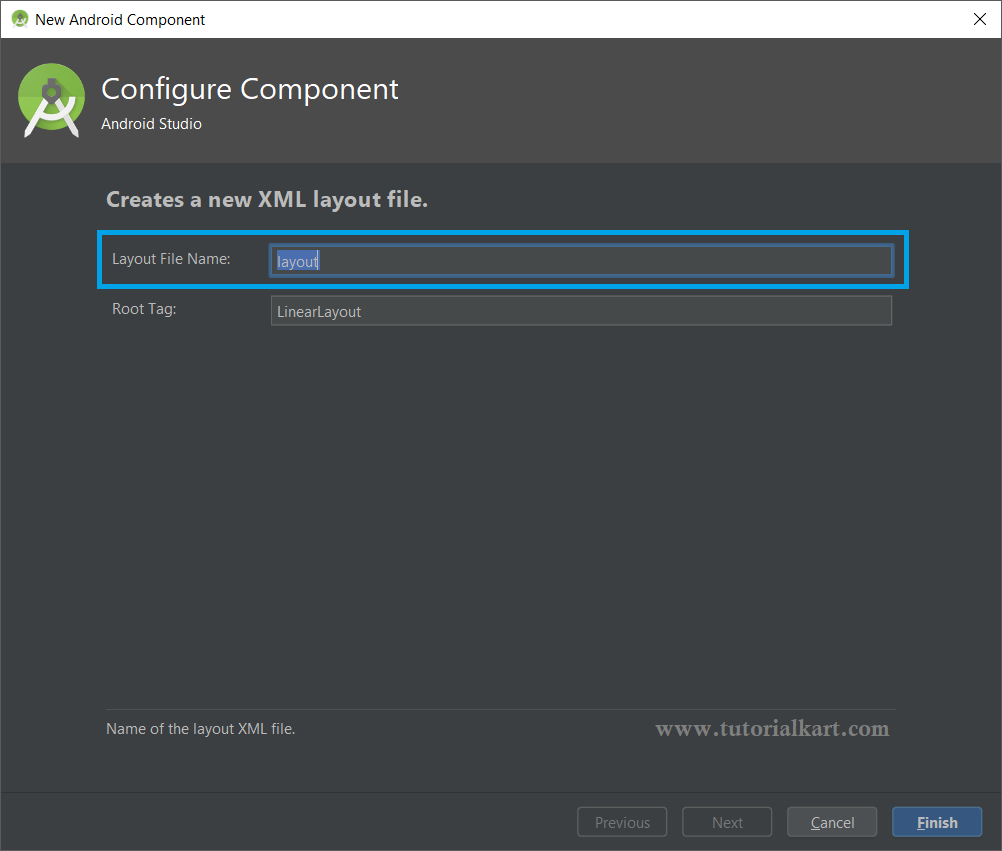
Use lowercase letters and underscores for the file name. Android resource file names cannot contain spaces, hyphens, or uppercase letters.
For example, a screen named “User Profile” can use the following file name:
activity_user_profile.xmlThe selected root element becomes the top-level XML element in the generated file. Common choices include ConstraintLayout, LinearLayout, FrameLayout, and ScrollView.
Example Android Layout XML File
A simple layout containing a centered TextView can be written as follows:
<?xml version="1.0" encoding="utf-8"?>
<LinearLayout xmlns:android="http://schemas.android.com/apk/res/android"
    android:layout_width="match_parent"
    android:layout_height="match_parent"
    android:gravity="center"
    android:orientation="vertical">

    <TextView
        android:layout_width="wrap_content"
        android:layout_height="wrap_content"
        android:text="Hello Android" />

</LinearLayout>
Android Studio may open the new file in the visual Layout Editor. Use the Code, Split, or Design option to switch between XML editing and the visual preview.
Reference the Layout XML File from an Activity
Android generates a resource identifier from the XML file name. For example, a file named activity_user_profile.xml is referenced as R.layout.activity_user_profile.
In a Kotlin activity that uses the traditional View system, pass the layout resource to setContentView():
override fun onCreate(savedInstanceState: Bundle?) {
    super.onCreate(savedInstanceState)
    setContentView(R.layout.activity_user_profile)
}
The file must be saved under res/layout and must not contain XML errors. Otherwise, the corresponding R.layout reference may not be generated correctly.
Android Layout File Naming Guidelines
- Use only lowercase letters, digits, and underscores.
- Choose a name that describes where the layout is used, such as
activity_login.xml,fragment_settings.xml, oritem_product.xml. - Use a consistent prefix for activities, fragments, dialogs, and list items.
- Do not include the
.xmlextension when referencing the resource throughR.layout. - Do not create two layout resources with the same name in the same resource configuration.
Fix Common Problems When Creating Android Layout XML Files
The layout folder is not visible
Confirm that you expanded the correct application module. You can also switch the Project window from Android view to Project view and navigate directly to app/src/main/res.
The layout file name is rejected
Remove spaces, uppercase letters, and hyphens. Use a valid name such as screen_profile.xml instead of Screen-Profile.xml.
R.layout does not contain the new layout
Check the XML file for syntax errors, save the file, and allow Android Studio to finish indexing or building the project. Also verify that the code imports your application module’s R class rather than an unrelated R class.
The project uses Jetpack Compose
Jetpack Compose defines user interfaces in Kotlin rather than XML. A Compose-only screen does not require a layout XML file. XML layouts are still used by projects and screens built with the Android View system.
Android Layout XML File Review Checklist
- Confirm that the file is stored in
app/src/main/res/layout. - Verify that the file name contains only lowercase letters, digits, and underscores.
- Ensure that the XML has one valid root element.
- Check that every view defines appropriate
android:layout_widthandandroid:layout_heightvalues. - Confirm that the generated
R.layout.file_namereference resolves without an error.
Conclusion
To create an Android layout XML file, open the application module, navigate to res/layout, create a new layout resource file, and provide a valid lowercase file name and root element. The resulting layout can then be referenced through R.layout from an activity, fragment, adapter, or other View-based component.
In this Kotlin Android Tutorial, we have learned how to create a layout XML file in the resources layout folder of an Android project.