 TutorialKart.com
This tutorial explains how to create a group in Tally ERP 9, arrange sub-groups under the correct parent group, and display, alter, or delete a user-created group. It also distinguishes accounting groups from ledgers so that customer and supplier accounts are classified correctly.
What Is an Account Group in Tally.ERP 9?
An account group is a classification used to organize ledgers with a similar accounting purpose. For example, customer ledgers are generally placed under Sundry Debtors, while supplier ledgers are placed under Sundry Creditors. Reports such as the Balance Sheet and Profit and Loss Account use these classifications to present balances under the appropriate accounting heads.
Tally.ERP 9 provides predefined primary and sub-groups. You can also create user-defined groups in Tally when the organization needs an additional reporting hierarchy, such as grouping customers by region or branch.
| Master type | Purpose | Example |
|---|---|---|
| Group | Classifies ledgers or other sub-groups | South India Debtors |
| Sub-group | Adds another classification level under a group | Bangalore Debtors under South India Debtors |
| Ledger | Stores transactions and account balances | ABC Limited under Bangalore Debtors |
Enable Advanced Group Master Options in Tally.ERP 9
If you are creating groups for the first time and need the additional master fields, open the Accounts/Inventory configuration and enable the relevant advanced options:
- Provide advanced information in masters
- Allow advanced entries in masters
Path: Gateway of Tally –> F12: Configure –> Accts / Inventory Info –> Accounts
The precise wording and availability of these settings can vary by Tally.ERP 9 release. Basic group creation requires a group name and a valid parent in the Under field.
Example Group Hierarchy for Sundry Debtors
The following example classifies customer accounts by region and city:
- Default parent group: Sundry Debtors
- Regional groups: South India Debtors and North India Debtors under Sundry Debtors
- City sub-groups: Bangalore Debtors, Vijayawada Debtors, and Hyderabad Debtors under South India Debtors
- Customer ledgers: ABC Limited and Tech Solutions under Bangalore Debtors
South India Debtors, North India Debtors, and the city classifications are groups. ABC Limited and Tech Solutions are ledgers because transactions are recorded against customer accounts, not directly against their classification groups.
How to Create a Single Group in Tally.ERP 9
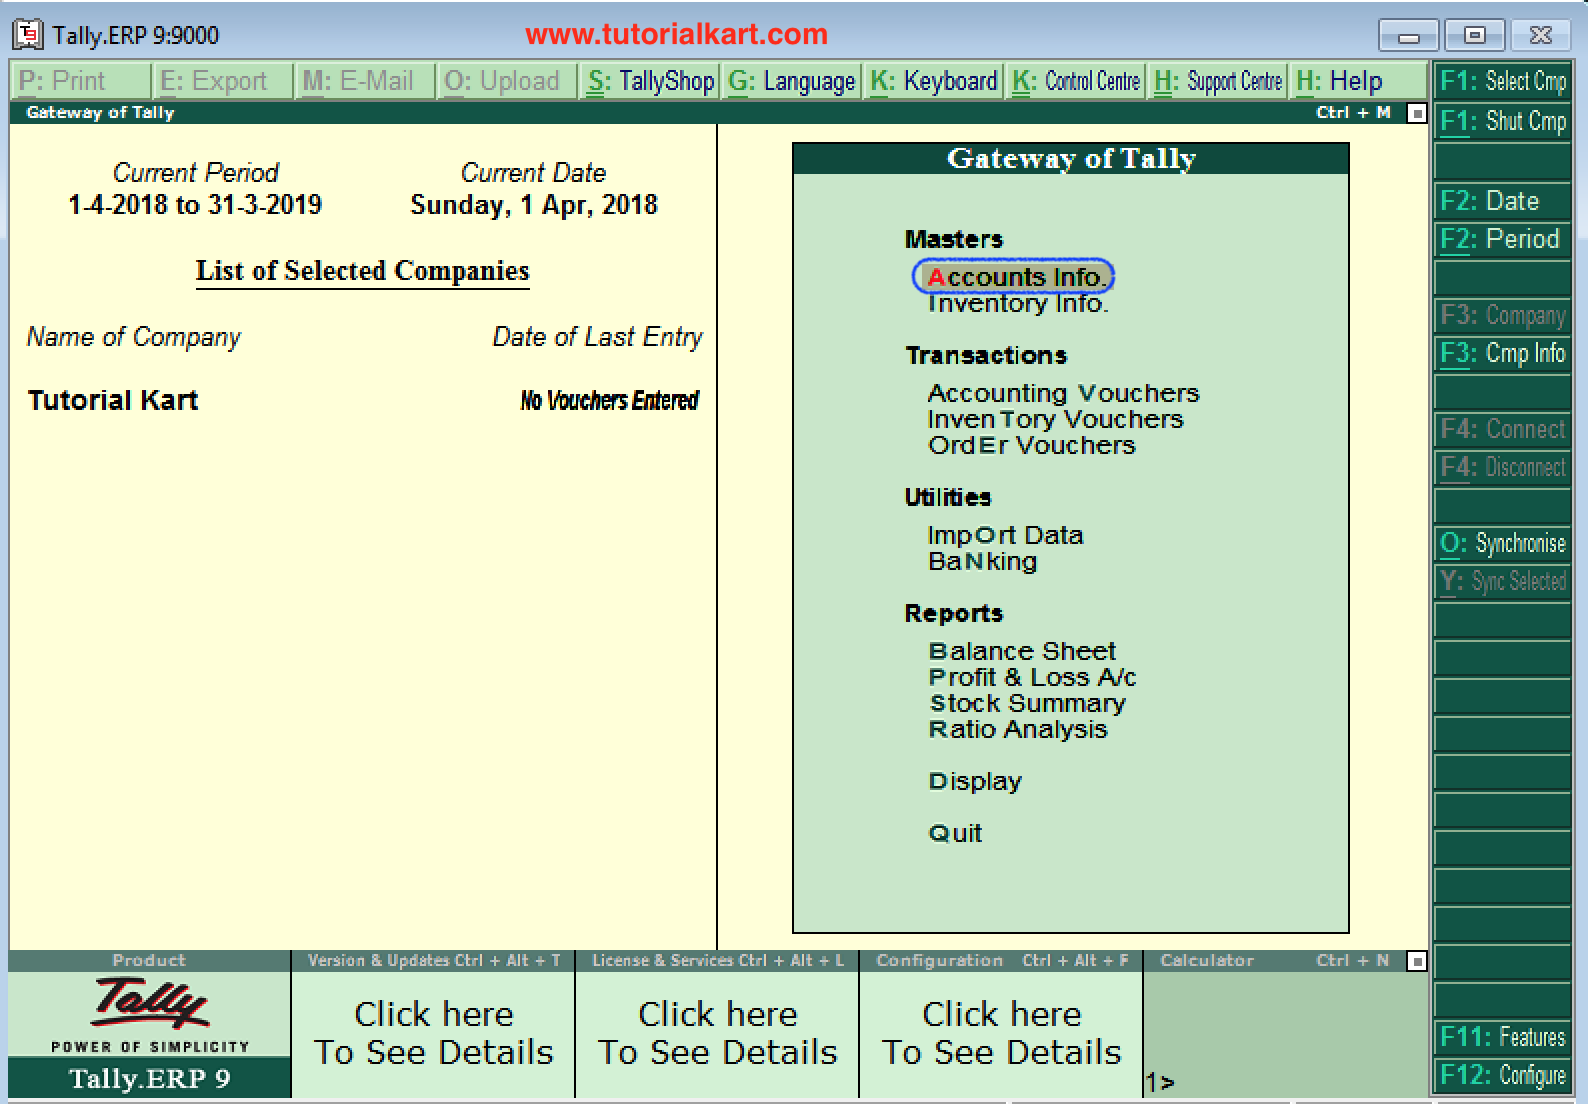
Step 1: From the Gateway of Tally, select Accounts Info.
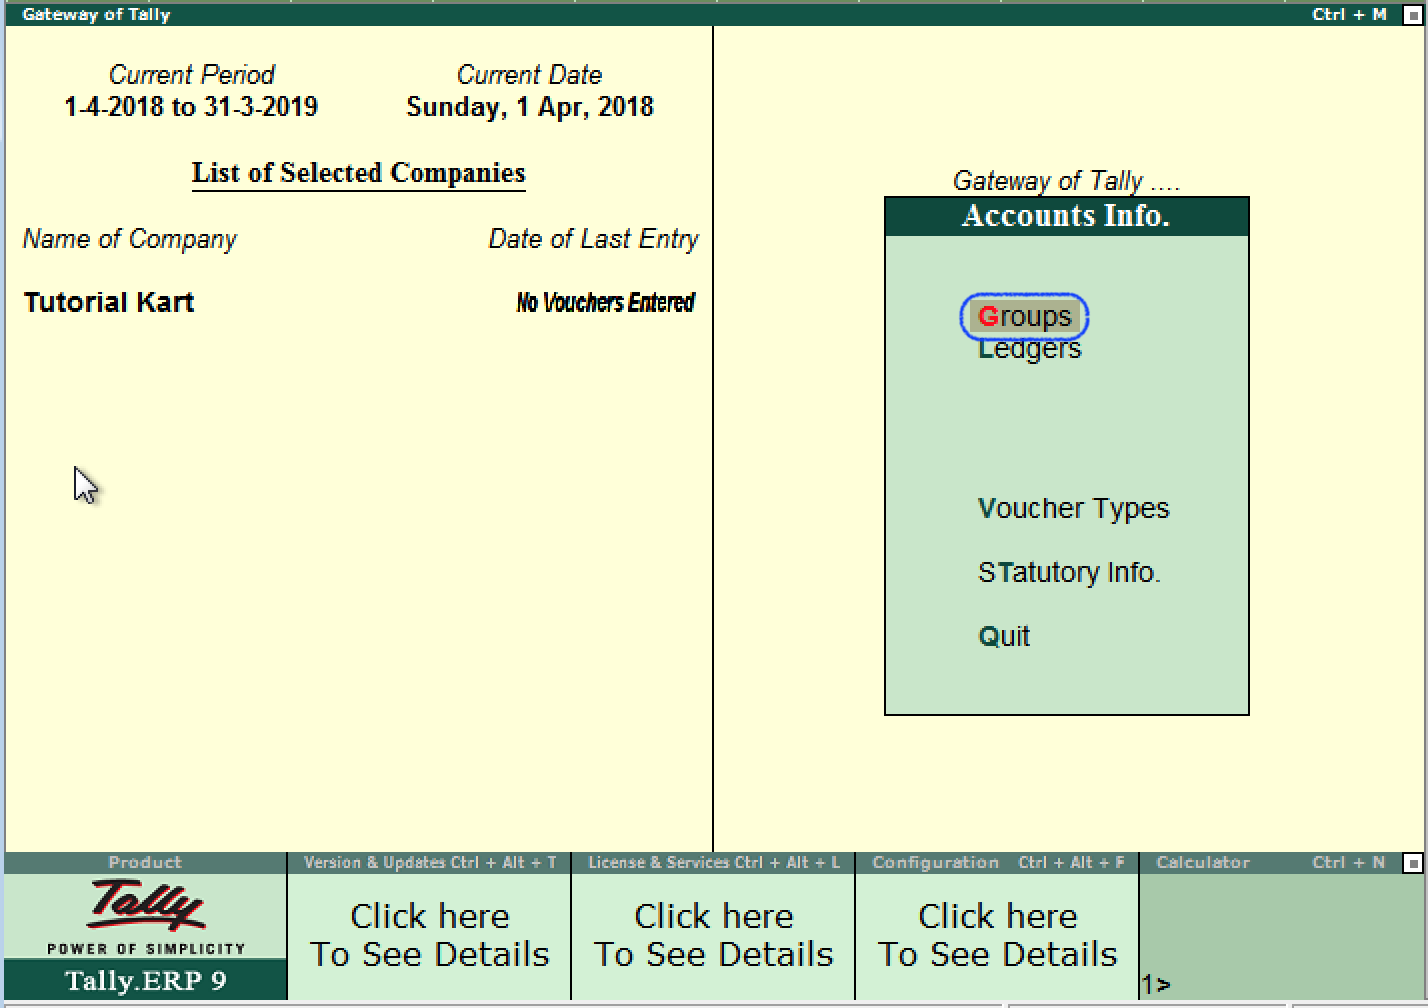
Step 2: Under Accounts Info, select Groups.
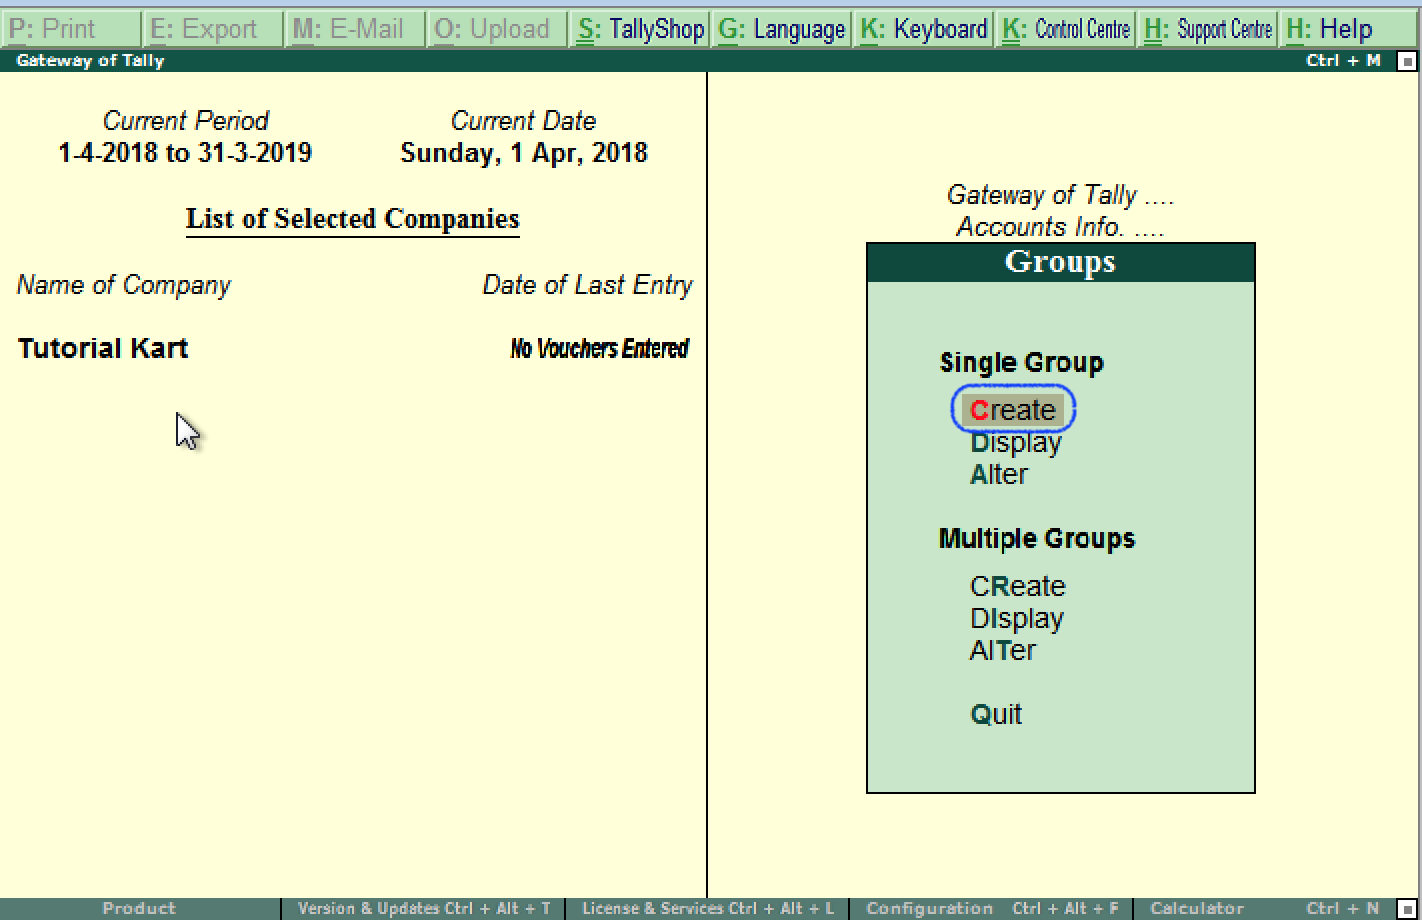
Step 3: In the Single Group section, select Create.
Step 4: Complete the Group Creation screen:
- Name: Enter a clear and unique group name, such as South India Debtors.
- Alias: Enter an alternative name only when the business uses another recognized name for the group.
- Under: Select the immediate parent group. For South India Debtors, select Sundry Debtors.
- Additional options: Complete any advanced fields displayed by the installed release only when they are required by the accounting setup.
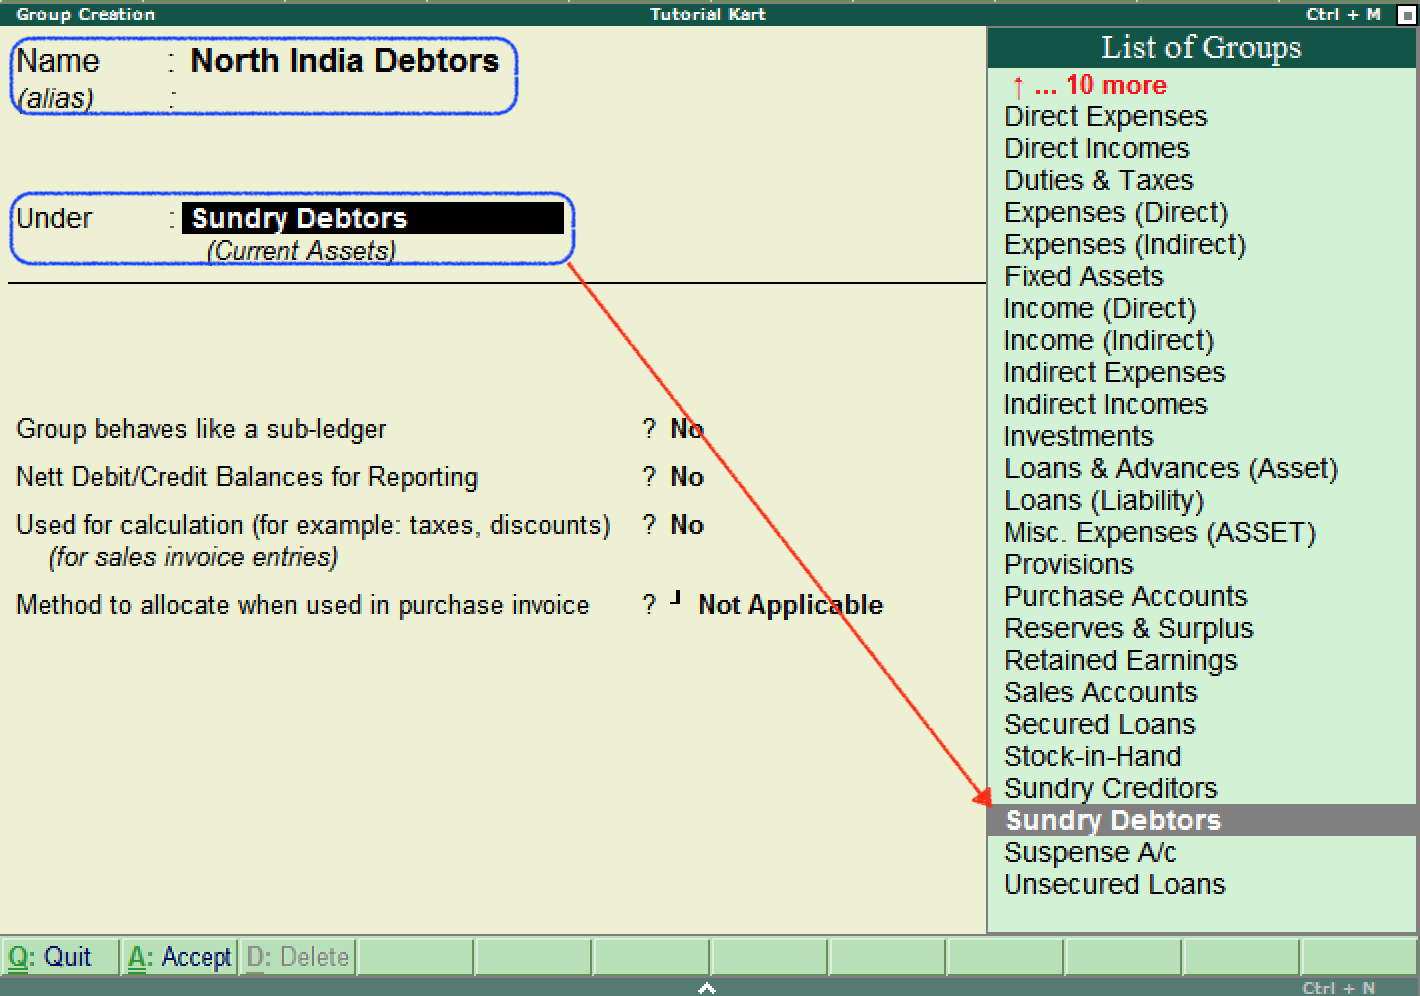
Step 5: Press Ctrl+A or choose A: Accept to save the group. The new group is then available in the List of Groups and can be selected as a parent while creating sub-groups or ledgers.
How to Create Sub-Groups Under Sundry Debtors
Create each level from the top of the hierarchy downward. A parent must exist before it can be selected in the Under field of another group.
- Create South India Debtors under Sundry Debtors.
- Create North India Debtors under Sundry Debtors.
- Create Bangalore Debtors under South India Debtors.
- Create Vijayawada Debtors under South India Debtors.
- Create Hyderabad Debtors under South India Debtors.
- Create the customer ledgers ABC Limited and Tech Solutions under Bangalore Debtors.
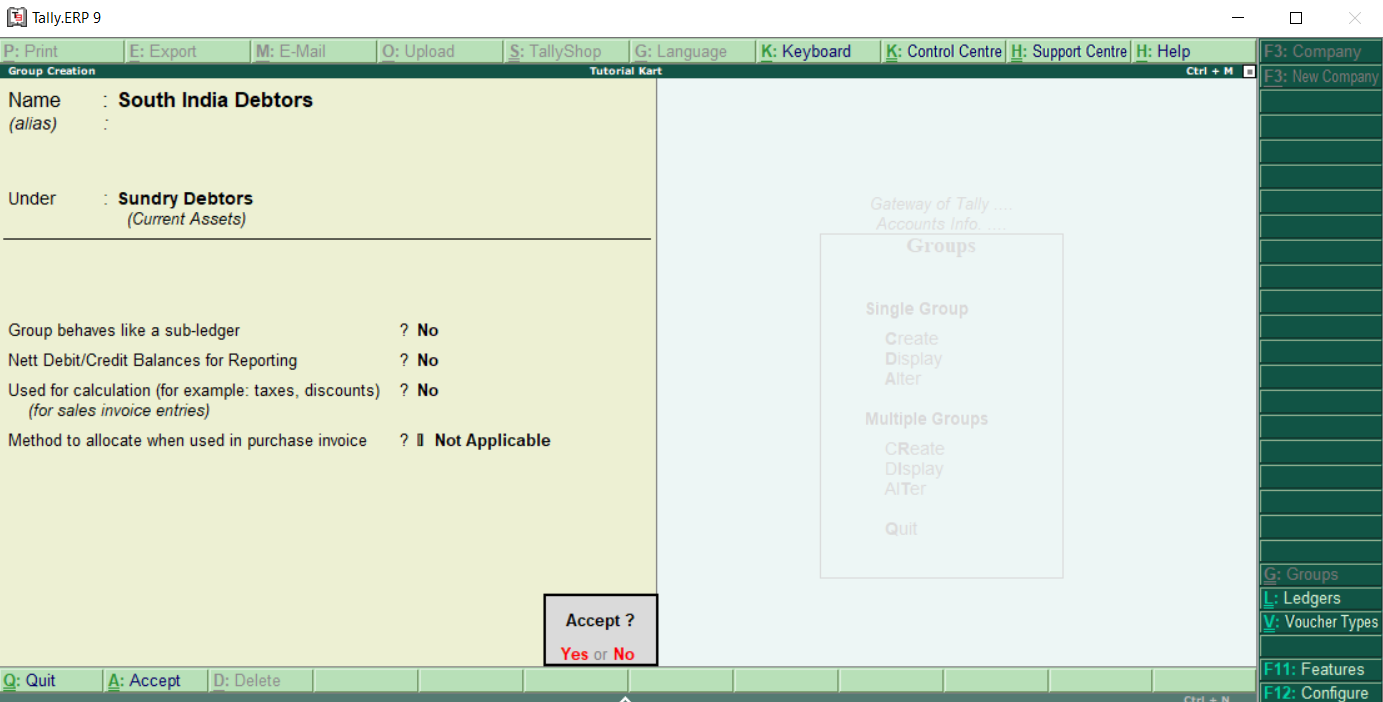
This structure keeps the regional and city classifications separate from the customer ledgers. When the hierarchy is used consistently, balances can be reviewed at the customer, city, regional, or Sundry Debtors level.
How to Create Multiple Groups in Tally.ERP 9
Use multiple-group creation when several groups must be added in one session. Go to Gateway of Tally –> Accounts Info –> Groups, and select Create under Multiple Groups. Choose a common parent group when all new groups belong under the same parent, or use the available option that permits the parent to be entered for each row.
- Select the parent-group mode required for the entries.
- Enter each new group name in a separate row.
- Verify the Under value for every group.
- Press Ctrl+A to accept the completed list.
- Display one or more newly created groups to confirm their position in the hierarchy.
Single-group creation is more suitable when advanced fields must be reviewed separately for each group. Multiple-group creation is useful for entering several straightforward classifications with the same or clearly defined parent groups.
How to Display a Group in Tally.ERP 9
Display mode lets you inspect a group without intentionally changing its master details.
Step 1: Follow Gateway of Tally –> Accounts Info –> Groups.
Step 2: Under Single Group, select Display.
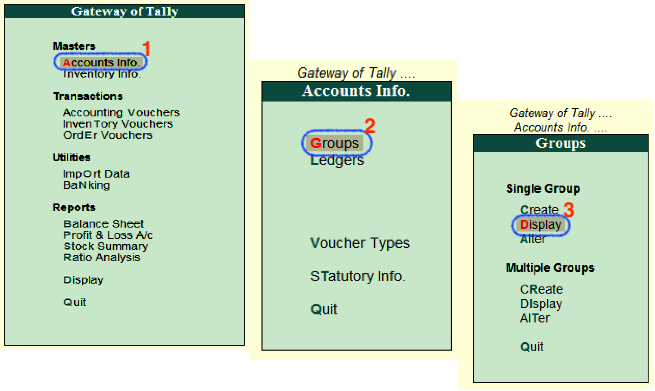
Step 3: Select the required group from the List of Groups.
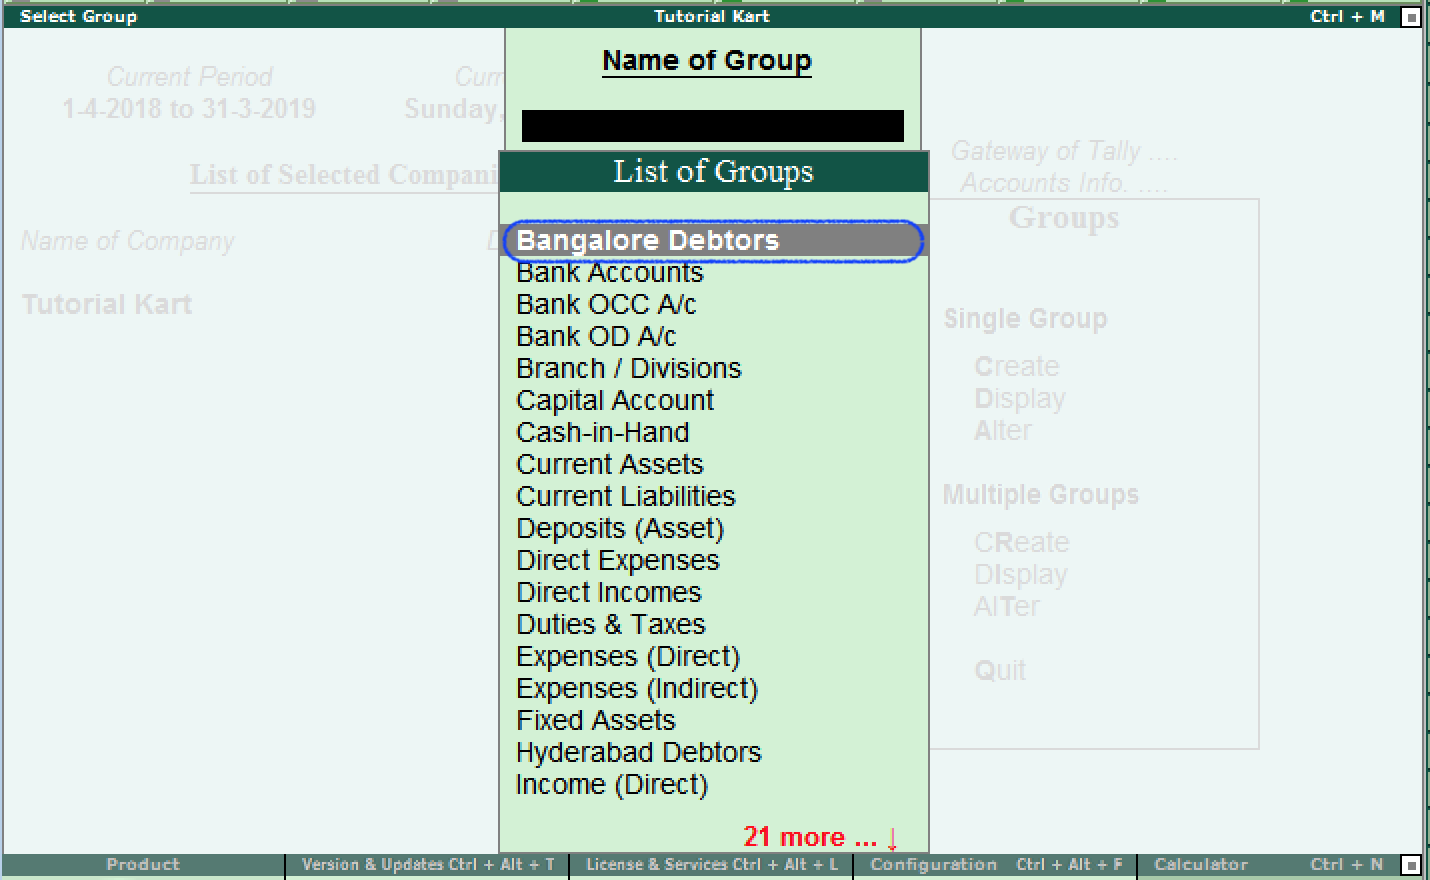
The selected group, such as Bangalore Debtors, appears with its saved classification details.
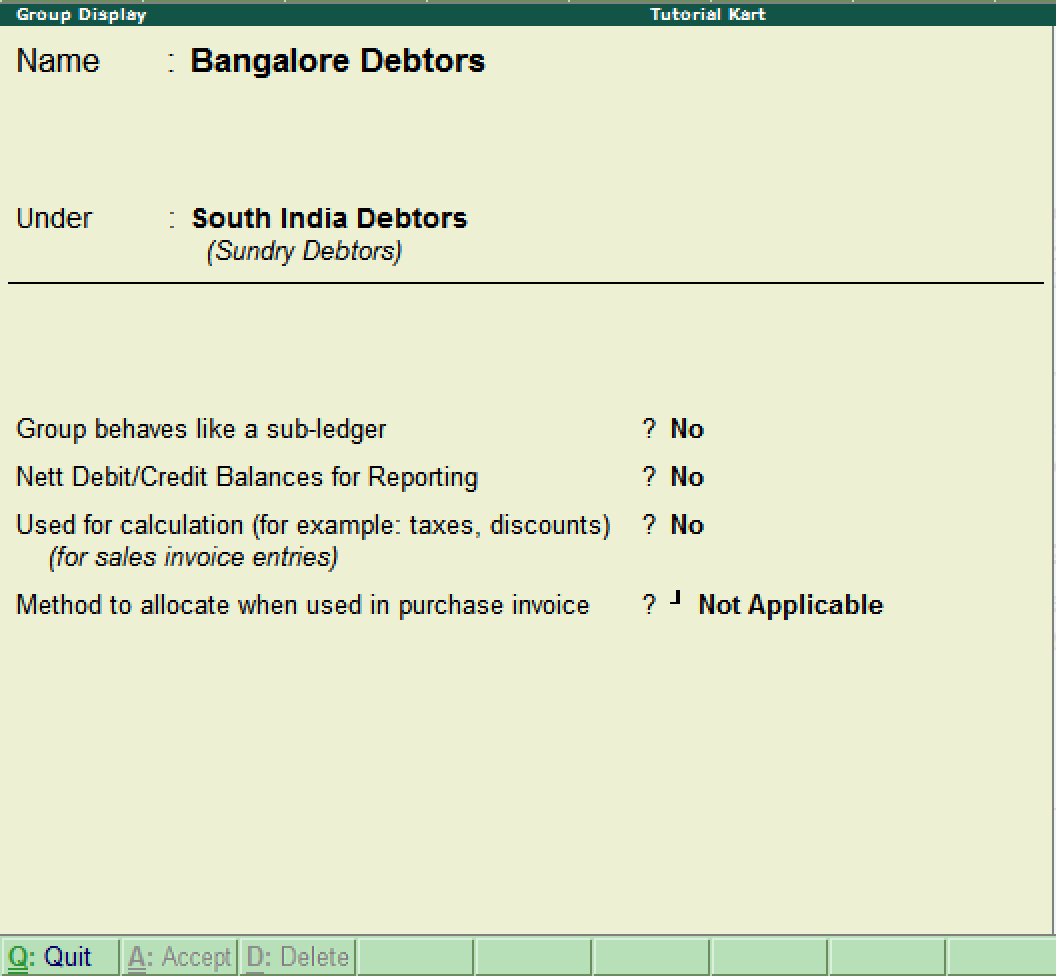
Use Q: Quit or the applicable escape command to close the display screen.
How to Alter a Group in Tally.ERP 9
Use alteration when a user-created group’s name, alias, parent, or another permitted setting must be corrected. Changing the parent reorganizes how its balances appear in accounting reports, so verify the classification before accepting the alteration.
Step 1: Go to Gateway of Tally –> Accounts Info –> Groups.
Step 2: Under Single Group, select Alter.
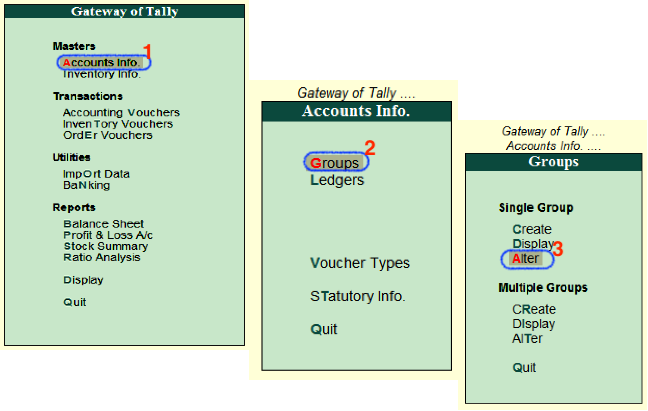
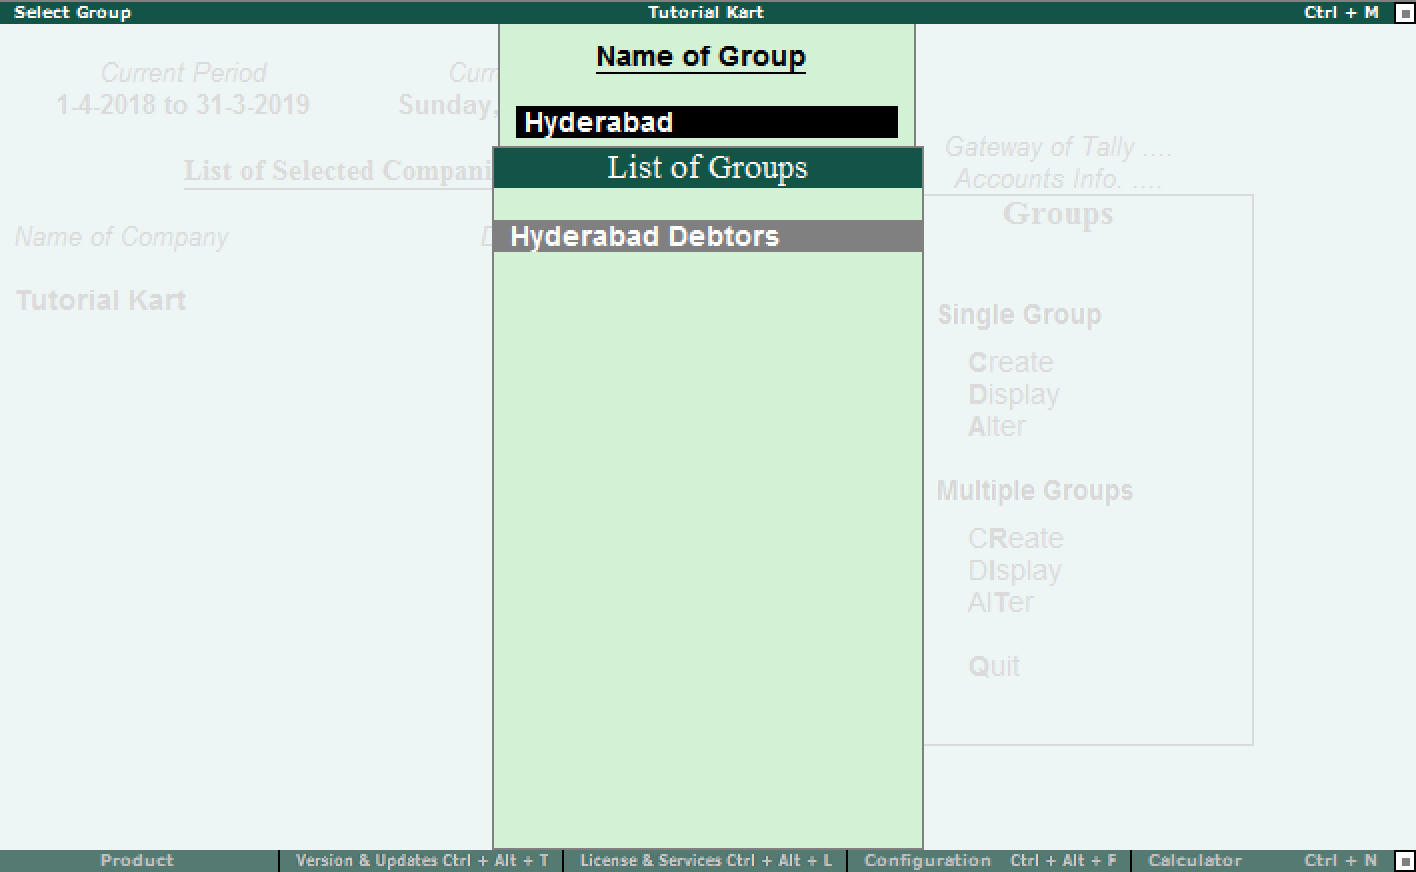
Step 3: Locate and select the required group from the List of Groups.
Step 4: Update the permitted fields on the Group Alteration screen. Check the Under field carefully if you are moving the group to another parent.
Step 5: Press Ctrl+A or select A: Accept to save the changes.
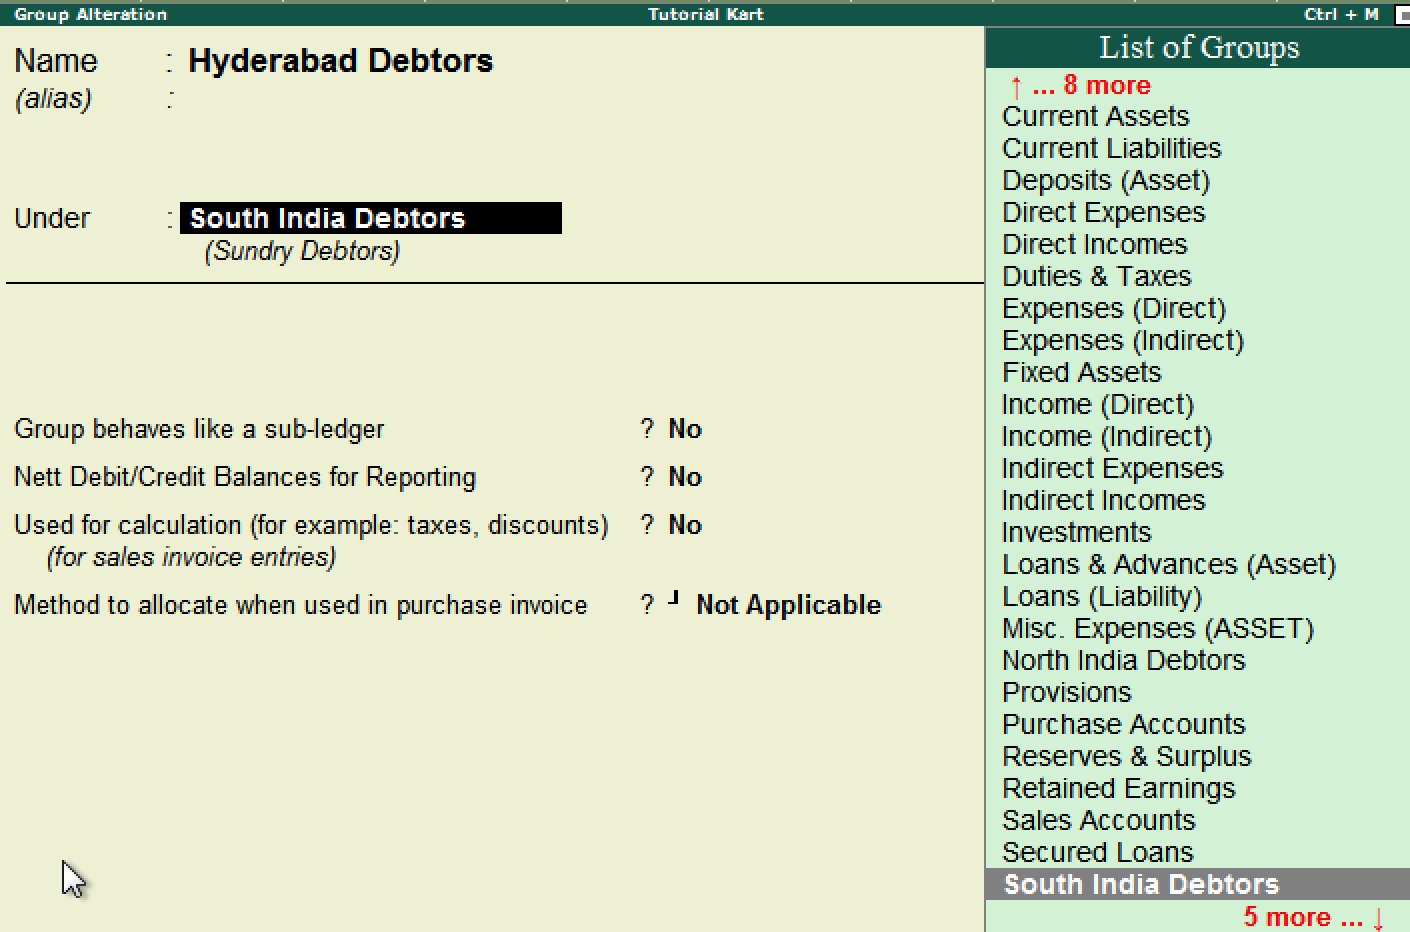
After saving, display the group or review the relevant accounting report to confirm that its name and position in the hierarchy are correct.
How to Delete a Group in Tally.ERP 9
A user-created group can be deleted from its Group Alteration screen when Tally permits the deletion. Open Gateway of Tally –> Accounts Info –> Groups –> Alter, select the group, and press Alt+D. Confirm the deletion only after verifying that the correct group is open.
Tally will not allow deletion in situations where the group is required by dependent masters or data. Reassign or remove its sub-groups and ledgers as appropriate before trying again. Predefined groups required by Tally’s accounting structure cannot be deleted. Take a backup before reorganizing or deleting established masters.
Choosing the Correct Parent Group in Tally.ERP 9
The parent selected in the Under field affects where balances are reported. Choose the parent according to the account’s actual nature, not merely because its name appears similar.
| Classification need | Typical parent group | Example user-created group |
|---|---|---|
| Customer accounts | Sundry Debtors | South India Debtors |
| Supplier accounts | Sundry Creditors | Local Suppliers |
| Operating expenses | Indirect Expenses | Office Administration Expenses |
| Revenue from primary sales | Sales Accounts | Domestic Sales |
The appropriate classification depends on the organization’s accounting policy and the nature of the transactions. When uncertain, confirm the parent group with the person responsible for the chart of accounts before recording transactions.
Tally Group Creation and Alteration QA Checklist
- Confirm that every user-created group has a unique, descriptive name.
- Verify that customer classifications are under Sundry Debtors and supplier classifications are under Sundry Creditors where applicable.
- Check that regional and city sub-groups are created before their dependent groups or ledgers.
- Confirm that party accounts such as ABC Limited are created as ledgers rather than groups.
- Review the Under field before accepting a new or altered group.
- Display newly created groups to confirm their location in the hierarchy.
- Review affected Balance Sheet or Profit and Loss classifications after moving an established group.
- Take a verified backup before deleting groups or substantially reorganizing the chart of accounts.
FAQs About Creating Groups in Tally.ERP 9
How do I create a group in Tally.ERP 9 with an example?
Go to Gateway of Tally –> Accounts Info –> Groups –> Create under Single Group. Enter South India Debtors as the name, select Sundry Debtors in the Under field, and press Ctrl+A to save it.
How do I alter a group in Tally.ERP 9?
Open Gateway of Tally –> Accounts Info –> Groups –> Alter, select the required group, update its permitted fields, and press Ctrl+A. Verify the parent group before saving because changing it can affect financial-report classification.
What is the difference between a group and a ledger in Tally?
A group classifies accounts for reporting, while a ledger represents an individual account against which transactions and balances are recorded. Bangalore Debtors can be a group, whereas ABC Limited should be a customer ledger under that group.
Can I create several groups at one time in Tally.ERP 9?
Yes. Open Accounts Info –> Groups and select Create under Multiple Groups. Enter each group and verify its parent before accepting the list. Use Single Group creation when you need to review advanced master settings individually.
Why can I not delete a group in Tally.ERP 9?
Deletion may be blocked because the group is predefined or because sub-groups, ledgers, or other dependent data are associated with it. Review and reassign dependent masters where appropriate, then open the user-created group in alteration mode and try Alt+D again.