 TutorialKart.com
Before recording vouchers or creating ledgers, you must create a company in Tally ERP 9. The company record stores the organisation’s name, contact information, financial-year dates, security preferences, and base-currency settings.
How to Create a Company in Tally ERP 9
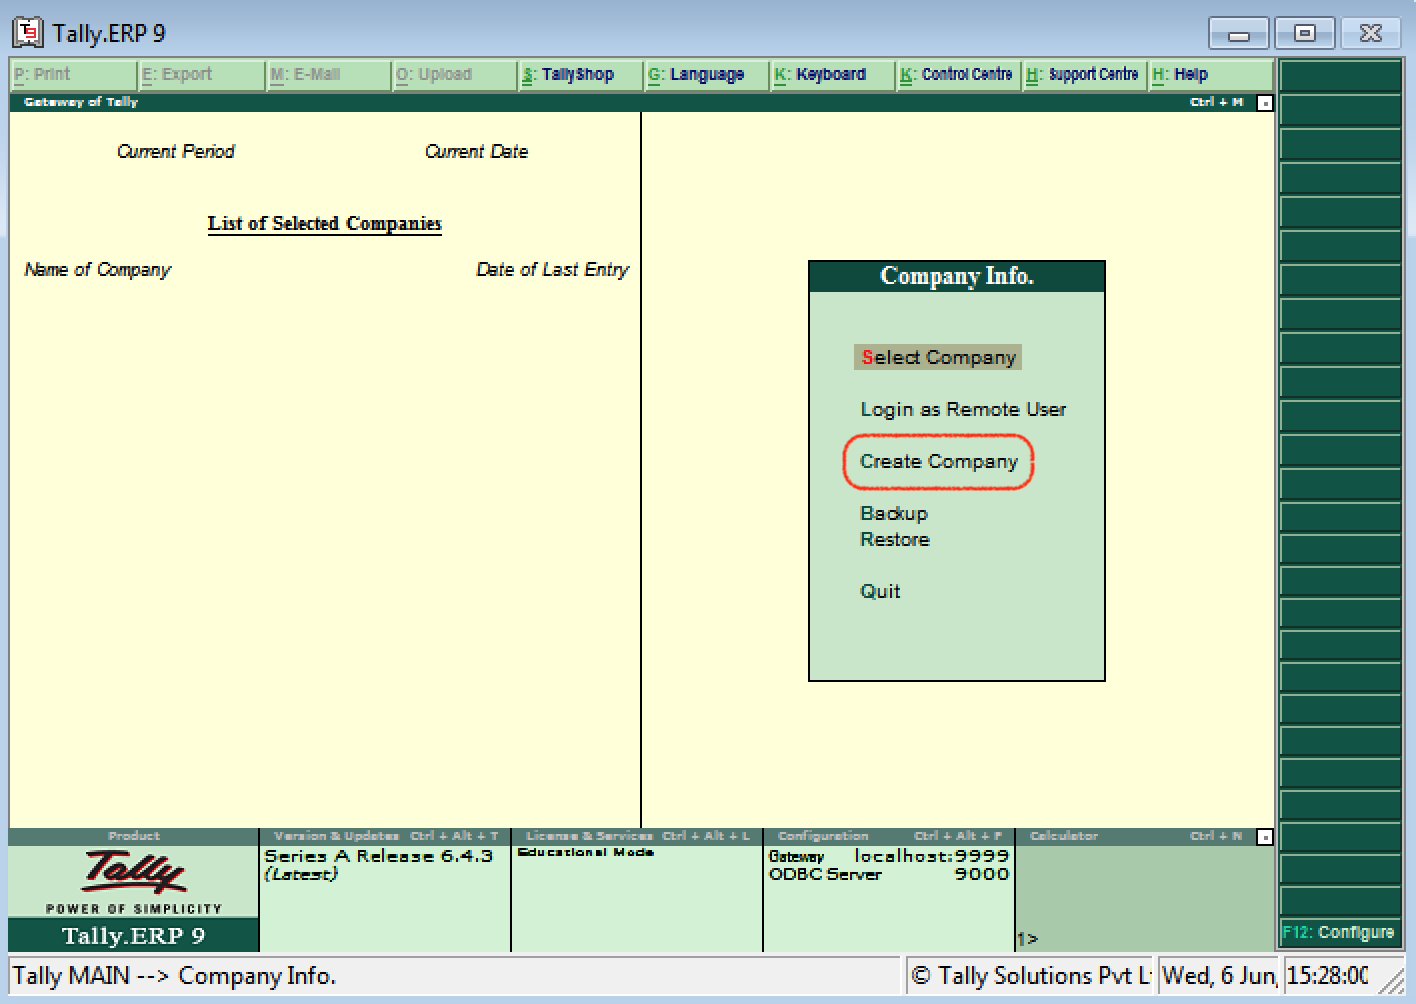
Use the following menu path to open the Company Creation screen:
Gateway of Tally > Company Info > Create Company
From the Gateway of Tally, you can also press Alt+F3 to open the Company Info menu in Tally.ERP 9 and then select Create Company. This shortcut applies to Tally.ERP 9; navigation in TallyPrime is different.
Step 1: Open the Tally ERP 9 Company Creation Screen
- Start Tally.ERP 9.
- Open Company Info from the startup screen, or press Alt+F3 from the Gateway of Tally.
- Select Create Company and press Enter.
The Company Creation screen appears as shown below.
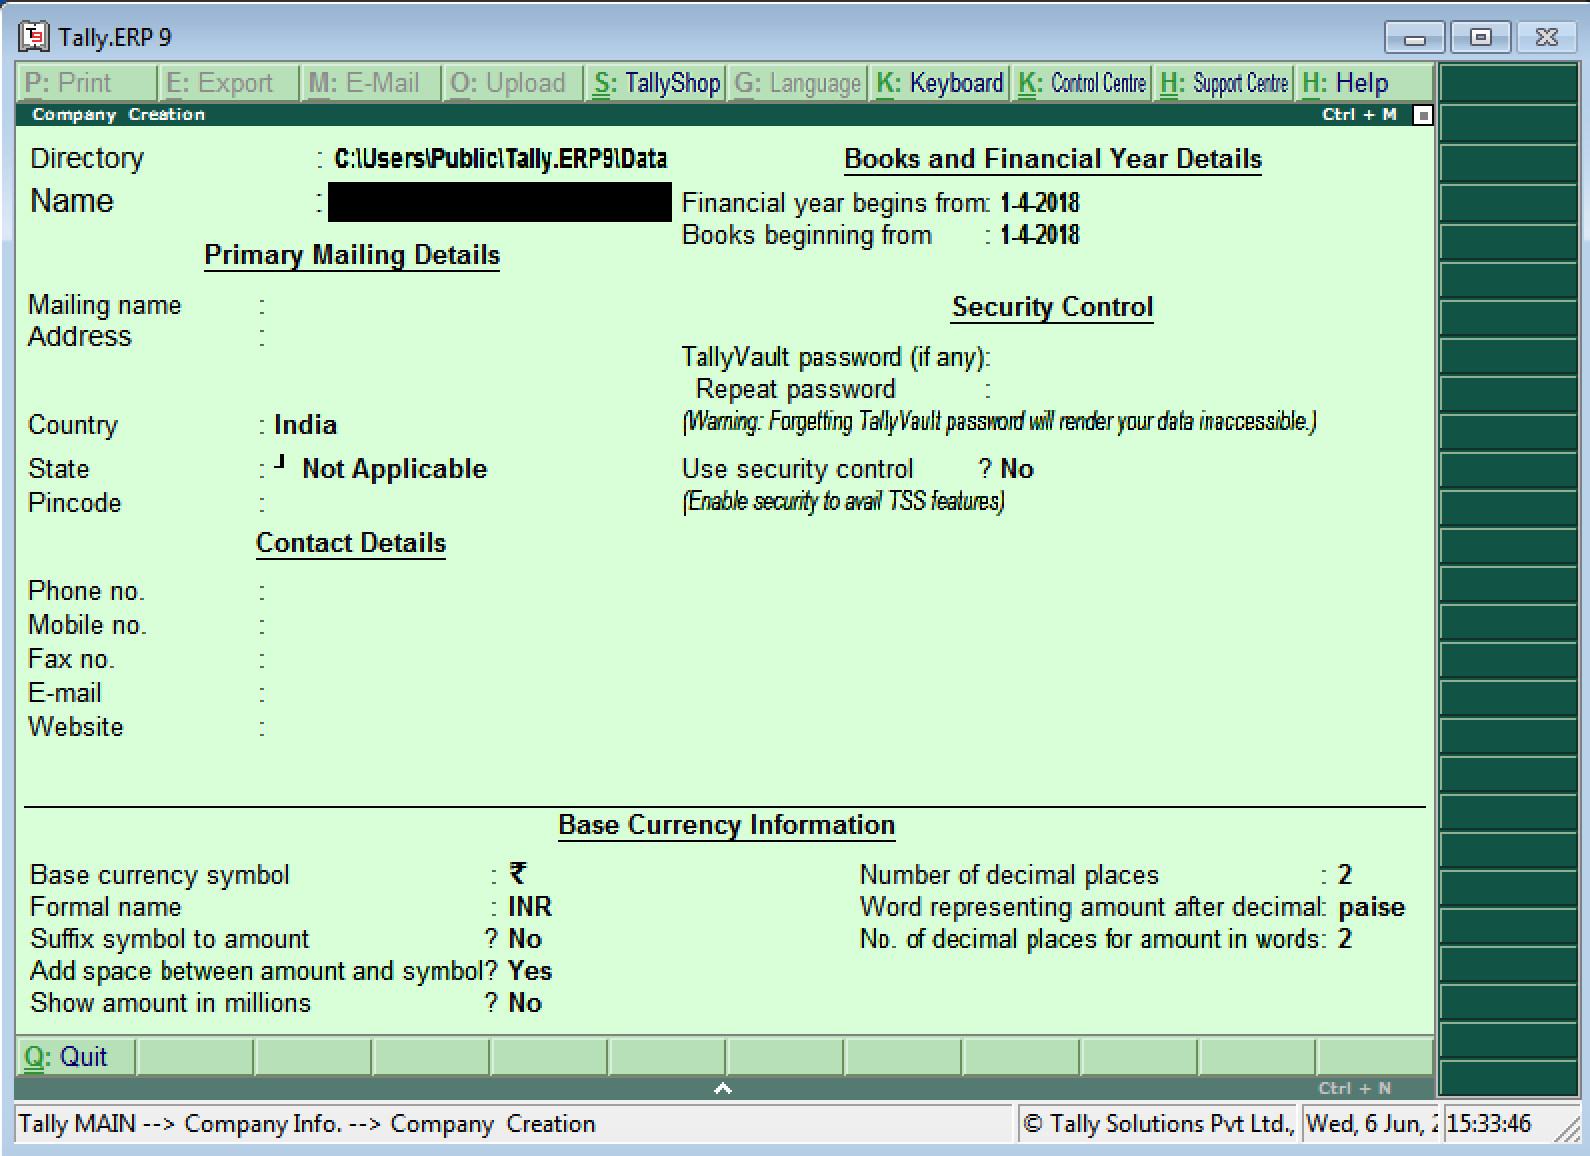
Use Enter, Tab, the arrow keys, or the mouse to move between fields. In normal Tally data-entry flow, Enter accepts the current field and moves to the next applicable field.
Step 2: Enter the Company Name and Data Directory
- Directory: Specifies where the company data will be stored. The displayed default depends on the Tally installation and system configuration. Confirm that the location is accessible and included in your backup process before changing it.
- Name: Enter the name that should identify the company inside Tally.ERP 9. This is the name users will see while selecting or switching companies.
Avoid creating duplicate company records with nearly identical names. If separate records are required for testing, branches, or prior-year data, use a clear naming convention so users can identify the correct company.
Step 3: Complete the Primary Mailing Details in Tally
The Primary Mailing Details identify the organisation on applicable reports and printed documents:
- Mailing Name: Tally normally copies the company name into this field. Change it if the legal or printed name is different from the internal company name.
- Address: Enter the complete mailing or registered address required on business documents.
- Country: Select the country in which the business operates. Country selection affects the statutory and currency options offered by Tally.
- State: Select the appropriate state or region from the list. For an Indian company, verify this field carefully because it is used by applicable statutory configurations.
- PIN Code: Enter the postal code for the company address.
Field names may vary slightly between Tally.ERP 9 releases. Older screens may display a label such as Statutory Compliance for, while later releases organise the location information through country and state selections.
Step 4: Add the Company Contact Details
- Telephone No.: Enter the organisation’s landline number, if applicable.
- Mobile No.: Enter the business contact number.
- E-mail: Enter the official company email address.
- Fax No.: Complete this field only if the company uses fax communication.
- Website: Enter the official website address, if available.
These fields should contain business contact details rather than an employee’s temporary personal information. Review the entries before using them on printed or exported documents.
Step 5: Set the Financial Year and Books Beginning Dates
The two date fields serve different purposes and should not be treated as interchangeable:
| Tally ERP 9 field | Purpose | Example |
|---|---|---|
| Financial Year Beginning From | Defines the start of the financial year used for the company. | 1 April 2026 for a financial year running from April 2026 to March 2027. |
| Books Beginning From | Defines the date from which transactions will be maintained in this Tally company. | 1 July 2026 when a business begins using Tally from July, even though its financial year began in April. |
For many businesses in India, the financial year begins on 1 April. However, the correct date must be chosen according to the organisation’s accounting period and applicable requirements. If the organisation starts maintaining records in Tally partway through the year, Books Beginning From can be later than the financial-year start date.
Confirm both dates before saving the company. An incorrect opening date can cause confusion while entering opening balances, importing transactions, and viewing period-based reports.
Step 6: Configure TallyVault and User Security
The Company Creation screen includes two separate security controls:
- TallyVault Password: Protects company data using TallyVault. Enter and confirm the password carefully. A forgotten TallyVault password cannot be retrieved through a normal password-reset process, so store it securely.
- Use Security Control: Enables user-based access control for the company. When enabled, enter the administrator name and password. Additional users and permissions can then be configured according to their responsibilities.
TallyVault and user security perform different functions. TallyVault protects access to the company data, while security control determines which authorised users can perform particular tasks. Do not assign a password unless the person responsible for the company data has a secure way to retain it.
Step 7: Verify the Base Currency Information
Tally supplies base-currency defaults according to the selected country. For a company using Indian rupees, review settings such as the currency symbol, formal currency name, decimal places, and the word used for the decimal portion.
- Base Currency Symbol: The symbol used when displaying amounts, such as ₹.
- Formal Name: The written name of the currency, such as Indian Rupees.
- Is Symbol Suffix to Amounts: Determines whether the symbol appears after rather than before an amount.
- Add Space Between Amount and Symbol: Controls spacing in displayed and printed values.
- Show Amounts in Millions: Determines whether large values use the international million format instead of the applicable local grouping format.
- Number of Decimal Places: Defines the number of digits shown after the decimal point. Two is commonly used for rupee-and-paise amounts.
- Word Representing Amount After Decimal: For Indian rupees, this is normally Paise.
- Decimal Places for Printing Amounts in Words: Controls how the decimal portion is represented when an amount is printed in words.
Do not change the base currency simply to enter an occasional foreign-currency transaction. Base currency is a company-level setting and should represent the currency in which the organisation primarily maintains its books.
Step 8: Accept and Save the Company in Tally ERP 9
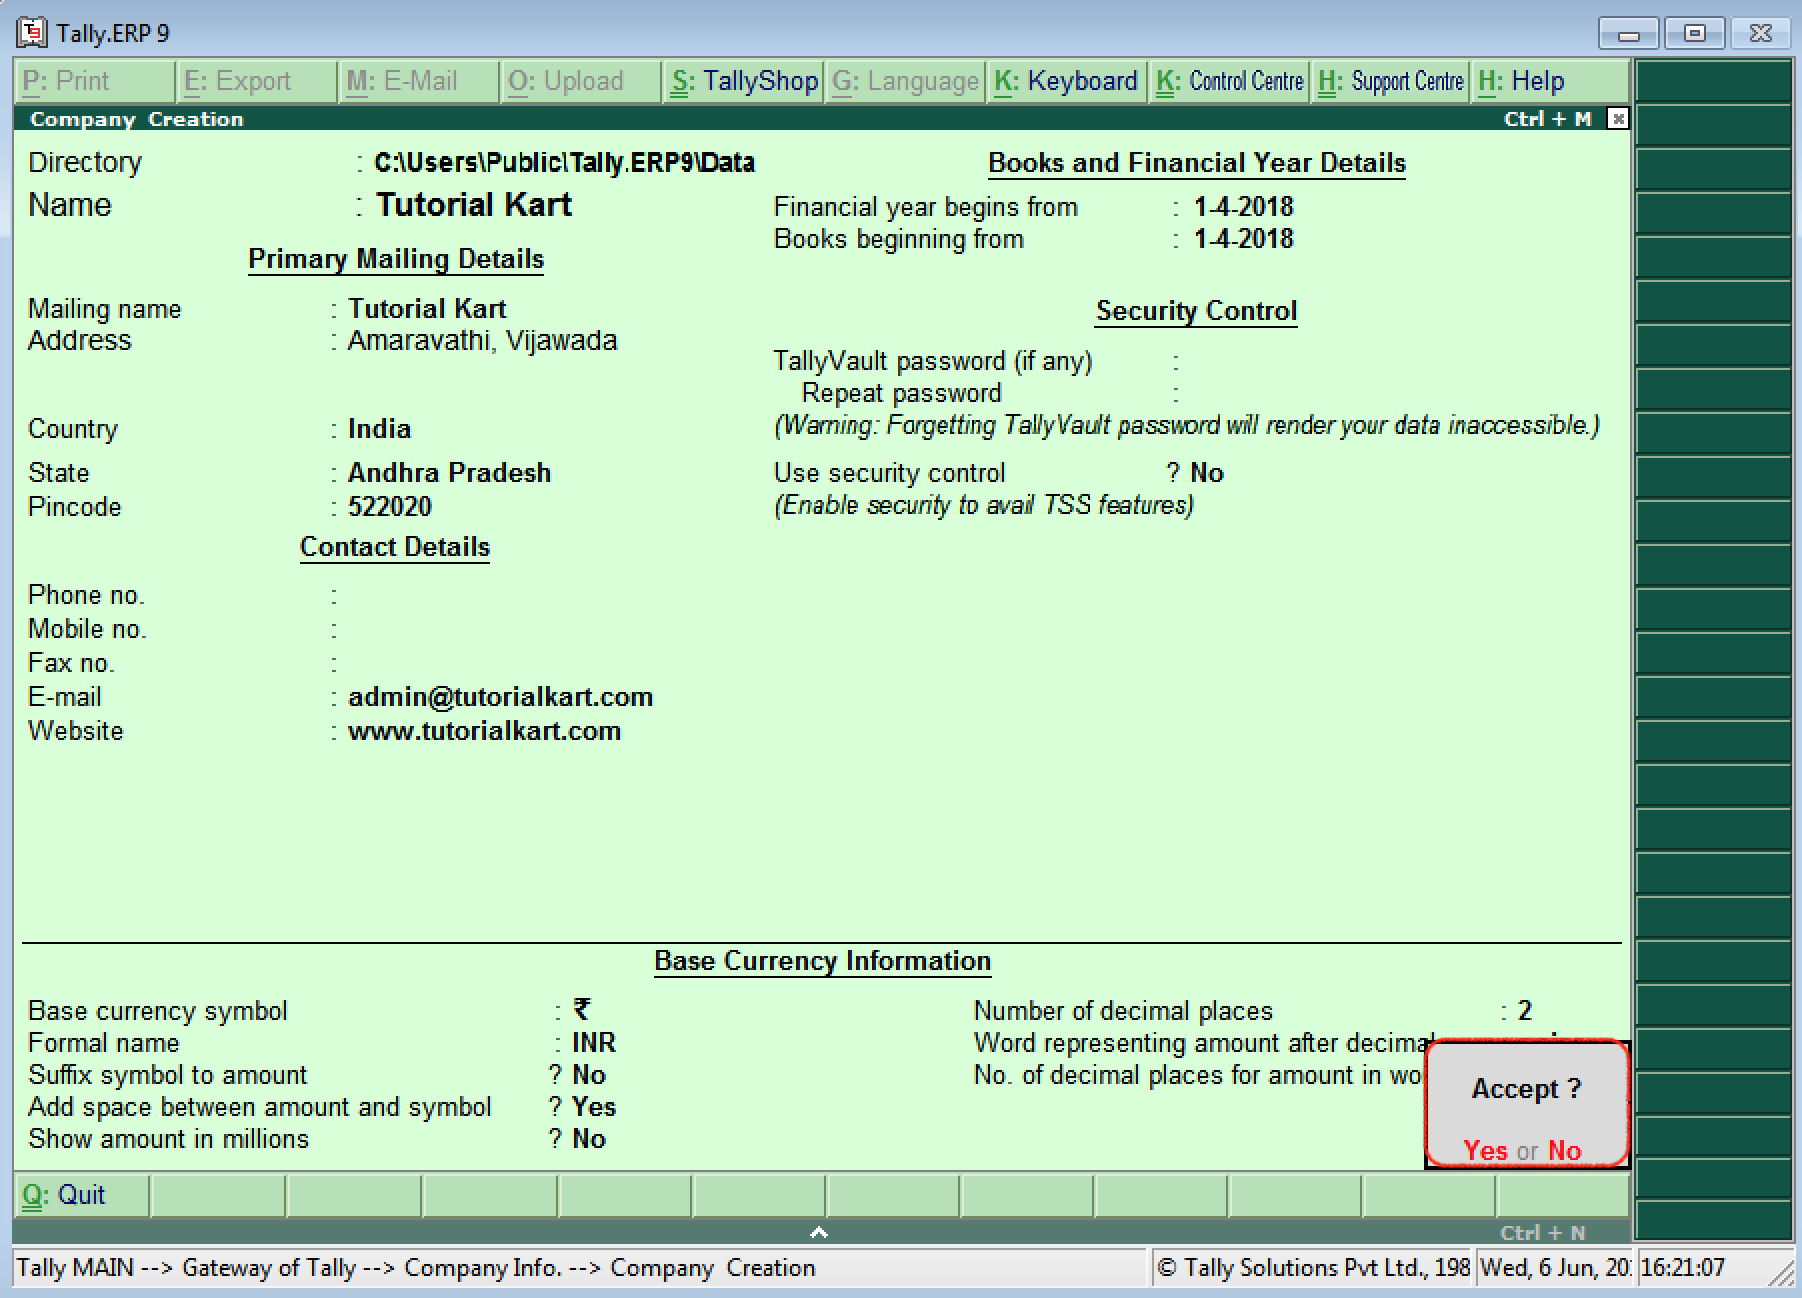
After entering the company details, review the name, data directory, country, state, financial-year dates, books-beginning date, security settings, and currency information. Move to the final acceptance prompt and choose Yes to save the company. You can also use Ctrl+A to accept a completed screen where that shortcut is available.
After saving, Tally loads the company and displays the Gateway of Tally. You can then create accounting masters such as groups and ledgers before recording transactions.
Company Creation Fields Required Before Saving
| Field group | What to confirm |
|---|---|
| Company identity | Company name, mailing name, and data directory |
| Location | Address, country, state, and postal code |
| Accounting period | Financial Year Beginning From and Books Beginning From |
| Security | Whether TallyVault or user security is required and who will retain the credentials |
| Currency | Base currency symbol, formal name, decimal places, and amount-in-words settings |
Common Company Creation Errors in Tally ERP 9
- Using the wrong data directory: Confirm the storage location and backup procedure before creating the company.
- Confusing financial-year and books-beginning dates: The financial year defines the accounting period; the books date defines when records start in this company.
- Selecting an incorrect country or state: These selections can affect statutory options and printed information.
- Forgetting a TallyVault password: Keep the password in an approved secure location because it cannot be recovered through a conventional reset.
- Creating a duplicate company: Check the existing company list before creating another record with a similar name.
- Changing currency defaults without review: Verify currency formatting with the person responsible for the accounts before saving.
Tally ERP 9 Company Creation QA Checklist
- Verify that the tutorial uses the Tally.ERP 9 path Company Info > Create Company and does not mix it with TallyPrime navigation.
- Confirm that Alt+F3 is identified as the Tally.ERP 9 Company Info shortcut.
- Check that the company-data directory is described as installation-dependent rather than as one universal Windows path.
- Verify that Financial Year Beginning From and Books Beginning From are explained as separate settings.
- Confirm that country, state, security, and currency guidance does not assume the same values for every organisation.
- Check that the TallyVault warning clearly states that the password must be retained securely.
- Ensure that all screenshots follow the same Tally.ERP 9 workflow described in the surrounding steps.
Frequently Asked Questions About Creating a Company in Tally ERP 9
What is the shortcut key to create a company in Tally ERP 9?
Press Alt+F3 at the Gateway of Tally to open Company Info, then select Create Company. Alt+F3 opens the Company Info menu; it does not save a new company automatically.
What is the difference between Financial Year Beginning From and Books Beginning From?
Financial Year Beginning From defines the start of the accounting year. Books Beginning From defines the date from which transactions are maintained in the Tally company. The books date can be later when accounting records begin partway through the financial year.
Can company details be changed after creating the company in Tally ERP 9?
Yes. Open Company Info and choose Alter, then select the company. Review the effect of changes to dates, security, statutory details, or currency-related settings before accepting them, especially after transactions have been recorded.
Can I create ledgers while creating a company in Tally ERP 9?
Company creation and ledger creation are separate tasks. Save the company first, then open the Accounts Info menu to create the required ledger masters. Tally also provides predefined ledgers, so review the existing ledger list before adding new ones.
Can I create more than one company in Tally ERP 9?
Yes. Tally.ERP 9 can maintain multiple company records. Each company can have its own accounting period, masters, vouchers, security settings, and data. Use distinct names and verify the active company before entering transactions.