 TutorialKart.com
How to Create, Display, and Alter a Cost Centre in Tally.ERP 9
This Tally tutorial explains how to enable cost centres and create, display, and alter a single cost centre in Tally ERP 9. The screenshots and menu paths in this guide apply to Tally.ERP 9; menu names and navigation can differ in TallyPrime.
What Is a Cost Centre in Tally?
A cost centre is an accounting dimension used to classify income and expenses by department, branch, project, employee, location, or another unit of responsibility. It allows the same ledger to be analysed across different operational units without creating a separate expense ledger for every unit.
For example, an organisation can record travel expenses in one Travel Expenses ledger and allocate individual voucher amounts to the Sales, Support, and Administration cost centres. Cost centre reports can then show how much each department incurred.
| Cost centre field | Purpose | Example |
|---|---|---|
| Name | Identifies the reporting unit | Sales Department |
| Alias | Provides an alternate name | Sales |
| Under | Places the cost centre below a parent in the hierarchy | Head Office |
| Category | Groups cost centres for allocation and reporting | Primary Cost Category |
Enable Cost Centres in Tally.ERP 9
Cost centre maintenance must be enabled before the Cost Centres option becomes available under Accounts Info. Complete the following configuration in the company where the cost centres will be used.
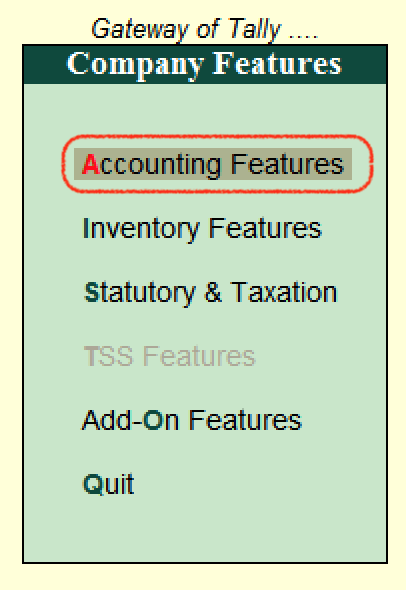
Step 1: Go to Gateway of Tally > F11: Features, and then open F1: Account Features.
Step 2: In the Accounting Features screen, set Maintain Cost Centres to Yes.
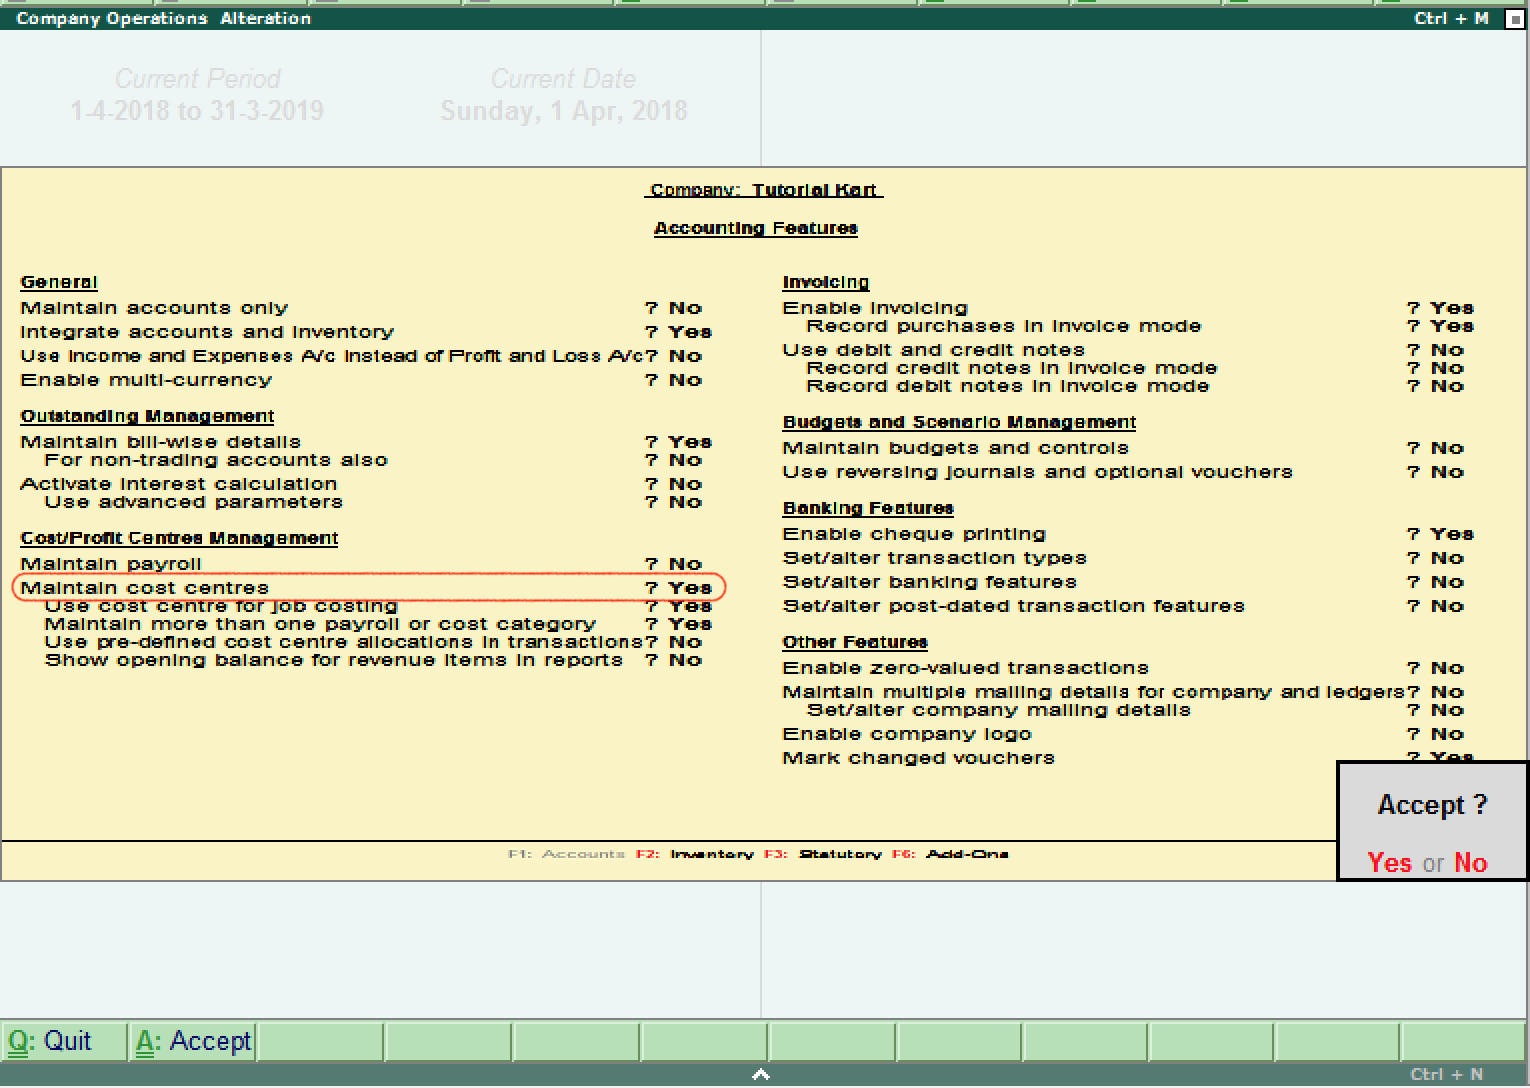
Step 3: Choose A: Accept to save the updated accounting features. Return to Accounts Info and confirm that the Cost Centres option is available.
How to Create a Single Cost Centre in Tally.ERP 9
Menu path: Gateway of Tally > Accounts Info > Cost Centres > Single Cost Centre > Create
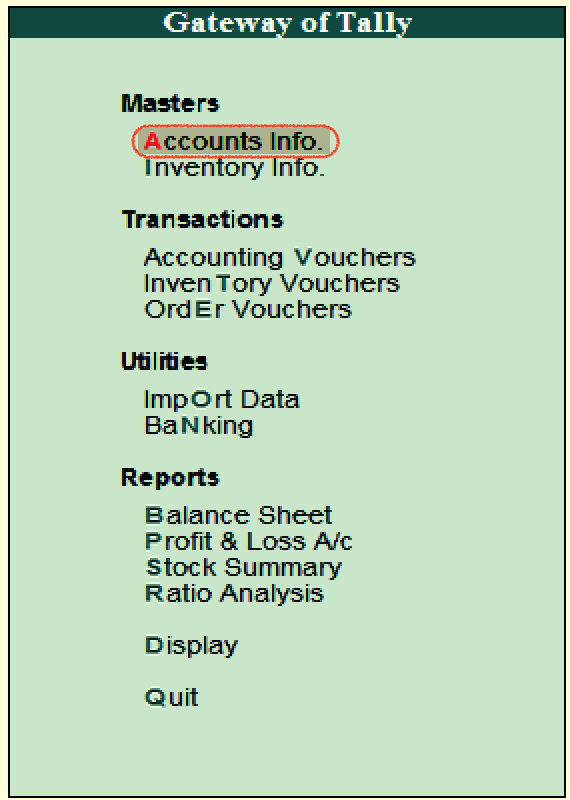
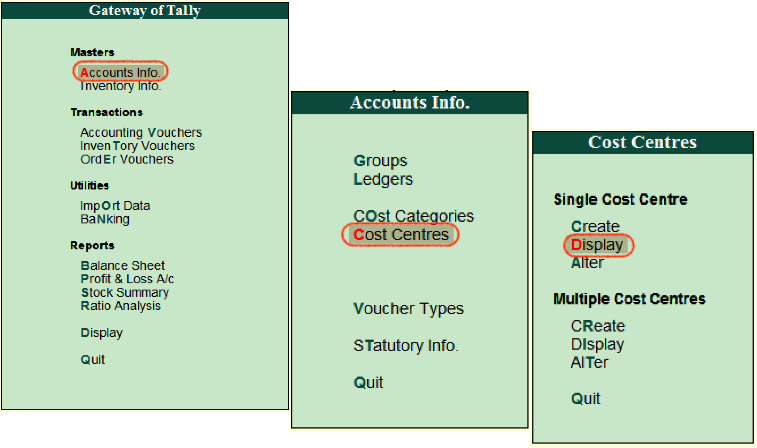
Step 1: Go to Gateway of Tally and select Accounts Info.
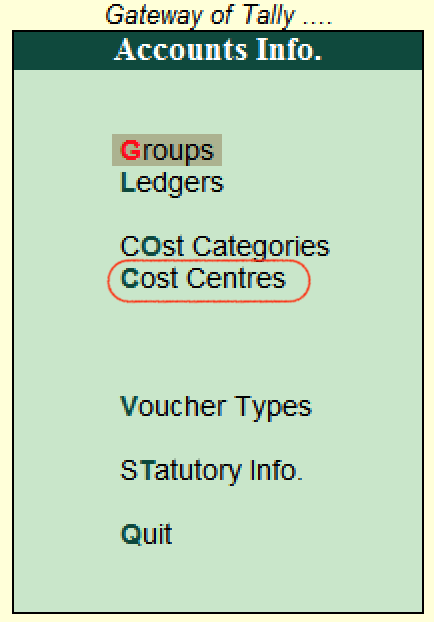
Step 2: Select Cost Centres.
Step 3: Under Single Cost Centre, select Create.
Note: To enter several cost centres from one screen, use the Create option under Multiple Cost Centres. The single cost centre screen is suitable when creating one centre and assigning its parent individually.
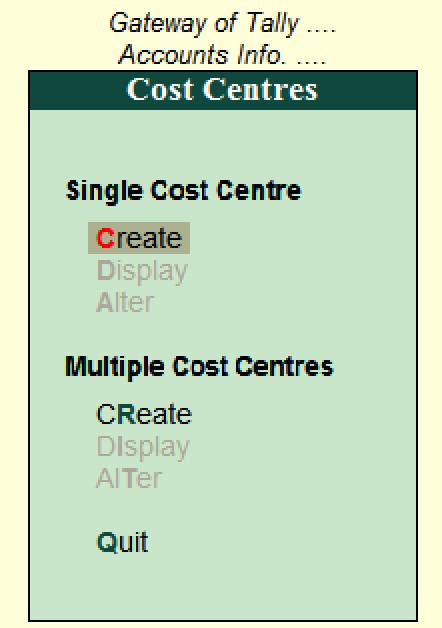
Step 4: Complete the fields on the Cost Centre Creation screen.
- Category: Select the applicable cost category. If no additional category has been created, use the default primary cost category shown by Tally.
- Name: Enter a clear and unique cost centre name, such as Sales Department, Chennai Branch, or Project A.
- Alias: Enter an optional alternate name by which the cost centre can be identified.
- Under: Select the parent cost centre. Choose Primary for a top-level cost centre, or choose an existing centre to create a hierarchy.
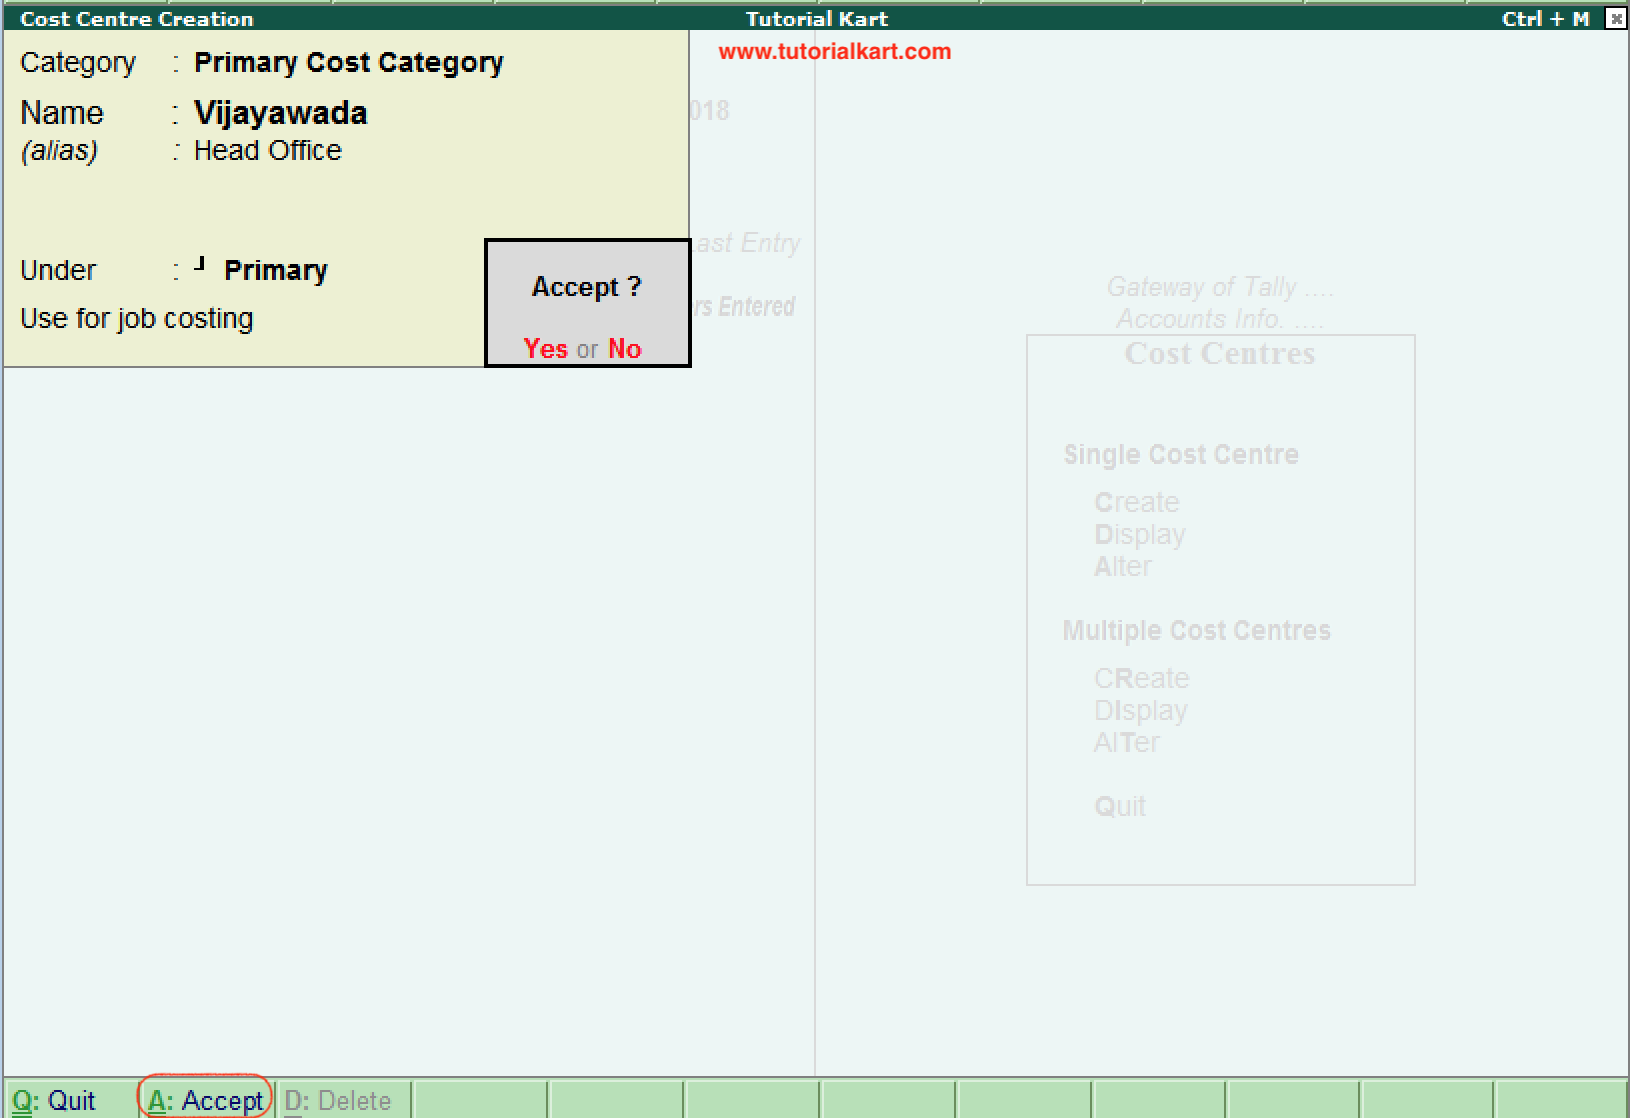
Step 5: Review the category, name, alias, and parent selection. Choose A: Accept to save the new cost centre.
Parent and Child Cost Centres in Tally.ERP 9
The Under field determines the cost centre hierarchy. A centre created under Primary is a top-level centre. A centre placed under another cost centre becomes its child. For example, North Region and South Region can be created under Sales Department.
- Use a parent centre when reports must show both consolidated and detailed values.
- Keep naming consistent across branches, projects, and departments.
- Avoid creating two cost centres for the same reporting unit unless separate tracking is intentional.
- Check the selected parent before accepting the master because an incorrect hierarchy affects report grouping.
How to Display a Single Cost Centre in Tally.ERP 9
Menu path: Gateway of Tally > Accounts Info > Cost Centres > Single Cost Centre > Display
Step 1: Open the Cost Centres menu and select Display under Single Cost Centre.
Step 2: On the Select Cost Centre screen, choose the required cost centre from the list.
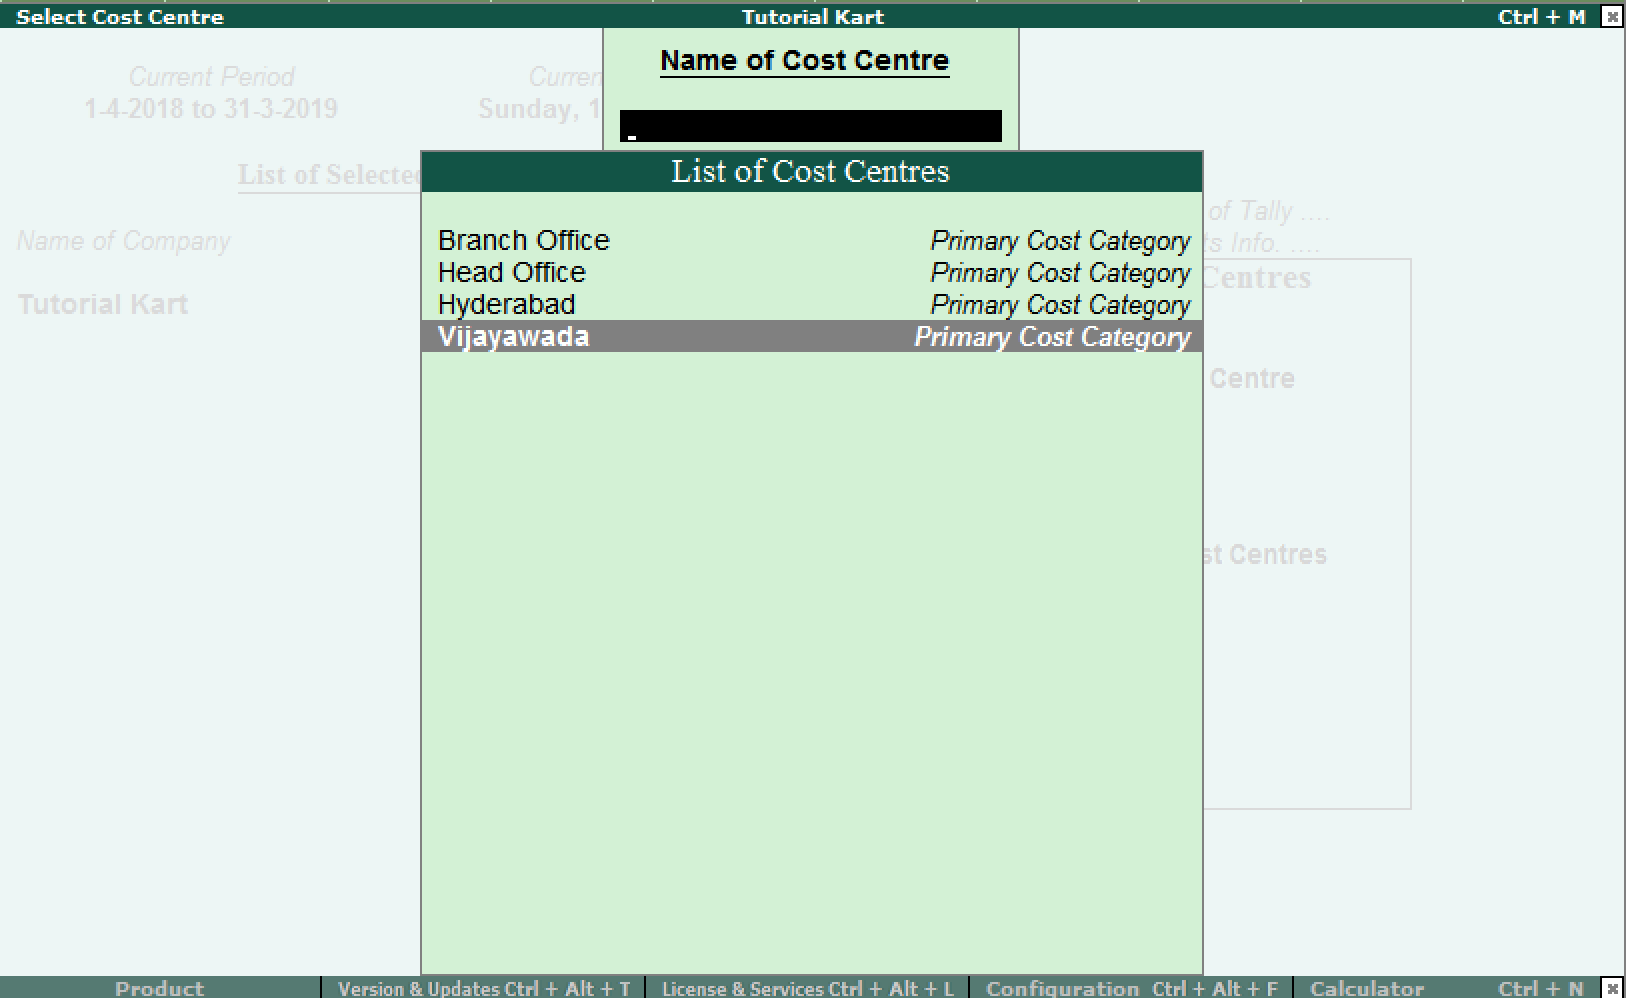
Step 3: Tally displays the saved cost centre details, including its category, name, alias, and parent.
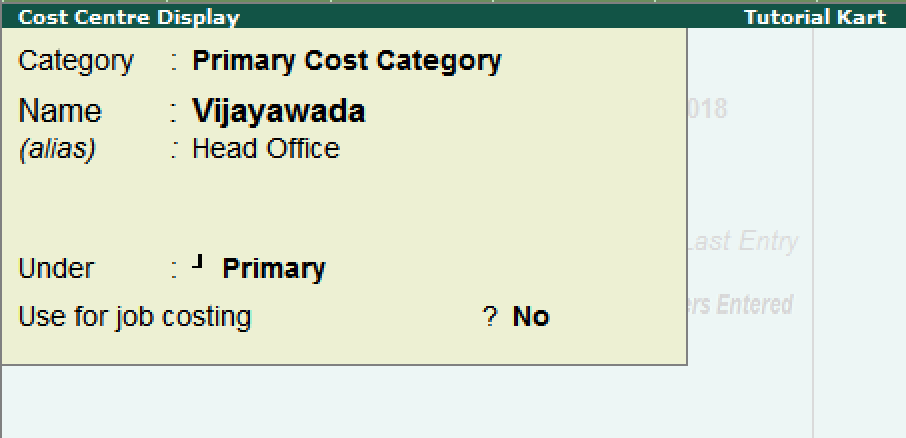
Display mode is read-only. Use it to verify the master without changing its details. To rename the cost centre, change its alias, or move it under another parent, open the master in Alter mode.
How to Alter a Single Cost Centre in Tally.ERP 9
Menu path: Gateway of Tally > Accounts Info > Cost Centres > Single Cost Centre > Alter
Step 1: Under Single Cost Centre, select Alter.
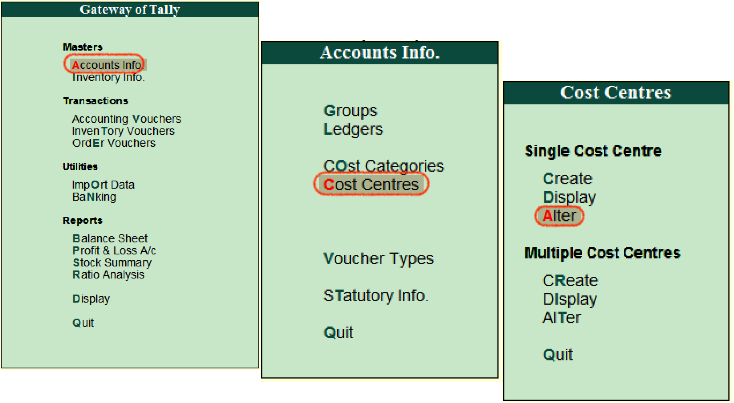
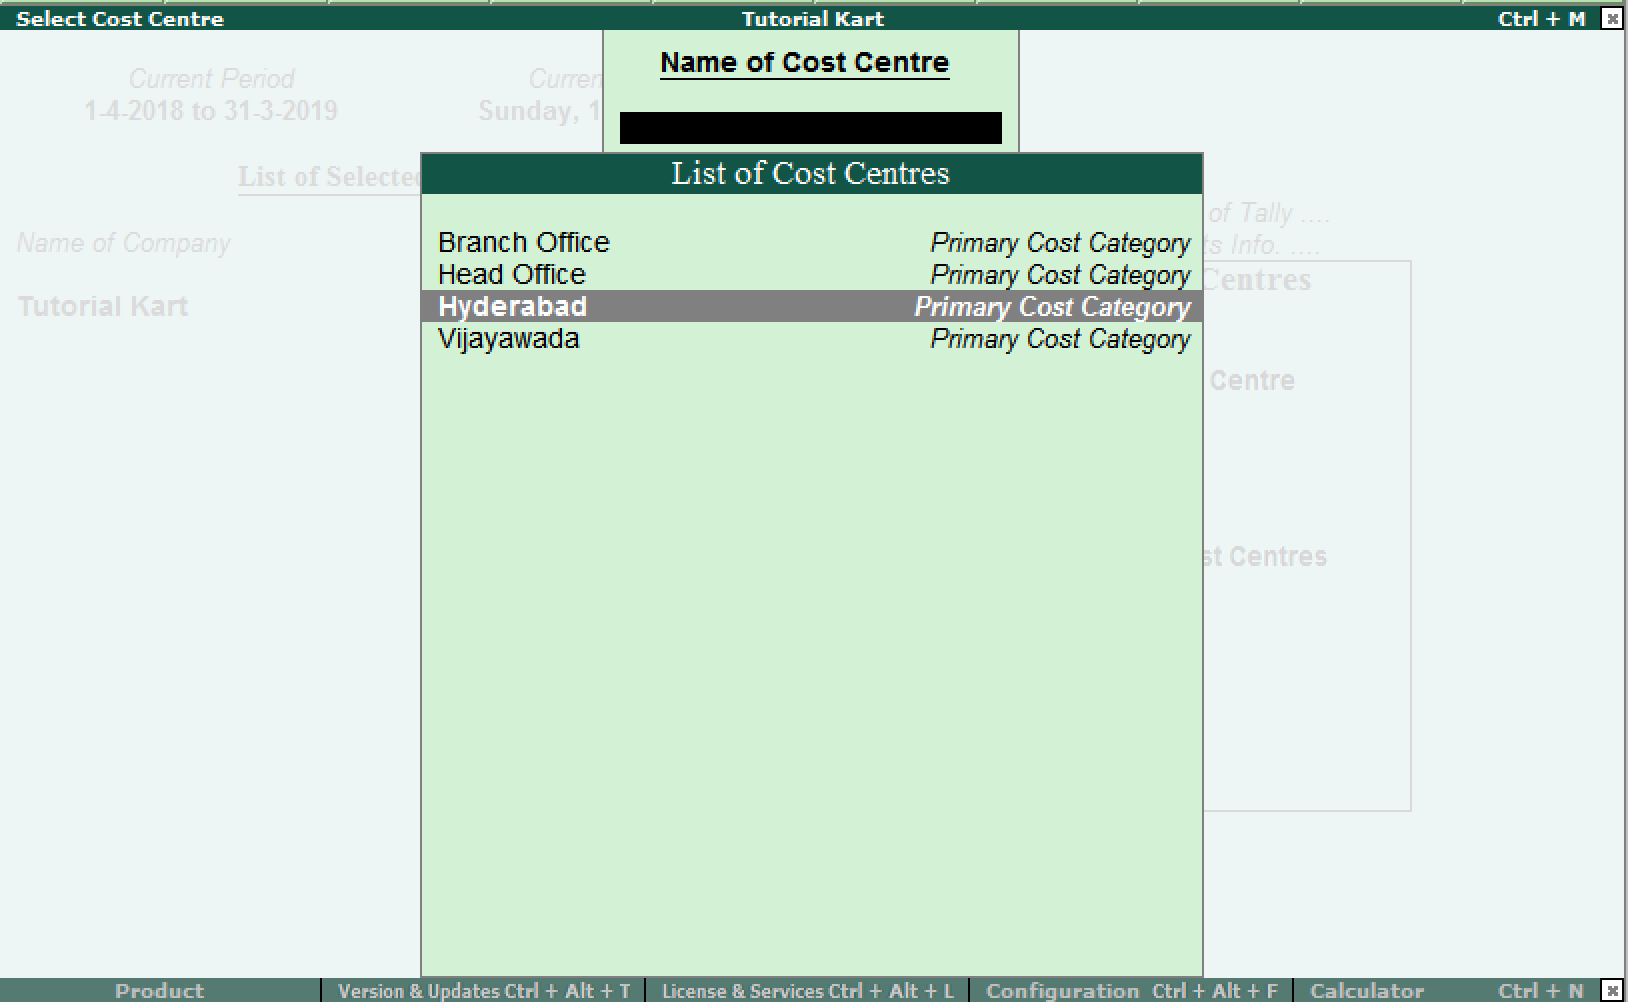
Step 2: On the Select Cost Centre screen, choose the cost centre whose details must be edited.
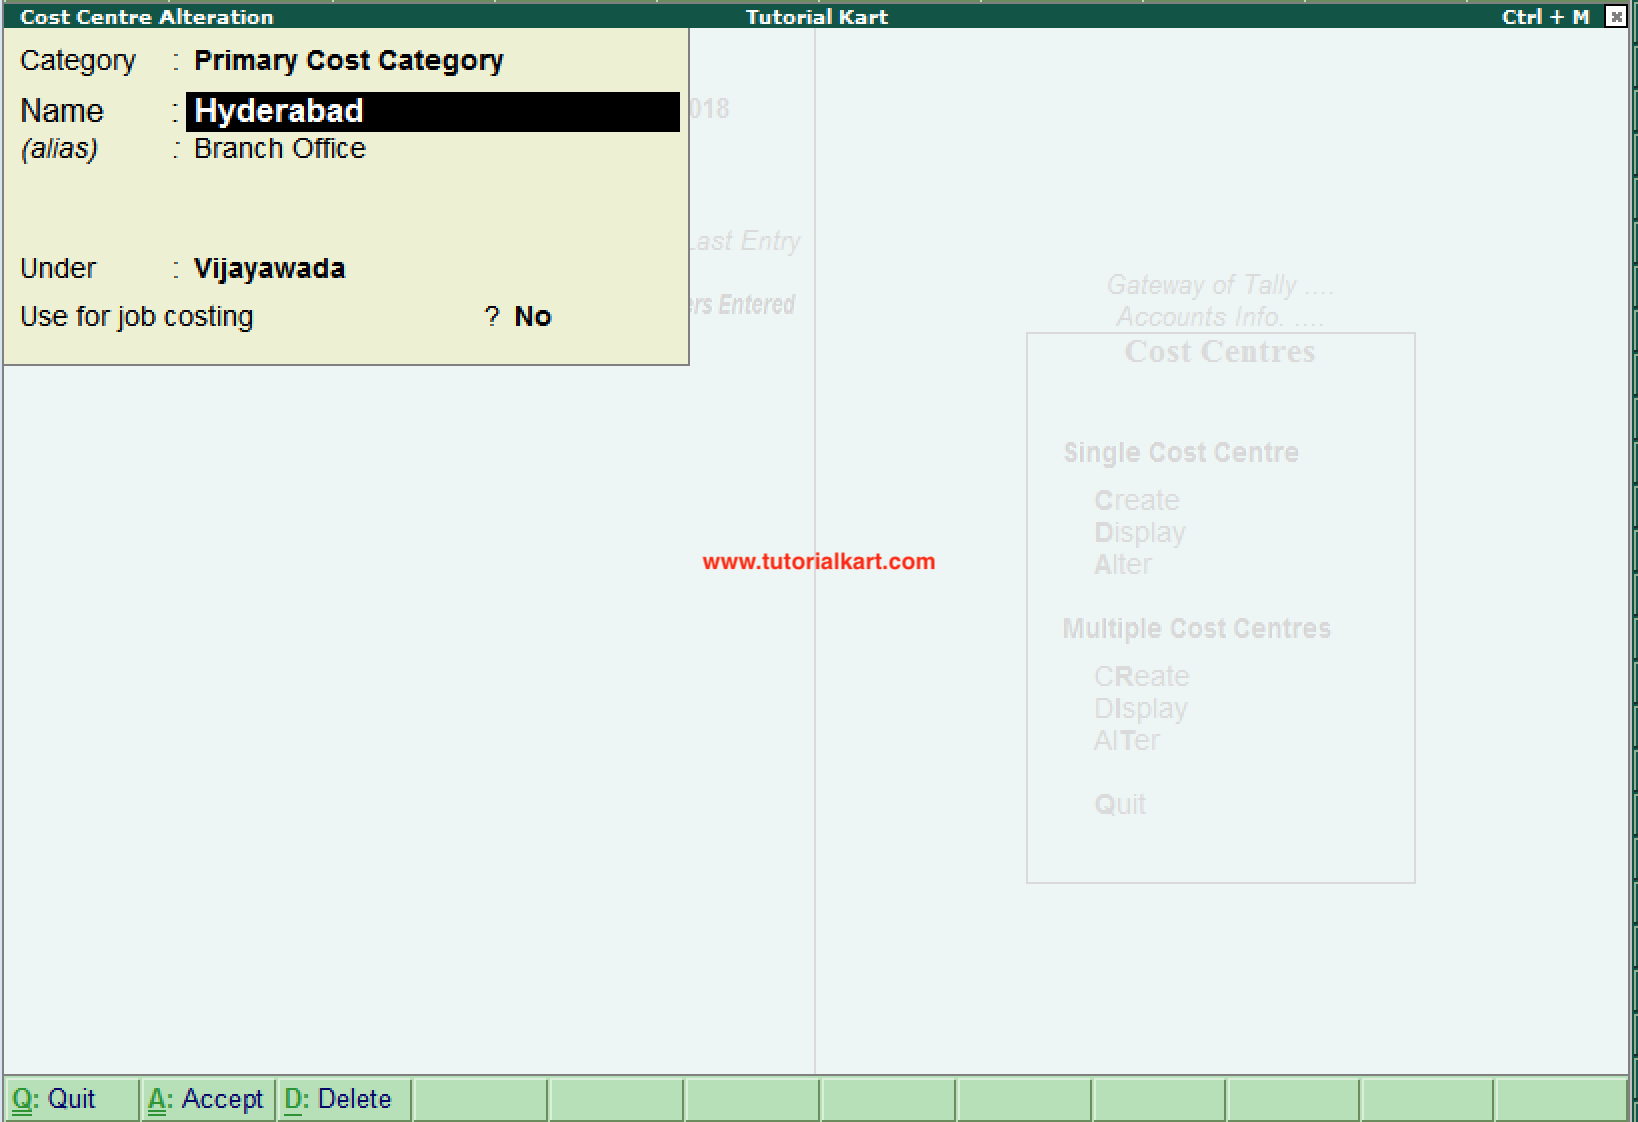
Step 3: Edit the required name, alias, category, or parent details. Review the effect of a hierarchy change on existing reports, and then choose A: Accept to save the updated cost centre.
Using the Cost Centre in Voucher Allocation
Creating a cost centre master does not by itself assign transaction values to that centre. Cost centre allocation must also be applicable to the relevant ledger, and the amount must be allocated while recording the voucher. The allocation screen can divide one ledger amount among one or more cost centres.
- Confirm that cost centre maintenance is enabled for the company.
- Open the relevant ledger and verify that cost centre allocation is applicable where required.
- Record the accounting voucher and select the expense or income ledger.
- Allocate the amount to the appropriate cost centre or centres.
- Ensure that the total allocation agrees with the ledger amount before accepting the voucher.
If the Cost Centre Allocation screen does not appear during voucher entry, check the company features and the ledger configuration. Also confirm that the voucher and ledger type support the intended allocation.
Cost Centre and Profit Centre Usage in Tally
Tally uses the cost centre feature as a flexible allocation and reporting dimension. A centre used to analyse expenses may be treated as a cost centre, while one used to compare both income and expenses for a branch, project, or business unit may be treated operationally as a profit centre. The master-creation process remains based on the organisation’s reporting structure.
Frequently Asked Questions About Cost Centres in Tally
How do I display a cost centre in Tally.ERP 9?
Go to Gateway of Tally > Accounts Info > Cost Centres > Single Cost Centre > Display. Select the required cost centre to view its saved details in read-only mode.
How do I alter a cost centre in Tally.ERP 9?
Go to Gateway of Tally > Accounts Info > Cost Centres > Single Cost Centre > Alter. Select the centre, edit the required fields, and accept the screen to save the changes.
Why is the Cost Centres option not displayed in Tally?
The feature may not be enabled for the active company. Open F11 Accounting Features and set Maintain Cost Centres to Yes. If allocation is missing only during voucher entry, also check whether cost centre allocation is applicable to the selected ledger.
What is the difference between a cost centre and a cost category?
A cost centre represents the unit being tracked, such as a department, branch, or project. A cost category groups cost centres into an allocation dimension. Categories can support parallel classifications when the accounting configuration requires them.
Can multiple cost centres be created together in Tally.ERP 9?
Yes. Open Accounts Info > Cost Centres and select Create under Multiple Cost Centres. This is useful for entering several centres under a selected parent, while the Single Cost Centre option provides an individual creation screen.
Cost Centre in Tally Editorial QA Checklist
- Verify that the screenshots and menu paths are identified as Tally.ERP 9 instructions.
- Confirm that Maintain Cost Centres is enabled before testing master creation.
- Create a test cost centre and verify its name, alias, category, and parent in Display mode.
- Alter the test cost centre and confirm that the updated details remain after accepting the screen.
- Check that parent and child cost centres appear in the intended hierarchy.
- Record a test voucher and confirm that allocated cost centre amounts equal the applicable ledger amount.
- Verify cost centre reports after voucher entry to ensure the transaction appears under the selected centre.