 TutorialKart.com
Tally ERP 9 Screen Components
The Tally ERP 9 screen components provide access to company data, accounting menus, reports, configuration options, calculator functions, and context-sensitive commands. Understanding these areas makes it easier to navigate Tally.ERP 9 and identify which commands are available on the current screen.
When Tally.ERP 9 starts, it first displays the product welcome screen while the application is loading.

After loading, Tally.ERP 9 opens its main working screen. Depending on the company-selection and startup configuration, you may see the Gateway of Tally directly or a screen from which you can select a company.
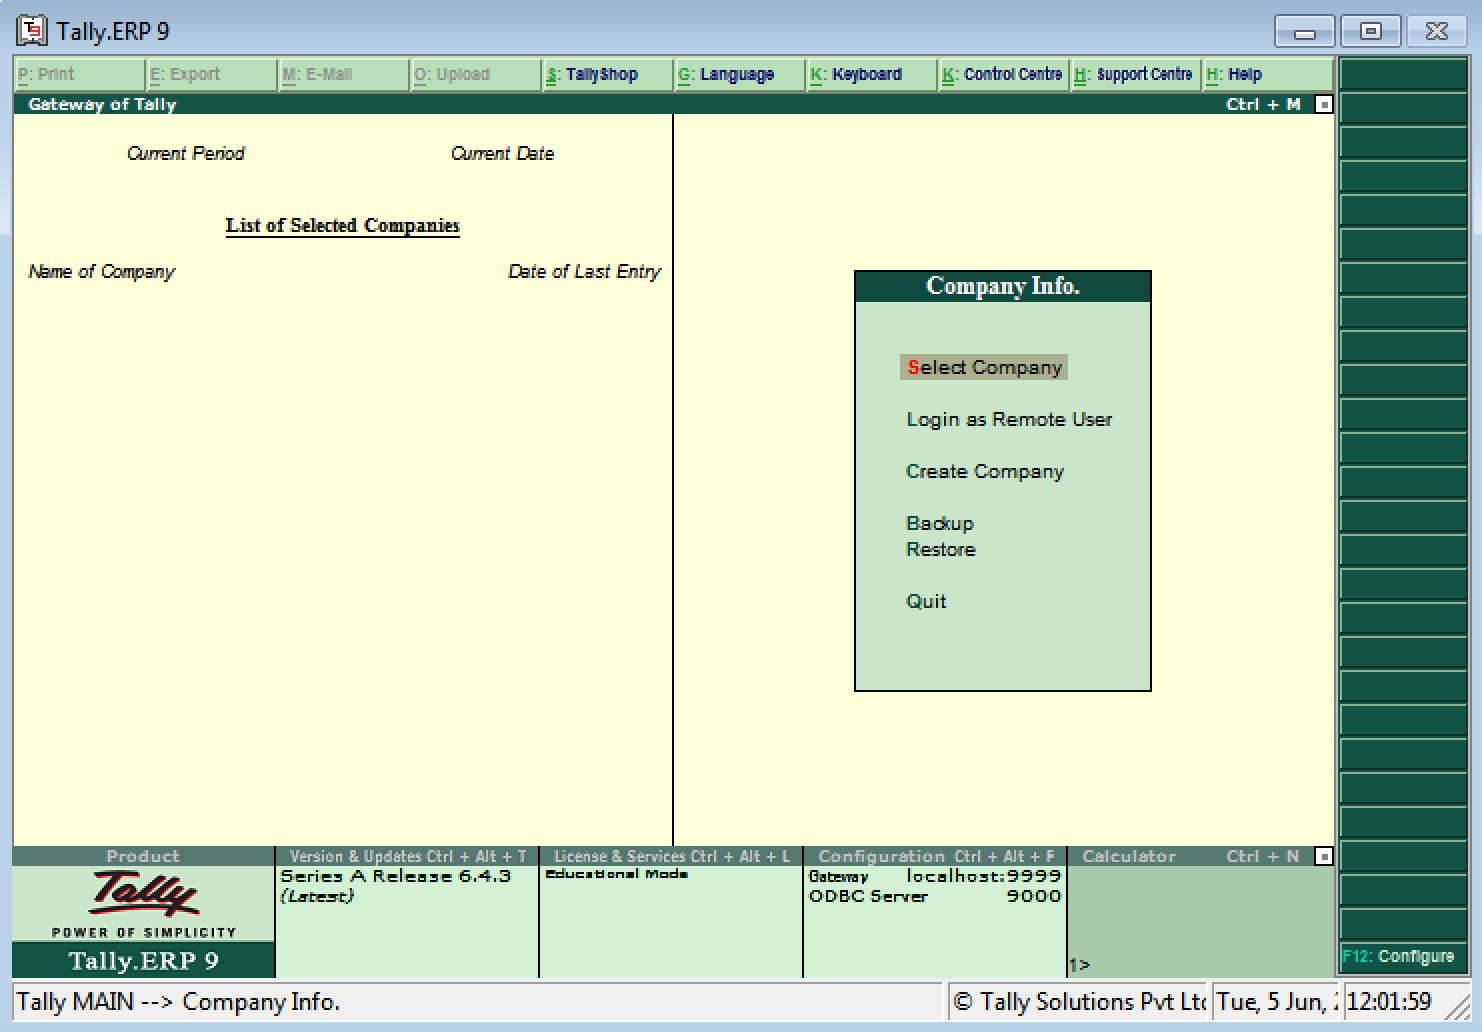
Main Components of the Tally ERP 9 Home Screen
The Tally ERP 9 home screen contains the following principal components:
- Title Bar
- Horizontal Button Bar
- Close Button
- Gateway of Tally
- Buttons Toolbar
- Calculator Area
- Info Panel
- Date and Time

Functions of Each Tally ERP 9 Screen Component
1. Tally ERP 9 Title Bar
The Title Bar appears at the top of the application window. It identifies the Tally.ERP 9 product and may display information related to the installed release. It also helps users distinguish the Tally window when several applications are open.
2. Horizontal Button Bar
The Horizontal Button Bar provides access to application-level options. Depending on the installed release and licensing environment, it can include commands for language selection, keyboard language, Control Centre, Support Centre, and Help. These options relate to the application as a whole rather than to an individual accounting voucher.
3. Close Button
The Close button is located in the upper-right corner of the Tally window. It is used to leave the application window. Before closing Tally, complete or cancel any voucher or alteration that is still open so that unfinished input is not mistaken for saved data.
4. Gateway of Tally
The Gateway of Tally is the primary navigation area. It provides access to company operations, account information, inventory information, accounting vouchers, inventory vouchers, and reports. The exact menu entries depend on the enabled features, the selected company, and the user’s security permissions.
A typical Gateway of Tally screen groups commands into areas such as Masters, Transactions, Utilities, and Reports. A highlighted menu item indicates the current selection. Press Enter to open it and Esc to return to the previous screen.
5. Tally Buttons Toolbar
The vertical Buttons Toolbar appears on the right side of the screen. It displays only the buttons relevant to the current activity. For example, a voucher-entry screen can show voucher-type and configuration commands, while a report screen can show options for changing the period, columns, level of detail, or display format.
Many toolbar buttons display a function key or key combination. You can click a button or use its displayed keyboard shortcut. Because this toolbar is context-sensitive, the function assigned to a key can change when you move between the Gateway, voucher-entry, master, and report screens.
6. Calculator Area
The Calculator Area is located near the bottom of the Tally screen. It can be used for calculations without leaving the application. This is useful when checking totals or working out an amount during voucher entry. The same area can also display system or processing messages in relevant contexts.
7. Tally ERP 9 Info Panel
The Info Panel displays product and environment information, such as the Tally release, licence status, and configuration-related details. The exact labels can differ according to the Tally.ERP 9 release, licence type, connectivity, and enabled services.
8. Date and Time Area
The lower portion of the screen can show date and time information. Do not confuse the computer’s current date with the current Tally date used for voucher entry. The active company period and the date selected inside Tally determine whether a transaction can be recorded for a particular day.
How the Tally ERP 9 Screen Changes During Work
Tally.ERP 9 uses a context-sensitive interface. The central work area and the right-side toolbar change according to the selected task:
- Gateway screen: Shows navigation menus for masters, transactions, utilities, and reports.
- Voucher-entry screen: Shows fields for transaction details and buttons for applicable voucher types and settings.
- Master screen: Shows fields used to create or alter ledgers, groups, stock items, units, and other records.
- Report screen: Shows financial or inventory information along with controls for period, detail, columns, filters, and configuration.
This explains why a command visible on one Tally screen may not appear on another. First confirm the current screen and then read the available buttons on the right.
Common Function Keys Visible on Tally ERP 9 Screens
Function keys provide faster access to commonly used Tally commands. Their exact purpose can depend on the current screen, but the following keys are frequently encountered:
| Key | Common use in Tally ERP 9 |
|---|---|
| F1 | Select or work with a company; its displayed role can vary by screen. |
| F2 | Change the current Tally date. |
| F3 | Access company-related options where available. |
| F4–F10 | Select voucher types or perform screen-specific operations. Read the right-side toolbar before using a key. |
| F11 | Open company features and enable applicable accounting, inventory, taxation, or related options. |
| F12 | Open configuration settings for the current context. |
| Enter | Accept a field, open a selected menu, or proceed to the next input. |
| Esc | Return to the previous screen or cancel the current step when appropriate. |
Always follow the label displayed beside a function key on the current screen. A key used for a voucher type during transaction entry may have a different role in a report.
Tally ERP 9 Screen Navigation Example
- Open Tally.ERP 9 and select the required company.
- Use the Gateway of Tally to choose the required menu.
- Move through menu options with the arrow keys or select an option with the mouse.
- Press Enter to open the highlighted option.
- Check the Buttons Toolbar for commands available on the new screen.
- Use Esc to return one level at a time.
Tally ERP 9 Screen Review Checklist
- Confirm that the Title Bar and product release shown in the screenshot match the Tally.ERP 9 version being documented.
- Verify that Gateway menu names are described as feature-dependent rather than universally visible.
- Check every function-key instruction against the label shown on the relevant Tally screen.
- Distinguish the current Tally date from the computer’s system date.
- Confirm that licence and configuration details are attributed to the Info Panel, while task commands are attributed to the Buttons Toolbar.
- Use the terms Calculator Area and Buttons Toolbar consistently throughout the tutorial.
Frequently Asked Questions About Tally ERP 9 Screen Components
What are the main components of the screen in Tally ERP 9?
The principal components are the Title Bar, Horizontal Button Bar, Close button, Gateway of Tally, Buttons Toolbar, Calculator Area, Info Panel, and date-and-time area. The central work area changes according to the selected task.
What is the Gateway of Tally?
The Gateway of Tally is the main navigation screen used to open company functions, masters, vouchers, utilities, and reports. Its available options depend on the selected company, enabled features, and user permissions.
Why do the buttons on the right side of Tally ERP 9 change?
The Buttons Toolbar is context-sensitive. It shows commands that apply to the current screen, so its buttons change when you move between menus, vouchers, masters, and reports.
What do F1 to F12 do in Tally ERP 9?
These keys provide shortcuts for company operations, dates, voucher types, features, configuration, and other commands. Some assignments change according to the current screen. The label in the right-side Buttons Toolbar shows the applicable function.
Where is the calculator in Tally ERP 9?
The Calculator Area appears near the bottom of the Tally window. It lets users perform calculations while continuing to work inside Tally.ERP 9.