In SAP, Shipping Condition plays a critical role in determining the route and logistics flow during sales order processing. Misalignment between the shipping condition in the customer master and the material master can lead to errors or incomplete processing. This tutorial demonstrates How to Determined Shipping Point Automatically into Sales Oder and ensure proper configuration for shipping conditions and route determination in SAP using the provided steps and screenshots.
Determined Shipping Point Automatically into Sales Oder
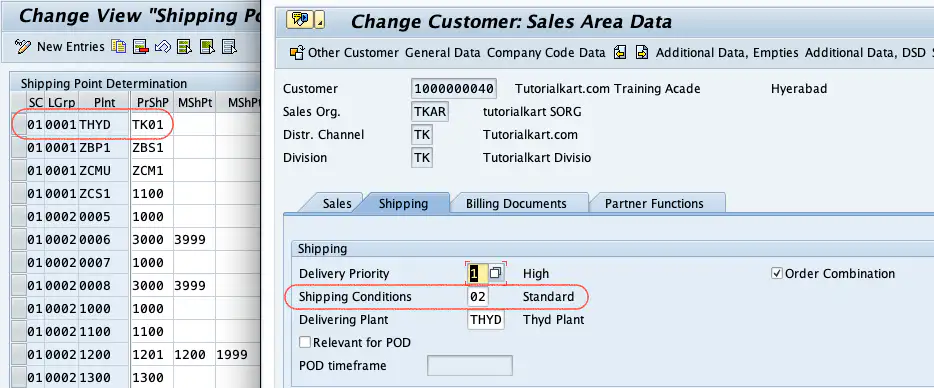
Step 1: Verify the Shipping Condition in the Customer Master
The shipping condition must align with what has been maintained in the customer master. Here’s how to verify:
- Access the Customer Master:
- Use transaction code
XD02(Change Customer Master) orXD03(Display Customer Master). - Enter the customer number and navigate to the Sales Area Data tab.
- Use transaction code
- Check the Shipping Condition:
- On the Shipping Tab, confirm the shipping condition (e.g., “Standard Delivery” or “Express Delivery”).
- Ensure that this condition matches the requirement for route determination and is consistent across the sales area.
Step 2: Match Shipping Condition in Material Master
The shipping condition specified in the customer master must align with what is referenced in the material master. Here’s how to ensure consistency:
- Access Material Master:
- Use transaction code
MM02(Change Material Master). - Enter the material number and navigate to the Sales: General/Plant tab.
- Use transaction code
- Verify the Relevant Fields:
- Ensure the Loading Group and Transportation Group match the logistics and delivery requirements.
- These settings contribute to determining the route when combined with the shipping condition.
This image highlights the transportation settings and loading group configuration in the material master.
Step 3: Shipping Point Determination Configuration
To ensure that the route is determined automatically, proper configuration must be in place:
- Maintain Route Determination Criteria:
- Navigate to the following path:
SPRO > Logistics Execution > Shipping > Basic Shipping Functions > Shipping Point and Goods Receiving Point Determination > Assign Shipping Points - Assign the Shipping Point determination criteria based on:
- Shipping Condition
- Loading Group
- Plant
- Shipping Point.
- Navigate to the following path:
- Assign and Validate the Criteria:
- Confirm that the route is mapped correctly for all combinations of shipping conditions and transportation groups.
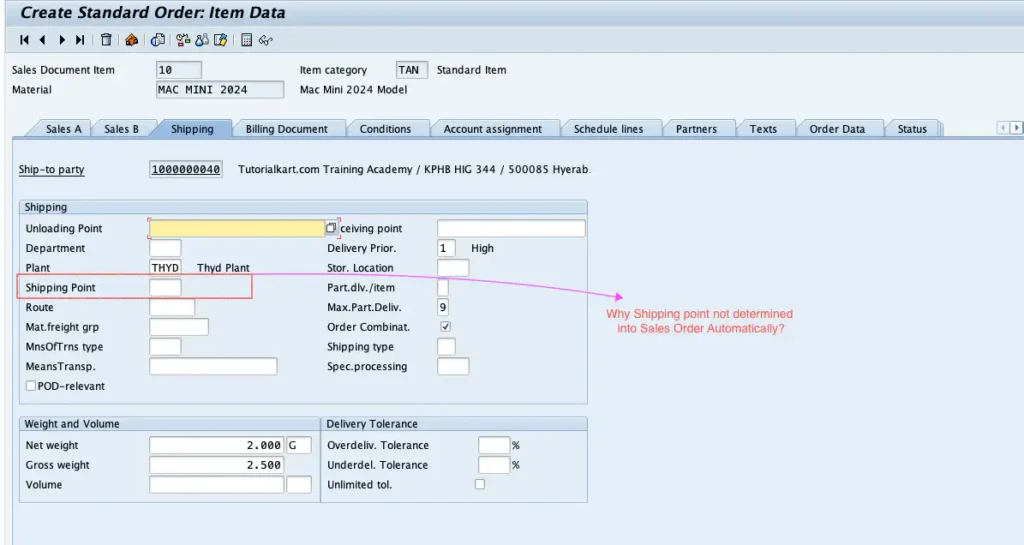
Step 4: Test the Configuration in a Sales Order
Once the shipping conditions and route determination criteria are configured, it is essential to test the setup:
- Create a Sales Order:
- Use transaction code
VA01(Create Sales Order). - Enter the customer number and material details.
- Use transaction code
- Verify the Shipping Point:
- On the Shipping Tab in the sales order, confirm that the route has been automatically populated based on the configured criteria.
- Ensure there are no errors or misalignments.
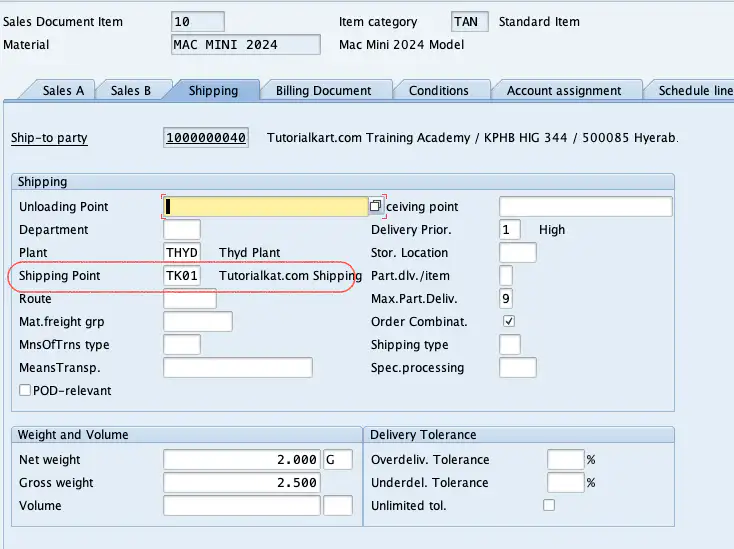
Conclusion
Proper alignment of Shipping Conditions, Transportation Groups, and Route Determination Criteria is critical for seamless logistics in SAP. By following the steps outlined above and using the configuration screens, you can ensure that the route is accurately determined during sales order processing.
This process not only minimizes errors but also optimizes delivery efficiency and customer satisfaction. Always test your configuration extensively to ensure a smooth workflow in production systems.