Flutter Basic Application in Android Studio
This tutorial explains how to create a basic Flutter application in Android Studio, run it on an Android emulator or physical device, and use hot reload while editing the application. Complete the environment setup for Application Development using Flutter before proceeding.
The finished starter application displays a counter. Each press of the floating action button increments the number shown on the screen, as demonstrated below.
Requirements for Creating the Flutter Application
- The Flutter SDK is installed and available to Android Studio.
- Android Studio has the Flutter plugin and its required Dart plugin enabled.
- The Android SDK and required platform tools are installed.
- An Android emulator is configured, or a physical Android device is available with developer options and USB debugging enabled.
Before creating the project, open a terminal and check the development environment with the following command:
flutter doctorReview any reported Android toolchain or license issues before continuing. Android Studio may also request the Flutter SDK location the first time a Flutter project is created.
Create a New Flutter Project in Android Studio
Step 1: Start Android Studio and click Start a new Flutter project. In newer Android Studio versions, this option may appear as New Flutter Project on the welcome screen or under File → New.
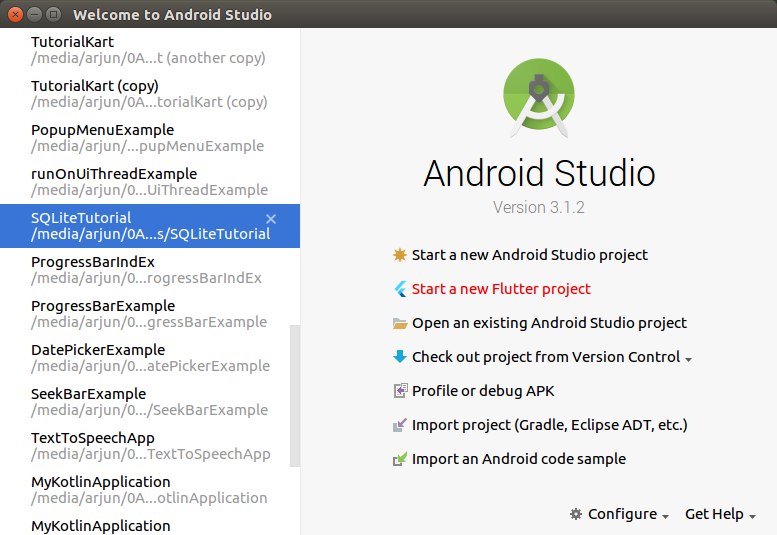
Step 2: Select Flutter Application under New Flutter Project. Depending on the installed plugin version, Android Studio may label this template simply as Flutter.

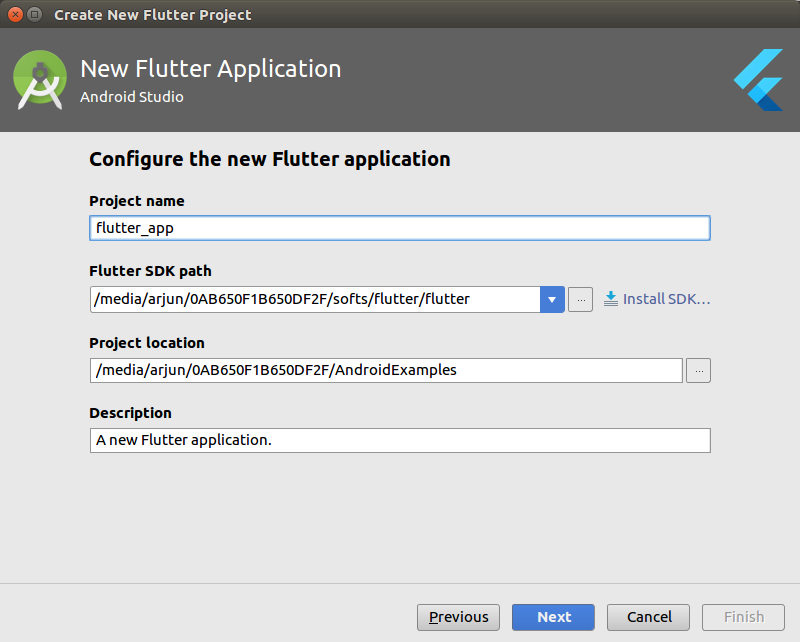
Step 3: Configure the new Flutter application. Enter or verify the Flutter SDK path, project name, project location, and project description.
- Flutter SDK path: The directory where the Flutter SDK is installed.
- Project name: Use lowercase letters and underscores, such as
basic_flutter_app. - Project location: The directory in which Android Studio will create the project.
- Description: A short description stored in the project metadata.
You may retain the suggested values or change them for your application. This tutorial uses the generated starter project.
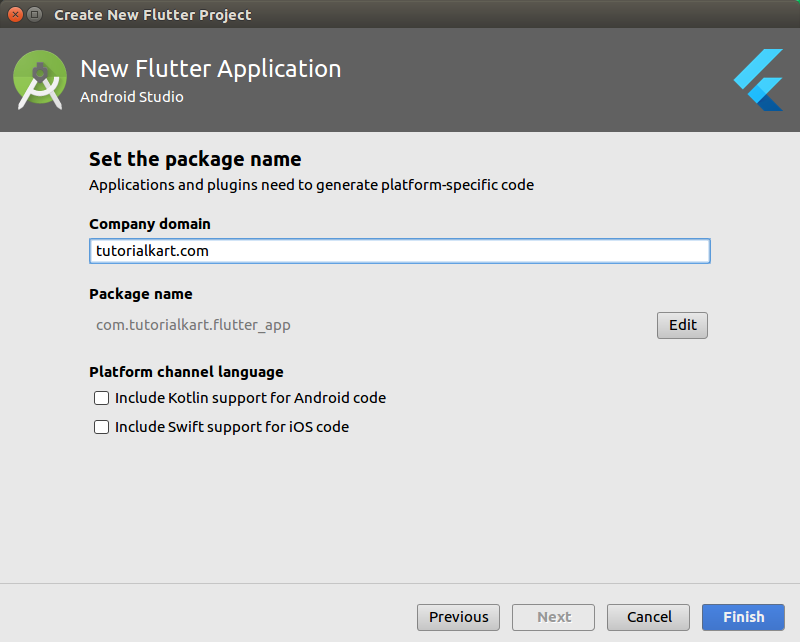
Step 4: Provide the organization or company domain and click Finish. Android Studio uses this value when forming platform-specific application identifiers. Choose a domain-style value that you control when preparing a real application for distribution.
Understand the Generated Flutter Project
Android Studio creates the project and resolves its Dart packages. The files and directories used most often in a basic Flutter application are:
lib/main.dartcontains the Dart entry point and the initial widget tree.pubspec.yamldefines package dependencies, assets, fonts, and project metadata.android/contains Android-specific configuration and build files.test/contains automated Flutter tests.
Execution begins in the main() function. The generated application passes its root widget to runApp(), builds a Material application, and stores the counter value in a stateful widget. A compact version of the same counter behavior is shown below.
import 'package:flutter/material.dart';

void main() {
  runApp(const CounterApp());
}

class CounterApp extends StatelessWidget {
  const CounterApp({super.key});

  @override
  Widget build(BuildContext context) {
    return const MaterialApp(
      debugShowCheckedModeBanner: false,
      home: CounterPage(),
    );
  }
}

class CounterPage extends StatefulWidget {
  const CounterPage({super.key});

  @override
  State<CounterPage> createState() => _CounterPageState();
}

class _CounterPageState extends State<CounterPage> {
  int count = 0;

  void incrementCounter() {
    setState(() {
      count++;
    });
  }

  @override
  Widget build(BuildContext context) {
    return Scaffold(
      appBar: AppBar(title: const Text('Basic Flutter App')),
      body: Center(
        child: Text(
          'Count: $count',
          style: const TextStyle(fontSize: 28),
        ),
      ),
      floatingActionButton: FloatingActionButton(
        onPressed: incrementCounter,
        child: const Icon(Icons.add),
      ),
    );
  }
}
The call to setState() tells Flutter that the counter value has changed. Flutter then rebuilds the affected widget so that the new value appears on the screen.
Run the Flutter App on an Emulator or Android Device
Step 5: Prepare an Android device. You may create a virtual device through Android Studio’s Device Manager or connect a physical Android device with developer options and USB debugging enabled.
Wait for the emulator to finish starting or for the connected phone to appear in Android Studio’s device selector. If more than one target is available, select the device on which the application should run.

Open lib/main.dart and click the green Run button. Android Studio builds the debug application, installs it on the selected device, and starts it. The first build can take longer because Gradle and Dart dependencies may need to be resolved.
Step 6: Observe the Run or Debug console while the project is built and installed. Output varies according to the Flutter, Gradle, Android Studio, and device versions. An older example is shown below.
Launching lib/main.dart on F3116 in debug mode...
Initializing gradle...
Resolving dependencies...
Running 'gradlew assembleDebug'...
Skipping compilation. Fingerprint match.
Built build/app/outputs/apk/debug/app-debug.apk (31.2MB).
Installing build/app/outputs/apk/app.apk...
Step 7: After the installation completes, the Flutter application opens on the selected Android device.
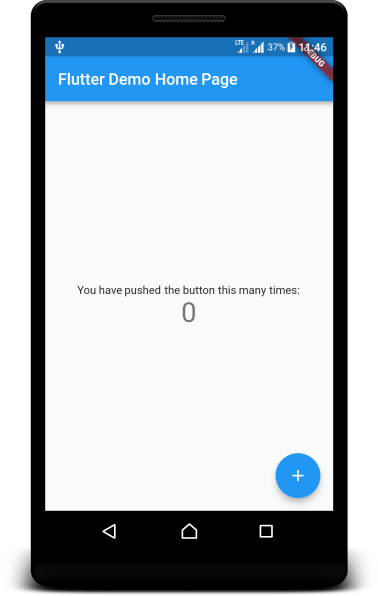
Press the floating action button. The displayed count increases by one after every press.
Use Hot Reload While Editing the Flutter App
Keep the application running and change visible text, a color, padding, or another widget property in lib/main.dart. Save the file or click Android Studio’s hot reload control to apply supported source changes without restarting the entire application.
Hot reload normally preserves the current application state. Use hot restart when a change must rerun main() or when the current state should be reset. Native Android configuration changes and some initialization changes may require stopping and running the application again.
Troubleshoot Flutter Device and Build Problems
Android Studio Does Not Show New Flutter Project
Open Android Studio’s plugin settings and confirm that the Flutter plugin is installed and enabled. Restart Android Studio after installing or updating the plugin.
No Android Device Appears in the Flutter Device Selector
Start an emulator from Device Manager before running the project. For a physical phone, unlock the device, enable USB debugging, accept the computer authorization prompt, and use a data-capable USB cable. The following commands can help confirm whether Flutter and Android Debug Bridge detect the device:
flutter devices
adb devices
Flutter Cannot Locate the Android Toolchain
Run flutter doctor and address the items listed under the Android toolchain. Confirm that the Android SDK is installed and that required Android SDK components and licenses are available.
Dart Packages or Gradle Dependencies Fail to Resolve
Check the reported error first. For Dart dependency problems, run the following command from the project directory:
flutter pub getIf generated build files are stale, clean the Flutter build output and resolve the packages again:
flutter clean
flutter pub get
Flutter Basic Application Questions
How do I create a Flutter project in Android Studio?
Install and enable the Flutter plugin, select New Flutter Project, provide the Flutter SDK path, choose the Flutter application template, enter the project details, and finish the project wizard.
Which file contains the main Flutter application code?
The generated application’s Dart entry point is lib/main.dart. Its main() function calls runApp() with the root widget.
How do I run a Flutter app on an Android emulator?
Create and start an emulator from Android Studio’s Device Manager, select it in the device selector, open lib/main.dart, and click the Run button.
Can I run the Flutter application on a physical Android phone?
Yes. Enable developer options and USB debugging on the phone, connect it to the computer, authorize the connection, select the phone in Android Studio, and run the project.
What is the difference between Flutter hot reload and hot restart?
Hot reload injects supported code changes and generally preserves the current state. Hot restart restarts the Dart application and resets its state.
Flutter Android Studio Tutorial QA Checklist
- Confirm that
flutter doctorrecognizes the Flutter and Android toolchains. - Verify that Android Studio displays the Flutter project template.
- Check that the project name uses a valid lowercase Dart package name.
- Confirm that an emulator or authorized physical device appears in the device selector.
- Run the counter application and verify that the floating action button increments the displayed value.
- Edit a widget property and confirm that hot reload applies the supported change.
Flutter Basic Application Result
In this Flutter Tutorial – Flutter Basic Application Example, we created a Flutter project in Android Studio, reviewed its main files, ran it on an Android device, tested the counter interface, and used hot reload during development.