 TutorialKart.com
Install Flutter on Linux Ubuntu
This tutorial explains how to install the Flutter SDK on a 64-bit Ubuntu system, add Flutter to the PATH, configure Android Studio and the Android SDK, accept Android licenses, connect a device or emulator, and verify the installation with flutter doctor.
The commands use Bash and standard Ubuntu package-management tools. Package names and Android Studio screens can vary between Ubuntu and Flutter releases, so compare release-specific requirements with the current Flutter documentation before installing.
Flutter Linux Installation Requirements
Before downloading Flutter, confirm the processor architecture, available storage, shell, and development target. The Flutter SDK itself is only part of the required storage. Android Studio, Android SDK platforms, build tools, system images, Gradle caches, and project files require additional space.
| Requirement | What to check |
|---|---|
| Operating system | A supported 64-bit Linux distribution such as Ubuntu |
| Processor architecture | Download an SDK archive that matches the system architecture |
| Command-line tools | bash, curl, git, unzip, xz-utils, zip, and standard file utilities |
| Storage | Space for Flutter, the IDE, Android SDK packages, emulator images, caches, and projects |
| Android development | Android Studio or Android command-line tools, an Android SDK, and a device or emulator |
| Linux desktop development | A compiler toolchain, CMake, Ninja, pkg-config, and the required GTK development libraries |
Check the Ubuntu architecture before selecting a Flutter SDK archive:
uname -mTypical results include x86_64 for an Intel or AMD 64-bit system and aarch64 for a 64-bit Arm system. Do not assume that an x64 archive will run on Arm64. Confirm the architectures currently offered on the official Flutter installation pages.
Install Ubuntu Packages Required by Flutter
Update the package index and install the basic command-line utilities used by Flutter and its setup tools:
sudo apt update
sudo apt install -y curl git unzip xz-utils zip libglu1-mesa
If the objective is to build native Linux desktop applications, install the Linux toolchain and GTK development packages as well:
sudo apt install -y clang cmake ninja-build pkg-config libgtk-3-dev libstdc++-12-devThe exact C++ development package available can depend on the Ubuntu release. If APT cannot find the named version, use the supported package identified by the current Flutter Linux setup documentation and your Ubuntu repositories.
Download the Flutter SDK for Linux
Download the current stable Linux SDK from the official Flutter SDK archive or follow the current manual installation instructions. Select the archive that matches the computer’s architecture rather than copying a version-specific filename from an older guide.
The original SDK archive address used by this tutorial was https://flutter.io/sdk-archive/#linux. If that legacy address redirects, use the current official Flutter documentation to locate the stable Linux archive.
Place the downloaded archive in a directory such as ~/Downloads. Avoid installing the Flutter SDK in a location that requires root access for routine updates. A user-owned directory such as ~/development is easier to manage.
mkdir -p "$HOME/development"
tar -xf "$HOME/Downloads/flutter_linux_<version>-stable.tar.xz" -C "$HOME/development"
Replace flutter_linux_<version>-stable.tar.xz with the actual downloaded filename. After extraction, the Flutter executable should be located at ~/development/flutter/bin/flutter.
Legacy Flutter SDK Extraction Command
The following command is retained from the original beta-era instructions. Its filename is obsolete and should not be used for a current installation.
$ tar xf flutter_linux_v0.3.2-beta.tar.xzAdd the Flutter SDK to PATH on Ubuntu
Add Flutter’s bin directory to the PATH so the flutter and dart commands are available in new terminal sessions. For Bash, append the export statement to ~/.bashrc:
echo 'export PATH="$HOME/development/flutter/bin:$PATH"' >> "$HOME/.bashrc"
source "$HOME/.bashrc"
Verify that the shell resolves the Flutter executable from the expected directory:
which flutter
flutter --version
dart --version
If another shell is in use, update that shell’s startup file instead. For example, a Zsh installation normally uses ~/.zshrc. Do not add duplicate Flutter entries to multiple files unless the shell configuration requires them.
Legacy Ubuntu PATH Examples
The blocks below are preserved from the original tutorial. They illustrate how the SDK location was determined and added to ~/.bashrc, but the example paths are specific to the original computer.
[PATH_TO_FLUTTER_SDK_DIRECTORY] = Use pwd while inside the extracted Flutter directory if the complete path is unknown.
$ pwd /media/arjun/0AB650F1B650DF2F/softs/flutter[PATH_TO_FLUTTER_SDK_DIRECTORY] = /media/arjun/0AB650F1B650DF2F/softs/flutterThe original instructions opened ~/.bashrc with the following command:
~$ sudo nano ~/.bashrcUsing sudo to edit a file in the home directory is normally unnecessary. A current installation can use nano ~/.bashrc or the append command shown earlier.
export PATH="[PATH_TO_FLUTTER_SDK_DIRECTORY]/flutter/bin:$PATH"The placeholder must be replaced with the real SDK location. Check the resulting path carefully because an extra flutter directory will make the command invalid unless the archive was extracted into a directory with that structure.
export PATH="/media/arjun/0AB650F1B650DF2F/softs/flutter/flutter/bin:$PATH"The original PATH verification command was:
~$ echo $PATHFor a clearer verification, which flutter or command -v flutter directly reports the executable selected by the shell.
Run Flutter Doctor After Installing the SDK
Run Flutter Doctor before configuring a development target. The detailed form reports the installed Flutter channel, Linux toolchain, Android toolchain, browsers, IDE integrations, and connected devices that Flutter can detect.
flutter doctor -vA warning is not always relevant to the intended target. For example, an Android-only developer does not need to resolve Linux desktop warnings. Resolve every issue associated with the platforms that will actually be built.
Original Flutter Doctor Beta Output
This preserved output comes from Flutter beta v0.3.2 and Android Studio 3.1. Current Flutter Doctor output, environment variables, Android SDK versions, and diagnostic symbols will differ.
arjun@localhost:~$ flutter doctor
Doctor summary (to see all details, run flutter doctor -v):
[?] Flutter (Channel beta, v0.3.2, on Linux, locale en_IN)
[?] Android toolchain - develop for Android devices
    ? Unable to locate Android SDK.
      Install Android Studio from: https://developer.android.com/studio/index.html
      On first launch it will assist you in installing the Android SDK components.
      (or visit https://flutter.io/setup/#android-setup for detailed instructions).
      If Android SDK has been installed to a custom location, set $ANDROID_HOME to that location.
[?] Android Studio (version 3.1)
[!] IntelliJ IDEA Community Edition (version 2017.2)
    ? Flutter plugin not installed; this adds Flutter specific functionality.
    ? Dart plugin not installed; this adds Dart specific functionality.
[!] Connected devices
    ! No devices available

! Doctor found issues in 3 categories.
arjun@localhost:~$
Install Android Studio and the Android SDK for Flutter
Download the current version of Android Studio and complete its setup wizard. Install the Android SDK components requested by Flutter, including an Android SDK platform, Platform-Tools, Build-Tools, command-line tools, and an emulator image if a virtual device will be used.
Open Android Studio’s SDK Manager and confirm where the Android SDK is installed. A common Ubuntu location is ~/Android/Sdk, but the actual location can be different.
Configure a Custom Android SDK Location for Flutter
If Flutter Doctor cannot locate an existing Android SDK, configure Flutter with its actual directory:
flutter config --android-sdk "$HOME/Android/Sdk"
flutter doctor -v
Use the location displayed by Android Studio rather than assuming the example path. Some third-party tools also inspect ANDROID_HOME or ANDROID_SDK_ROOT; follow their current documentation before defining either variable.
The following environment-variable example is retained from the original tutorial. Its absolute path belongs to the original system and must not be copied unchanged.
#android sdk
export ANDROID_HOME="/media/arjun/0AB650F1B650DF2F/Android/Sdk"
Accept Android SDK Licenses for Flutter
After Android command-line tools are available, review and accept the required Android SDK licenses:
flutter doctor --android-licensesRead each license prompt and respond as appropriate. If Flutter reports that sdkmanager is missing, install or update the Android SDK Command-line Tools from Android Studio’s SDK Manager and run the command again.
Install the Flutter and Dart Plugins in Android Studio
The Flutter plugin adds project creation, run configurations, debugging, widget tooling, and Flutter-aware editing to Android Studio. Installing it also installs or requests the Dart plugin.
- Open Android Studio.
- Open the Plugins section from the current Settings or Preferences screen.
- Search the Marketplace for Flutter.
- Install the Flutter plugin and approve the Dart plugin if prompted.
- Restart Android Studio.
- Confirm that the option to create a Flutter project is available.
The screenshots below show an older Android Studio interface. The labels and layout can differ in current releases, but the plugin names remain Flutter and Dart.
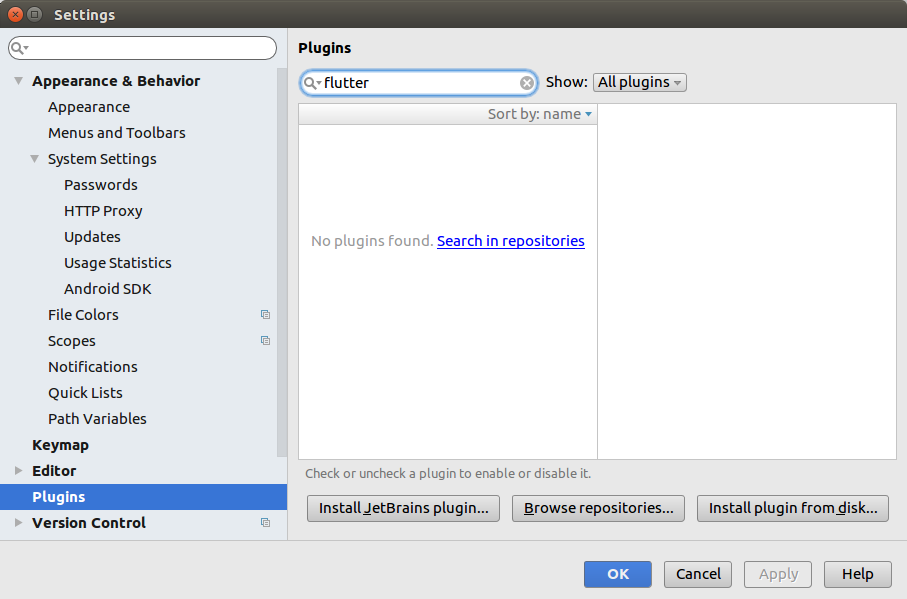
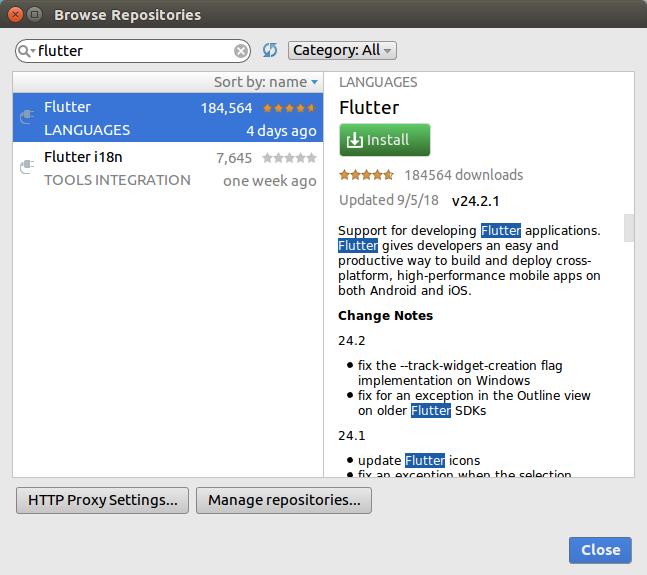

If IntelliJ IDEA is used instead, install its Flutter plugin and the associated Dart plugin through the IDE’s plugin settings.
Configure an Android Device or Emulator for Flutter
Connect a Physical Android Device to Flutter
- Enable Developer options on the Android device.
- Enable USB debugging.
- Connect the device with a data-capable USB cable.
- Approve the debugging authorization prompt on the device.
- Run
flutter devicesto confirm that Flutter detects it.
flutter devices
adb devices
If the device is listed as unauthorized, unlock it and approve the computer. If it is not listed at all, check the cable, USB mode, ADB installation, and applicable Linux device permissions.
Create an Android Emulator for Flutter
Open Android Studio’s Device Manager, create a virtual device, select an installed system image, and start the emulator. Hardware virtualization must be enabled and available to the current user for acceptable emulator performance.
flutter emulators
flutter devices
Create and Run a Test Flutter Application on Ubuntu
Create a small project after Flutter Doctor recognizes the required toolchain and at least one target device:
flutter create ubuntu_flutter_test
cd ubuntu_flutter_test
flutter run
If more than one device is available, Flutter asks for a target or displays the device identifiers. A specific target can be selected with flutter run -d <device-id>.
Verify a Complete Flutter Installation on Linux
Run these checks after configuring the intended platforms:
flutter --version
flutter doctor -v
flutter devices
flutter analyze
A successful setup does not require every optional platform to be installed. It requires Flutter Doctor to recognize the toolchain and device needed for the platform being developed.
The following preserved output shows what a completed setup looked like in the original beta-era environment. It is historical output, not a current version reference.
~$ flutter doctor
Doctor summary (to see all details, run flutter doctor -v):
[?] Flutter (Channel beta, v0.3.2, on Linux, locale en_IN)
[?] Android toolchain - develop for Android devices (Android SDK 27.0.3)
[?] Android Studio (version 3.1)
[?] IntelliJ IDEA Community Edition (version 2017.2)
[?] Connected devices (1 available)

• No issues found!
Fix Common Flutter Installation Problems on Ubuntu
| Flutter installation problem | Check or corrective action |
|---|---|
flutter: command not found | Confirm the SDK extraction path, update the correct shell startup file, reload it, and run which flutter. |
| Android SDK not found | Check the SDK location in Android Studio and configure Flutter with flutter config --android-sdk. |
| Android licenses not accepted | Install Android command-line tools and run flutter doctor --android-licenses. |
| No connected devices | Start an emulator or enable USB debugging and approve the physical device. |
sdkmanager missing | Install Android SDK Command-line Tools through Android Studio’s SDK Manager. |
| Linux desktop toolchain missing | Install Clang, CMake, Ninja, pkg-config, GTK development libraries, and the supported C++ development package. |
| Permission errors while updating Flutter | Move the SDK to a user-owned directory and avoid routine Flutter commands with sudo. |
| Git reports unsafe ownership | Check who owns the extracted SDK directory and correct unintended root ownership rather than bypassing the warning without review. |
Update the Flutter SDK on Ubuntu
Check the installed release and update the current Flutter channel from a user-owned SDK directory:
flutter --version
flutter upgrade
flutter doctor -v
Review Flutter release notes and migration guidance before upgrading an established project. An SDK update can introduce new toolchain requirements or deprecations that require project changes.
Flutter Installation on Ubuntu FAQs
Where should the Flutter SDK be installed on Ubuntu?
Install it in a user-owned directory such as ~/development/flutter. Avoid protected system directories because Flutter needs to update files inside its SDK directory.
Can Flutter be installed on Linux Arm64?
Arm64 installation depends on the SDK artifacts and development targets currently supported by Flutter. Check uname -m, consult the current official Linux installation documentation, and download only an archive intended for that architecture.
Is Android Studio required to use Flutter on Ubuntu?
No IDE is mandatory for editing Flutter projects. However, Android development requires the appropriate Android SDK tools. Android Studio provides a convenient way to install and manage those tools, emulators, and Flutter IDE support.
Why does Flutter Doctor show warnings after installation?
Flutter Doctor checks several possible development targets and integrations. Resolve warnings related to the platforms you intend to build. Optional platform warnings can remain if those platforms are not part of the project.
Should Flutter be installed with sudo on Ubuntu?
APT package installation requires administrative privileges, but the Flutter SDK itself should normally be extracted into a user-owned directory. Running routine Flutter commands with sudo can create ownership and permission problems.
Flutter Ubuntu Installation Editorial QA Checklist
- Confirm that the current Flutter Linux download supports every architecture named in the tutorial.
- Test the APT package names on the Ubuntu releases covered by the article.
- Verify that the PATH example resolves to the extracted
flutter/bindirectory without a duplicated folder name. - Check the current Android Studio navigation for SDK Manager, Device Manager, and Flutter plugin installation.
- Run
flutter doctor -v, accept Android licenses, and verify a physical device or emulator before marking the Android setup complete. - Keep beta v0.3.2 commands and diagnostic output clearly identified as legacy material.
- Confirm that new command blocks use Bash formatting while preserved historical code blocks remain unchanged.
Continue with Flutter Development After Ubuntu Setup
Once the required Flutter Doctor checks pass and a test application runs, continue with the Flutter Tutorial to learn Dart fundamentals, widgets, layout, state, navigation, animations, and data storage.