 TutorialKart.com
Flutter Navigation from One Screen to Another
Flutter uses the Navigator widget to manage a stack of screens, which Flutter calls routes. Use Navigator.push() to place a new screen on top of the current screen and Navigator.pop() to remove the current screen and return to the previous one.
This tutorial demonstrates the two basic navigation operations:
- Open a second screen from the first screen.
- Close the second screen and return to the first screen.
How Flutter Navigator Manages Screens
The navigator maintains routes as a stack. When Navigator.push() is called, the new route is added to the top of that stack. When Navigator.pop() is called, the top route is removed and the route underneath becomes visible again.
Navigator.push()opens a new route.MaterialPageRoutecreates a platform-appropriate transition to a Material Design screen.Navigator.pop()closes the current route.- The
BuildContextsupplied to the navigator must be below aMaterialAppor another widget that provides a navigator.
Navigate to a Second Screen with Navigator.push()
Call Navigator.push() in a button callback and pass it the current BuildContext and a route. The route’s builder returns the widget that represents the destination screen.
Navigator.push(
  context,
  MaterialPageRoute(
    builder: (context) => const SecondPage(),
  ),
);
Return to the Previous Screen with Navigator.pop()
On the second screen, call Navigator.pop(context) to remove the current route. The app then displays the screen that was immediately below it in the navigation stack.
Navigator.pop(context);A standard AppBar also displays a back button automatically when the current route can be popped. Therefore, users can normally return by tapping either the app bar’s back arrow or a button that calls Navigator.pop().
Complete Flutter Two-Screen Navigation Example
The following current example defines two stateless screens. The first screen opens SecondPage, and the second screen returns to HomePage. ElevatedButton is used because it is the modern replacement for the deprecated RaisedButton widget.
import 'package:flutter/material.dart';

void main() {
  runApp(const MyApp());
}

class MyApp extends StatelessWidget {
  const MyApp({super.key});

  @override
  Widget build(BuildContext context) {
    return MaterialApp(
      debugShowCheckedModeBanner: false,
      title: 'Flutter Navigation Demo',
      home: const HomePage(),
    );
  }
}

class HomePage extends StatelessWidget {
  const HomePage({super.key});

  @override
  Widget build(BuildContext context) {
    return Scaffold(
      appBar: AppBar(
        title: const Text('Home - TutorialKart'),
      ),
      body: Center(
        child: ElevatedButton(
          onPressed: () {
            Navigator.push(
              context,
              MaterialPageRoute(
                builder: (context) => const SecondPage(),
              ),
            );
          },
          child: const Text('Go to Second Screen'),
        ),
      ),
    );
  }
}

class SecondPage extends StatelessWidget {
  const SecondPage({super.key});

  @override
  Widget build(BuildContext context) {
    return Scaffold(
      appBar: AppBar(
        title: const Text('Second Screen'),
      ),
      body: Center(
        child: ElevatedButton(
          onPressed: () {
            Navigator.pop(context);
          },
          child: const Text('Go Back to Home Screen'),
        ),
      ),
    );
  }
}
Example
In this example, we have two screens/pages, they are: MyHomePage and MySecondPage which extend StatefulWidget. They both have different state classes.
In MyHomePage, we shall place a button and when this button is pressed, we shall navigate to second screen, MySecondPage.
In MySecondPage, we shall place a RaisedButton and when this button is pressed, we shall navigate back to the first screen MyHomePage.
main.dart
import 'package:flutter/material.dart';

void main() => runApp(MyApp());

class MyApp extends StatelessWidget {
  @override
  Widget build(BuildContext context) {
    return MaterialApp(
      title: 'Flutter Demo',
      home: MyHomePage(),
    );
  }
}

class MyHomePage extends StatefulWidget {
  @override
  _MyHomePageState createState() => _MyHomePageState();
}

class MySecondPage extends StatefulWidget {
  @override
  _MySecondPageState createState() => _MySecondPageState();
}

class _MyHomePageState extends State<MyHomePage> {
  @override
  Widget build(BuildContext context) {
    return Scaffold(
      appBar: AppBar(
        title: Text('Home - TutorialKart'),
      ),
      body: Center(
        child: RaisedButton(
          child: Text('Go to Second Screen'),
          onPressed: () {
            Navigator.push(
              context,
              MaterialPageRoute(builder: (context) => MySecondPage()),
            );
          },
        ),
      ),
    );
  }
}

class _MySecondPageState extends State<MySecondPage> {
  @override
  Widget build(BuildContext context) {
    return Scaffold(
      appBar: AppBar(
        title: Text('Second Screen'),
      ),
      body: Center(
        child: RaisedButton(
          child: Text('Go back to Home Screen'),
          onPressed: () {
            Navigator.pop(context);
          },
        ),
      ),
    );
  }
}
The original example above uses RaisedButton, which is retained here for reference. In a new Flutter project, use ElevatedButton as shown in the updated example.
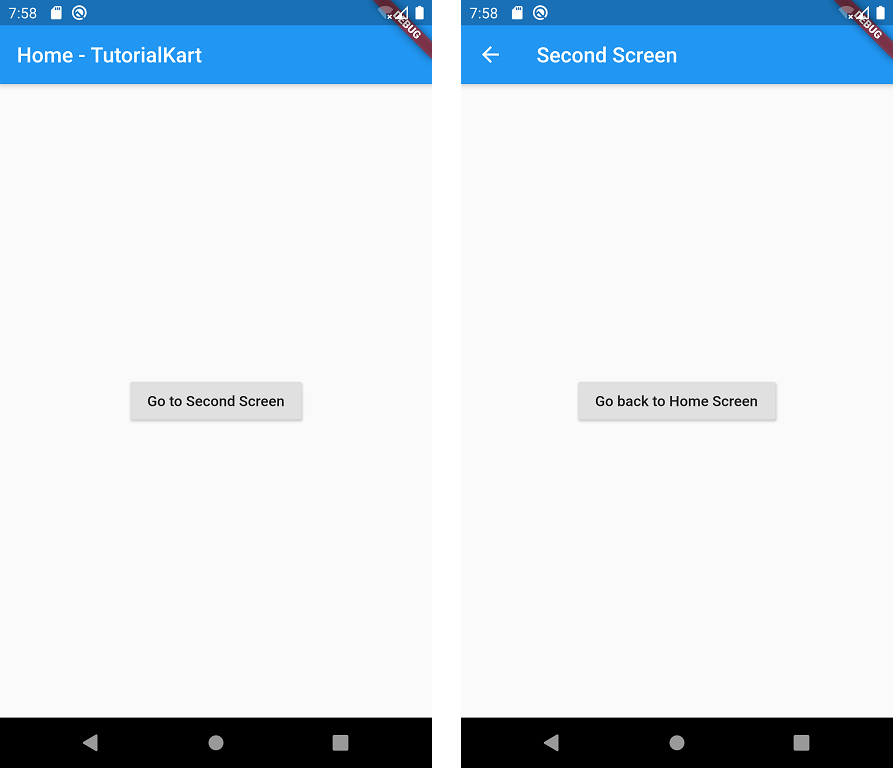
Run this application and you should get the first and second screen as shown below.
Pass Data Back When Closing the Second Screen
A route can return a value when it is popped. First, await the result of Navigator.push() on the first screen. Then pass the result as the second argument to Navigator.pop() on the second screen.
final String? result = await Navigator.push<String>(
  context,
  MaterialPageRoute(
    builder: (context) => const SecondPage(),
  ),
);

if (result != null && context.mounted) {
  ScaffoldMessenger.of(context).showSnackBar(
    SnackBar(content: Text(result)),
  );
}
From the second screen, return a string while closing the route:
Navigator.pop(context, 'Returned from the second screen');Replace the Current Screen Instead of Stacking It
Use Navigator.pushReplacement() when the current page should not remain in the back stack. This is commonly suitable after a temporary screen such as a splash screen or after completing a sign-in flow.
Navigator.pushReplacement(
  context,
  MaterialPageRoute(
    builder: (context) => const SecondPage(),
  ),
);
Unlike Navigator.push(), this method removes the current route after adding the replacement. Pressing Back will therefore not return to the replaced screen.
Common Flutter Navigation Problems
Navigator operation requested with a context that does not include a Navigator
This error occurs when the supplied BuildContext is not below a navigator. Place the screen under MaterialApp, and call the navigation method from a context inside that app.
The Back Button Does Not Return to the First Screen
Confirm that the second screen was opened with Navigator.push(). If it was opened with pushReplacement(), the first route was replaced and is no longer available to pop back to.
Code Uses the Deprecated RaisedButton Widget
Replace RaisedButton with ElevatedButton. Put the callback in onPressed and the label in child. The navigation code inside the callback can remain the same.
Navigation Runs After an Awaited Operation
When navigation follows an asynchronous gap, verify that the widget is still mounted before using its context. In a State object, check mounted. Where supported, use context.mounted.
Complete Project
You can find the complete code at – Github – TutorialKart – Flutter – Navigation Example.
Flutter Navigator.push and Navigator.pop FAQs
What is a route in Flutter navigation?
A route is an entry managed by Flutter’s navigator. In a typical mobile app, each route represents a full-screen page. Routes are placed on and removed from a stack as the user moves through the app.
What is the difference between Navigator.push and Navigator.pop?
Navigator.push() adds a route and opens its screen. Navigator.pop() removes the current route and reveals the previous route.
Does Flutter add a back arrow automatically?
Yes. An AppBar normally adds a back arrow when the current navigator has a previous route. The automatic leading widget can be changed or disabled through the app bar configuration.
How do I send data to the second Flutter screen?
Define constructor parameters on the destination widget and pass values when creating it inside the route builder. Use required constructor parameters when the second screen cannot work without that data.
When should I use named routes?
Named routes can be useful when route names are managed centrally. For a small example or when strongly typed constructor arguments are important, creating a MaterialPageRoute directly is often simpler.
Flutter Two-Screen Navigation Review Checklist
- Confirm that
MaterialAppprovides a navigator above both screens. - Verify that the destination widget is returned by the
MaterialPageRoutebuilder. - Use
Navigator.push()when the user should be able to return to the current screen. - Use
Navigator.pop()only when the current route can be closed. - Use
ElevatedButtonrather than the deprecatedRaisedButtonin new code. - Check
mountedbefore navigating with a context after an asynchronous operation.
Conclusion
In this Flutter Tutorial, we learned how to navigate between two screens/pages using Navigator.push() and Navigator.pop(). We also covered returning a result, replacing a route, and resolving common navigation errors.