Flutter AppBar
Flutter AppBar class is used to display a material design app bar with optional actions (IconButtons).
AppBar is typically displayed as a fixed-height widget at the top of the screen.
Flutter AppBar widget has properties like actions, backgroundColor, primary, title, etc., that help us to enhance the look or functionality of the AppBar.
Syntax
The syntax to display an AppBar widget with a title and an array of actions is shown in the following.
AppBar(
  title: /*some title*/,
  actions: <Widget>[
    //array of widgets that take some actions
  ],
),
Example
In the following Flutter Application, we shall display a simple AppBar in a Scaffold, with just the title set to AppBar Tutorial.
main.dart
import 'package:flutter/material.dart';
void main() => runApp(const MyApp());
/// main application widget
class MyApp extends StatelessWidget {
const MyApp({Key? key}) : super(key: key);
static const String _title = 'Flutter Tutorial';
@override
Widget build(BuildContext context) {
return const MaterialApp(
title: _title,
home: MyStatelessWidget(),
);
}
}
/// stateless widget that the main application instantiates
class MyStatelessWidget extends StatelessWidget {
const MyStatelessWidget({Key? key}) : super(key: key);
@override
Widget build(BuildContext context) {
return Scaffold(
appBar: AppBar(
title: const Text('AppBar Tutorial'),
),
body: const Center(
child: Text(
'Hello World!',
style: TextStyle(fontSize: 24),
),
),
);
}
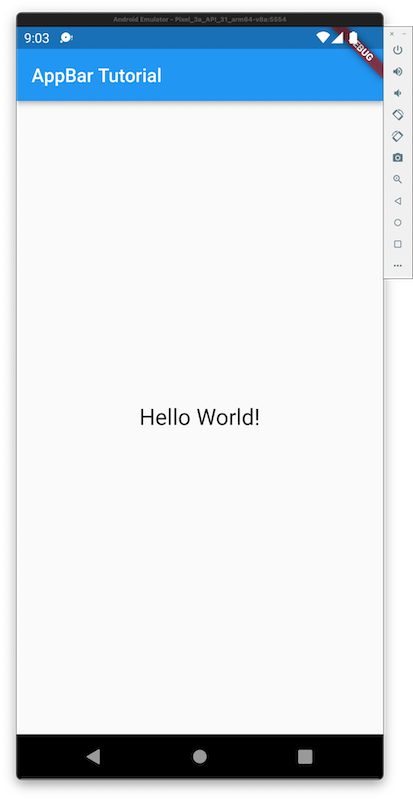
}Screenshot – Android Emulator
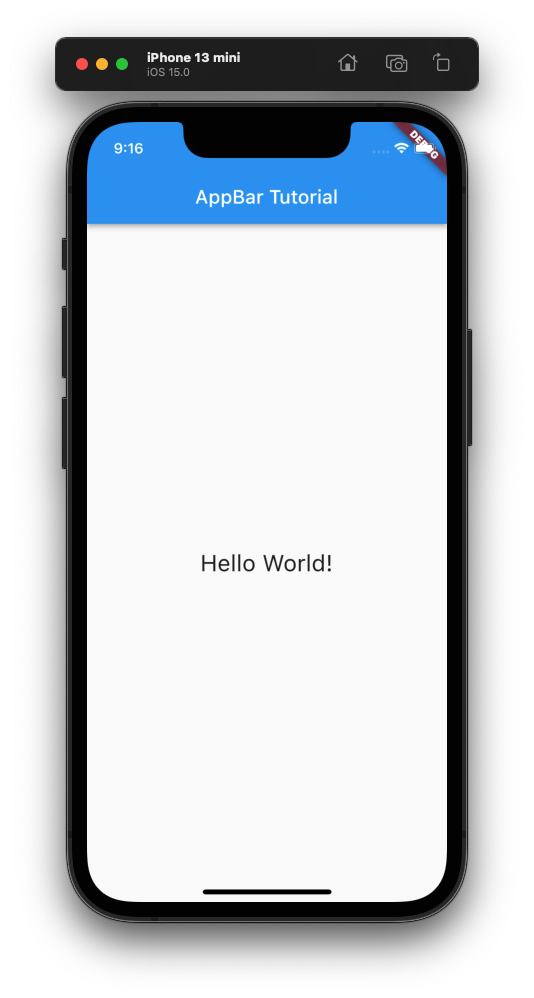
Screenshot – iPhone Simulator
Example – AppBar with Actions
In the following Flutter Application, we shall display an AppBar with an action. We can add more actions, if required, as the elements of the array to the actions property.
main.dart
import 'package:flutter/material.dart';

void main() => runApp(const MyApp());

/// main application widget
class MyApp extends StatelessWidget {
  const MyApp({Key? key}) : super(key: key);

  static const String _title = 'Flutter Tutorial';

  @override
  Widget build(BuildContext context) {
    return const MaterialApp(
      title: _title,
      home: MyStatelessWidget(),
    );
  }
}

/// stateless widget that the main application instantiates
class MyStatelessWidget extends StatelessWidget {
  const MyStatelessWidget({Key? key}) : super(key: key);

  @override
  Widget build(BuildContext context) {
    return Scaffold(
      appBar: AppBar(
        title: const Text('AppBar Tutorial'),
        actions: <Widget>[
          IconButton(
            icon: const Icon(Icons.add_alert),
            onPressed: () {
              ScaffoldMessenger.of(context).showSnackBar(
                  const SnackBar(content: Text('You pressed bell icon.')));
            },
          ),
        ],
      ),
      body: const Center(
        child: Text(
          'Hello World!',
          style: TextStyle(fontSize: 24),
        ),
      ),
    );
  }
}
Screenshot – Android Emulator

Screenshot – iPhone Simulator

Conclusion
In this Flutter Tutorial, we learned how to display an AppBar in our Flutter Application, with examples.