Salesforce Schema Builder for viewing objects, fields, and relationships
In our previous Salesforce tutorial we have understood salesforce application, How to create salesforce application, How to create an object in Salesforce, Different field types, Salesforce object relationship, Master Detail relationship, Lookup Relationship and Many to Many relationships. Now we will learn what Salesforce Schema Builder is, how to open it from Setup, how to read the relationship lines, and how to create objects and fields from the Schema Builder canvas.
Salesforce Schema Builder is most useful when an app has several custom objects and relationships. Instead of opening each object separately in Object Manager, you can view the data model in one visual layout and understand how the objects connect to each other.
What is Salesforce Schema Builder?
Salesforce Schema Builder is a visual tool in Setup that shows Salesforce objects, fields, and relationships in a diagram. It helps admins and developers inspect the data model, explain object relationships, and create selected metadata items such as custom objects and fields from the same screen.
In Schema Builder, each object appears as a box. The fields of the object appear inside the box, and relationship lines connect objects. This makes it easier to identify parent-child relationships, lookup relationships, master-detail relationships, and the overall structure of a Salesforce app.
When Salesforce Schema Builder is useful
- Use Schema Builder when you want to understand how standard and custom objects are connected.
- Use it before creating new relationship fields, so that you can check whether the data model already has a suitable parent object.
- Use it while explaining a Salesforce app data model to another admin, developer, or business user.
- Use it to create custom objects and fields when you prefer a visual modeling screen instead of moving through Object Manager pages.
How to access Schema Builder in Salesforce Setup
To open Salesforce Schema Builder, go to Setup, enter Schema Builder in the Quick Find box, and select Schema Builder. In older Salesforce documentation and older org interfaces, this path may also be described as Setup | Build | Schema Builder.
After Schema Builder opens, Salesforce displays a canvas and a left sidebar. The canvas is where selected objects are shown. The sidebar contains object filters, selected objects, and the Elements tab used for creating new items.
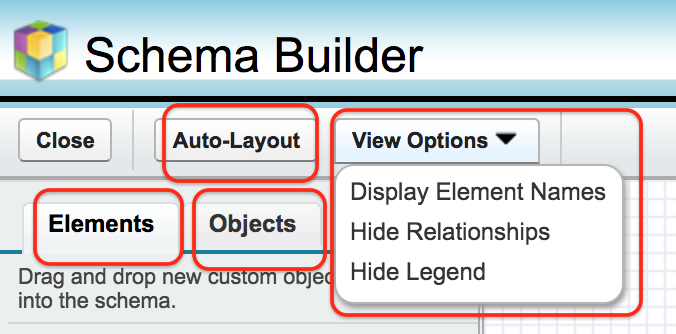
Salesforce Schema Builder screen options explained
In Salesforce Schema Builder, the main options are Auto-Layout, View Options, Elements, and object filters. These options control what is displayed and how the diagram is arranged.
- Elements: The Elements tab is used to drag new objects, fields, and relationship fields onto the Schema Builder canvas.
- Auto-Layout: Auto-Layout arranges selected objects on the canvas so that the object relationship diagram is easier to read.
- View Options: View Options control display settings such as showing element names, hiding relationships, or hiding the legend.
- Object filters: Object filters help you display all objects, selected objects, standard objects, custom objects, or system objects depending on the data model you want to inspect.
Choosing objects to display in Schema Builder
Schema Builder can display both standard and custom objects in an org. In a large Salesforce org, do not select all objects at once unless you need a full diagram. Start with the main object, then add related objects one by one. This keeps the Schema Builder canvas readable and helps you focus on the relationships that matter for the current task.
For example, if you are reviewing a sales process, you may begin with Account, Contact, Opportunity, and the custom objects connected to Opportunity. If you are reviewing a custom app, select only the custom objects for that app first and then add standard objects where required.
How to read lookup and master-detail relationship lines in Schema Builder
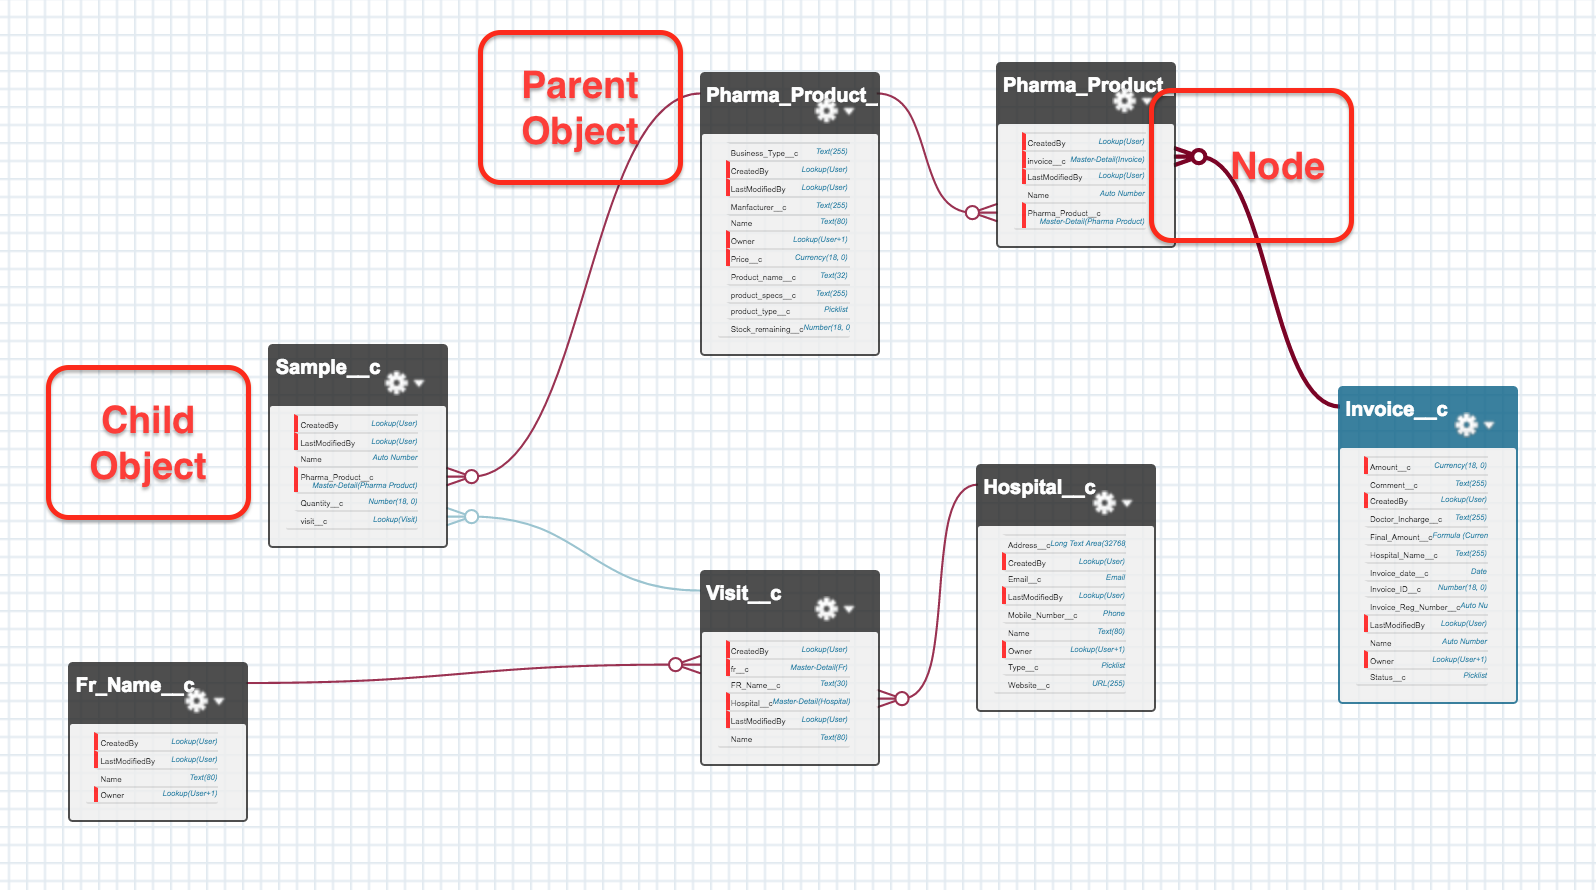
As shown above, the selected custom objects are displayed with their relationships. The relationship lines help you understand how data flows between objects. In this example, the blue line represents a lookup relationship, and the red connection represents a master-detail relationship.
Click Auto-Layout and zoom out when the canvas is crowded. You can also drag object boxes to different positions. Moving an object box on the Schema Builder canvas changes only the visual placement; it does not change the object, fields, or relationships in Salesforce.
In the above Salesforce Schema Builder diagram, the master-detail relationships are marked with red connections. The relationship between Visit and Sample is a lookup relationship, which is commonly used when a child record can refer to a parent record without the same ownership and deletion behavior as master-detail.
Lookup relationship in Salesforce Schema Builder
A lookup relationship connects one object to another while keeping the two objects relatively independent. In Schema Builder, this is helpful when you want to see which object stores a reference to another object. Lookup relationships are often used when the child record can exist without requiring a strict parent record lifecycle.
Master-detail relationship in Salesforce Schema Builder
A master-detail relationship creates a stronger parent-child connection. The detail record is closely tied to the master record. In Schema Builder, master-detail lines help you identify records whose ownership, sharing, and deletion behavior may depend on the parent object. Before changing a master-detail relationship, review the impact carefully because it can affect reporting, roll-up summary fields, and data access.
Create custom objects from Salesforce Schema Builder
We can also create Custom Objects, Fields and relationships using schema builder. To create a custom object from Salesforce Schema Builder, open the Elements tab, drag Object onto the canvas, enter the object details, and click Save.
- Open Setup and search for Schema Builder.
- Open the Elements tab in the left panel.
- Drag Object from the Elements tab to the canvas.
- Enter the custom object label, plural label, object name, and other required details.
- Click Save. The new object appears in the Schema Builder diagram.
After saving the object, you can continue adding fields from the same canvas. You can also open the object later from Object Manager if you need to configure page layouts, record types, buttons, validation rules, or other object settings that are not handled directly from the visual canvas.
Create fields and relationship fields in Schema Builder
Schema Builder can create normal fields and relationship fields. Open the Elements tab, choose the required field type, and drag it onto the object where the field should be created. Then enter the field details and save it.
- Select the object that needs the new field.
- From Elements, drag the required field type onto that object.
- Enter the field label, field name, help text, and required field properties.
- For relationship fields, choose the related object and review the relationship behavior.
- Save the field and confirm that it appears under the correct object in Schema Builder.
When creating relationship fields, decide whether the relationship should be lookup or master-detail before saving. This choice affects record ownership, deletion behavior, reporting, and how users interact with related records.
Schema Builder best practices for Salesforce data modeling
- Start with selected objects: Display only the objects required for the current app, process, or feature review.
- Use Auto-Layout before reviewing relationships: A clean layout reduces the chance of misreading parent-child connections.
- Check field placement: Before creating a field, confirm whether it belongs on the current object or on a related object.
- Review relationship type carefully: A lookup relationship and a master-detail relationship have different behavior, so choose based on the business rule and data ownership requirement.
- Do final configuration in Object Manager when needed: Schema Builder is useful for visual modeling, but Object Manager is still needed for many detailed object and field settings.
Salesforce Schema Builder review checklist
Before saving changes from Schema Builder, use this checklist to avoid common data model mistakes.
- Confirm that the object label, plural label, and API name follow your org naming standards.
- Confirm that each new field is created on the correct object, not on a related object by mistake.
- Confirm whether the relationship should be lookup or master-detail before creating it.
- Check whether a similar object or field already exists in the org.
- After saving, review page layouts, field-level security, validation rules, reports, and automation that may need updates.
Common mistakes while using Salesforce Schema Builder
A common mistake is selecting too many objects and trying to read a crowded diagram. Another mistake is creating a relationship field without reviewing whether the selected relationship type matches the business requirement. Admins should also remember that creating a field is only part of the configuration. Users may still need field-level security, page layout placement, and related list updates before they can work with the new field effectively.
Schema Builder should be treated as a visual data modeling tool, not as a replacement for every Setup configuration page. Use it to see the structure quickly, create core metadata items, and validate relationships. Use Object Manager and related Setup pages for detailed configuration.
Salesforce Schema Builder official learning resources
For additional reference, see the official Salesforce resources on working with Schema Builder in Trailhead and Salesforce Help for Schema Builder. These references are useful when you want to compare the visual workflow with the current Salesforce Setup experience.
Salesforce Schema Builder FAQs
What does Salesforce Schema Builder show?
Salesforce Schema Builder shows selected Salesforce objects, their fields, and the relationships between those objects in a visual diagram. It can display standard objects, custom objects, and system objects depending on the filters you choose.
Can I create custom objects in Salesforce Schema Builder?
Yes. You can create a custom object by opening the Elements tab, dragging Object onto the canvas, entering the object details, and saving it. After that, the object appears in the Schema Builder diagram.
Can I create fields from Salesforce Schema Builder?
Yes. You can drag field types from the Elements tab onto an object in the canvas. Schema Builder supports creating normal fields and relationship fields, but some advanced configuration may still need to be completed from Object Manager.
What is the difference between lookup and master-detail lines in Schema Builder?
A lookup line shows a looser relationship between two objects, while a master-detail line shows a stronger parent-child relationship. Master-detail relationships can affect ownership, sharing, deletion behavior, and roll-up summary fields.
Does moving objects in Schema Builder change Salesforce data?
No. Dragging object boxes around the Schema Builder canvas changes only the visual layout of the diagram. It does not change records, fields, object settings, or relationship definitions.
Salesforce Schema Builder summary
In this salesforce Tutorial we have learned what Salesforce Schema Builder is, how to access it from Setup, how to read object relationship lines, and how to create custom objects and fields from the visual canvas. Salesforce Schema Builder is helpful for understanding an org data model, but detailed configuration such as page layouts, security, automation, and validation rules should still be reviewed from the appropriate Setup pages.