Salesforce Workflow Actions – Tasks, Email Alerts, Field Updates and Outbound Messages
Salesforce workflow actions are the automated actions that run when a workflow rule meets its rule criteria. In this Salesforce tutorial, we create a workflow rule for an Invoice object and add four workflow actions: field update, email alert, task, and outbound message. If you are new to the concept, first read What is workflow rule in Salesforce. We also use a simple example in Salesforce where invoices greater than 12000 must be reviewed and marked as bulk invoices.
Note: Workflow Rules are part of Salesforce’s older automation setup. In many current implementations, Salesforce Flow is preferred for new automation. However, workflow actions still appear in existing orgs and in many administrator training examples, so understanding them is useful for maintaining older Salesforce configurations.
What is a workflow rule in Salesforce?
Salesforce Workflow Rules are rule-based automation processes that can send Email alerts, assign tasks, update fields, or send outbound messages when a record satisfies defined criteria.
A workflow rule has two main parts. The first part decides when the automation should run. The second part decides what Salesforce should do after the condition is satisfied.
- Rule Criteria : Rule Criteria defines when the rule actions should happen.
- Rule Actions : Rule actions happens when the rule criteria is satisfied.
Salesforce Workflow Rule Criteria Example for Invoice Amount Greater Than 12000
Salesforce Workflow Rule illustration with an Example
Requirement :- If the invoice amount is greater than 12000.
- then it should be marked as “Bulk Invoice” and an email alert should be sent to the invoice owner.
- Task should be assigned to the user to review the invoices and Outbound message to be sent out with the Invoice details.
In this example, the workflow rule criteria is Invoice Amount > 12000. The workflow actions are: update the Bulk Invoice checkbox, send an email alert, assign a task, and send an outbound message with invoice details.
Workflow actions used in this Salesforce invoice automation
| Workflow action | Purpose in this example | Runs on |
|---|---|---|
| Field Update | Checks the Bulk Invoice checkbox | Invoice record |
| Email Alert | Sends an invoice notification to the selected recipient | When workflow criteria is met |
| Task | Assigns invoice review work to a user | Activity-enabled object |
| Outbound Message | Sends selected invoice field values to an external endpoint | External SOAP listener |
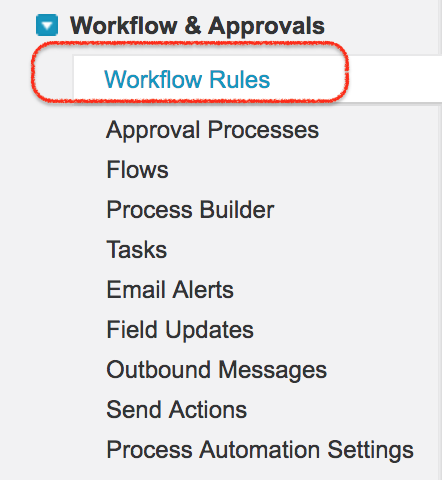
To create salesforce workflow rules login to Salesforce and navigate to Setup | Build | Create | Workflows & approvals | Workflow rules.
- Click on New rule to create immediate workflow rule in SFDC.

Step 1: Select the Salesforce object for the workflow rule
In the process of creating workflow rules in Salesforce there are four steps. Now we have to select invoice Object.
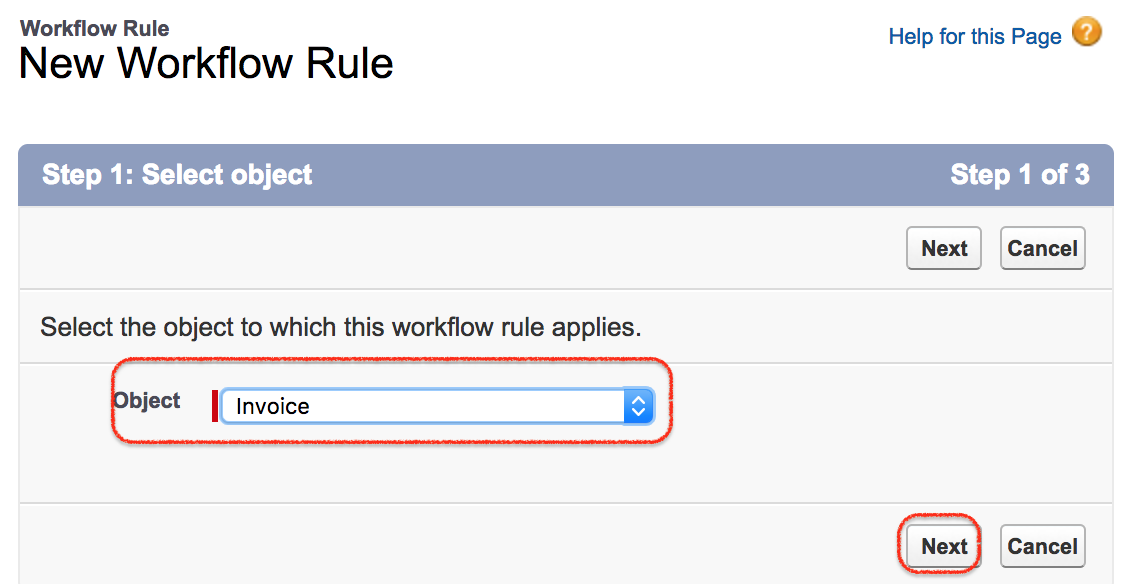
- As per per our requirement select Invoice Object and click on Next button.
Step 2: Configure the Salesforce workflow evaluation criteria and rule criteria
In this step we have to configure salesforce workflow rule by selecting Evaluation criteria and Rule criteria.
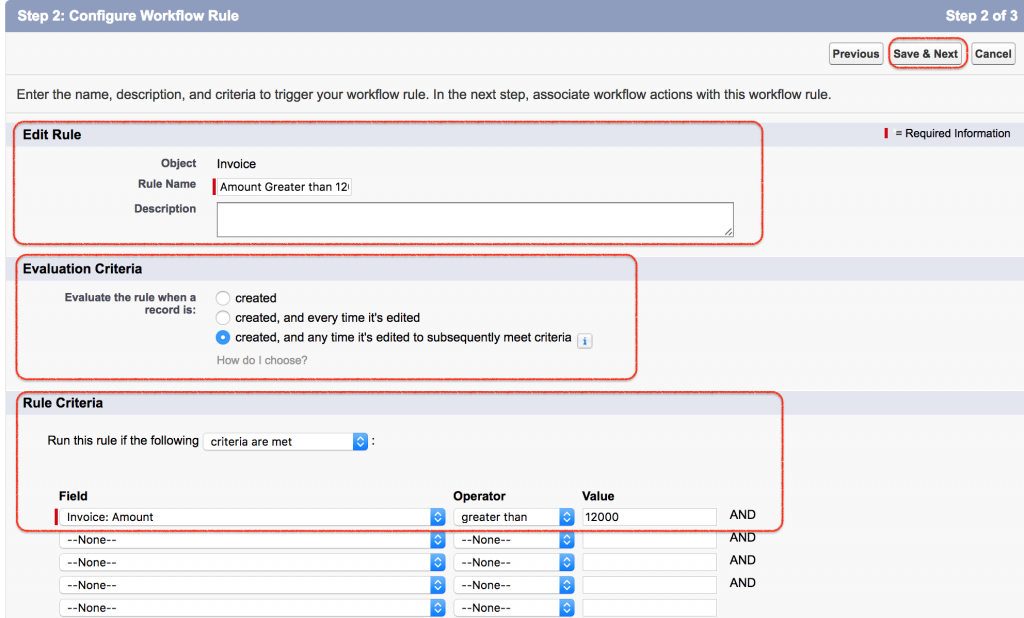
- Rule name : Enter rule name as Amount greater than 12000.
- Evaluation Criteria : Evaluate the rule when the record is created when the invoice amount is greater than 12000.
- Created : This rule will be evaluated at the time of record creation.
- Created and every time it’s edited : This rule will be evaluated when the record is created and every time the record gets edited.
- Created and every time it’s edited to subsequently meet criteria : This rule will be evaluated at the time of record creation and edited but with condition only the record meets the criteria.
For this example, choose the evaluation option carefully. If the field update should happen only when an invoice is first created above 12000, use created. If the invoice can be edited from a lower amount to an amount above 12000 and should then trigger the actions, use the option that evaluates when the record is created and edited to subsequently meet criteria.
- Rule Criteria : In run this rule if the following criteria are met.
Invoice Amount greater than 12000.- Now click on Save.
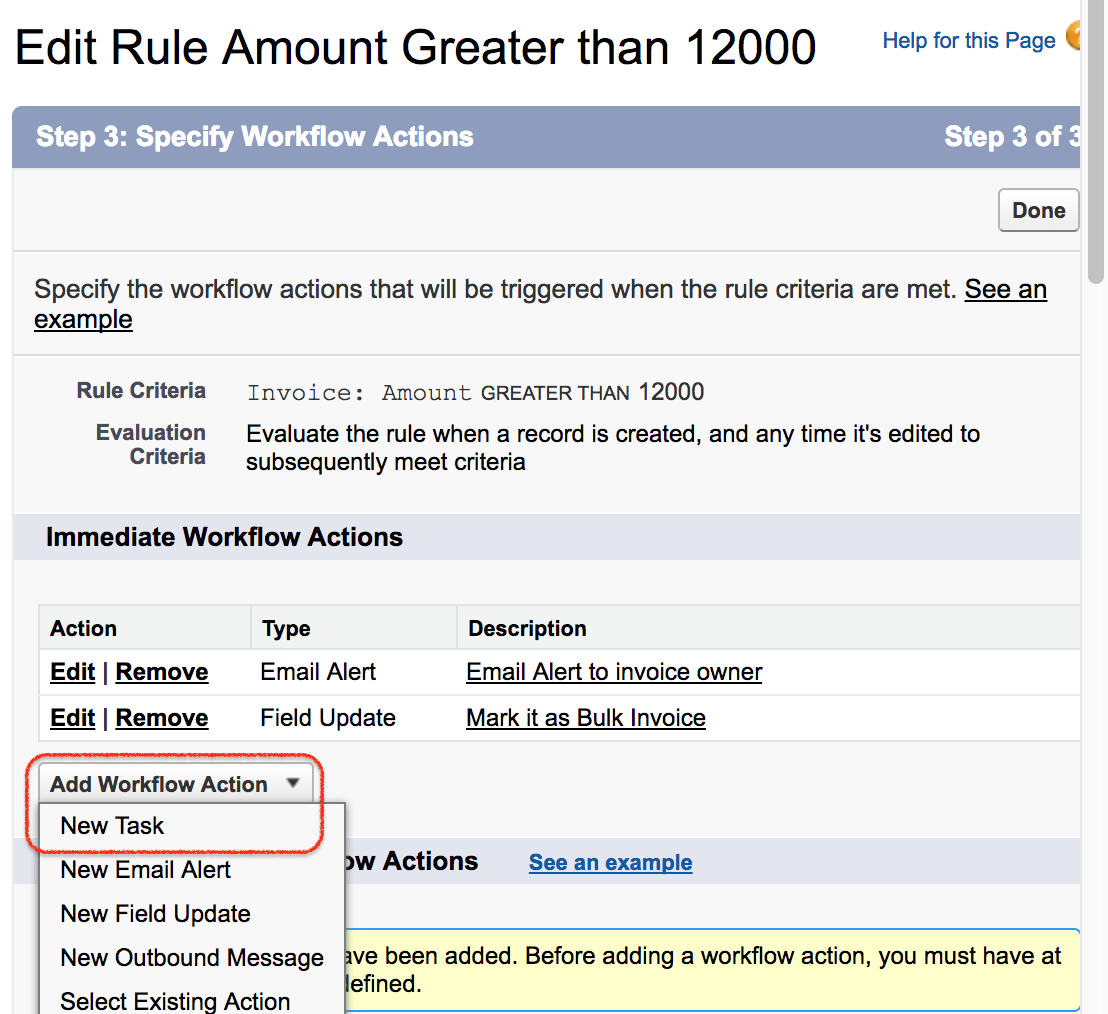
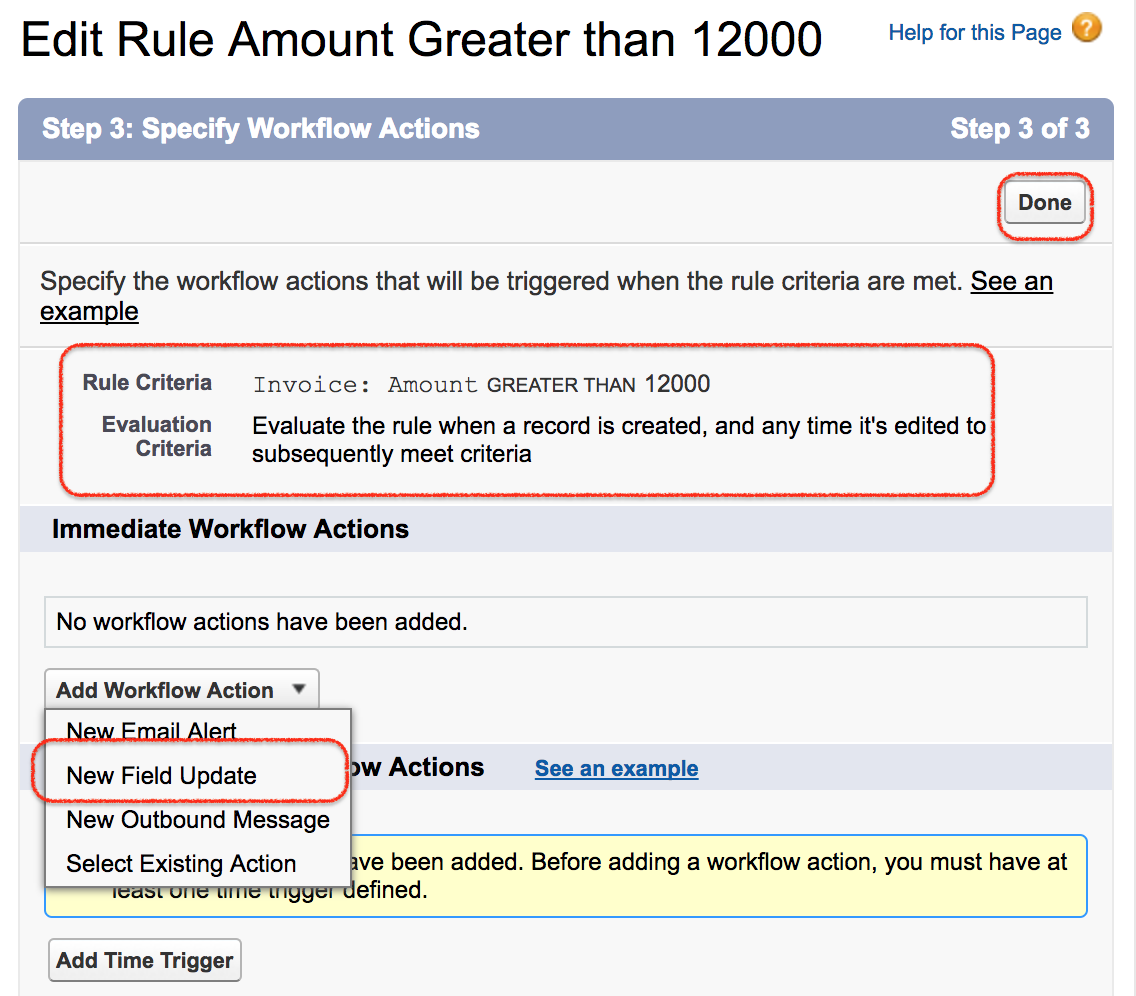
Now we have successfully saved our workflow rule. Creating a workflow rule and adding workflow action is a must. So now we are going to add workflow actions to this workflow rule. There are four type so workflow actions in Salesforce they are
- Email alert.
- Field update.
- Outbound Message.
- Assigning Task.
Workflow rule with out workflow rule action is useless. When adding workflow rule actions we can also add existing Workflow rule action to the workflow rule.
How to Create Salesforce Workflow Actions for the Invoice Rule
As discussed in the beginning of this SFDC tutorial we have to create the following Salesforce workflow actions.
Requirement :- If the invoice amount is greater than 12000.
- Then it should be marked as “Bulk Invoice” and an email alert should be sent to the invoice owner.
- Task should be assigned to the user to review the invoices and Outbound message to be sent out with the Invoice details.
Create a Salesforce field update action to mark Bulk Invoice
In this scenario the bulk invoice field must be marked as bulk invoice when the invoice amount is greater than 12000 the bulk invoice checkbox should be checked. Before creating workflow action, create a field called ‘Bulk Invoice‘ and made it as checkbox.

- Click on New field Update as shown above.
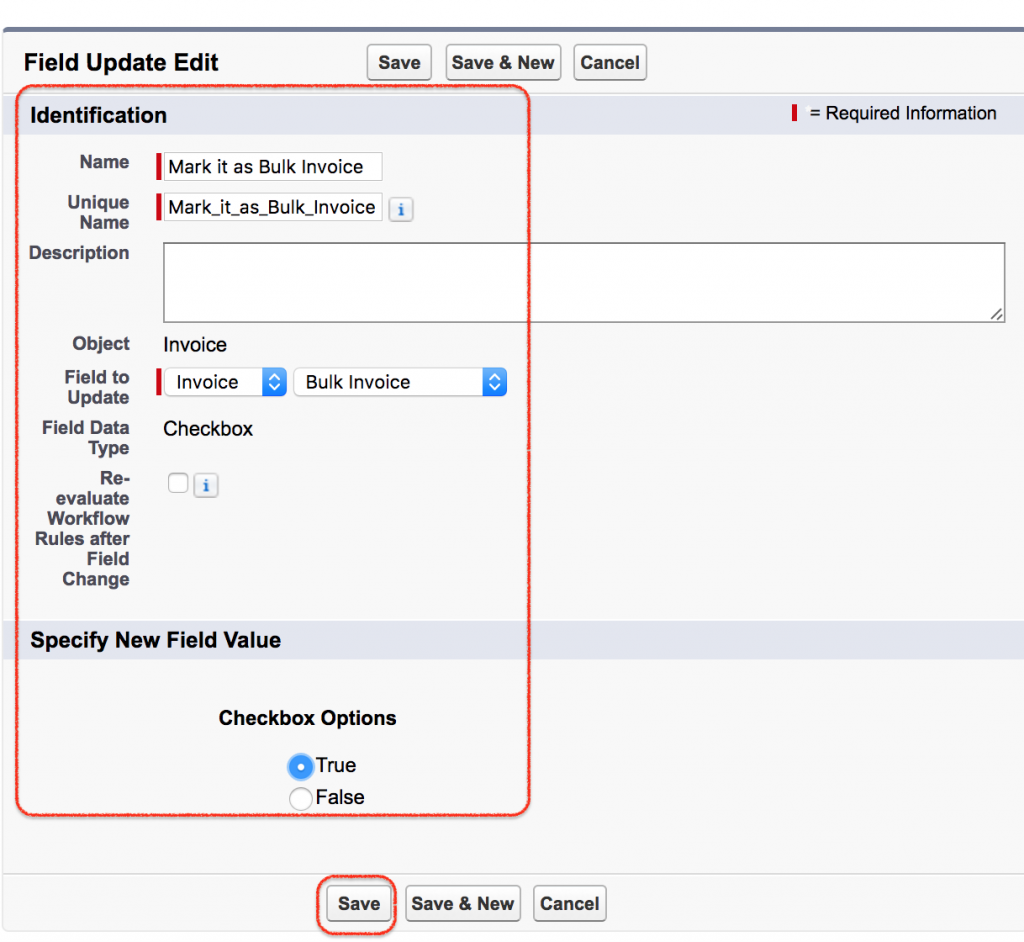
- Enter name.
- Description.
- Enter the field to update(Invoice).Field update can be done on the same object and also on the parent object.
- Select checkbox option as True.
- Now save all the settings.
For a checkbox field update, choose the target checkbox field and set its value to True. In this example, the Bulk Invoice field becomes checked automatically when the workflow rule criteria is satisfied.
Send a Salesforce email alert from the workflow rule
Sending email alert is the one of the workflow action provided in Salesforce. The email alert must be send to the customer whose invoice amount in greater than 12000. Let us create new email alert in Salesforce.
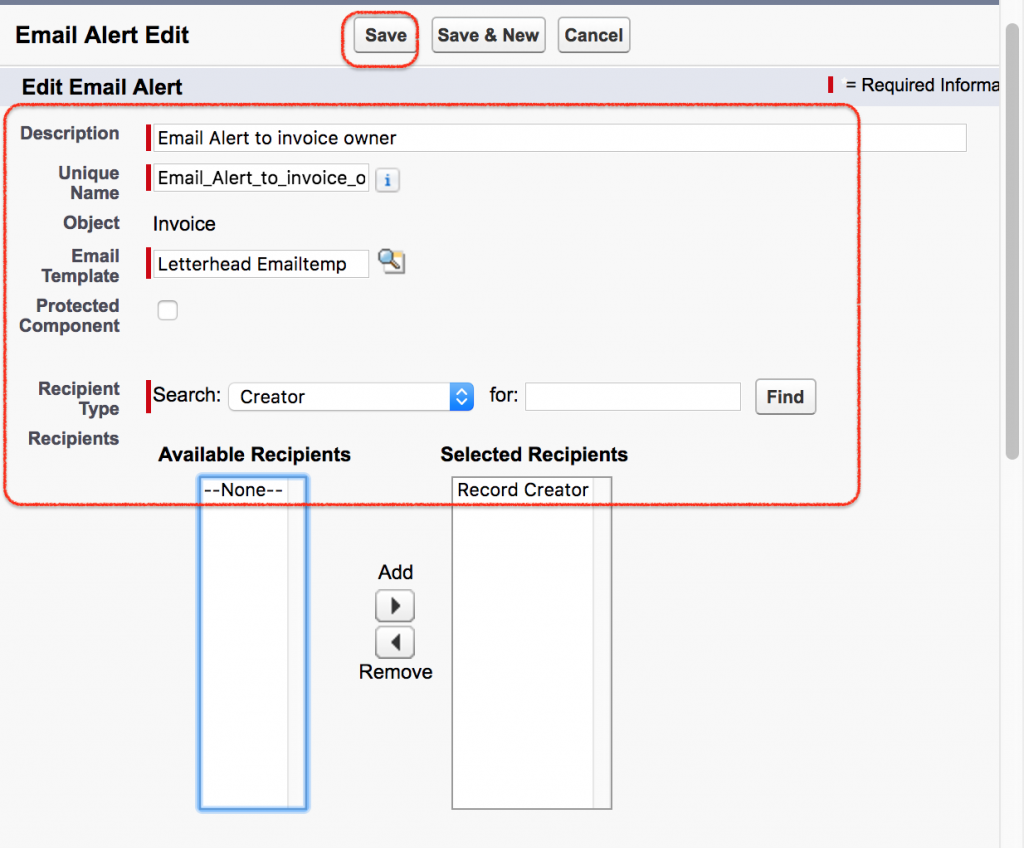
- Click on Email alert.
- Enter description and select Email Template.
- Select recipient types like Users, Role, Roles and Subordinates, Owner and so on. Here we are sending email to creator.
- Click on Save button.
- Now we have successfully created email alert using Salesforce workflow rule actions.
An email alert needs a saved email template and one or more recipients. Before testing the rule, make sure the selected user or record owner has a valid email address and that the email template contains the correct merge fields for the Invoice object.
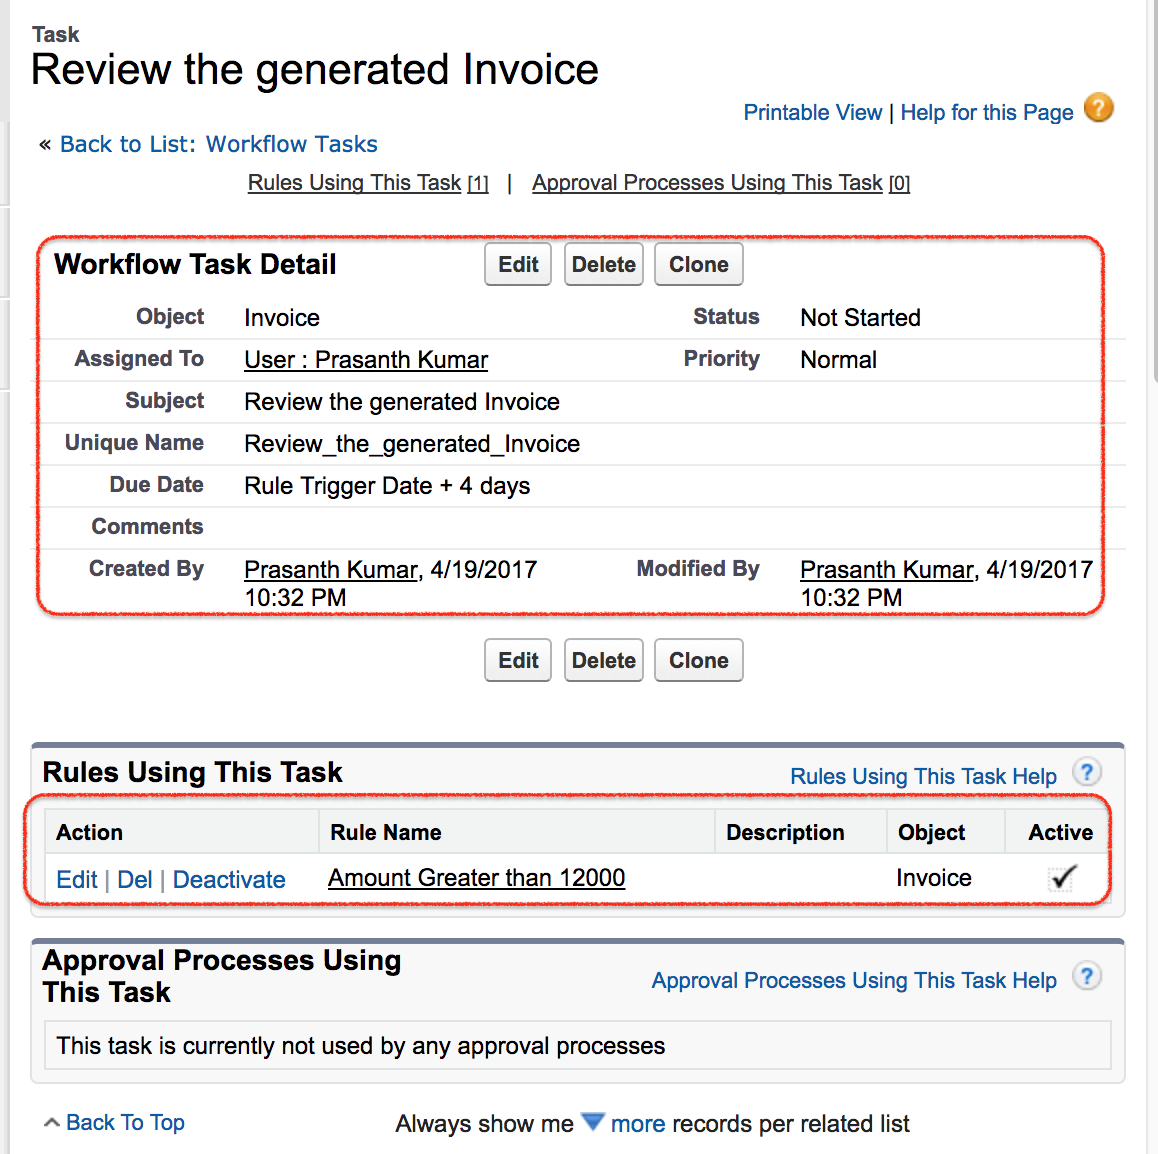
Create a Salesforce task action for invoice review
We dont have an option called ‘Task’ in workflow actions. Why dont we have option called Task. By default task is available for Standard Object. Here we are working on Invoice Object which is custom object. To add task to Invoice Object, go to Invoice object definition page and click on Edit.
- Enable Track activities and save it.
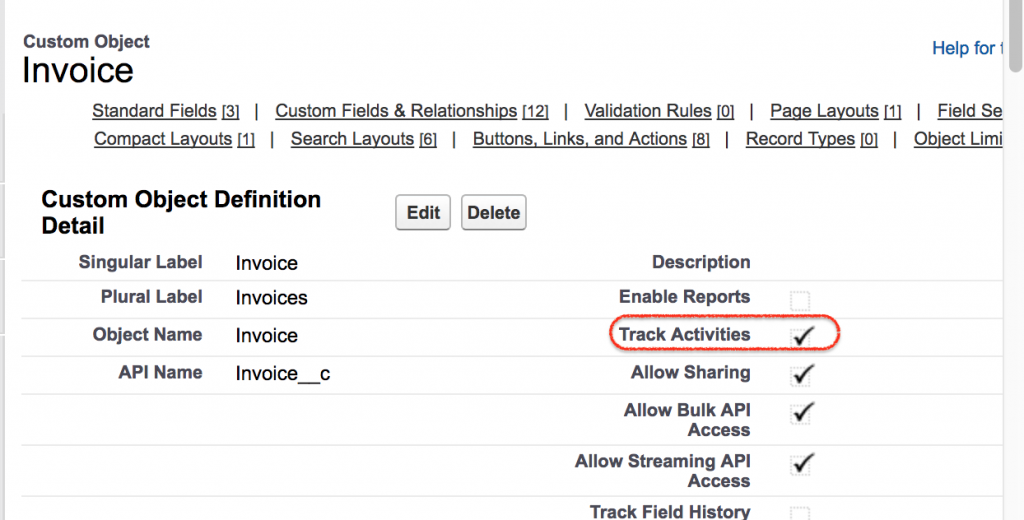
If the Task option is not visible for a custom object, verify that activities are enabled for that object. Once activities are enabled, Salesforce can associate tasks with records of that object.
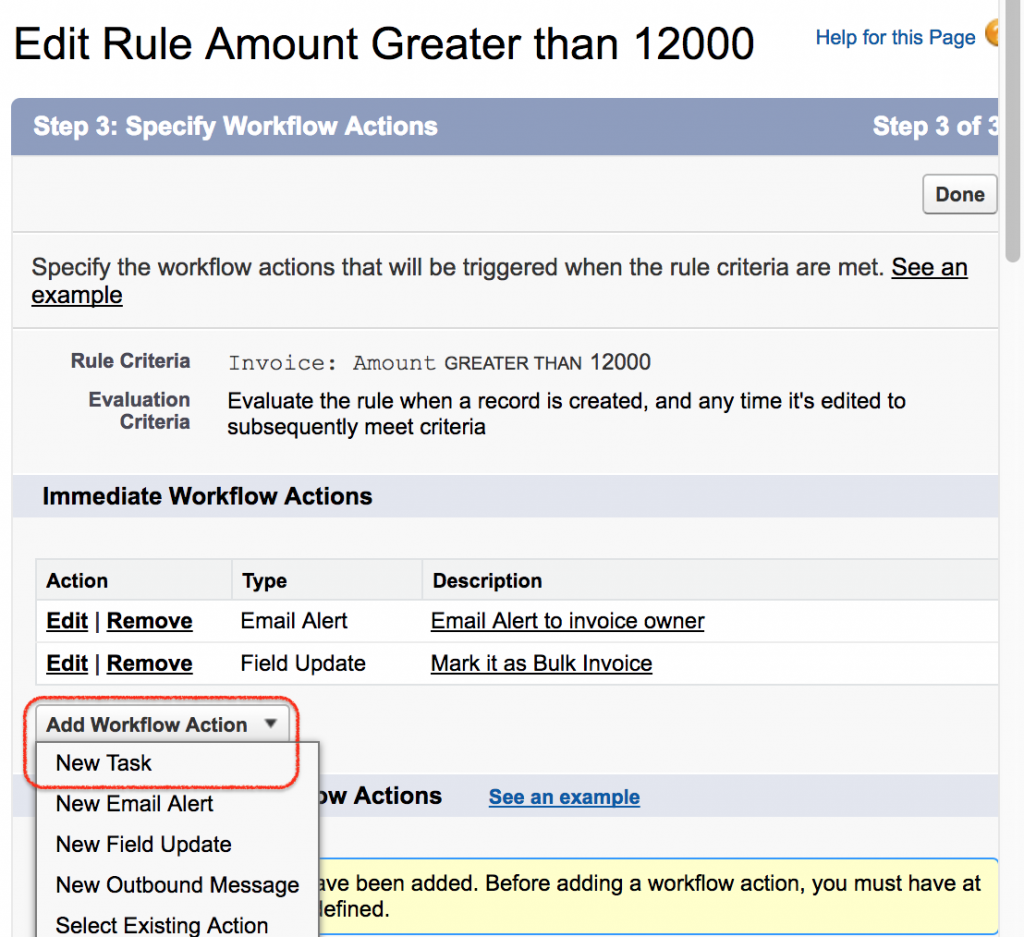
Add a new task workflow action and assign it to a Salesforce user
- Select New task as below.
In this workflow action we have to select the user to which this task is to be assigned.
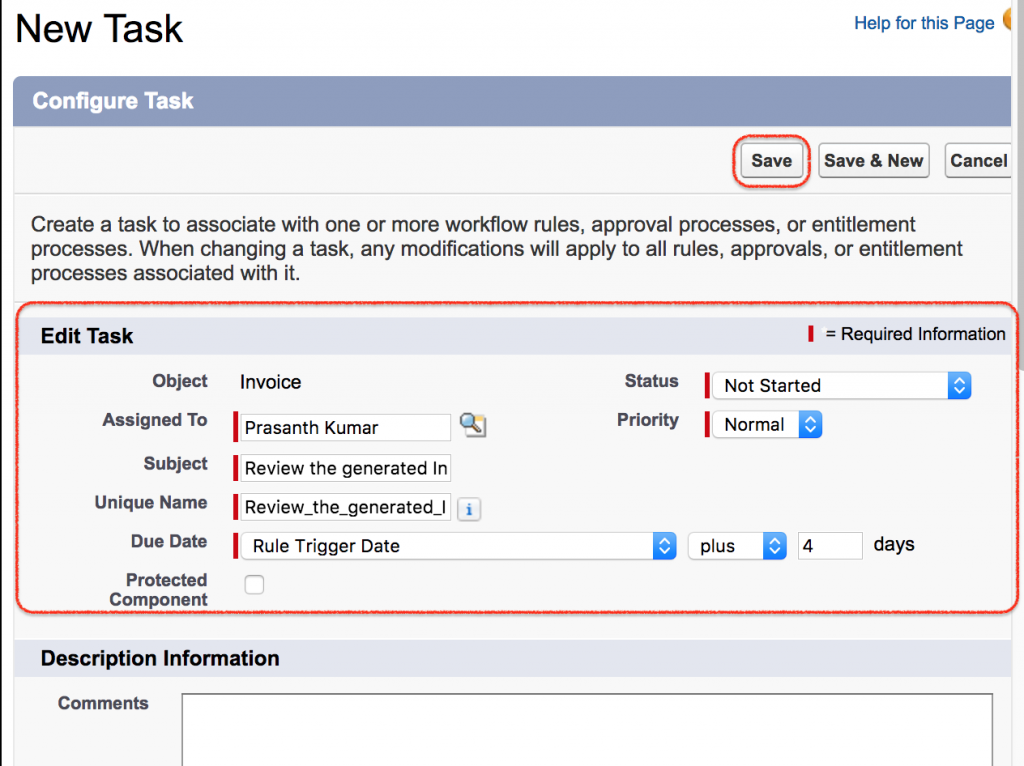
- Select the user.
- Enter Subject name.
- Select due date as shown above.
- Status is not started and priority is normal.
- Click on Save button.
Use a clear task subject, such as Review the generated Invoice. The task subject should tell the assigned user what to do without opening the record first.
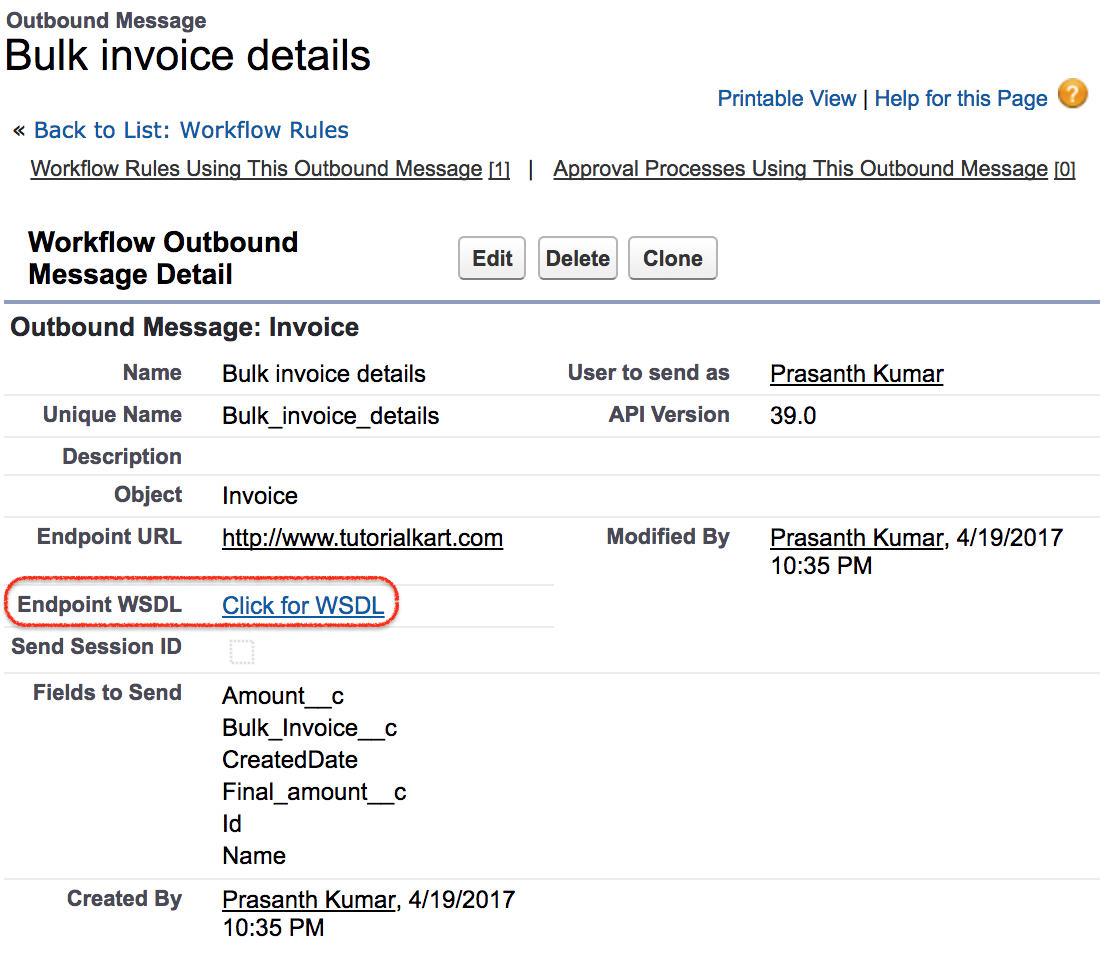
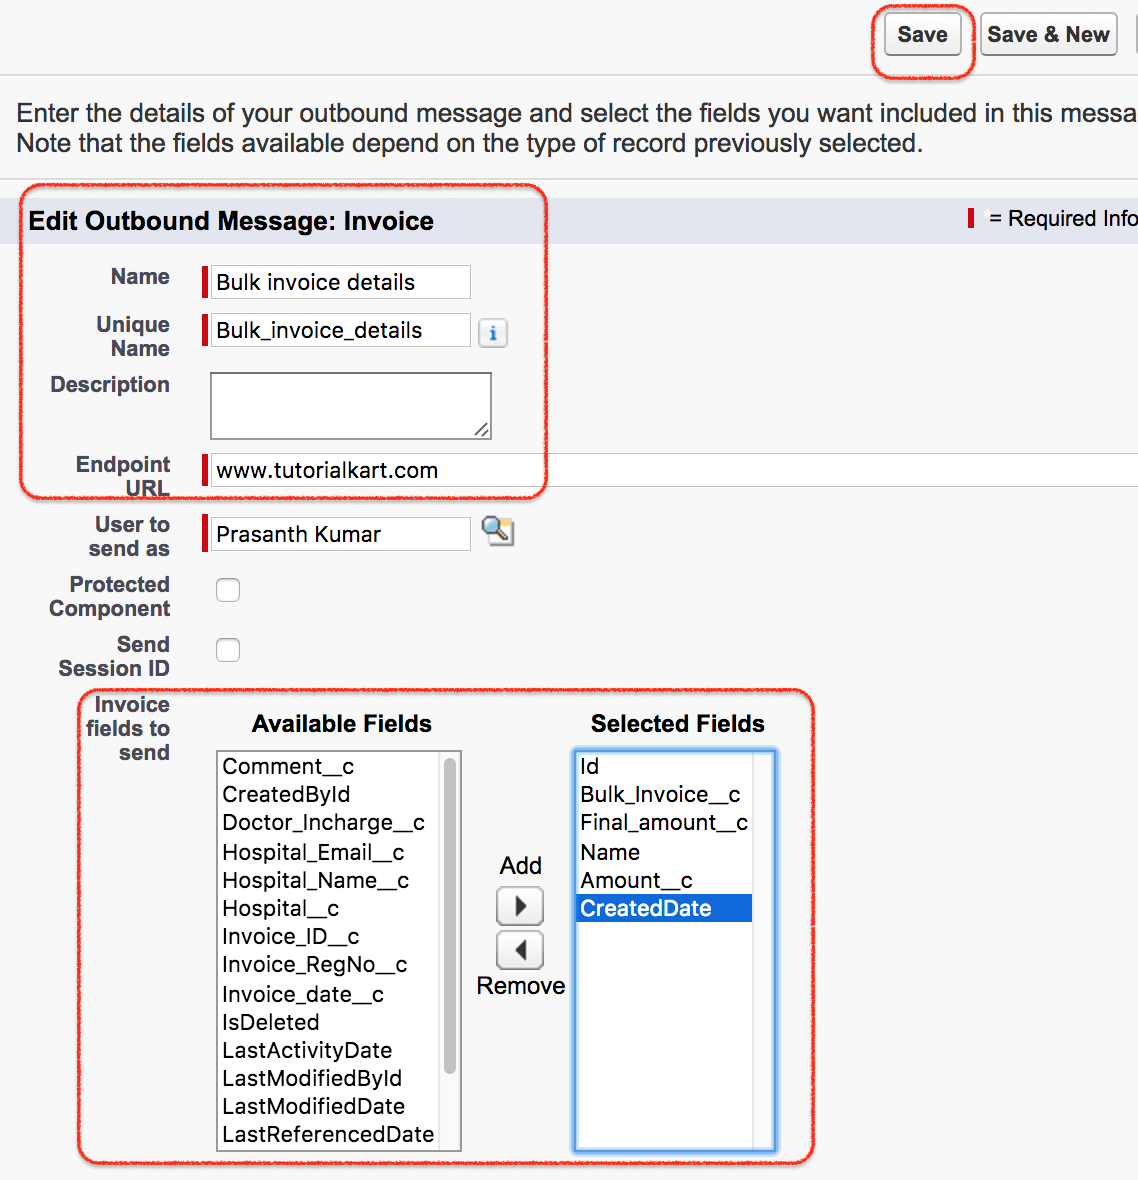
Create a Salesforce outbound message workflow action
What is an Outbound Message in Salesforce?
Outbound messages are SOAP(Simple Object Access protocol) transactions that are sent to external systems which are integrated to our Salesforce application.
How to can we send Outbound message in Salesforce?
- Select New Outbound Message in workflow rule action.

- Enter all the details required to send Outbound message in salesforce.com.
- End endpoint URL.
- Select the user to send.
- Select Invoice fields to send from available fields to selected fields.
- Finally click on Save button.
An outbound message should be used only when an external system is ready to receive and process the SOAP message. Select only the fields required by the external system, because unnecessary fields make the integration harder to maintain.
Successfully we have all Workflow action in Salesforce.com and we will check the WSDL for the Outbound message.
Activate the Salesforce Workflow Rule After Adding All Workflow Actions
Without activating workflow we can not work on Workflows in Salesforce. Go to workflows and activate the workflow rule.
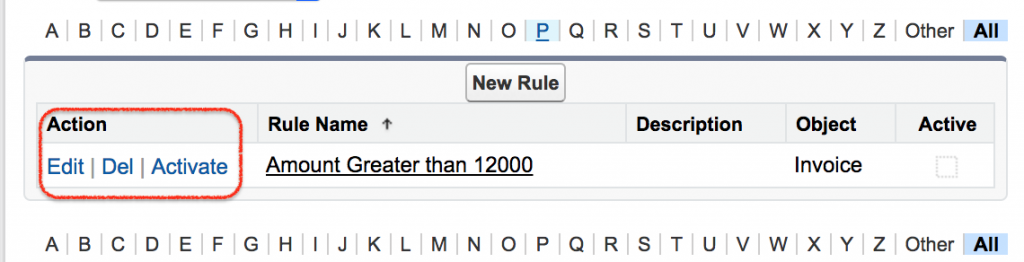
- Click on Activate.
Activate the workflow rule only after checking the rule criteria and every workflow action. A small mistake in the criteria can send emails, create tasks, or update fields for the wrong records.
Test the Salesforce Workflow Actions with a New Invoice Record
Checking Salesforce Workflow Rule Output.
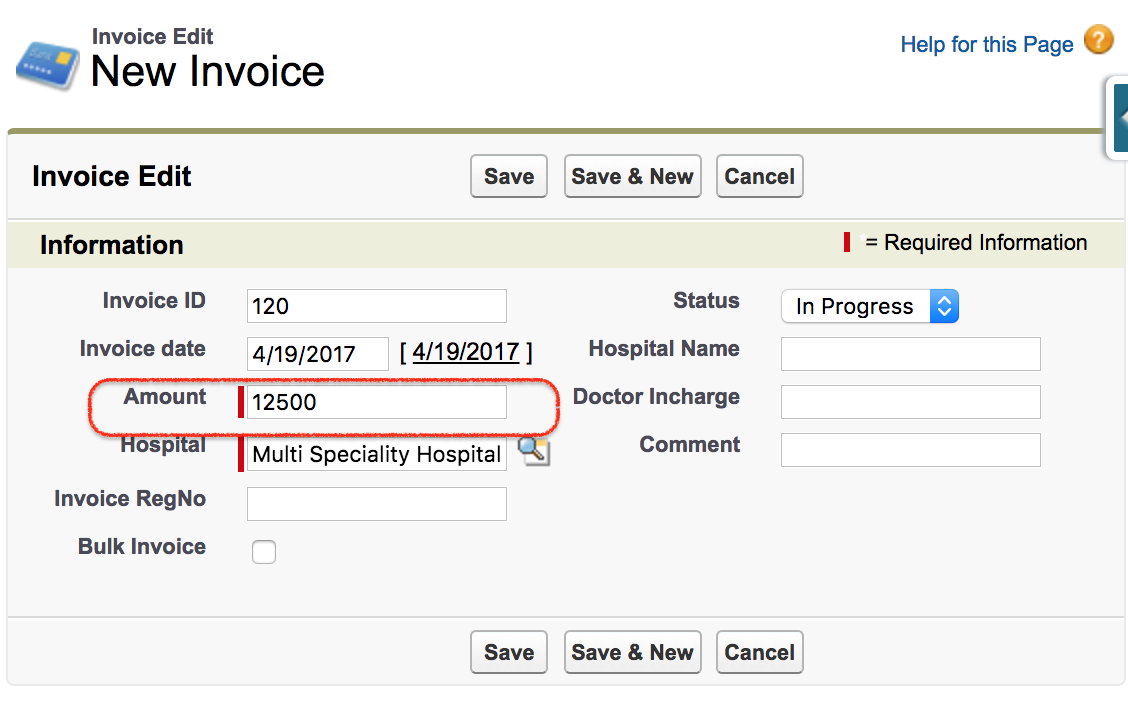
Go to Invoice Object and create a new record where invoice amount in greater than 12000.
- Click on Invoices as shown above.
- Click on New to create new record.
- Enter Invoice amount greater than 12000.
- Enter all the details like Hospital name, Status.
- Finally click on Save button.
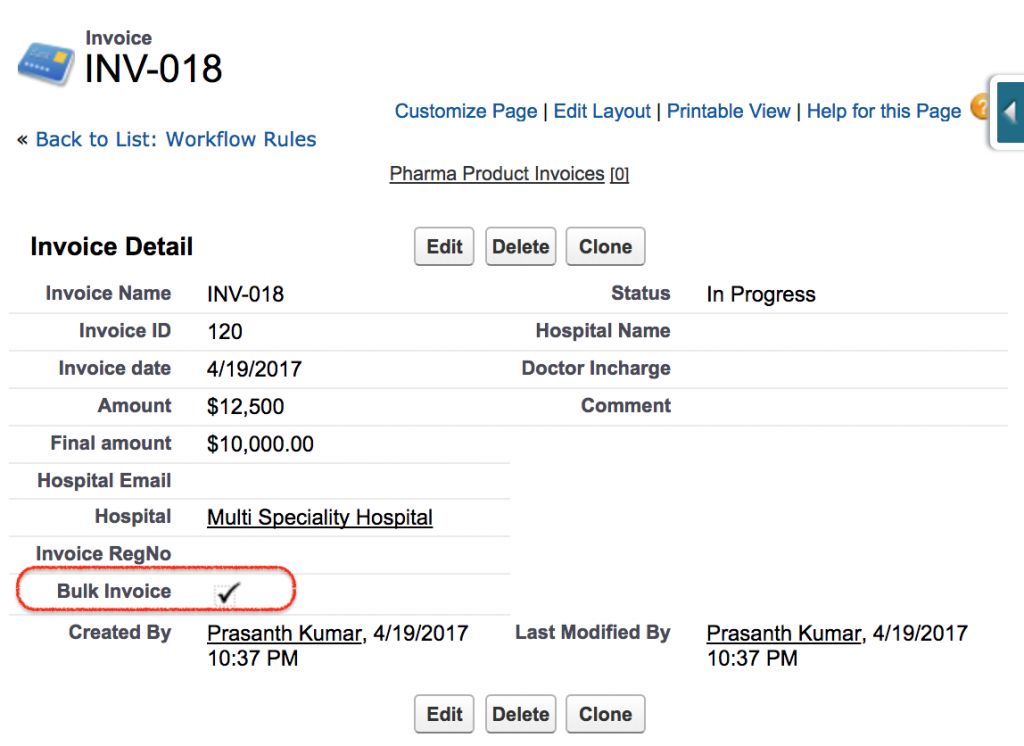
As shown above Bulk Invoice checkbox is checked automatically because the invoice amount is greater than 12000.
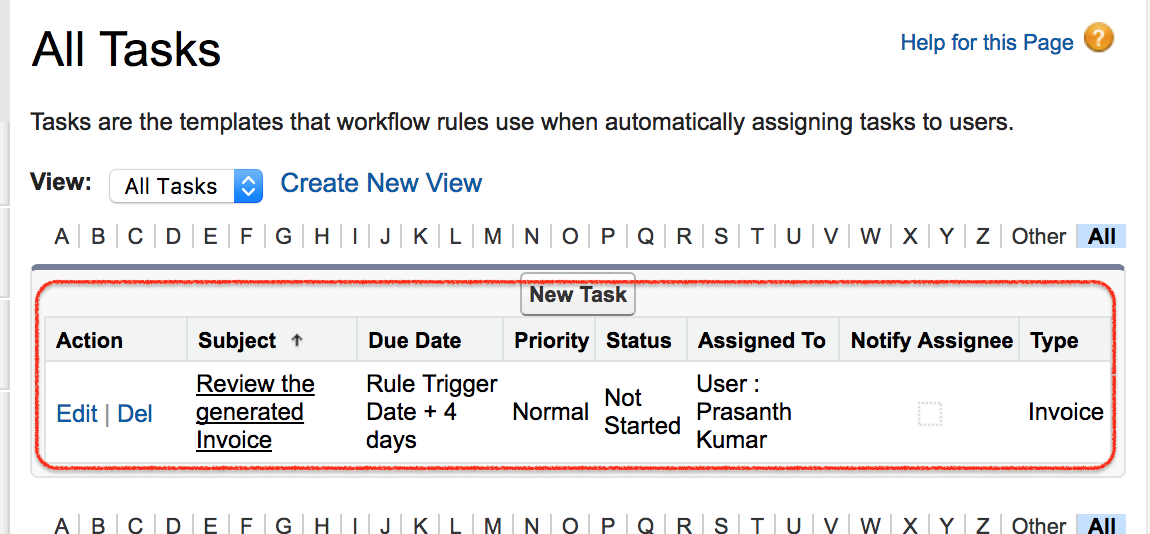
Login into Salesforce as the task assigned user. Now go to Build | Create | Workflow & Approvals | Tasks.
Salesforce Workflow Actions Troubleshooting Checklist
If the workflow rule does not create the expected field update, email alert, task, or outbound message, check the following items before changing the rule.
- Workflow rule is active: An inactive workflow rule will not run even if the record matches the criteria.
- Criteria matches the record: Confirm that the Invoice Amount value is actually greater than 12000 and not blank.
- Evaluation criteria is correct: If the record was edited later, choose an evaluation option that supports edited records.
- Email template is selected: Email alerts need a valid template and valid recipients.
- Activities are enabled: Task actions on a custom object require activity tracking to be enabled for that object.
- Outbound endpoint is ready: The external endpoint must be available and able to process the SOAP outbound message.
Best Practices for Salesforce Workflow Email Alerts, Tasks and Field Updates
- Use a rule name that explains the condition, such as Invoice Amount greater than 12000.
- Keep email alert recipients limited to users who need the notification.
- Use task subjects that clearly describe the action required from the assigned user.
- Test with one record that meets the criteria and one record that does not meet the criteria.
- Document the business reason for every workflow action so future admins can maintain the automation safely.
- Review whether a newer automation tool such as Flow Builder is more suitable when designing new automation.
Salesforce Workflow Actions FAQ
What are the four main workflow actions in Salesforce Workflow Rules?
The four common workflow actions are email alert, field update, task, and outbound message. In this tutorial, all four are added to an Invoice workflow rule.
Why is the Task option not showing for my Salesforce custom object workflow?
For a custom object, the Task option may not appear until activities are enabled for that object. Edit the custom object definition and enable activity tracking before creating the task action.
Can a Salesforce workflow field update change a checkbox field?
Yes. A workflow field update can set a checkbox field to True or False. In this invoice example, the Bulk Invoice checkbox is set to True when Invoice Amount is greater than 12000.
What does an outbound message do in a Salesforce workflow rule?
An outbound message sends selected record field values to an external system through a SOAP message. It is useful when another application must receive data after a Salesforce record meets workflow criteria.
Should I use Workflow Rules or Flow Builder for new Salesforce automation?
For many new Salesforce automation requirements, Flow Builder is the preferred tool. Workflow Rules are still useful to understand when maintaining older Salesforce orgs that already contain workflow rules and workflow actions.
Salesforce Workflow Actions Editorial QA Checklist
- The example condition is consistently written as Invoice Amount > 12000.
- The tutorial explains all four workflow actions: email alert, field update, task, and outbound message.
- The custom object task limitation is explained before the task creation steps.
- The field update example clearly states that the Bulk Invoice checkbox is set to True.
- The testing section verifies both the record update and the assigned task output.
- The article does not present Workflow Rules as the only current Salesforce automation option.
Conclusion
In this Salesforce.com Training we have learned about How to create Salesforce Workflow rules and how to create new Salesforce Workflow rule actions and how to check workflow rules and Workflow actions. In our upcoming Salesforce tutorial we are going to learn about Approval Process and configuring multiple steps and multiple approvers to the approval process in Salesforce.com.