Salesforce Data Import Wizard for Insert, Update, and Upsert
Salesforce Data Import Wizard is a browser-based Data Management tool used in SFDC to load smaller CSV files without installing a desktop application. In this Salesforce Tutorial, we will learn what the Salesforce Data Import Wizard does, when to use it, how to prepare a CSV file, and how to insert, update, and upsert a record using Data Import Wizard Salesforce.
The Data Import Wizard is useful when an admin or trained user wants a guided import for supported standard objects and custom objects. It is not a replacement for every bulk data task, but it is a simple option for common imports such as leads, accounts, contacts, campaign members, person accounts, and custom object records.
What Salesforce Data Import Wizard Does
Salesforce Data Import Wizard is one of the Data Management tool options available in Salesforce. It helps you upload a CSV file, choose the target Salesforce object, select an import action, map CSV columns to Salesforce fields, and review the import result.
Salesforce states that the Data Import Wizard can import up to 50,000 records at a time. For larger files, unsupported objects, exports, deletes, or automated command-line jobs, use Salesforce Data Loader instead.
Salesforce Data Import Wizard Limits and Supported Objects
Before you start an import, check whether the wizard supports the object and data volume. The wizard supports common objects such as accounts, contacts, leads, solutions, campaign members, person accounts, and custom objects. The exact options visible in your org depend on your edition, permissions, object settings, and enabled Salesforce features.
| Data import requirement | Use Salesforce Data Import Wizard when | Use Salesforce Data Loader when |
|---|---|---|
| Number of records | You need to import up to 50,000 records in a guided UI. | You need to process more records or repeat large jobs. |
| Objects | The object is supported by the wizard, such as Leads or a custom object. | The object is not available in the wizard. |
| Operations | You need insert, update, or add-and-update behavior. | You need export, delete, hard delete, or more advanced bulk operations. |
| User experience | You want field mapping and review steps in Setup. | You are comfortable using a desktop client or command-line process. |
For official reference, see Salesforce Help for the Data Import Wizard, Salesforce Help for import limits, and Salesforce Developer documentation for inserting, updating, upserting, or deleting data using Data Loader.
Insert, Update, and Upsert Options in Salesforce Data Import Wizard
When you choose an object in the wizard, Salesforce asks what you want to do with the rows in your CSV file. The wording can vary slightly by object, but the intent is usually one of these three actions.
| Wizard action | Meaning | CSV requirement |
|---|---|---|
| Add new records | Creates new Salesforce records from CSV rows. | Include all required fields for the object, such as Last Name and Company for a basic Lead import. |
| Update existing records | Changes existing records that Salesforce can match. | Include the Salesforce record ID or another matching field supported in the wizard. |
| Add new and update existing records | Updates matching records and creates records when no match is found. | Use a reliable match field or external ID so that Salesforce can identify existing records correctly. |
For upsert-style imports, spend time choosing the match field. If the match field is not unique, Salesforce can create duplicates or fail rows depending on duplicate rules and matching rules in the org. If related records are involved, confirm the lookup or master-detail relationship behavior before running the job.
Steps to Use Salesforce Data Import Wizard Safely
Before importing or updating Salesforce records, follow a controlled process. Do not upload a file directly into production until the CSV format, matching logic, required fields, and validation behavior are reviewed.
- Prepare the CSV data file with clean headers and one row per Salesforce record.
- Confirm required fields, picklist values, lookup values, ownership, validation rules, field-level security, and data type formats.
- Select the standard object or Custom objects option in the wizard.
- Select the activity to be performed: Insert, Update, or Upsert.
- Map the fields in the data file with the fields in the Salesforce object.
- Start the import and monitor the job status.
- Download the result file and rework the errored records if any rows fail.
Prepare the CSV File for Salesforce Data Import Wizard
The Data Import Wizard expects a comma-separated values file. You can prepare the data in a spreadsheet application and save or export it as CSV. While preparing the file, review mandatory fields, data types, date formats, email formats, picklist values, and duplicate values.
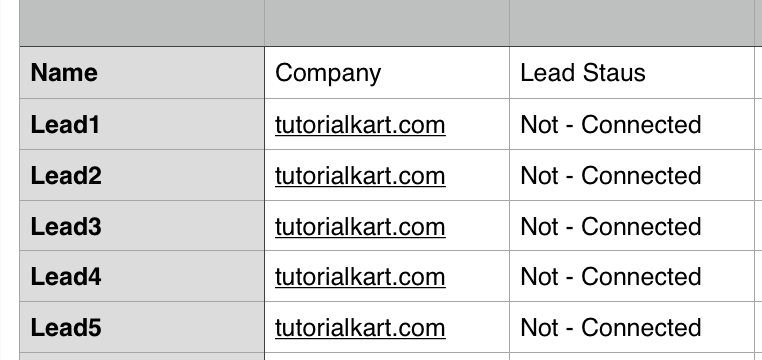
For example, a simple Lead insert file can start with a header row like this:
FirstName,LastName,Company,Email,LeadSource,Status
Asha,Rao,TutorialKart,asha.rao@example.com,Web,Open - Not Contacted
Vikram,Mehta,Example Pvt Ltd,vikram.mehta@example.com,Phone Inquiry,Open - Not Contacted
Use field names that are easy to map. Salesforce can automatically map many columns when the CSV header closely matches the Salesforce field label or API name, but you should still review every mapped field before starting the import.
- To create a data file in Microsoft Office, prepare the sheet in Excel and save it in .CSV format.
- If you are using Numbers on macOS, export the spreadsheet as CSV. For larger or repeated jobs, review Salesforce Data Loader as an alternative tool.
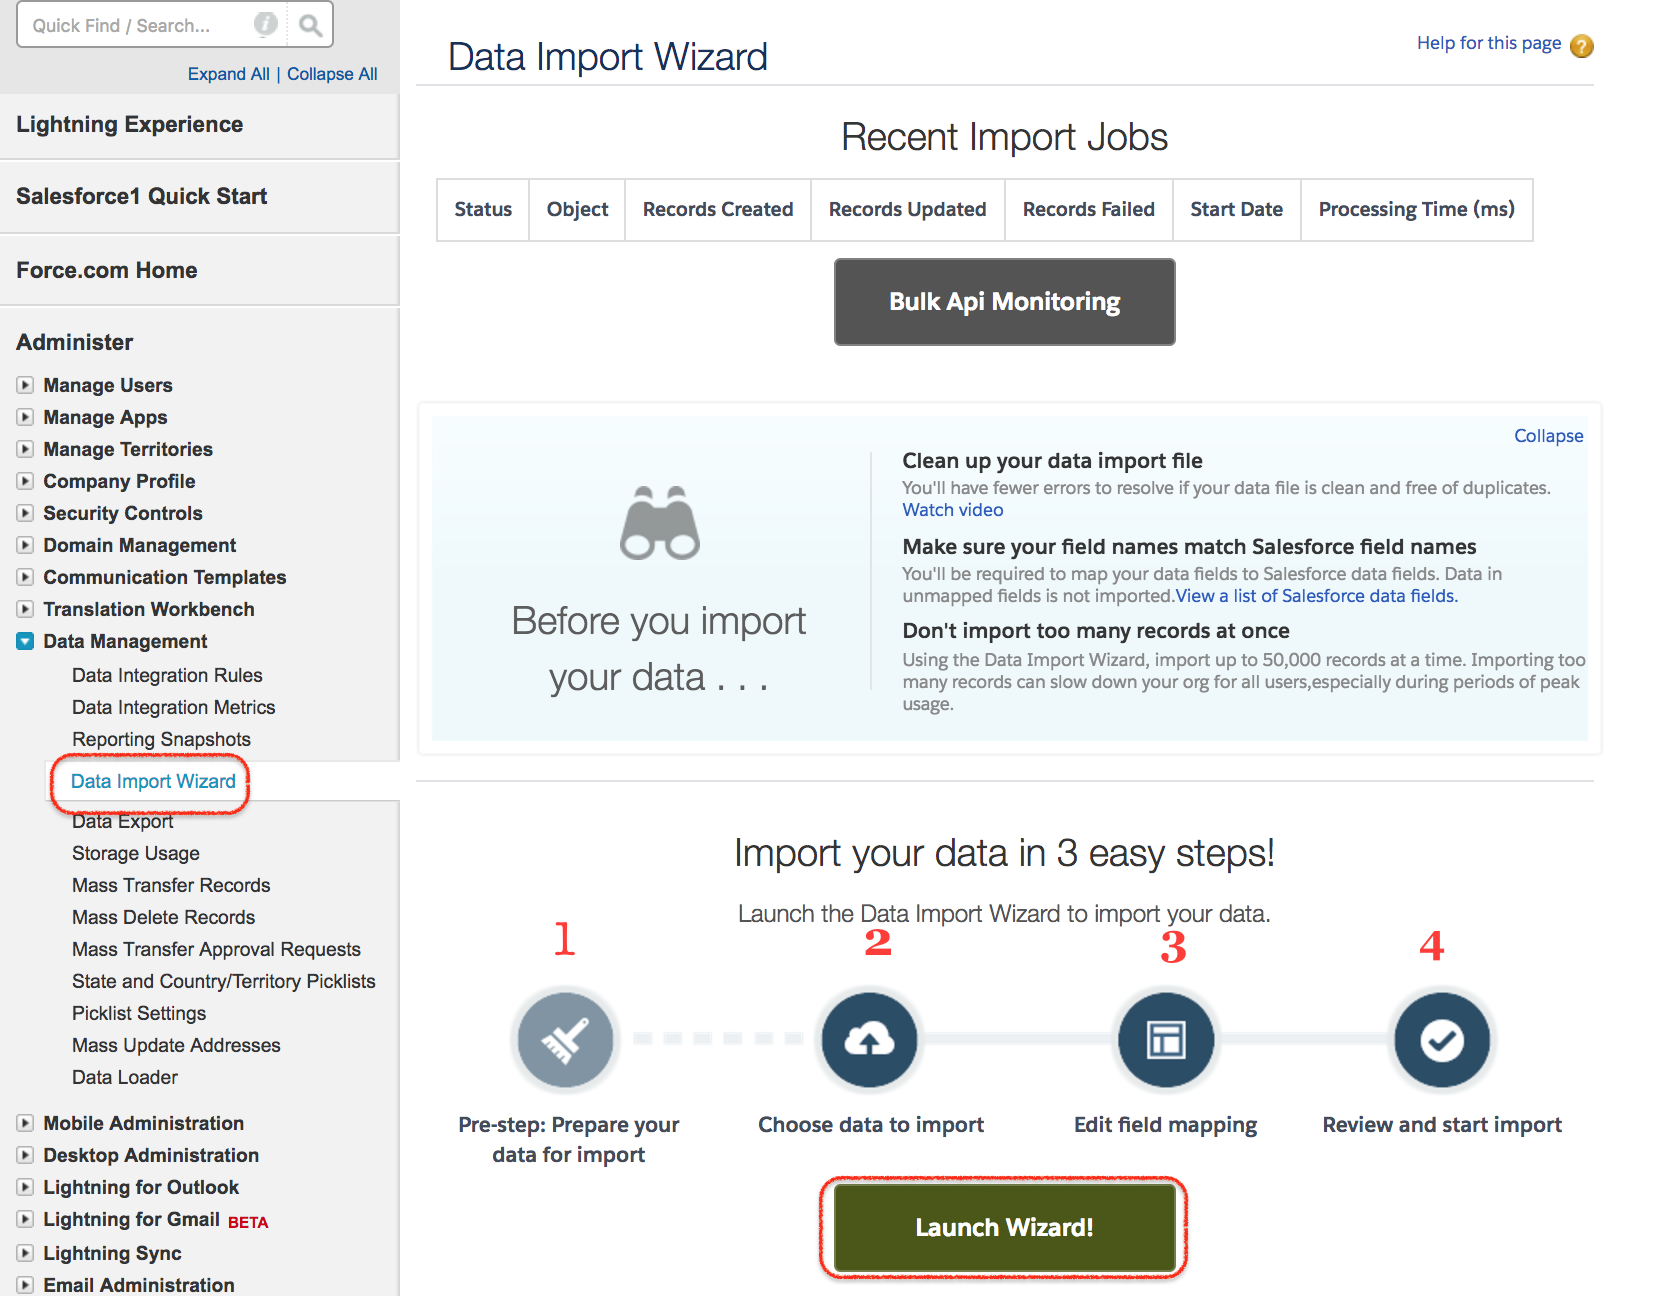
Launch Salesforce Data Import Wizard from Setup
To open the wizard in Lightning Experience, go to Setup, enter Data Import Wizard in the Quick Find box, and select Data Import Wizard. Then click Launch Wizard. In older Salesforce setup screens, the path may appear as Administer | Data Management | Data Import Wizard | Launch Wizard.
The screenshots in this tutorial show the same import flow: choose the data, map the fields, start the import, and review the job result. Your current Salesforce UI may look different, but the decisions are the same.
Choosing Lead Insert, Update, or Upsert in Data Import Wizard
Importing data using Data Import Wizard mainly involves three stages: choosing the data, mapping the fields, and checking the import result. In this example, we will insert Lead records from a CSV file.
- Add New Records – It inserts new records into the selected object.
- Update Existing Records – It updates existing records that Salesforce can match.
- Add New and Update Existing Records – It updates matching records and, if the record does not exist, creates a new record.
We can import data into Salesforce up to 50,000 records at a time using the Data Import Wizard. We can import supported standard objects and Custom Objects.
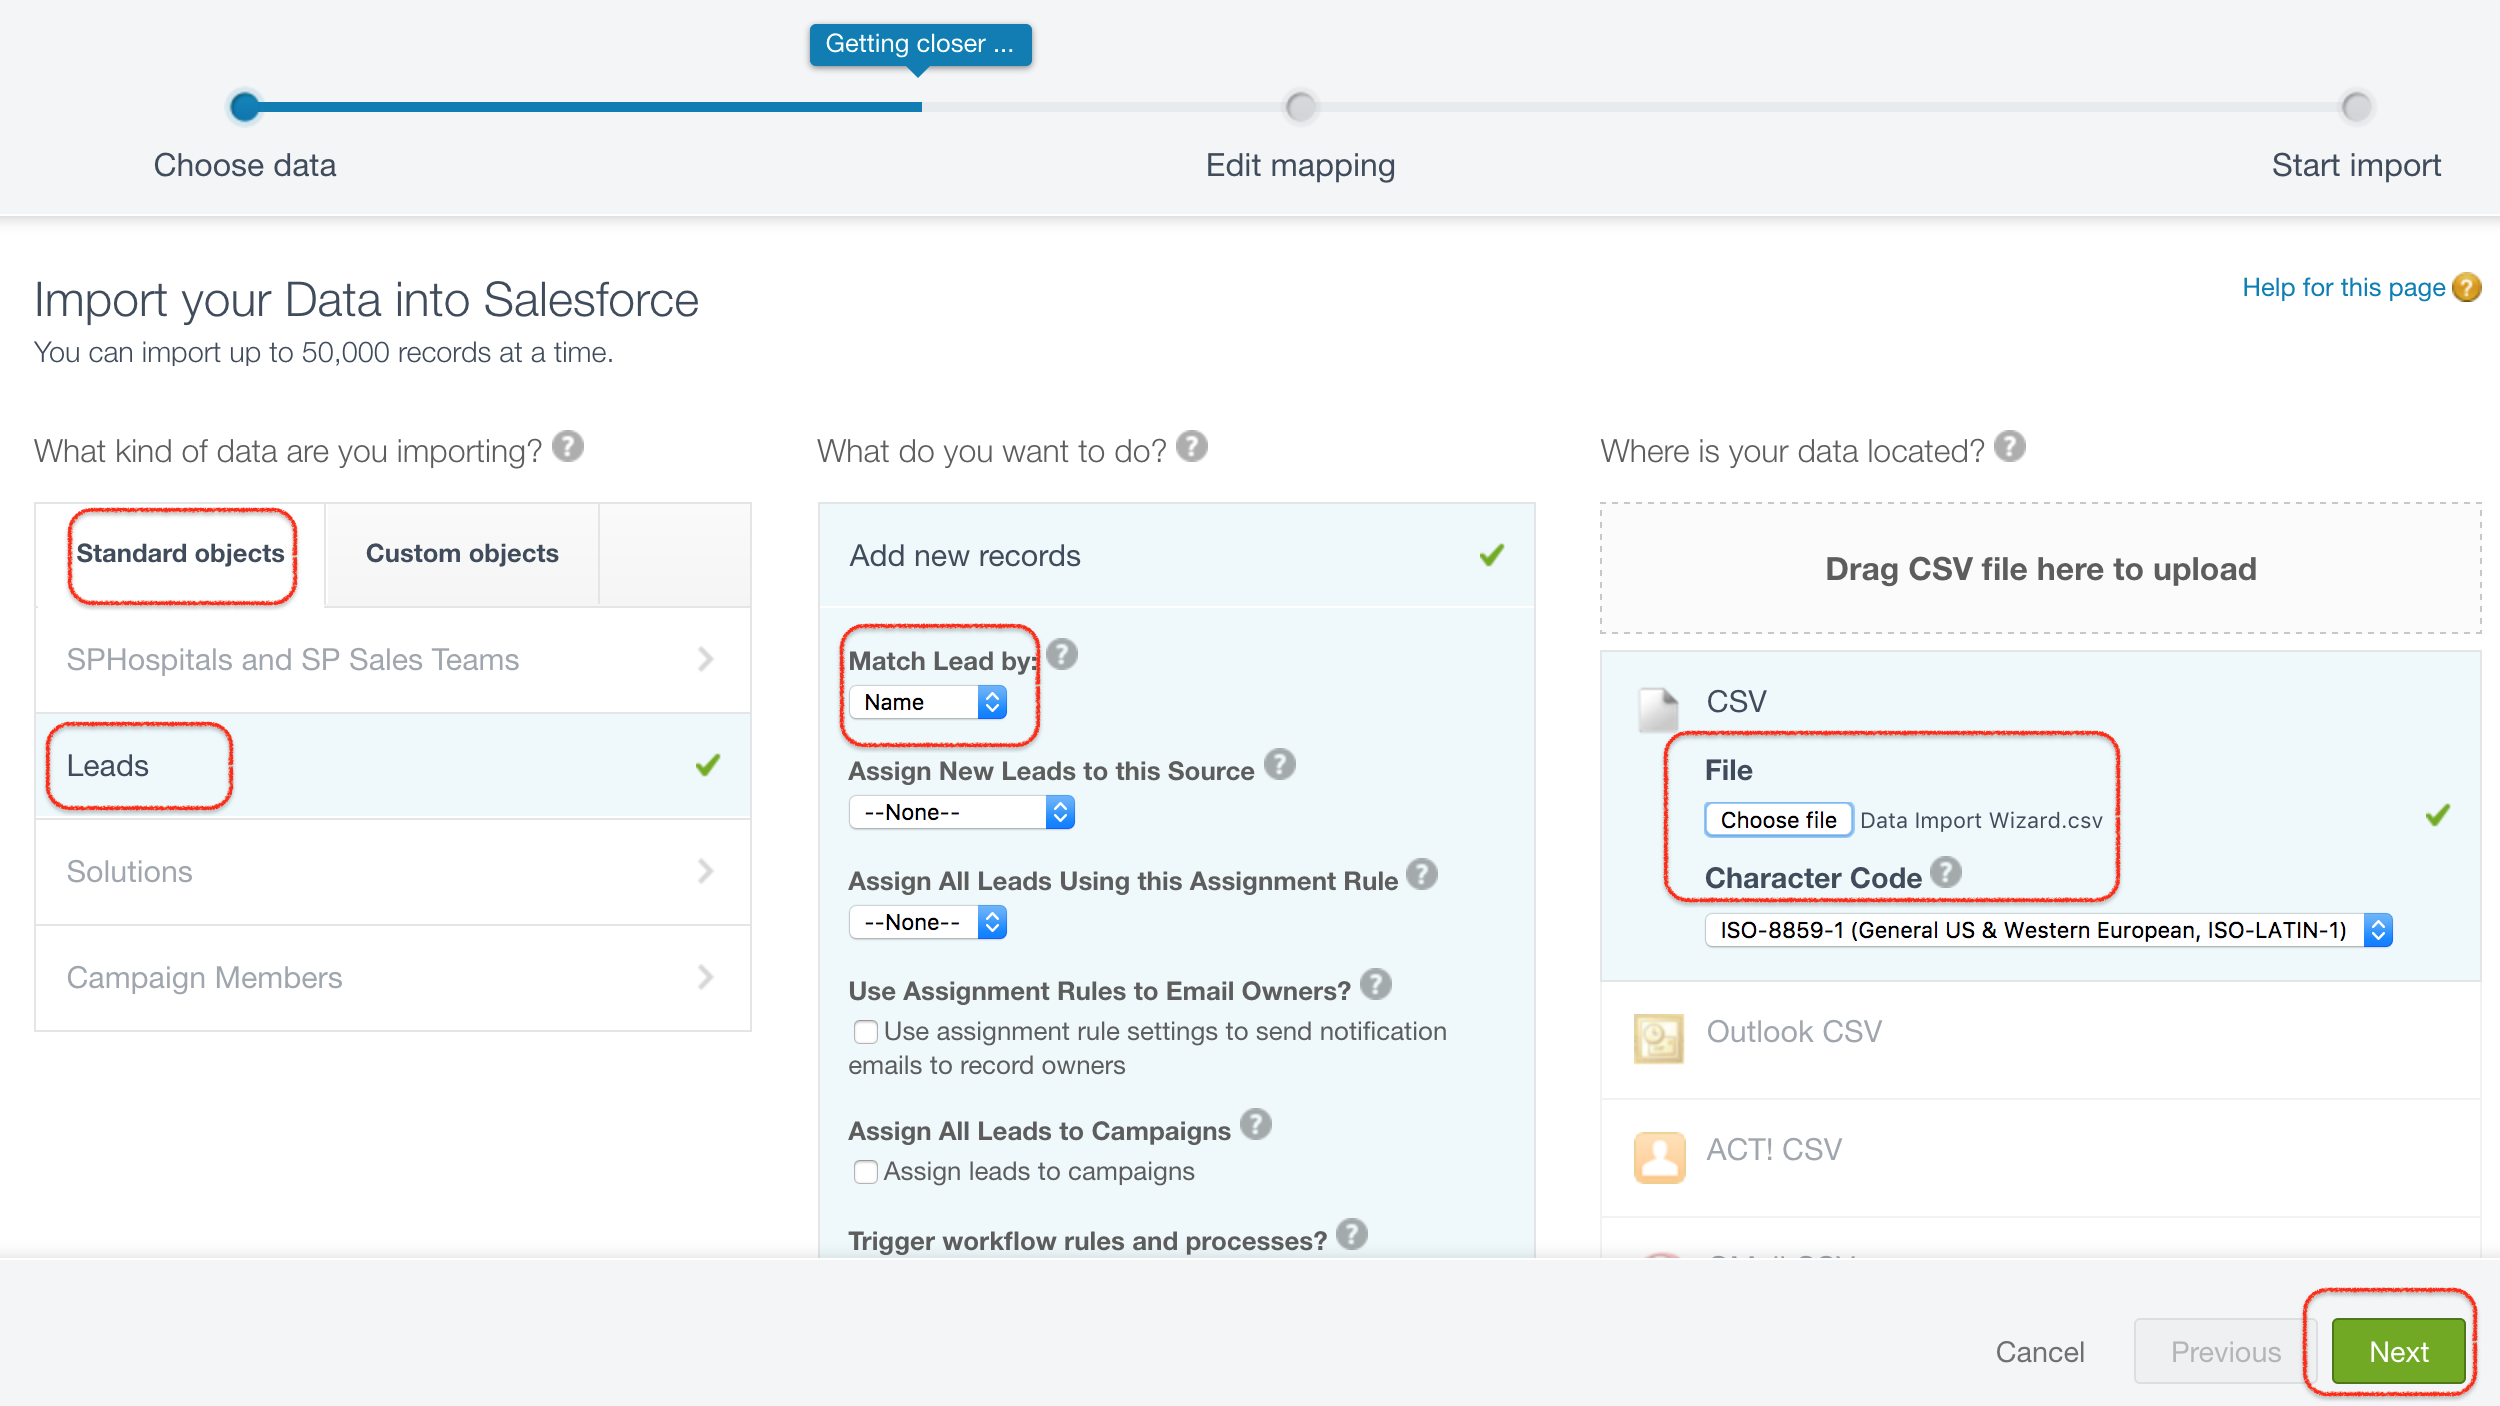
In this step, choose the activity to be performed. Here we are going to add new records to the Leads object. As we are working on the Leads object, click Standard Objects, then choose Leads. If you are working with a custom table-like object, choose the custom object option instead.
- Click on Leads.
- Click Add new records. If the screen asks how to match leads, choose the matching option that fits your data and duplicate policy.
- Upload the CSV file that we created earlier.
- Review the character encoding and CSV delimiter if Salesforce shows those options.
- Click the Next button.
Map CSV Columns to Salesforce Lead Fields
After uploading the CSV file to the Data Import Wizard, field mapping must be reviewed carefully. Salesforce will map the fields automatically when the CSV header is close to the Salesforce field name. If a field is not mapped or is mapped incorrectly, click Map and select the correct Salesforce field.

Do not start the import until the required columns are mapped. For a Lead insert, confirm fields such as Last Name, Company, Lead Status, Email, Lead Source, Owner, and any custom required fields used by your org. For update and upsert jobs, also confirm that the Salesforce ID, external ID, or selected match field is mapped correctly.
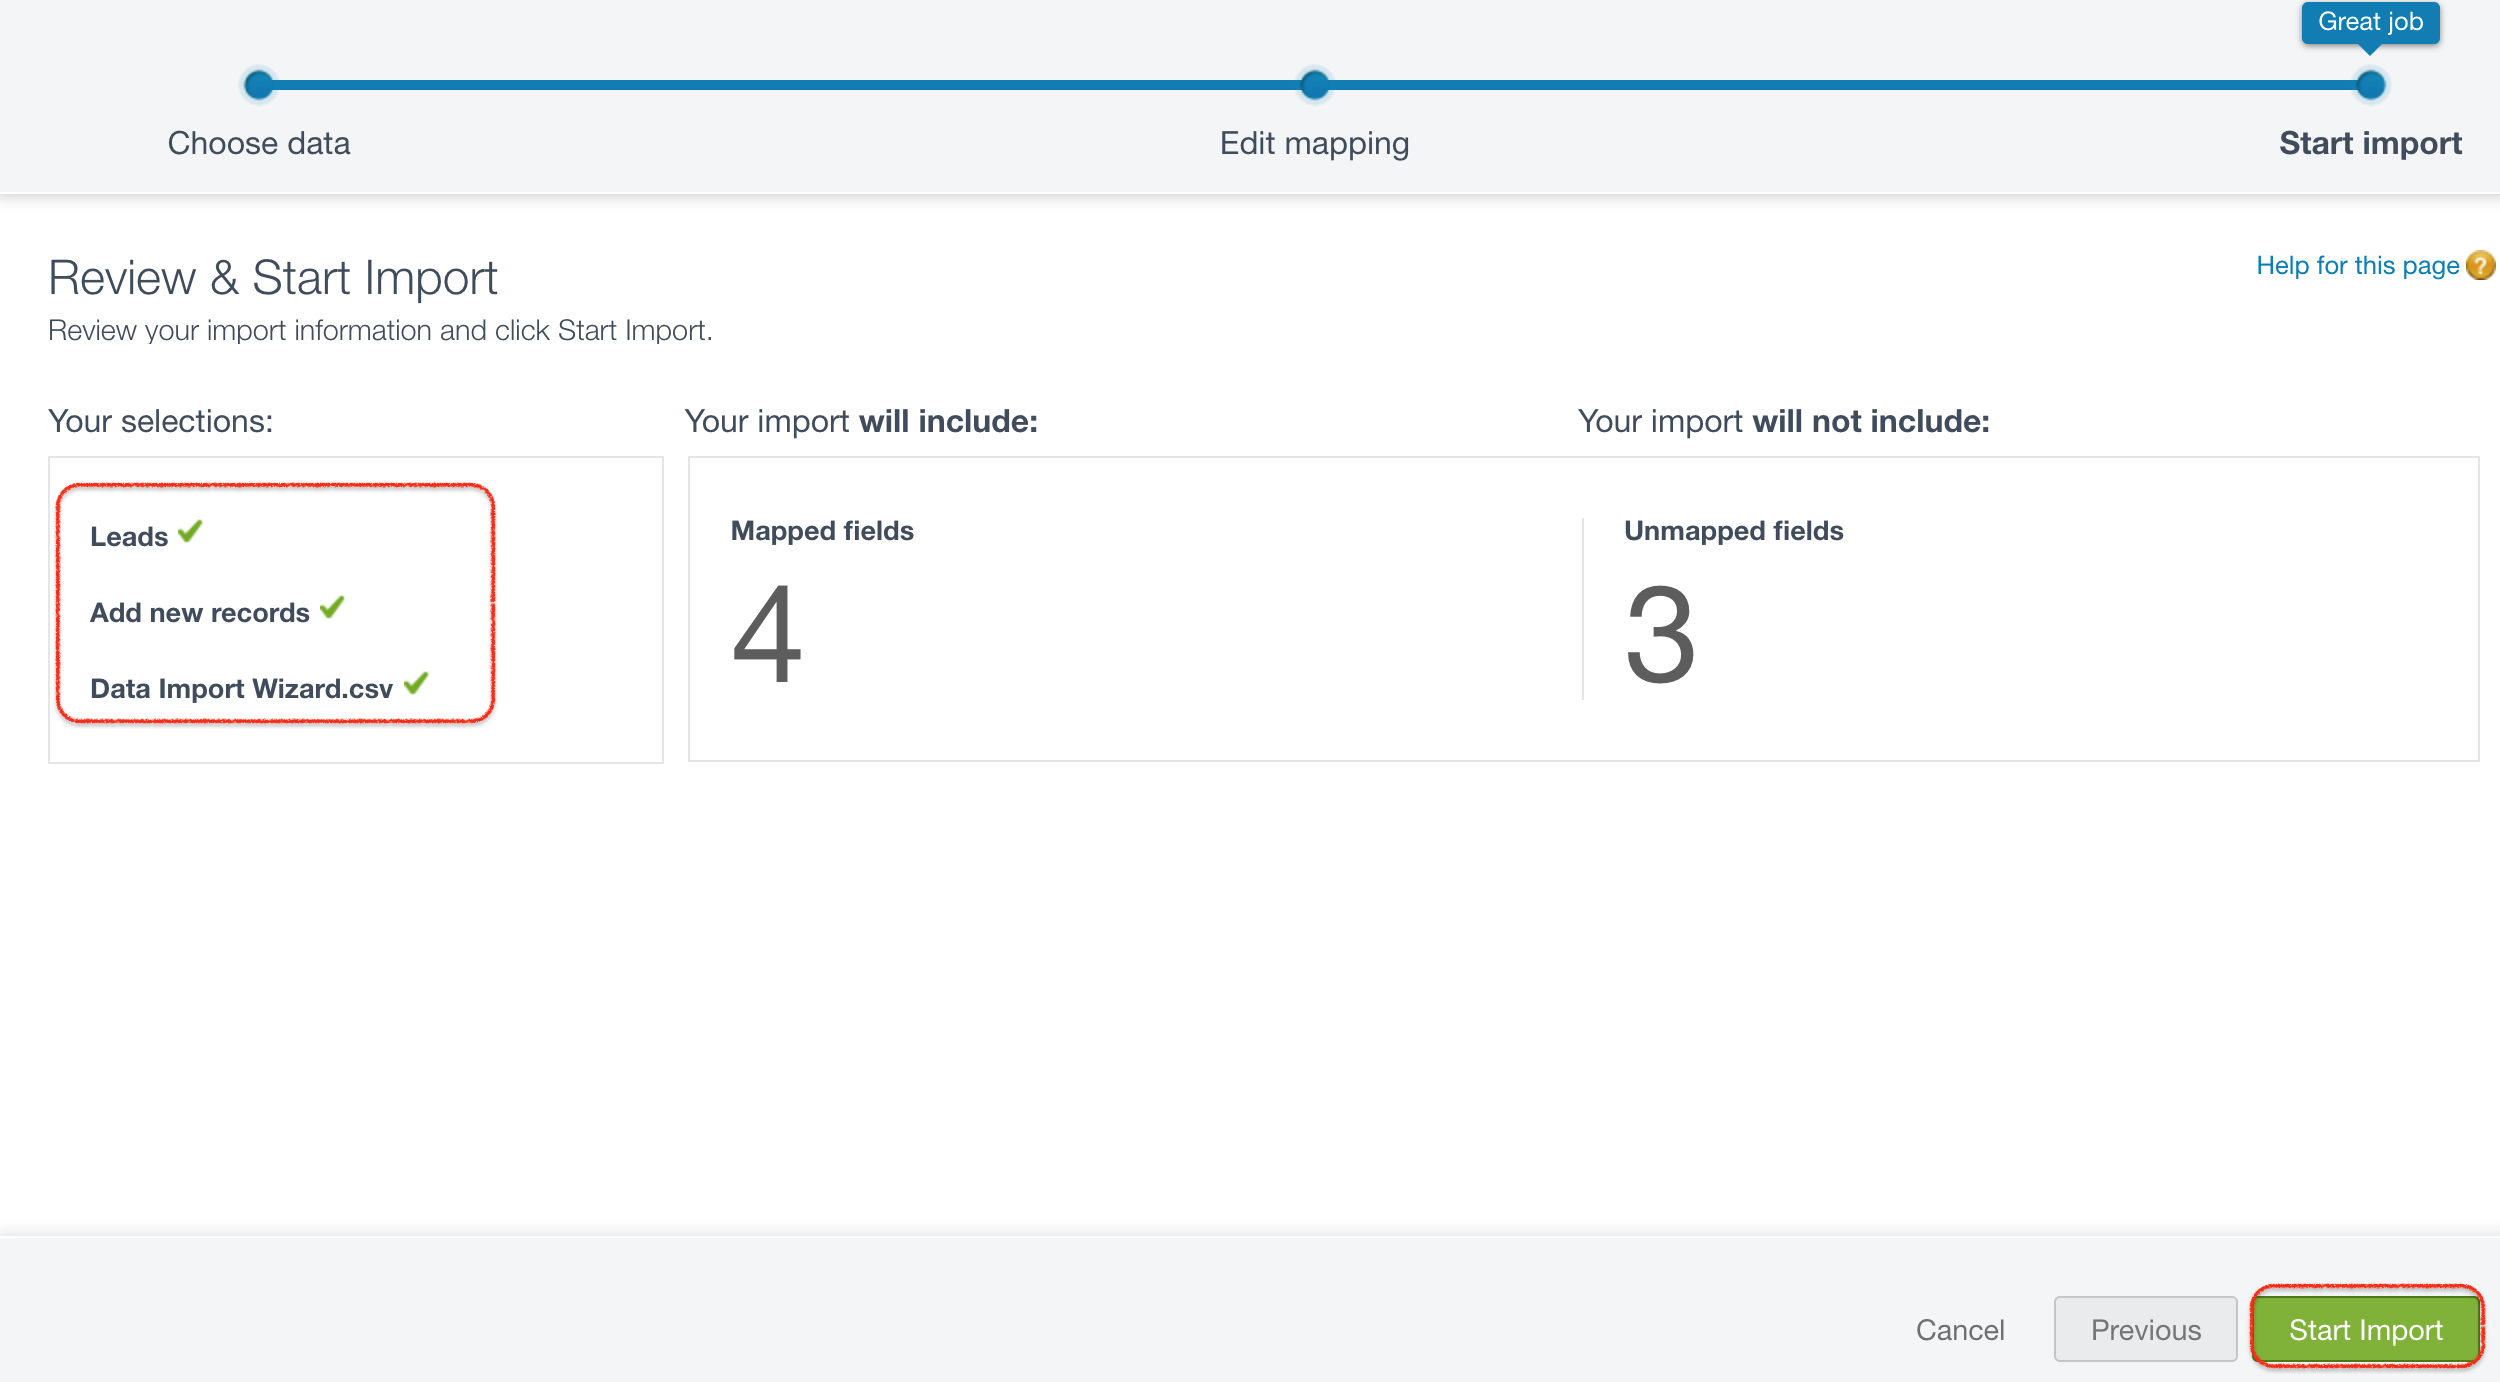
As shown above, four fields have been mapped. The review screen displays details such as the selected object, selected import function, CSV upload status, and field mapping status. Review these details, then click the Start Import button.
Start the Salesforce Import and Review the Bulk Data Load Job
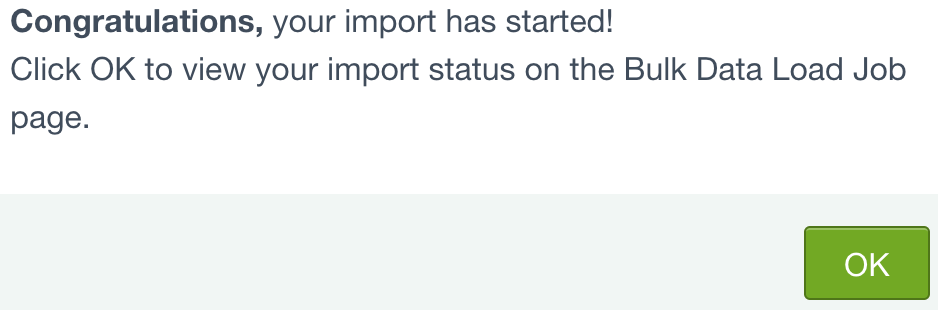
After the import starts, Salesforce creates a bulk data load job in the background. Click the OK button and then check the job details. A successful start message does not always mean every row succeeded, so always review the result file.
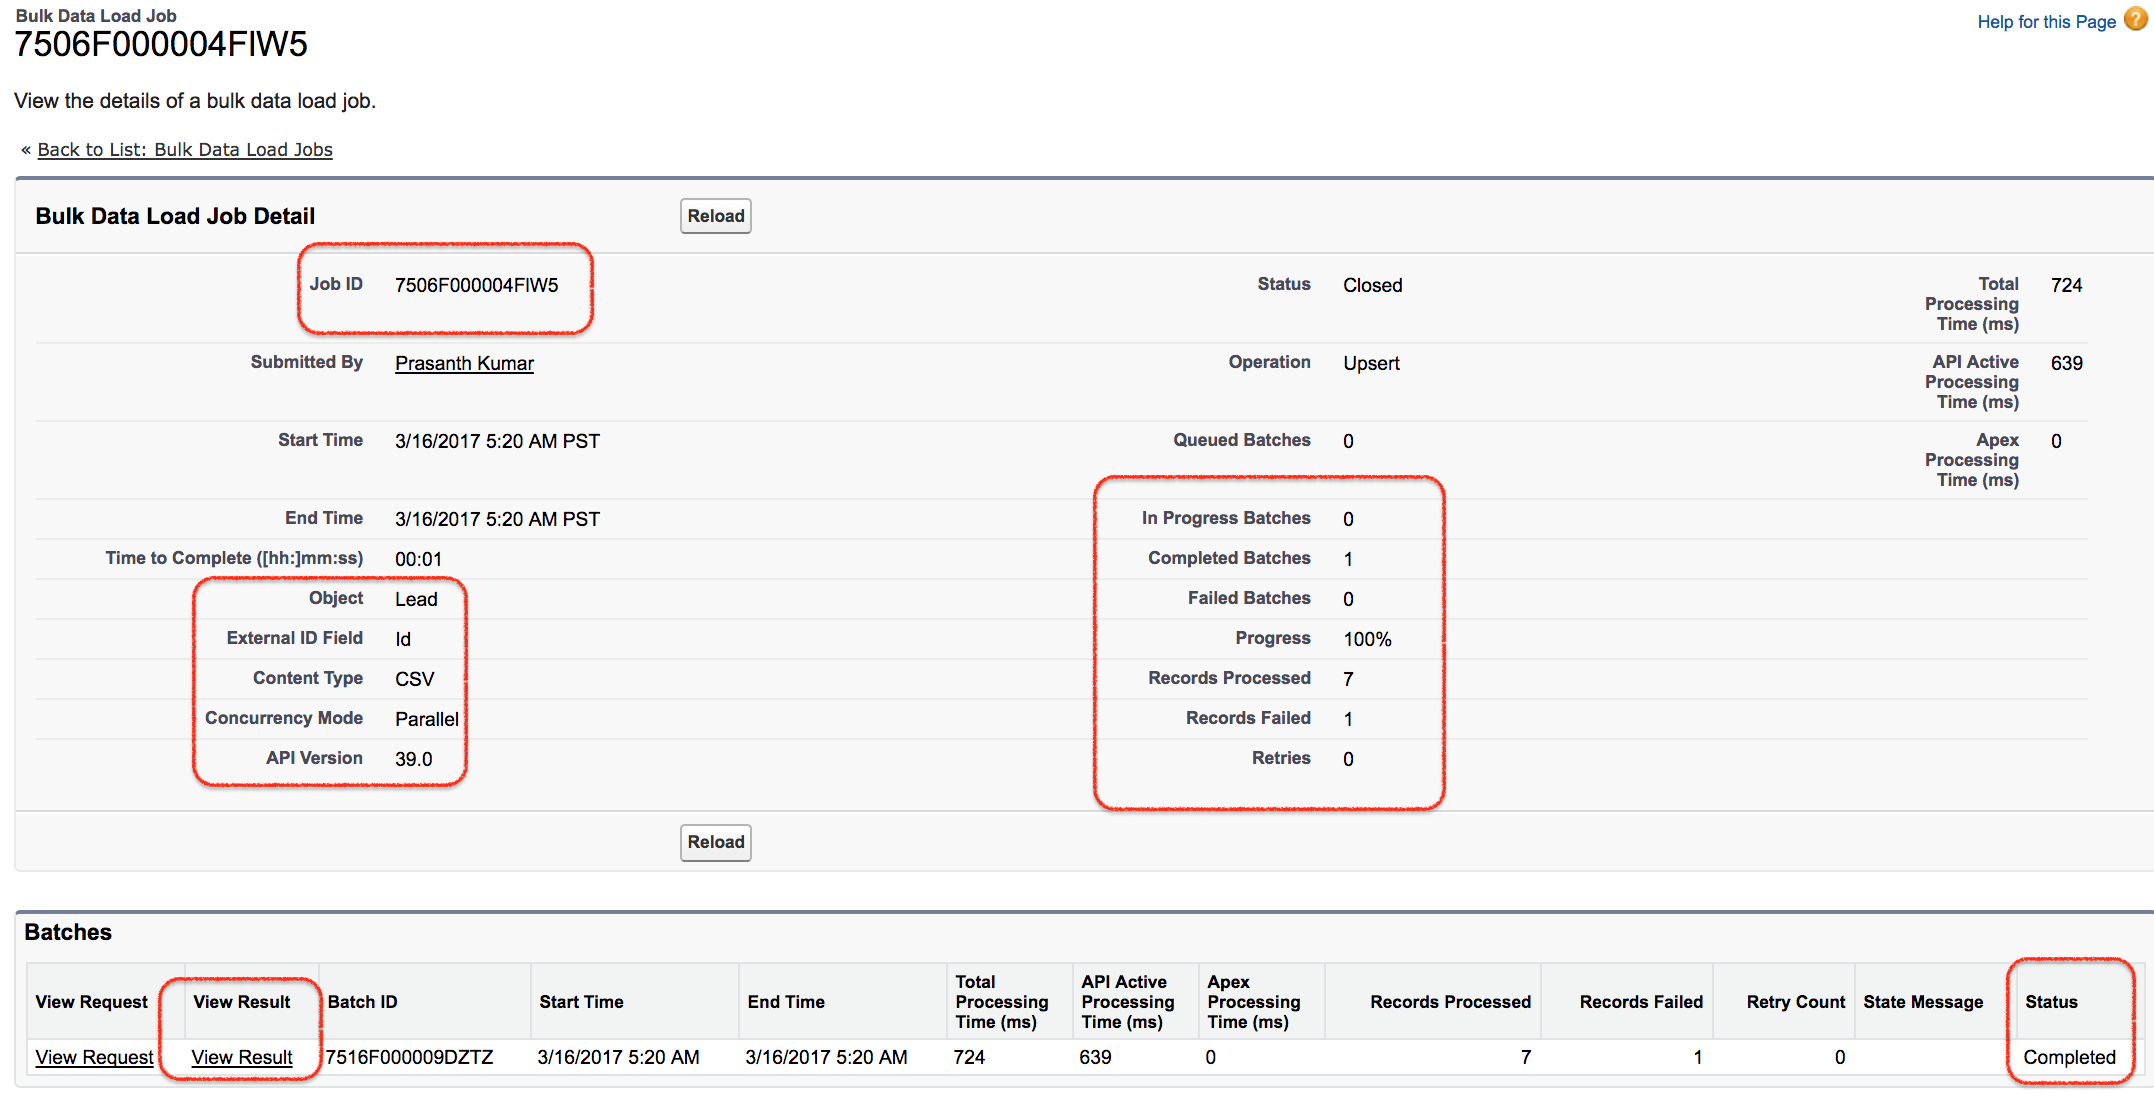
This screen shows bulk job details. Some useful details about the job are listed below.
- Job ID.
- Object selected for import.
- External ID field or matching field, if used.
- Data file type.
- Number of batches in progress.
- Completed batch list.
- Records processed.
- Number of records failed.
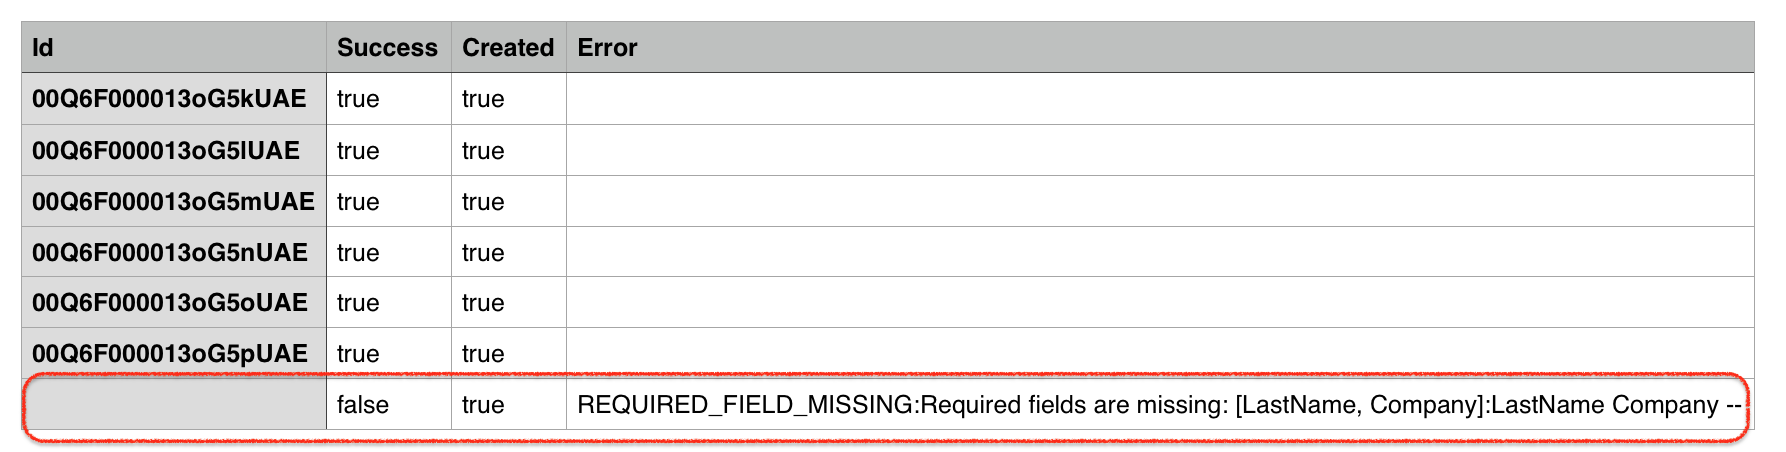
Click View Results as shown above. Salesforce downloads a result file that displays success and failure messages for each row. Keep this file with your import backup because it helps you identify which rows were created, updated, skipped, or failed.
To check bulk data load jobs in Salesforce, go to Setup | Monitor | Jobs | Bulk Data Load Jobs. In Lightning Experience, you can also search for Bulk Data Load Jobs in Setup Quick Find.
Fix Failed Records from a Salesforce Data Import Wizard Result File
If the result file shows failed rows, do not re-upload the full original file without checking the successful rows first. Re-importing the same data can create duplicates when insert mode was used. Instead, create a separate CSV file containing only failed rows, correct the issue, and run the import again.
| Result file error pattern | Likely cause | How to correct it before re-import |
|---|---|---|
| Required field missing | A mandatory standard or custom field is blank. | Add the missing value or change the mapping if the value is present in another CSV column. |
| Invalid picklist value | The CSV value does not match an allowed Salesforce picklist value. | Use the exact active picklist value or ask an admin to update the picklist configuration. |
| Validation rule failed | The row does not meet a business rule in Salesforce. | Read the validation error, correct the source data, and re-import only the corrected rows. |
| Duplicate rule blocked the row | Salesforce found a possible duplicate based on matching rules. | Decide whether to update the existing record, change the match field, or merge duplicates before importing again. |
| Insufficient access or field not writable | The importing user cannot create or edit the object or field. | Check profile, permission set, object permission, field-level security, and record access. |
Salesforce Data Import Wizard CSV Checklist
Use this checklist before clicking Start Import in the Salesforce Data Import Wizard.
- CSV file has one header row and no merged cells, formulas, hidden rows, or blank trailing columns.
- Required fields for the selected Salesforce object are present and mapped.
- Update and upsert files include a dependable Salesforce ID, external ID, or match field.
- Picklist values, dates, phone numbers, email values, and numeric values match the expected Salesforce formats.
- Lookup fields use valid related record IDs or supported external IDs.
- Duplicate rules, assignment rules, validation rules, and automation have been considered before the import.
- A backup or export of existing records is available before update or upsert jobs.
- The import is tested with a small sample file before loading a large file.
Salesforce Data Import Wizard FAQs
How many records can Salesforce Data Import Wizard import at a time?
Salesforce Data Import Wizard can import up to 50,000 records at a time. If the file is larger or the object is not supported by the wizard, use Salesforce Data Loader or another approved integration method.
Can Salesforce Data Import Wizard update existing records?
Yes. Choose the update option and provide a Salesforce record ID or another supported match field so that Salesforce can identify the existing record. Always test with a small file before updating many records.
What is upsert in Salesforce Data Import Wizard?
Upsert means Salesforce updates a matching record when it exists and creates a new record when no match is found. The quality of the match field is important because weak matching can lead to duplicates or failed rows.
Why are some rows failing in Salesforce Data Import Wizard?
Rows can fail because required fields are missing, picklist values are invalid, validation rules block the data, duplicate rules detect a match, lookup values are not found, or the importing user does not have the required access.
When should I use Data Loader instead of Salesforce Data Import Wizard?
Use Data Loader when you need to process larger jobs, work with objects not supported by the wizard, export data, delete records, hard delete records, or automate repeat data loads.