In this Salesforce tutorial, we are going to learn what Salesforce Report Builder is, how it is used, and how to use Salesforce Report Builder to create reports.
Salesforce Report Builder helps admins and users build reports by selecting a report type, adding fields, applying filters, grouping records, summarizing values, and running the report. In Lightning Experience, reports can be started from the Reports tab or the Analytics tab, depending on the app and permissions available in the org.
What is Salesforce Report Builder?
Salesforce Report Builder is a drag-and-drop visual editor used to build and edit reports from Salesforce data. It lets you choose the fields to display, define filters, group records, add summaries, preview the report, and run the final report.
The report builder does not create new data. It reads records that users are allowed to access and presents that data in a report format. The final output depends on the selected report type, report filters, user permissions, and sharing settings.
Salesforce Report Builder Panels and Their Uses
When you open a report in the Salesforce Report Builder, the screen is organized into areas that help you design the report. The exact layout can differ between Lightning Experience and Salesforce Classic, but the basic reporting concepts are similar.
- Fields pane: Shows the available fields for the selected report type. You can add fields as columns in the report.
- Outline pane: Controls report columns and row or column groupings.
- Filters pane: Controls which records appear in the report by using standard filters, field filters, filter logic, and other filter options.
- Preview area: Shows a sample preview while you build the report. You run the report to view the complete result.
- Save and Run actions: Save the report to a folder and run it to display the final report data.
How to Create Reports Using Report Builder in Salesforce
Salesforce Reports and Dashboards are stored in folders. We can also create a new custom folder for reports and dashboards. To create a new Salesforce report, login to Salesforce and follow the steps given below.
Step 1: Open the Reports Tab in Salesforce
- Click on Reports as shown below.
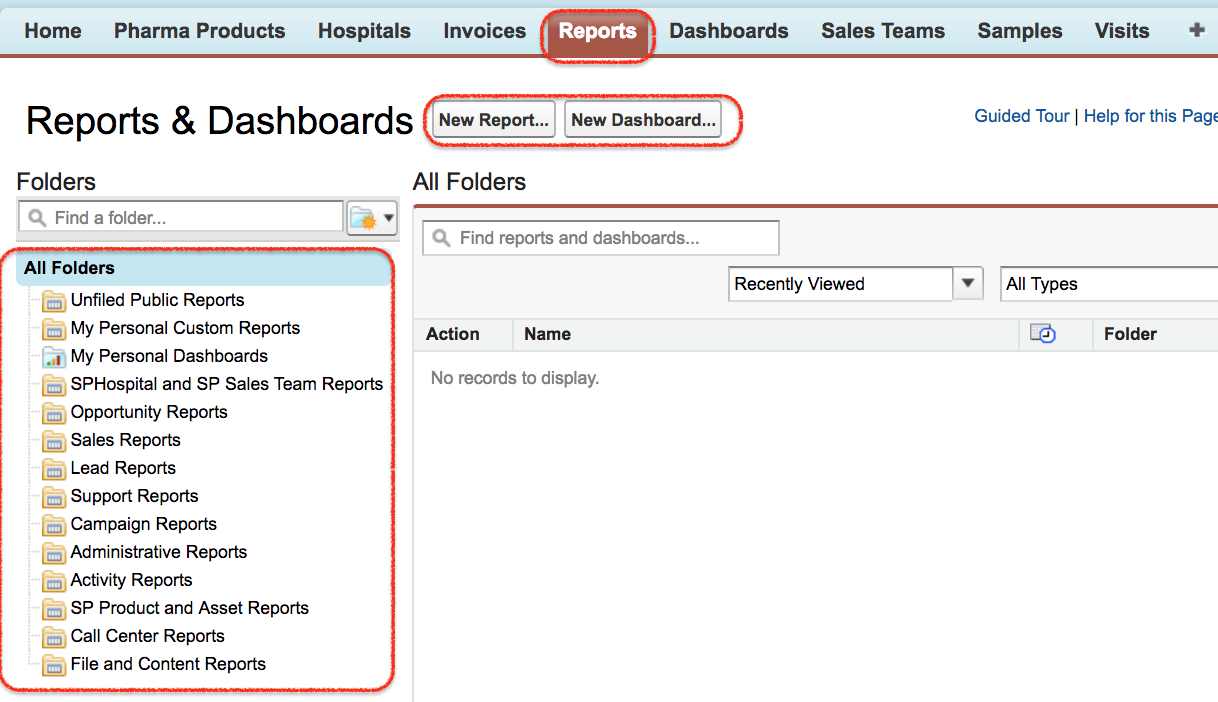
Folders are used for grouping reports. As shown above, we have an all folders sidebar with a number of subfolders. Standard folders contain standard reports, and custom folders contain reports created by users or admins, depending on folder access.
Step 2: Click New Report in Salesforce Report Builder
- Click on New report button as shown above.
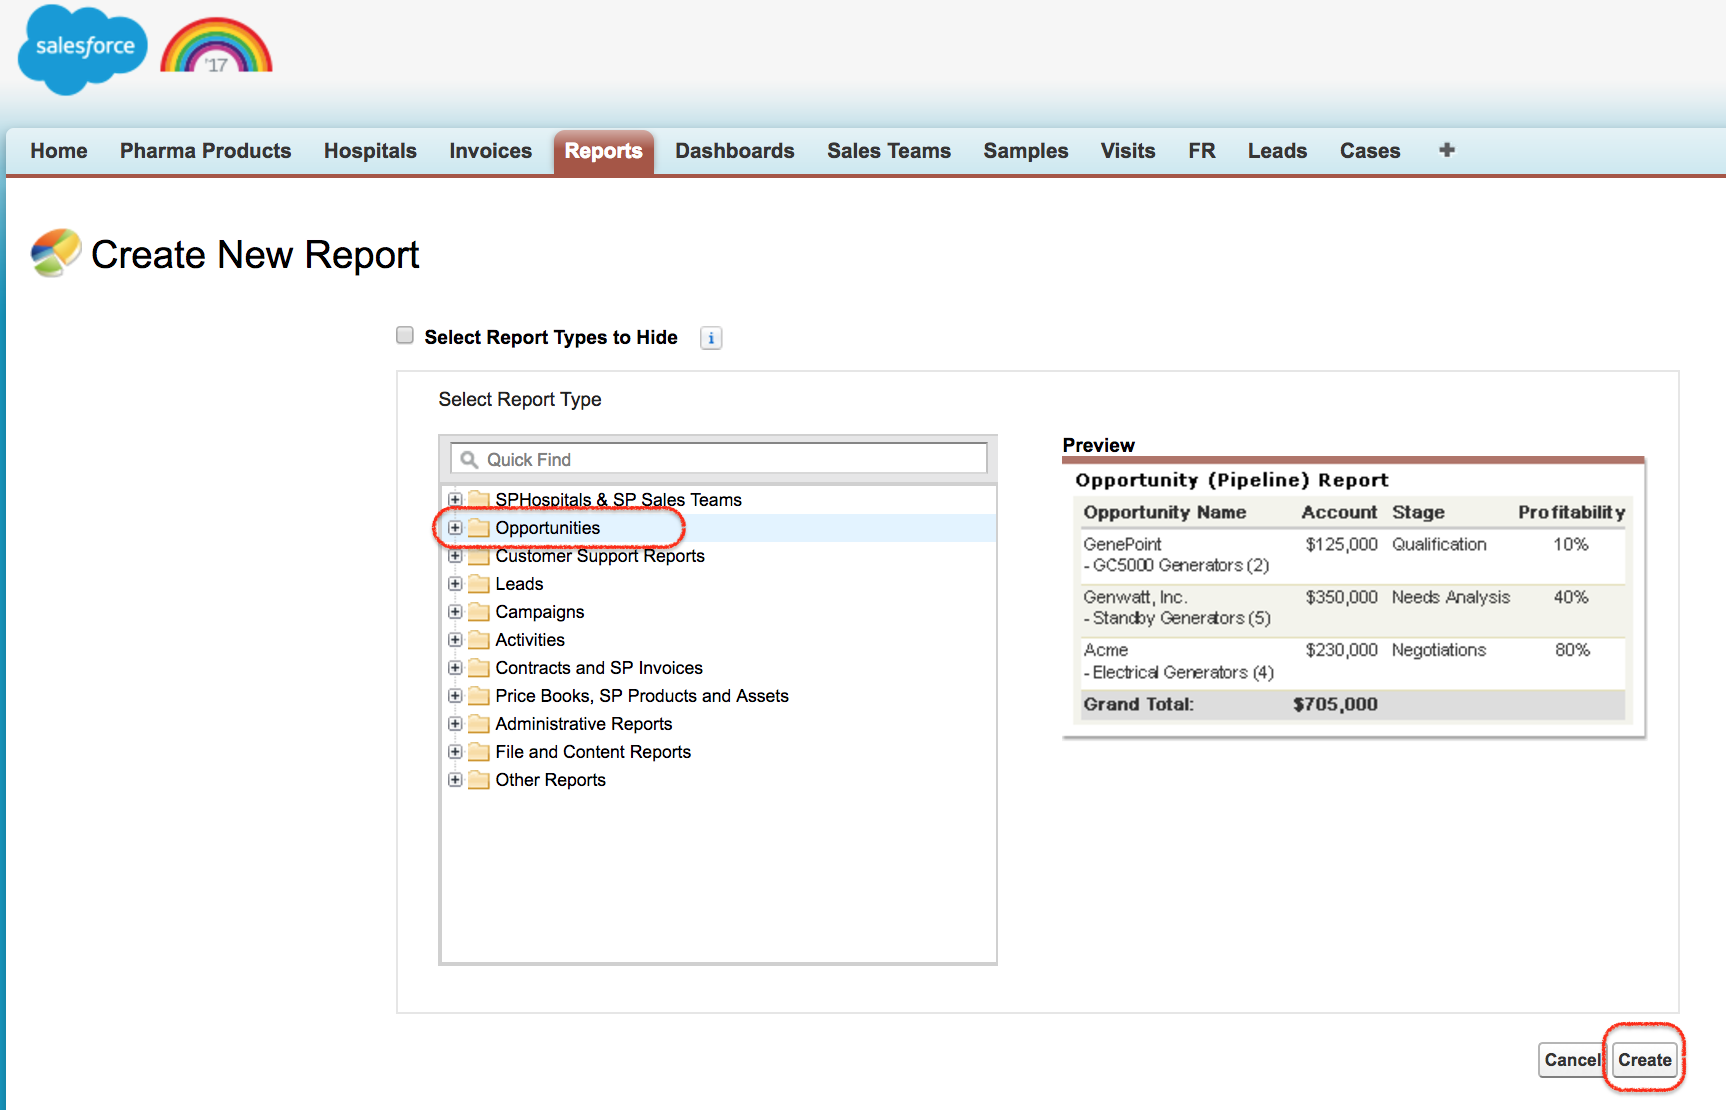
Step 3: Select a Salesforce Report Type
Based on our criteria, we can use standard reports and also create new reports. After selecting new report, in the first step we have to select the report type. So what is a report type? The report type defines the relationship between a primary object and its related objects. Report types can be standard report types or custom report types. The reports shown above are standard report types. In this Salesforce tutorial, we are going to generate reports using Opportunities as shown below.
The report type is important because it controls which objects and fields are available in the report. For example, an Opportunities report type shows opportunity fields, while an Accounts with Opportunities report type can include fields from both accounts and related opportunities.
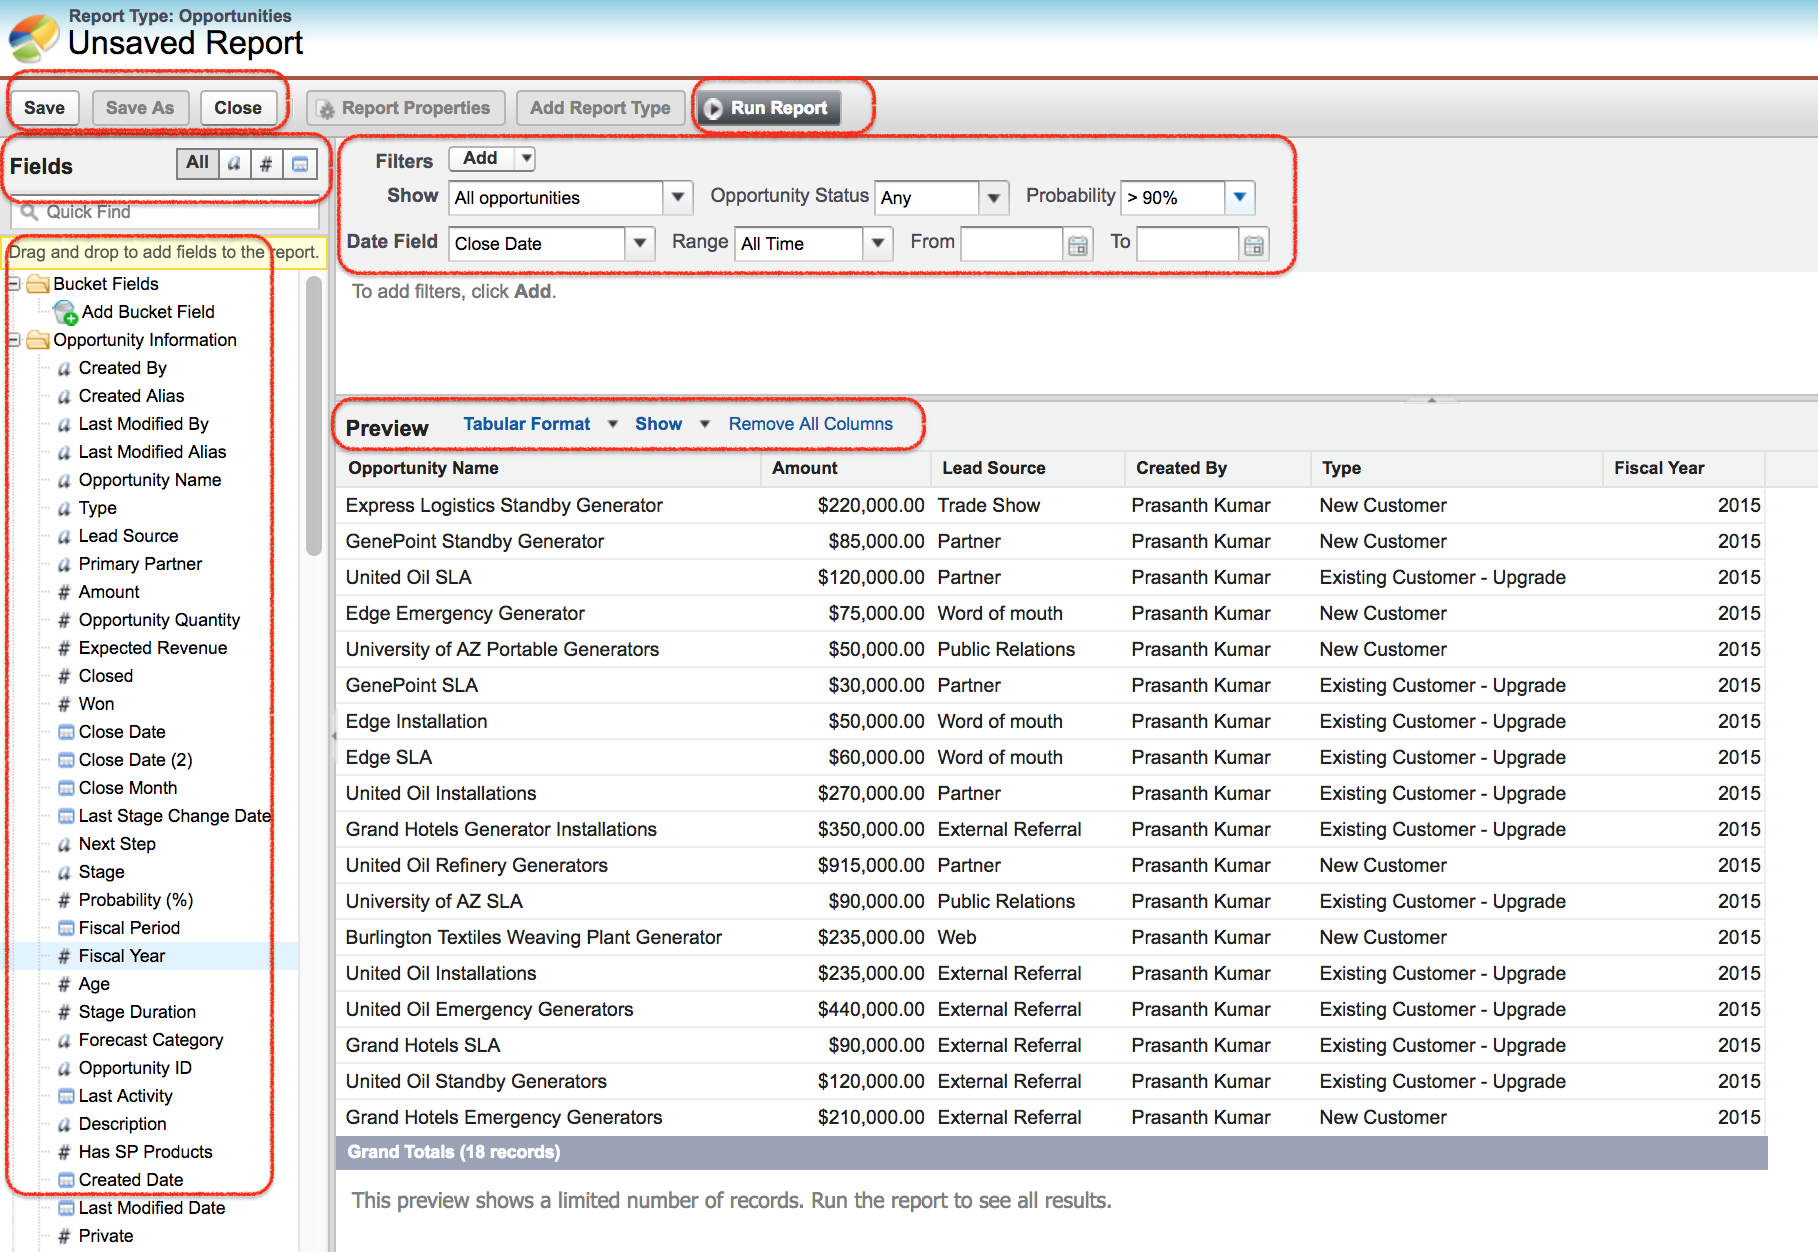
Step 4: Add Columns, Filters, and Groupings to the Salesforce Report
We have multiple options available for creating a report using Salesforce Report Builder. There is a left narrow section and right wide section available as shown above.
The left narrow section gives information about all the fields, and the fields displayed depend on the selected report type. Here, the fields are related to opportunities. We can also use filters to show only text fields, number fields, or date fields. To list all fields, click on All button.
- In filter section we have four filter option they are field filter, filter logic, cross filter and row limit. Select the scenario to which you want to filter.
- Add filter to the report and also select data field to which the reports are to be displayed.
- Click on Ok button.
- In Bottom section we can select the report format. Select any report format from the drop down menu.
- Click on remove columns and add the fields from left side. Drag and drop from left side to preview tab.
- Finally click on Run report button.
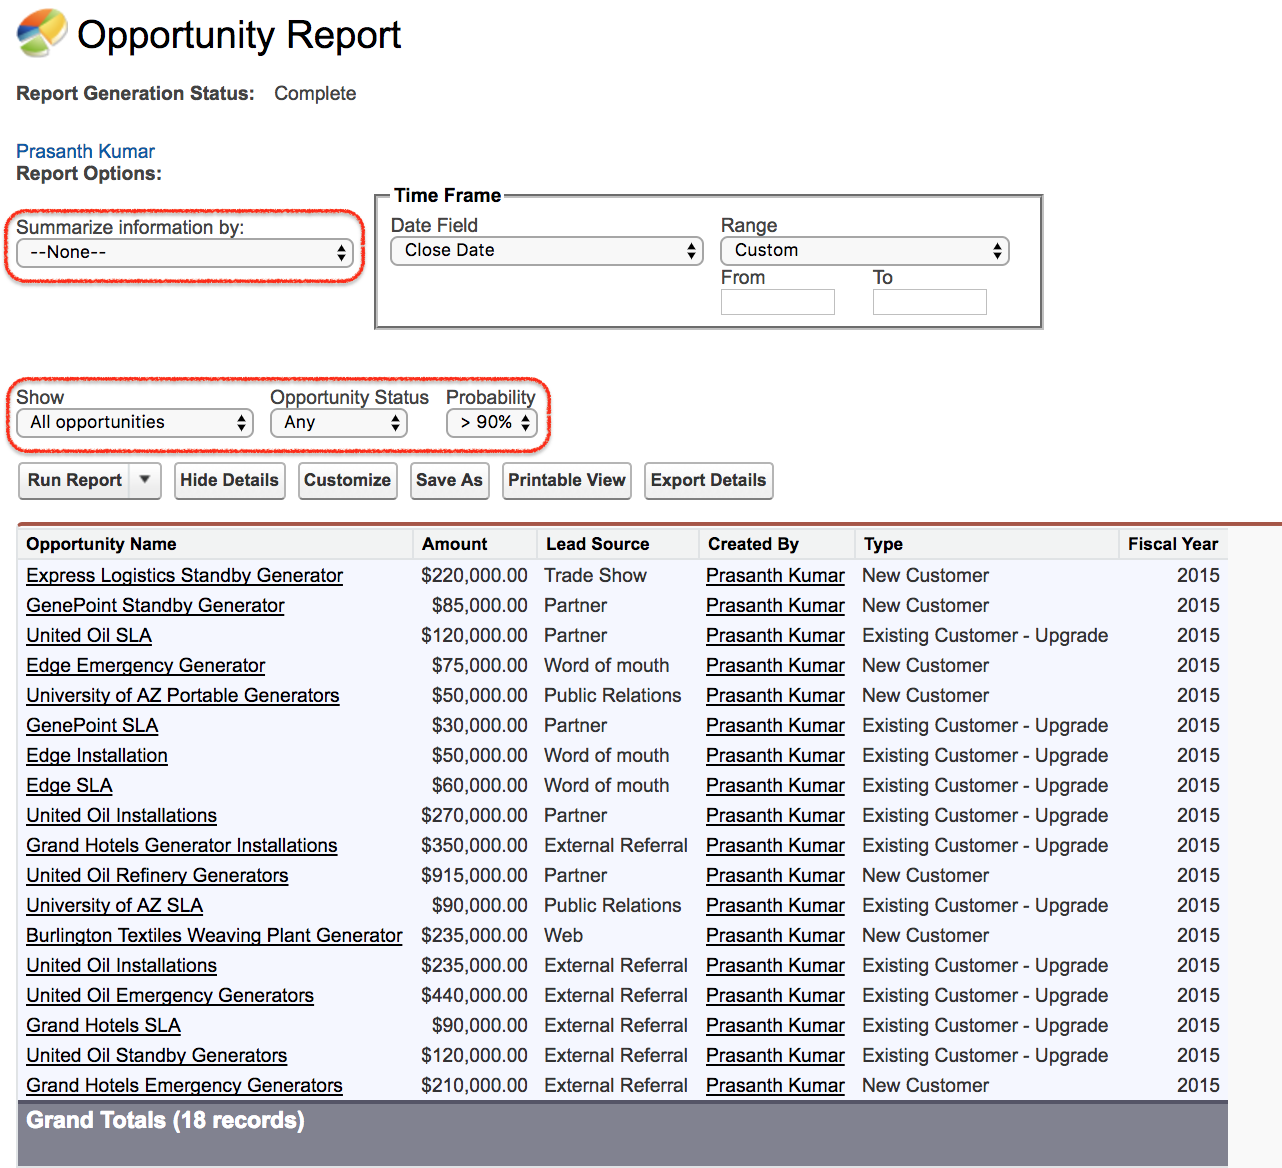
Step 5: Run the Salesforce Report and Review the Results
We have successfully generated a report using Salesforce Report Builder. To summarize information by Amount, use grouping and summary options as shown below.
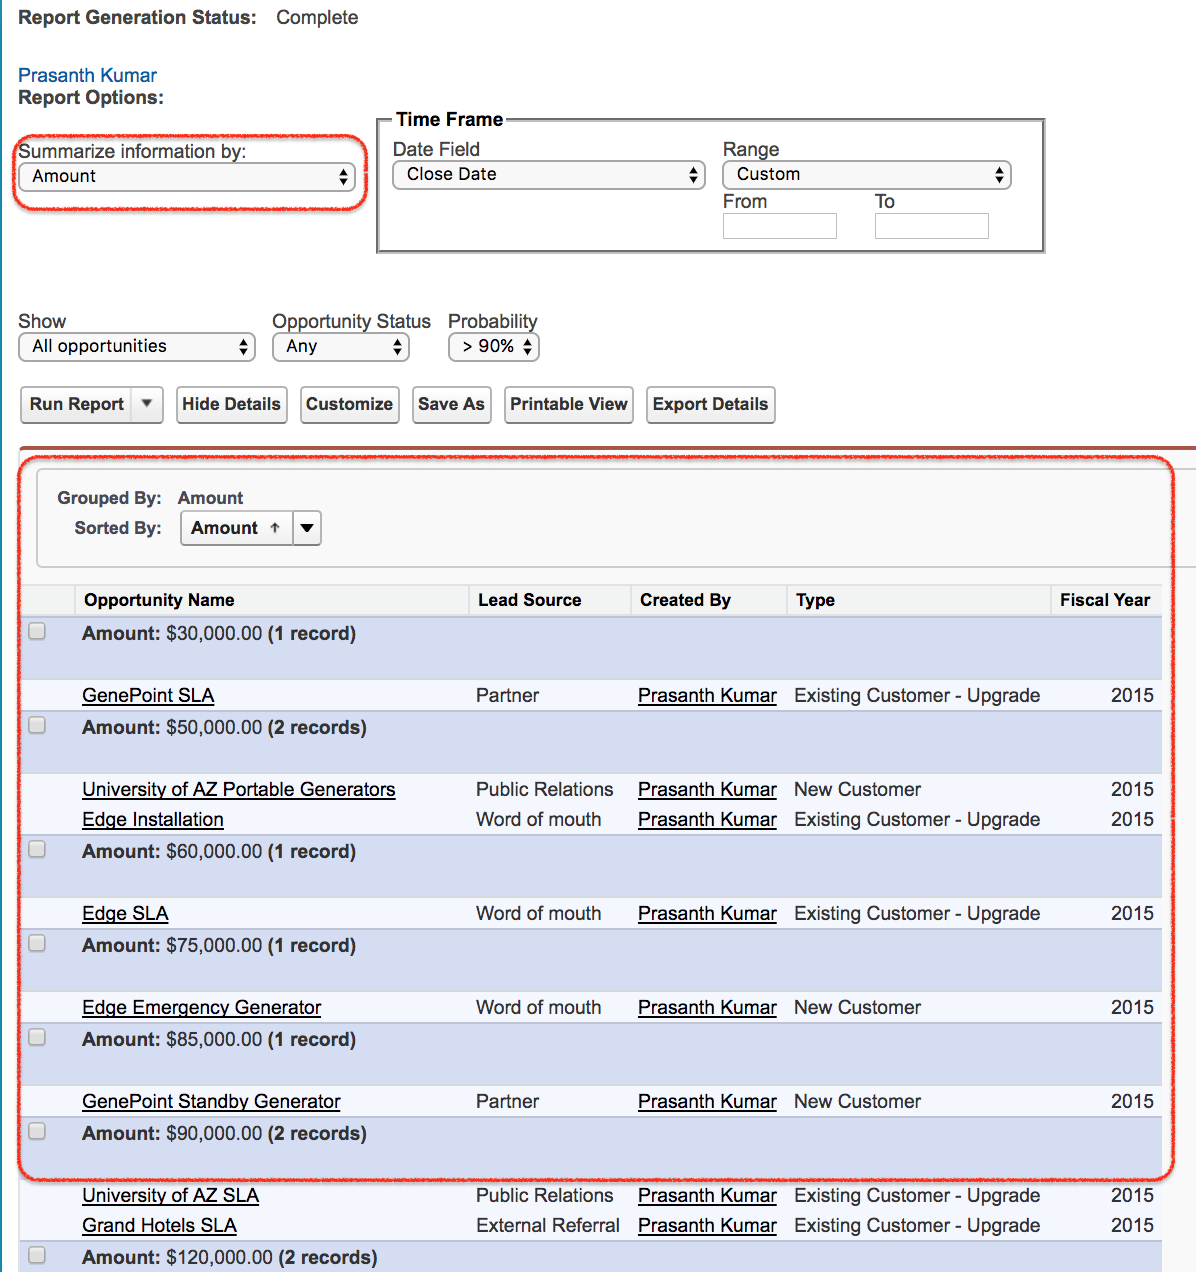
- We can also download the report file.
Choosing the Correct Salesforce Report Format
The report format controls how report data is displayed. Choose the simplest format that answers the business question clearly.
| Salesforce Report Format | Best Use | Example |
|---|---|---|
| Tabular report | Simple list of records without grouping | Open opportunities closing this month |
| Summary report | Records grouped by rows with summaries | Opportunity amount grouped by stage |
| Matrix report | Records grouped by both rows and columns | Opportunity amount by stage and close month |
| Joined report | Multiple report blocks shown in one report | Accounts with opportunities and cases in separate blocks |
For most beginner reports, start with a tabular or summary report. Use a matrix report when you need comparison across two dimensions. Use a joined report only when the report needs multiple blocks of related information.
Salesforce Report Builder Filters That Control Report Data
Filters are used to decide which records appear in a Salesforce report. A report without useful filters can become too broad and difficult to read.
- Standard filters: Common filters such as date range, owner, or record scope, depending on the report type.
- Field filters: Filters based on field values, such as Stage equals Closed Won or Amount greater than a selected value.
- Filter logic: Combines filters using AND and OR conditions when the report needs more specific logic.
- Cross filters: Shows records with or without related records, such as Accounts with Opportunities.
- Row limit: Limits the number of rows returned, often used for focused list-style reports.
Common Uses of Salesforce Report Builder
Salesforce Report Builder is used by sales, service, marketing, operations, and admin teams to answer questions from CRM data. Common reporting needs include pipeline review, activity tracking, case monitoring, lead analysis, and dashboard source reports.
- Sales pipeline reports: Track open opportunities by stage, owner, close date, and amount.
- Lead reports: Review leads by source, status, owner, and created date.
- Case reports: Monitor open cases, case age, priority, and support team workload.
- Activity reports: Review tasks and events by assigned user or activity date.
- Dashboard source reports: Build reports that can be used as dashboard components.
Salesforce Report Builder Best Practices for Useful Reports
A good report should answer a specific question. Before building a report, decide what the user needs to know, which records should be included, and how the result should be grouped or summarized.
- Name the report clearly so users understand its purpose.
- Select the most accurate report type before adding fields and filters.
- Use only the columns needed for analysis or review.
- Apply date filters to avoid showing unnecessary old records.
- Use summaries and groupings when users need totals, counts, or comparisons.
- Save reports in the correct folder and review folder sharing before users depend on the report.
- Test the report with a user profile that represents the intended audience.
Why Salesforce Report Builder May Not Show Expected Records
If a report does not show the expected records, check the report type, filters, date range, user permissions, and sharing access. Report Builder can only show data that the running user is allowed to view.
- Wrong report type: The selected report type may not include the object or relationship you need.
- Restrictive filters: Date filters, field filters, or filter logic may exclude records.
- Missing field-level access: Users may not have permission to view certain fields.
- Record sharing: Users may not have access to all records included in the business requirement.
- Folder access: Users may not be able to view or edit the report if the folder is not shared correctly.
Official Salesforce References for Report Builder
For Salesforce product behavior and current interface details, refer to the official Salesforce documentation and learning content.
- Salesforce Help: Build a Report in Lightning Experience
- Salesforce Help: Build a Report
- Salesforce Trailhead: Create Reports with the Report Builder
FAQs on Salesforce Report Builder
What is Report Builder in Salesforce?
Report Builder in Salesforce is a visual tool used to create and edit reports. It lets users select a report type, add fields, apply filters, group records, summarize values, and run the report.
How do I build my own report in Salesforce?
To build your own report in Salesforce, open the Reports tab, click New Report, choose the correct report type, add columns, apply filters, add groupings or summaries if needed, and click Run. Save the report in the required folder.
What is the use of Salesforce Report Builder?
Salesforce Report Builder is used to analyze Salesforce records and answer business questions. It helps users view filtered data, compare grouped records, calculate totals, and prepare reports for dashboards.
What are the four report formats in Salesforce?
The common Salesforce report formats are tabular, summary, matrix, and joined reports. Tabular reports show simple lists, summary reports group rows, matrix reports group rows and columns, and joined reports display multiple report blocks.
Why should I choose the report type carefully in Salesforce?
The report type controls which objects, relationships, and fields are available in the report. If the wrong report type is selected, the report may not show the records or fields needed for the business question.
Editorial QA Checklist for Salesforce Report Builder Tutorial
- Confirm that the tutorial explains Salesforce Report Builder as a tool for selecting fields, filters, groupings, summaries, and report output.
- Check that the steps include opening Reports, selecting New Report, choosing a report type, adding filters, running the report, and saving or downloading the report.
- Verify that report type and report format are explained separately, because they control different parts of report creation.
- Review the section on filters to make sure standard filters, field filters, filter logic, cross filters, and row limits are described in a Salesforce-specific way.
- Ensure the troubleshooting notes mention report type, filters, permissions, sharing access, and folder access.
Conclusion: Creating Reports with Salesforce Report Builder
In this Salesforce tutorial, we learned how to create reports using Salesforce Report Builder. We also covered report types, report formats, filters, folders, common reporting use cases, and checks to perform when a report does not show the expected records. In the next Salesforce tutorial, we will create different reports using different report formats.