 TutorialKart.com
Salesforce Web to Lead is a standard Salesforce feature that captures lead details from a website form and creates Lead records in Salesforce. It is useful when a company wants website enquiries, contact requests, campaign responses, or demo requests to enter Salesforce without building a custom integration first.
Every organization needs a reliable way to collect qualified leads and pass them to sales or marketing teams. With Web-to-Lead in Salesforce, website visitor data can be captured, assigned, acknowledged with an email response, and followed up from the Lead object.
Salesforce Web to Lead Forms – Lead Management
A Salesforce Web-to-Lead form is an HTML form generated from Salesforce Setup. When a visitor submits the form, Salesforce receives the field values and creates a new Lead record. The form can be placed on a website page, landing page, or campaign page.
- Web-to-Lead forms capture sales enquiries from a website.
- No custom Apex code is required to generate a basic Salesforce Web-to-Lead form.
- The form can include standard Lead fields and eligible custom Lead fields.
- Hidden fields can be used to pass values such as Lead Source, Campaign, or landing page information.
- Assignment rules and response rules can help route leads and send acknowledgement emails.
In this Salesforce tutorial, we will understand the purpose of Web to Lead, how to create Salesforce web to lead forms, how to test submitted leads, and what to check before placing the form on a live website.
How Salesforce Web-to-Lead works
Salesforce Web-to-Lead works by generating an HTML form that posts visitor-entered values to Salesforce. The generated form includes your Salesforce organization ID, selected Lead fields, and a return URL. After submission, Salesforce creates a Lead record and then redirects the visitor to the return URL, usually a thank-you page.
The basic flow is:
- A visitor enters details in the Web-to-Lead form on your website.
- The form sends the data to Salesforce.
- Salesforce creates a Lead record using the submitted field values.
- Lead assignment rules may assign the lead to the correct user or queue.
- A response email may be sent if a response rule and template are configured.
- The visitor is redirected to the return URL entered during form generation.
Web-to-Lead creates records on the Lead object. It does not directly create records in custom objects. If a business process needs to create related custom object records, use Salesforce automation such as Flow after the lead is created, or use a custom integration instead of the standard Web-to-Lead form.
How to create Salesforce Web to Lead forms?
The standard Salesforce web to lead functionality allows a form to be embedded into a company’s website to capture information that is then turned into a lead in the company’s Salesforce instance. The form is submitted to a servlet that is common to all Salesforce instances and thus, may not be customized besides sending the user to a thank you page that is disconnected from the lead.
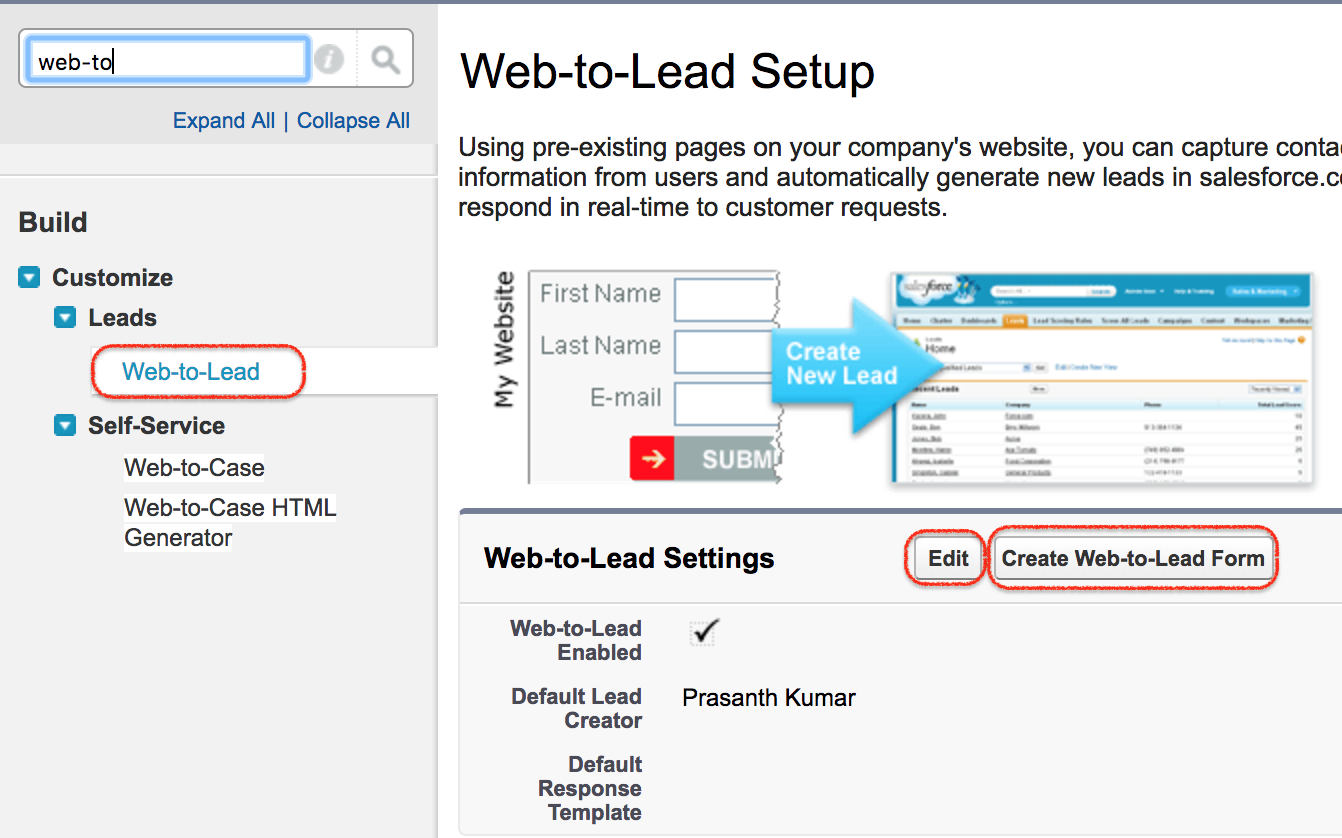
In Lightning Experience, you can search for Web-to-Lead in Setup. In older Salesforce Setup screens, the navigation may appear differently. The screenshots below show the classic setup flow used when this tutorial was originally prepared.
- Navigate to Setup | Build | Lead | Web to Lead | Edit.
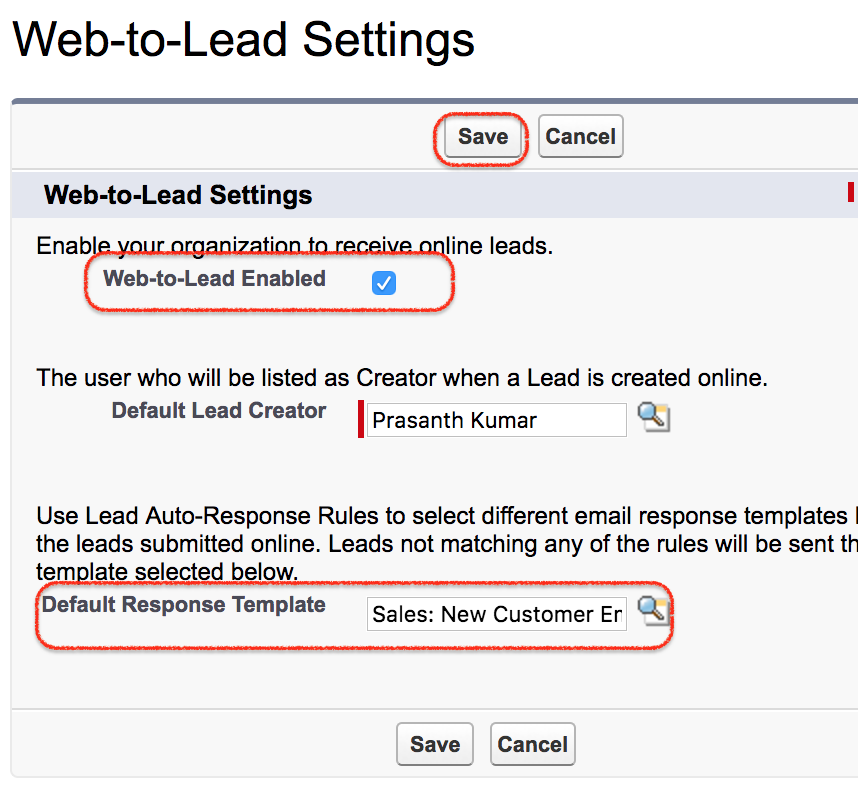
- On the web to Lead page first we have to enable Web to lead and then correct web to lead settings.
- Enter Default lead creator.
- Select default Response Template from the lookup as shown below.
The default lead creator is important because Salesforce needs a user context for Web-to-Lead records. Select a valid active user and choose a response template only if an acknowledgement email must be sent to the lead.
To create Web to Lead Salesforce forms, Navigate to Setup | Leads | Web to leads | Create Web-to-Lead Form.
Select Lead fields for the Salesforce Web-to-Lead form
Select the fields that to appear on the Web to lead form and external styling is not required. As shown below we have selected first name, second name, title, company, website, email, phone number, lead source, industry, country, state/province, Annual revenue and employees.
Choose only the fields required for the first response. A shorter form is easier for visitors to complete. Common fields are First Name, Last Name, Company, Email, Phone, Lead Source, and a description or message field. Use additional fields only when they are needed for routing, qualification, or reporting.
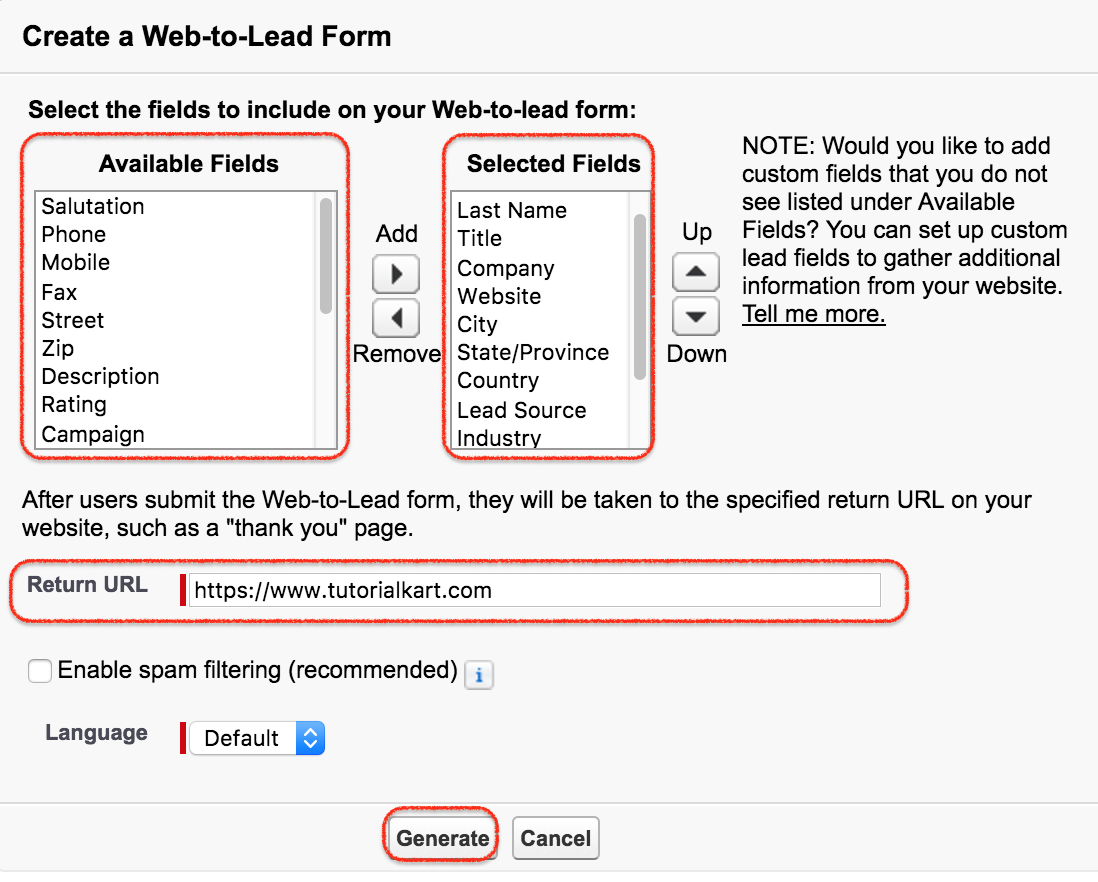
After users submit the Web-to-Lead form, they will be taken to the specified return URL on your website, such as a “thank you” page. Enter the website url as https://www.tutorialkart.com.
- Finally click on generate button.
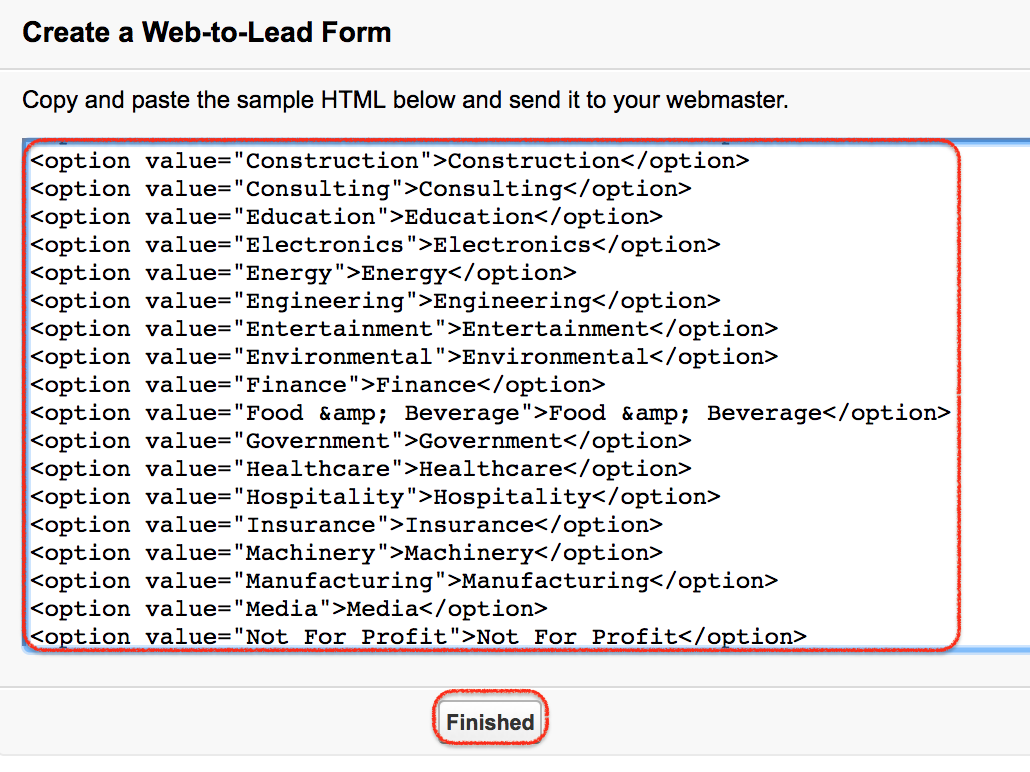
- Now html code is generated
- Copy Html code and paste it on Notepad.
- Save that with .html extension (example web to lead.html)
- Go to web to lead from and open it on browser.
- Now web to lead form will be generated.
The generated HTML contains field names that Salesforce expects. Do not remove the organization ID field or the return URL field unless you know exactly how the form submission will be handled.
<form action="https://webto.salesforce.com/servlet/servlet.WebToLead?encoding=UTF-8" method="POST">
    <input type="hidden" name="oid" value="YOUR_SALESFORCE_ORG_ID">
    <input type="hidden" name="retURL" value="https://www.example.com/thank-you">

    <label for="first_name">First Name</label>
    <input id="first_name" maxlength="40" name="first_name" type="text">

    <label for="last_name">Last Name</label>
    <input id="last_name" maxlength="80" name="last_name" type="text">

    <label for="email">Email</label>
    <input id="email" maxlength="80" name="email" type="email">

    <input type="submit" name="submit" value="Submit">
</form>
The example above shows the basic structure only. Use the HTML generated by your Salesforce org because it contains the correct field names for your selected standard and custom Lead fields.
How to check Salesforce web to lead forms?
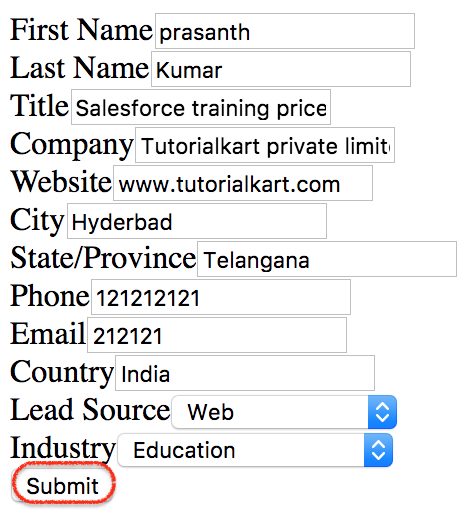
To check the working of Salesforce Web to Lead forms copy and paste the html code in any wb page and the form will be displayed as given below.
- Enter all the fields in the form and click on submit button.
- Now a new lead will be generated in the salesforce organization.
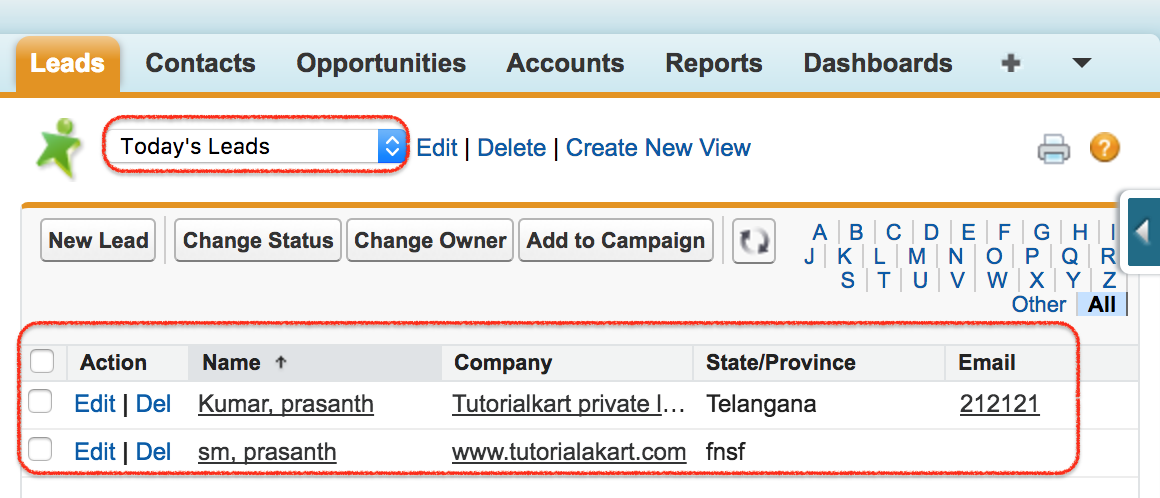
To check number of leads generated in Salesforce org, login to Salesforce and click on Lead Tab.
- Now select Today’s Leads in the view and click go.
- Here a list of all leads that generated through web to lead Salesforce are displayed.
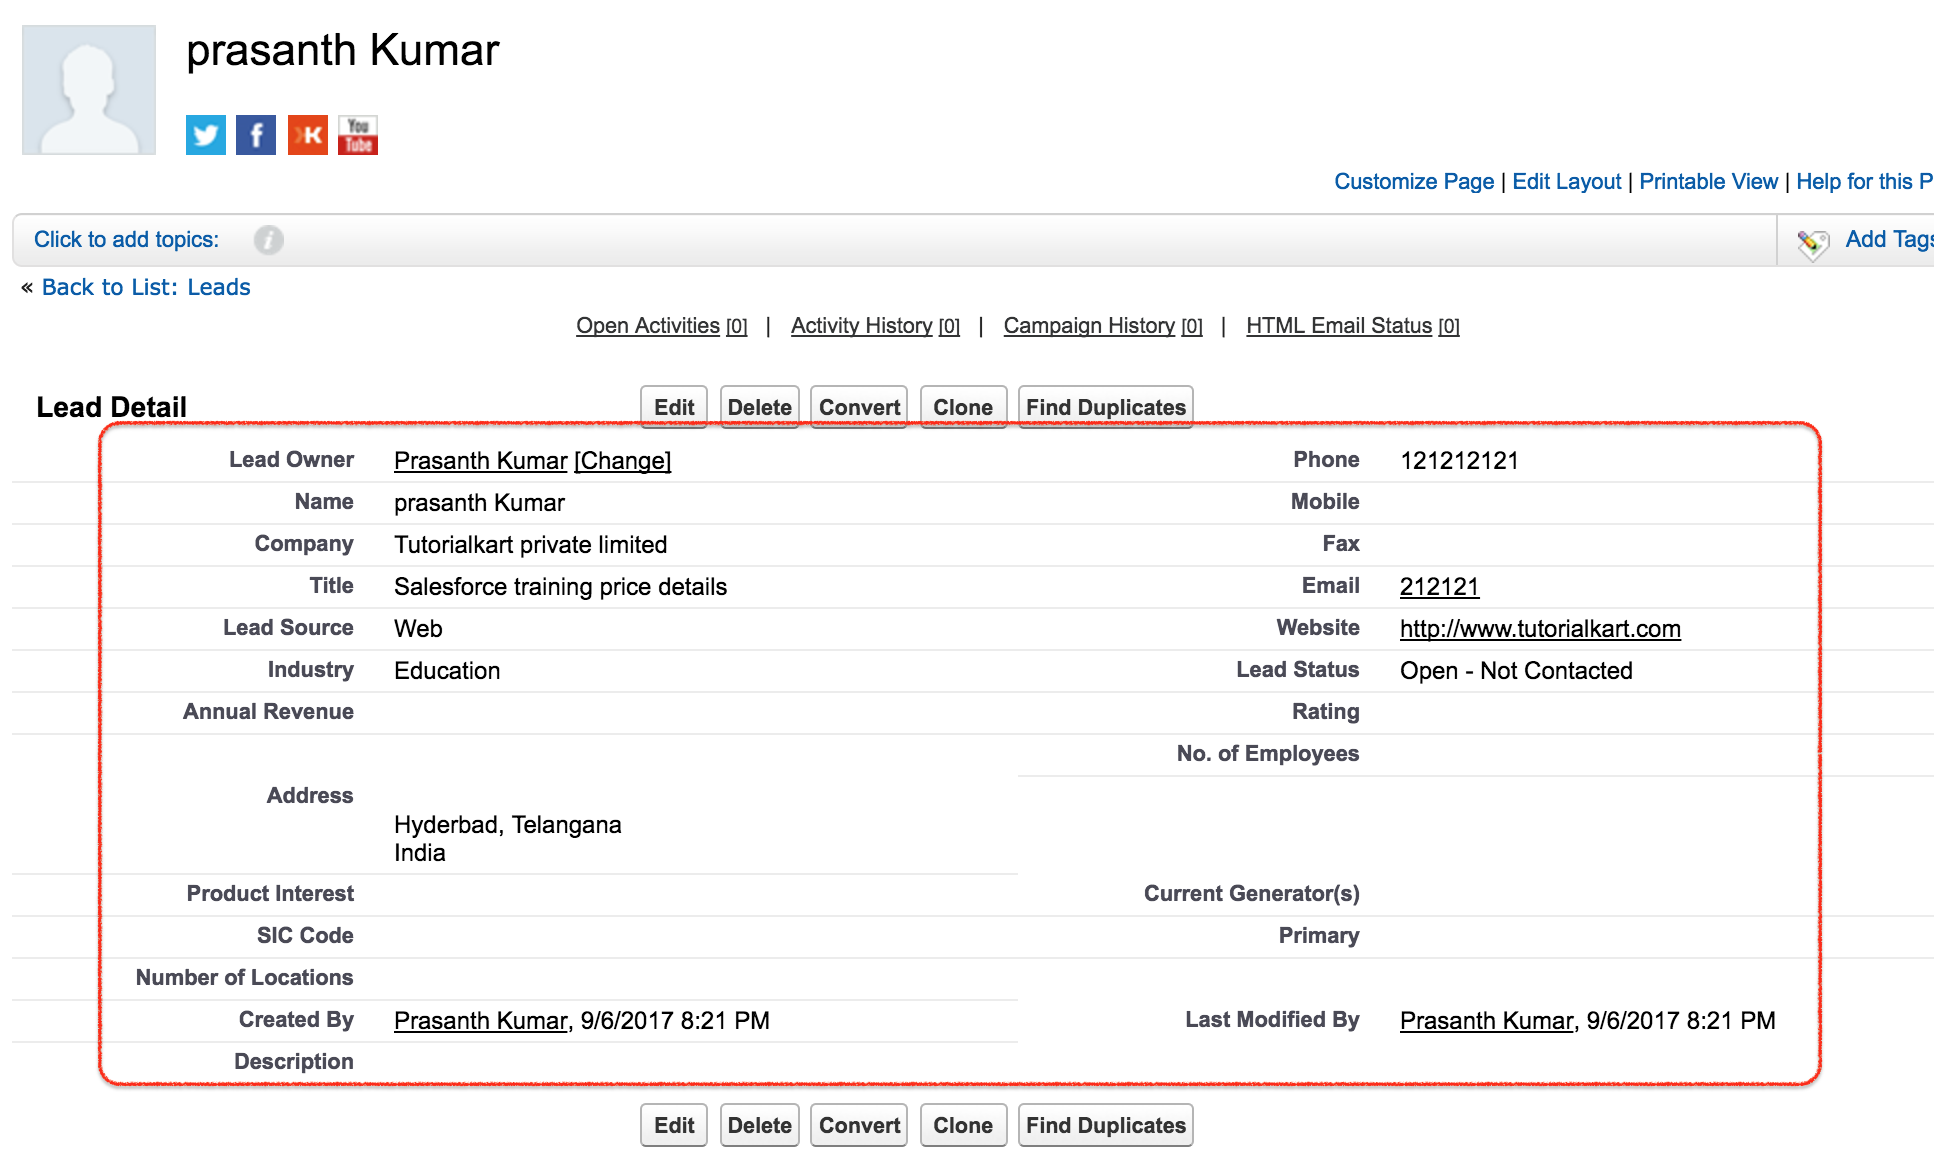
- Click on the lead to get lead information.
Testing a Salesforce Web-to-Lead form before publishing
Before using the form on a public website, test it with sample data and confirm that Salesforce receives the lead correctly. Testing should include both the website form and the Salesforce lead record created from it.
- Submit the form with a unique test email address.
- Open the Leads tab and search for the test lead.
- Confirm that required fields such as Last Name, Company, Email, Phone, and Lead Source are populated correctly.
- Check whether assignment rules route the lead to the expected user or queue.
- Check whether the response email is sent when a response rule is configured.
- Verify that the visitor is redirected to the correct thank-you page after submission.
If the lead is not created, check whether Web-to-Lead is enabled, whether the generated HTML has the correct organization ID, and whether all required Lead fields are included in the form.
Using hidden fields in Salesforce Web-to-Lead
Hidden fields are useful when you want to pass values to Salesforce without asking the visitor to enter them manually. For example, a landing page can pass a fixed Lead Source value such as Website, Google Ads, or Product Demo Page.
<input type="hidden" name="lead_source" value="Website">
<input type="hidden" name="00NXXXXXXXXXXXX" value="Demo Request Page">
The first hidden field in the example uses the standard Lead Source field. The second line represents a custom Lead field, where the field name is the Salesforce-generated field ID used in the Web-to-Lead HTML. Always use the field names generated by Salesforce for your own org.
Salesforce Web-to-Lead assignment and response rules
After a Web-to-Lead form creates a Lead record, Salesforce can use lead assignment rules to decide who owns the lead. For example, leads from one country can be assigned to one queue, while leads from another product page can be assigned to a different sales user.
Response rules can send an email acknowledgement to the person who submitted the form. Use a clear response template that confirms receipt of the enquiry. Avoid placing sensitive information in response emails because the email is sent to the address entered in the form.
Security and spam checks for Web-to-Lead forms
A public Web-to-Lead form can receive spam submissions if it is not protected. Before publishing the form, add suitable website-side validation and spam protection. Salesforce-generated HTML is a starting point, but most public websites should also style the form, validate inputs, and reduce automated spam submissions.
- Use required fields only where they are genuinely needed.
- Validate email and phone fields on the website before submission.
- Add spam protection such as CAPTCHA where appropriate.
- Avoid exposing unnecessary fields on the public form.
- Use duplicate rules or matching rules in Salesforce to reduce duplicate Lead records.
- Do not use the Web-to-Lead form to collect passwords, payment card data, or other sensitive information.
When Salesforce Web-to-Lead is not enough
Salesforce Web-to-Lead is suitable for many simple lead capture forms, but it is not the right choice for every use case. Consider another approach when the form needs complex validation, multi-step logic, file uploads, real-time duplicate checks before submission, or creation of records outside the Lead object.
For advanced requirements, common alternatives include a custom website integration, Salesforce APIs, Experience Cloud forms, Marketing Cloud Account Engagement forms, or a Flow-based process after the lead is created. The correct option depends on the website platform, security needs, lead volume, and data model.
Common Salesforce Web-to-Lead issues and fixes
| Issue | Likely reason | What to check |
|---|---|---|
| Lead is not created | Web-to-Lead is disabled or form HTML was changed incorrectly | Enable Web-to-Lead and regenerate the form HTML |
| Required field error | A required Lead field is missing from the form | Add the required field or review Lead field requirements |
| Lead goes to the wrong owner | Assignment rules are missing or not matching | Review lead assignment rule criteria |
| No response email is sent | Response rule or template is not configured correctly | Check response rules and the selected email template |
| Duplicate leads are created | The same visitor submits more than once or duplicate checks are not configured | Review duplicate rules and matching rules |
| Thank-you page does not open | Return URL is missing or incorrect | Check the retURL value in the generated HTML |
FAQs on Salesforce Web-to-Lead forms
What is Salesforce Web-to-Lead used for?
Salesforce Web-to-Lead is used to capture lead details from a website form and create Lead records in Salesforce. It is commonly used for contact forms, enquiry forms, campaign landing pages, and demo request forms.
Does Salesforce Web-to-Lead require coding?
A basic Web-to-Lead form does not require custom Salesforce code. Salesforce generates the HTML form. However, a website developer may still be needed to style the form, add validation, and place it correctly on a live website.
Can Salesforce Web-to-Lead create custom object records?
No. Standard Web-to-Lead creates Lead records. If custom object records must also be created, use Salesforce automation after lead creation or build a custom integration.
Can custom Lead fields be added to a Web-to-Lead form?
Yes. Eligible custom fields on the Lead object can be selected while generating the Web-to-Lead form. Use the generated field names from Salesforce when adding those fields to the website form.
How do I know whether a Web-to-Lead form is working?
Submit the form with test data, open the Leads tab in Salesforce, and search for the submitted name or email address. Also check field values, lead owner, response email, and thank-you page redirection.
QA checklist for this Salesforce Web-to-Lead tutorial
- Confirm that the article explains Web-to-Lead as a Lead object capture feature, not a custom object form builder.
- Verify that the setup flow, screenshots, and notes clearly distinguish older Salesforce Setup screens from current Setup search behavior.
- Check that the generated HTML guidance does not tell users to remove required fields such as organization ID and return URL.
- Ensure the testing steps cover lead creation, field mapping, assignment rules, response emails, and thank-you page redirection.
- Review the security section for public website concerns such as spam protection, input validation, duplicate leads, and sensitive data collection.
Conclusion on Salesforce Web-to-Lead lead management
Salesforce Web-to-Lead is a practical way to connect a website enquiry form with Salesforce Lead Management. The key steps are to enable Web-to-Lead, choose the correct Lead fields, generate the HTML form, place it on the website, and test the created Lead records. For simple lead capture, it works without custom Salesforce code. For advanced validation, custom object creation, or complex website journeys, use Salesforce automation or a custom integration along with the standard lead management process.